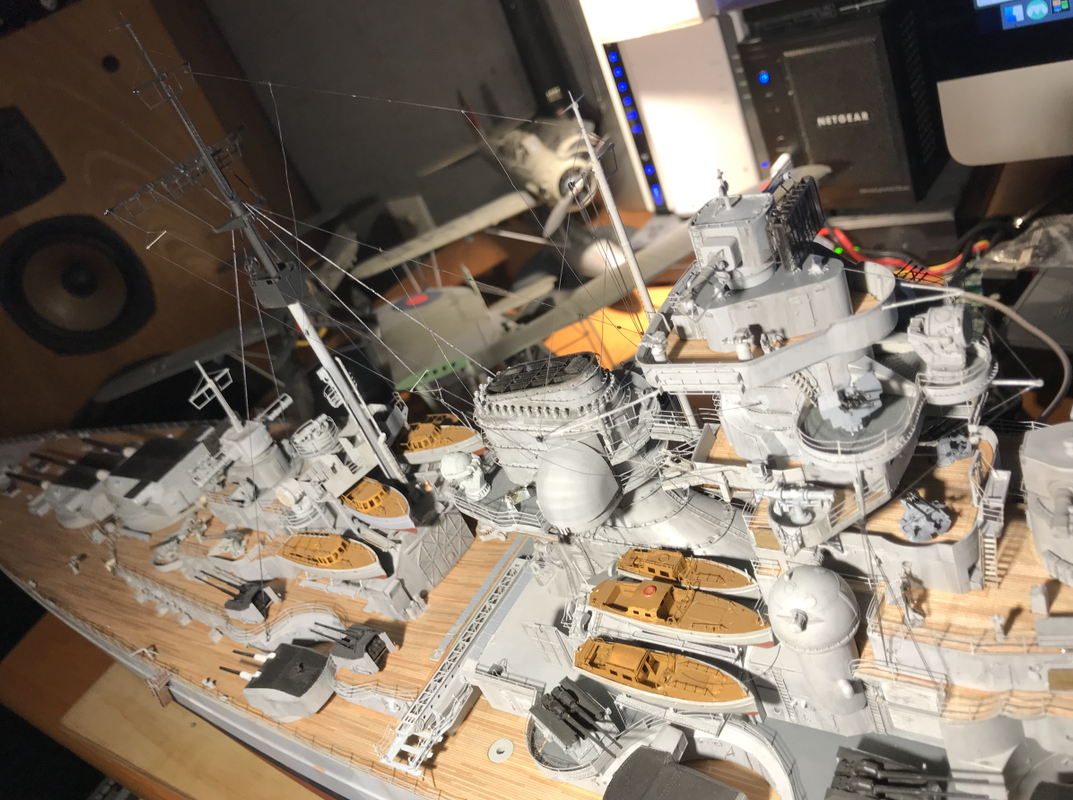
I started installing the shrouds and the antennas. EZ heavy for the main mast. Light for the rest. Stay calm and drink cool!


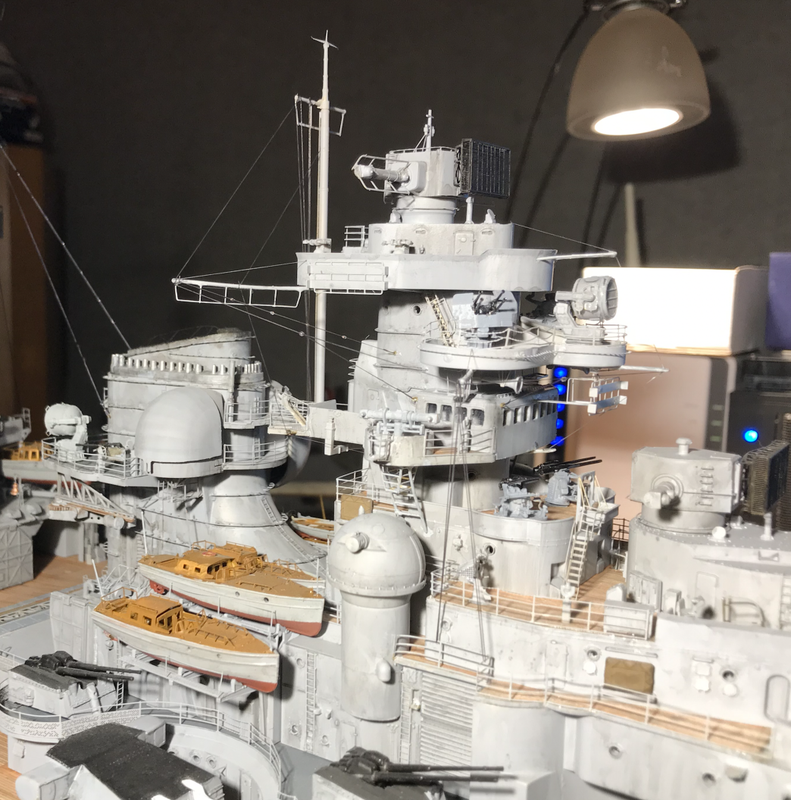
Rigs, rigs, rigs is The Mission today, from this morning to this evening..
I made a turntable for some of the antennas. I stole some pins from my wife's sewing box...Tension must be equal on all strands with EZ.

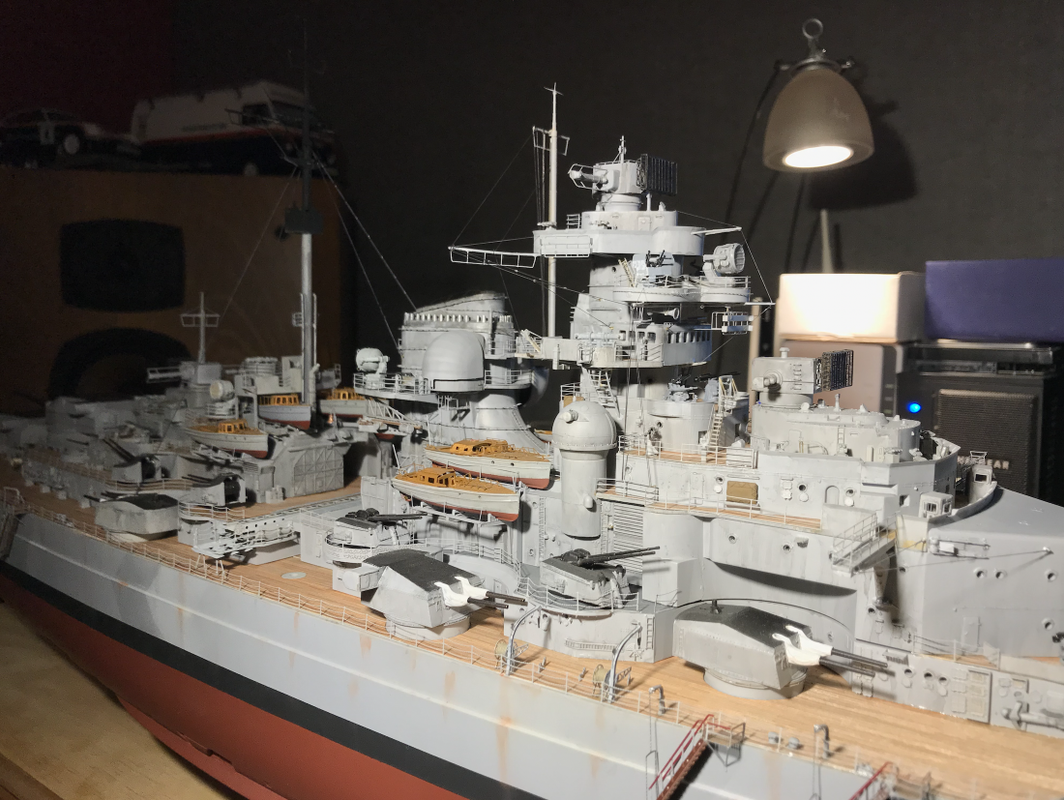
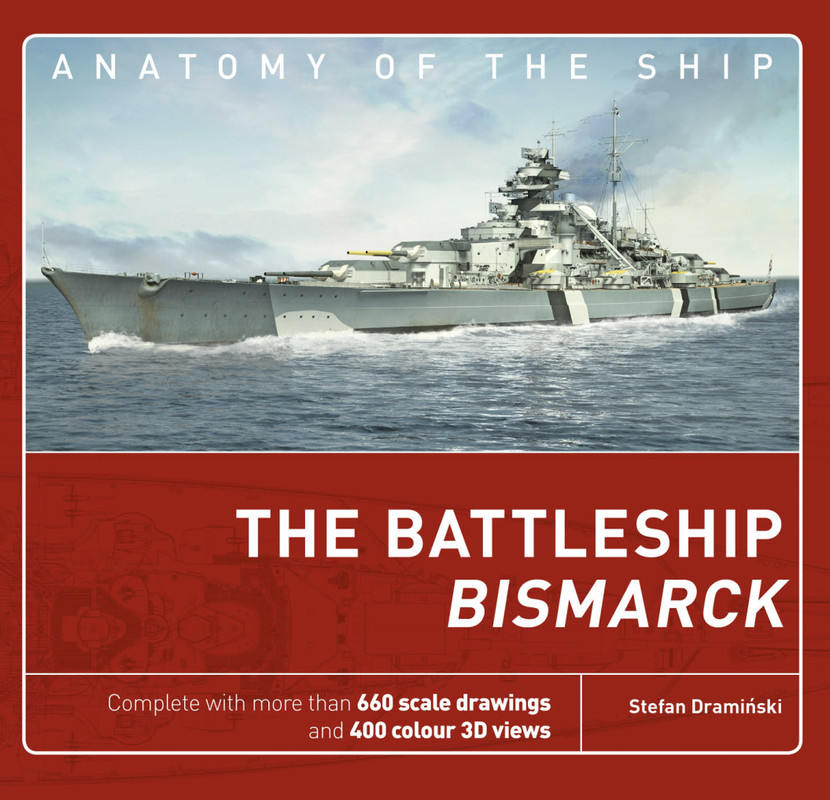
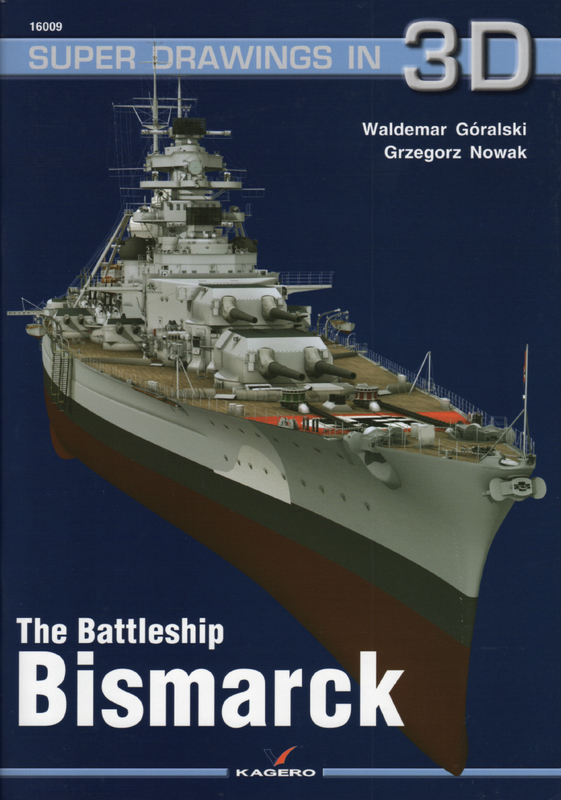
After 3 days of rig assembly, about 20 hours of work... I'm coming to the end, still 3, 4 cables to add to this virgin forest tonight, I think I didn't forget anything, I referred to the two books on the subject, Bismarck "Anatomy of the ships" and "The Battle Ship Bismarck", two very good references.
There are some differences between the two books on some points, but the documentation is simply extraordinary .
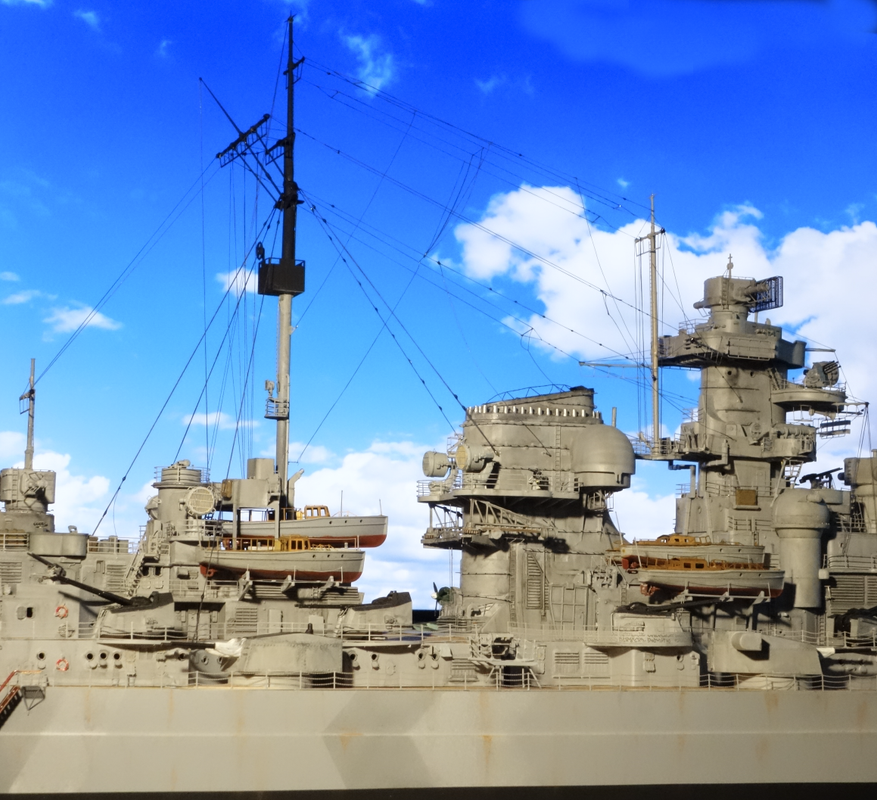
Here's what it looks like.
I just noticed in the doc that the little buoys in the bow were of different colours, red on the port side and green on the starboard side, I would say of course, anyway I have to replace them because they are normally conical, but I have to make them.

I used a sprue piece to make the buoys, then I filed it into a cone with my drill, to make half a buoy.

I'm not satisfied with the colors of my Arado, so I'm going to redo them and improve the details with the MK1 EP.
The paint peels off the metal, even before being bent. This is often the problem with painted PE. The problem is to glue efficiently.
I would retouch with RLM 02 (Grey) Revell Matt 45 (Light Olive).
I'm used to this cockpit, I recently built 2 of them, 1/32 Revell, an Arado 196B (Prototype single float) and an A3 (Prinz Eugen, double float).

I removed the plastic with the Dremel to install the cockpit.
The Arado factory is running at full capacity today..
A last one. 25 pi�ces by plane..
I made some progress on this ship today.
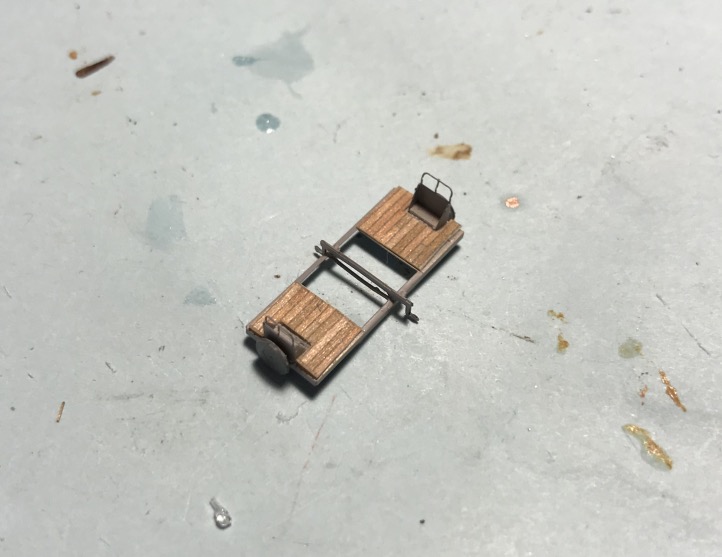
I finished one of the Arado's completely, I had a set of decals left, so I put it on his catapult trolley and on the port catapult for good.
You can see the difference in colour between the first Arado I'd ridden and the last ones, which were much more neat on all levels, in total I would have ridden 8 of them for the fun of it. Only 4 will be used on this ship for the staging.
The port crane is not glued yet, I have to add the control wheels (Scratch) and probably a sailor later at the controls. The purpose is to make him lift a load, a wooden box for example, the box coming from a small supply ship upright, along the edge. this small ship will be fixed to the hull by very thin and invisible metal rods. it can be removed if necessary.
I have set my sights on this normally armed 1/200 Russian patrol boat which I will transform into a small supply ship by disarming it. I have not found any other ship suitable for this 1/200 role.
It is North Star which manufactures this pretty small patrol boat, I will paint it with the German colors.
MO-4 Soviet WWII small guard ship.

For Arado this is what it looks like:

It's finally taking shape.


I'm making some progress with the construction of the launch boat that's coming to an end.
I also made crates and 200-litre drums of oil and other things with the 3D printer to furnish the boarding scene with the crane with these spare parts and consumables, and probably the Schnaps of Admiral G�nther L�tjens and Commander Ernst Lindemann, donated by the F�hrer ...
It's all still to be painted.
I used 3D files at scale 1 found for free on the canvas, but as it's made hollow when I reduce the scale to make different sizes of crates with the same basic model, the thickness is much too thin for the smaller ones, I didn't miss anything.
I think I'll make some more myself at the right scale. On the other hand, the barrels and others on wooden pallet are successful, you can even see the filler cap on the top.
It remains to paint all that. I can't wait to get my grey resin, because the crystal green to work with is not really great...


The launch boat is almost complete.
spent the day questioning details, a bit of weathering, a bit of blackening of the side exhaust pipes, painting of the boxes and cans.
I made a load platform out of leftover radar (PE), and some plastic I-beam that I just received. I also added a half platform for the front machine guns. Flag, front flagpole, small oars in the dinghy.
High beam lights are in place!

Manufacture of a net for the port crane in EZ line heavy. I put 0.3mm piano wire for the 'lines' to give the impression of weight. I re-manufactured 40 cans of 200 lts in 3D printing, I have stock now! The Hornet will need them too.
I'm almost done with the launch, I have the crew to add. The crane needs to be revised a little and I'll put a crane operator on it. I changed the hoisting cable that was made of PE, it was too short and not suitable for the stage. A little paint touch up here and there.
some of the sailors on general supply duty. The crane operator's there, too, of course.

I started installing the shrouds and the antennas. EZ heavy for the main mast. Light for the rest. Stay calm and drink cool! :big_grin:
[img]https://i.postimg.cc/fTDWvNkK/Screenshot-2020-04-02-21-47-10-987.png[/img]
[img]https://i.postimg.cc/yYj1QbZz/Screenshot-2020-04-02-21-47-42-390.png[/img]
[img]https://i.postimg.cc/JhDRh7d1/Screenshot-2020-04-02-21-49-29-405.png[/img]
[img]https://i.postimg.cc/nhwHZ92R/Screenshot-2020-04-02-21-50-21-629.png[/img]
Rigs, rigs, rigs is The Mission today, from this morning to this evening..
I made a turntable for some of the antennas. I stole some pins from my wife's sewing box...Tension must be equal on all strands with EZ.
[img]https://i.postimg.cc/GmG4QyQ9/Screenshot-2020-04-03-21-01-09-259.png[/img]
[img]https://i.postimg.cc/6QhysxFX/Screenshot-2020-04-03-21-02-45-405.png[/img]
[img]https://i.postimg.cc/kXkVKcWk/Screenshot-2020-04-03-21-03-11-575.png[/img]
[img]https://i.postimg.cc/KYbRs8qf/Screenshot-2020-04-03-21-04-34-932.png[/img]
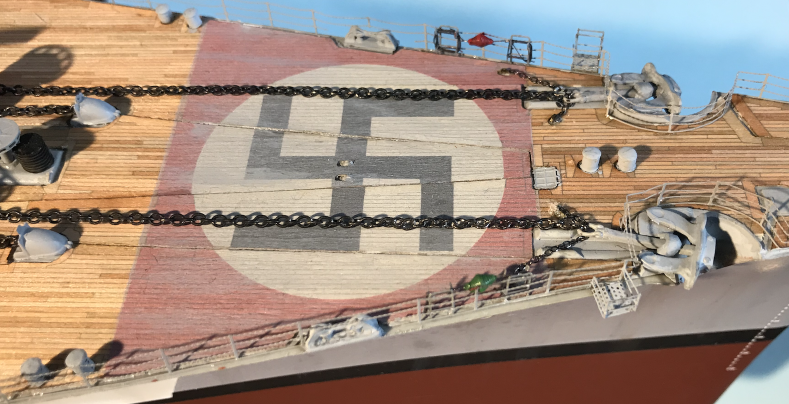
After 3 days of rig assembly, about 20 hours of work... I'm coming to the end, still 3, 4 cables to add to this virgin forest tonight, I think I didn't forget anything, I referred to the two books on the subject, Bismarck "Anatomy of the ships" and "The Battle Ship Bismarck", two very good references.
There are some differences between the two books on some points, but the documentation is simply extraordinary .
[img]https://i.postimg.cc/HkdC51cF/Screenshot-2020-04-05-20-11-17-004.png[/img]
[img]https://i.postimg.cc/Mp5Jm31H/Screenshot-2020-04-05-20-13-18-715.png[/img]
Here's what it looks like.
[img]https://i.postimg.cc/brxBNdTr/Screenshot-2020-04-05-19-59-53-540.png[/img]
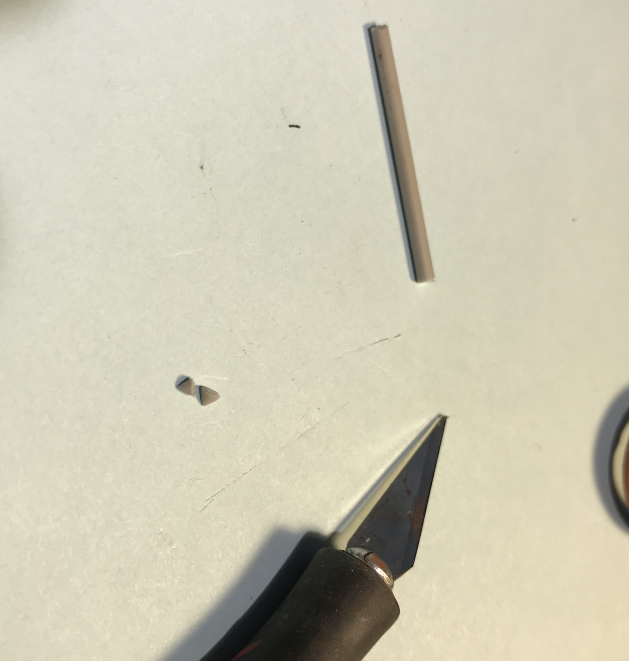
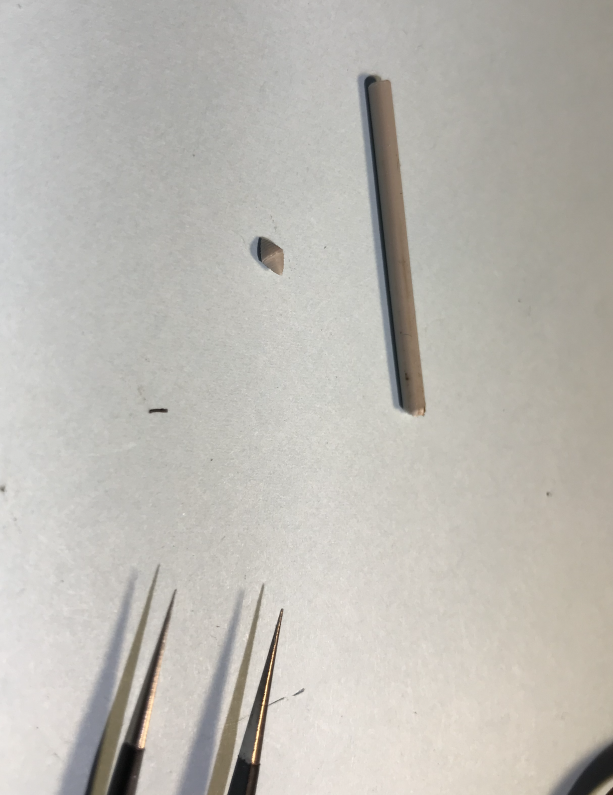
I just noticed in the doc that the little buoys in the bow were of different colours, red on the port side and green on the starboard side, I would say of course, anyway I have to replace them because they are normally conical, but I have to make them.
[img]https://i.postimg.cc/RZjGtnTg/Screenshot-2020-04-06-10-28-23-413.png[/img]
I used a sprue piece to make the buoys, then I filed it into a cone with my drill, to make half a buoy.
[img]https://i.postimg.cc/pVcGfBKB/Screenshot-2020-04-06-17-26-10-521.png[/img]
[img]https://i.postimg.cc/rFdhQtJ2/Screenshot-2020-04-06-17-26-32-676.png[/img]
[img]https://i.postimg.cc/25d9nRxq/Screenshot-2020-04-06-17-29-01-203.png[/img]
[img]https://i.postimg.cc/mZPq6qLn/Screenshot-2020-04-06-17-48-54-441.png[/img]
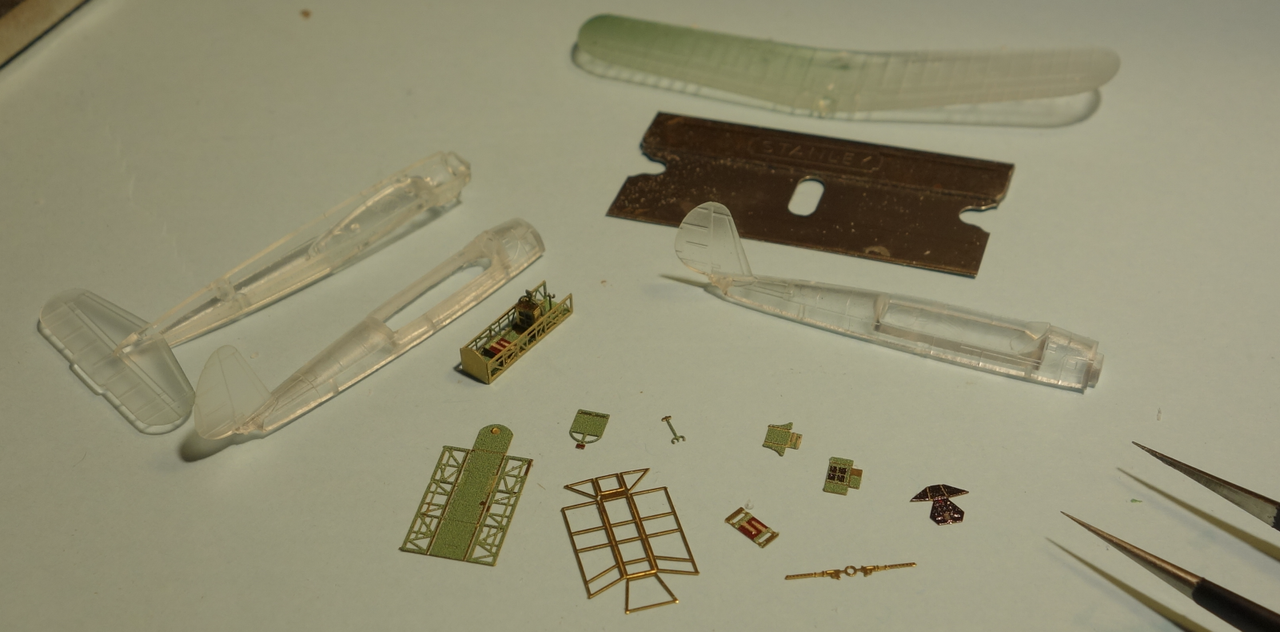
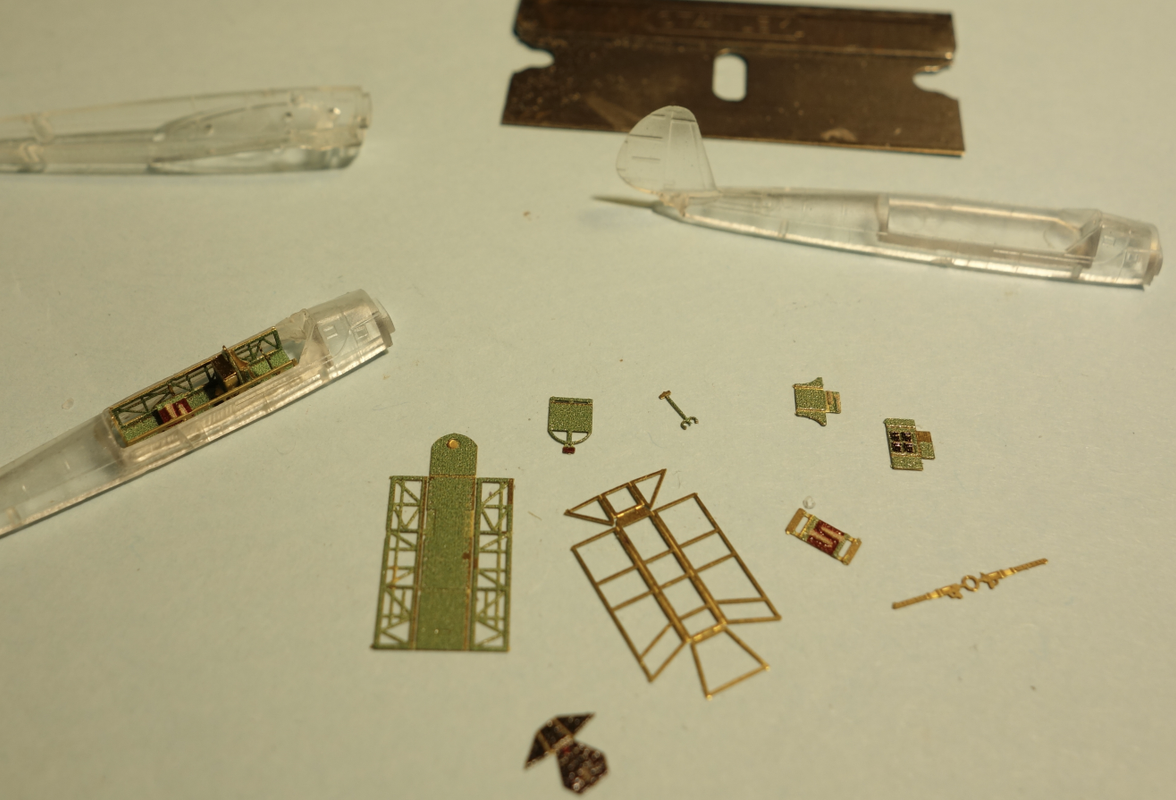
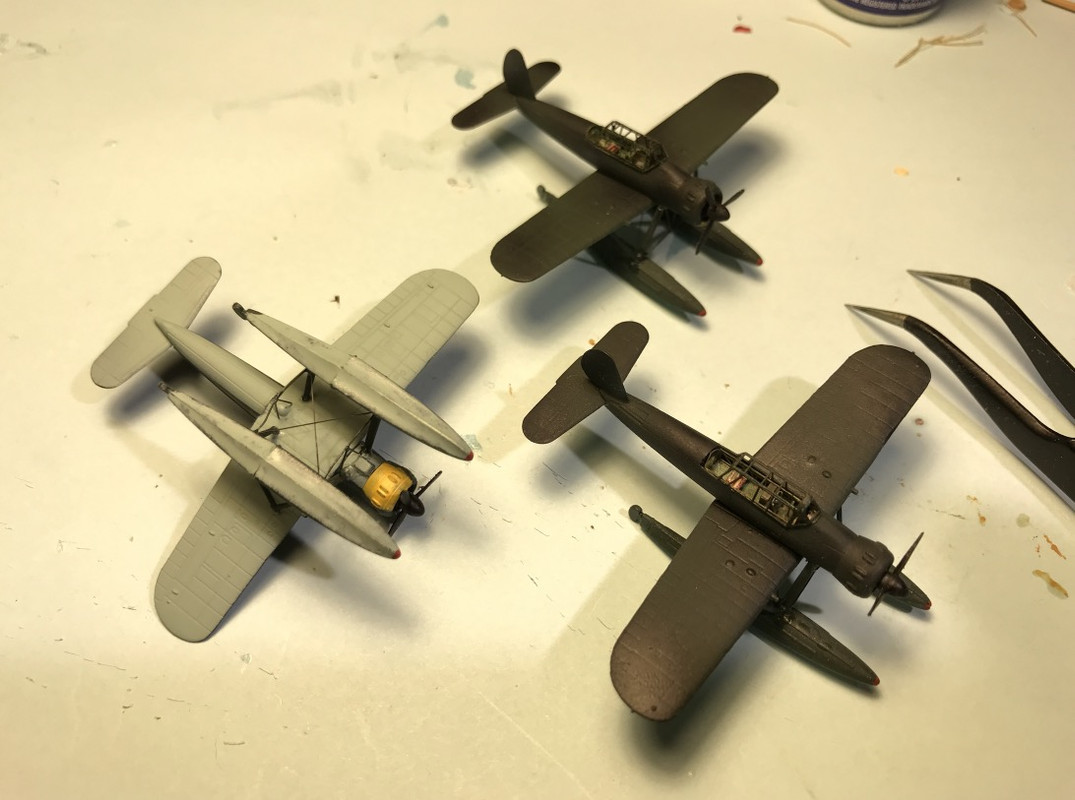
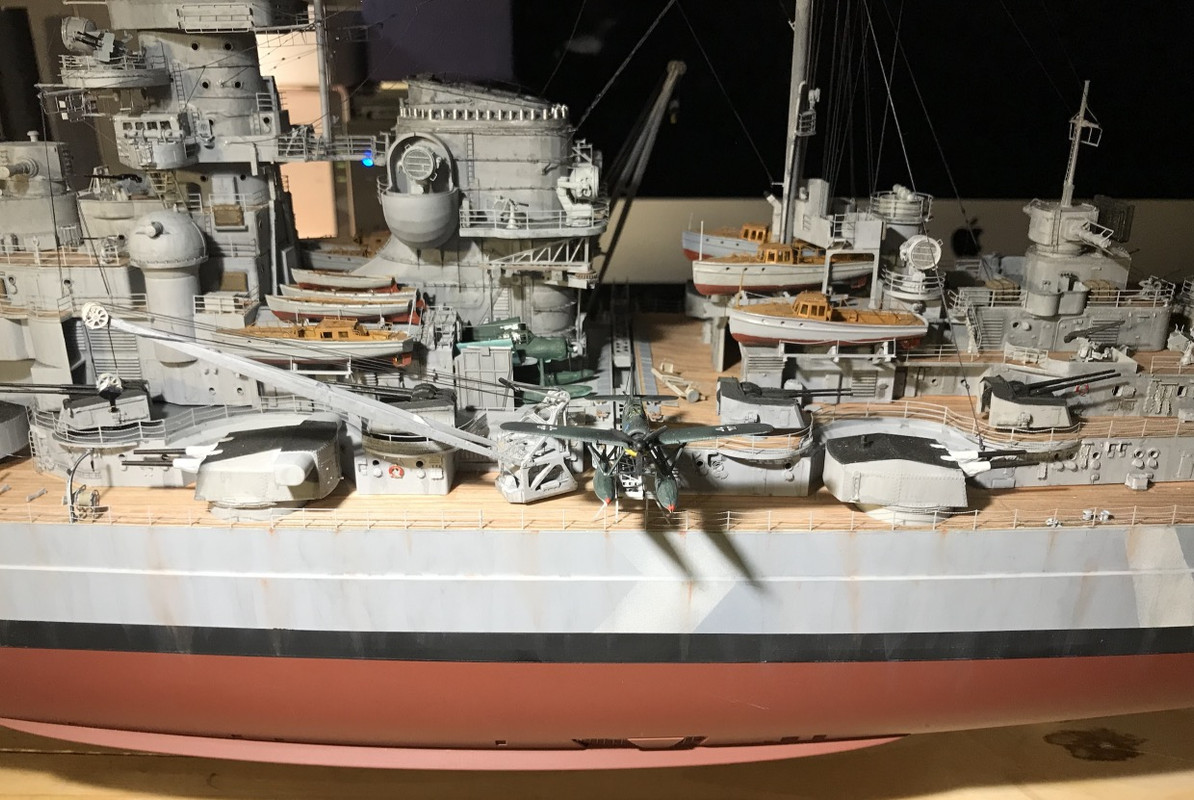
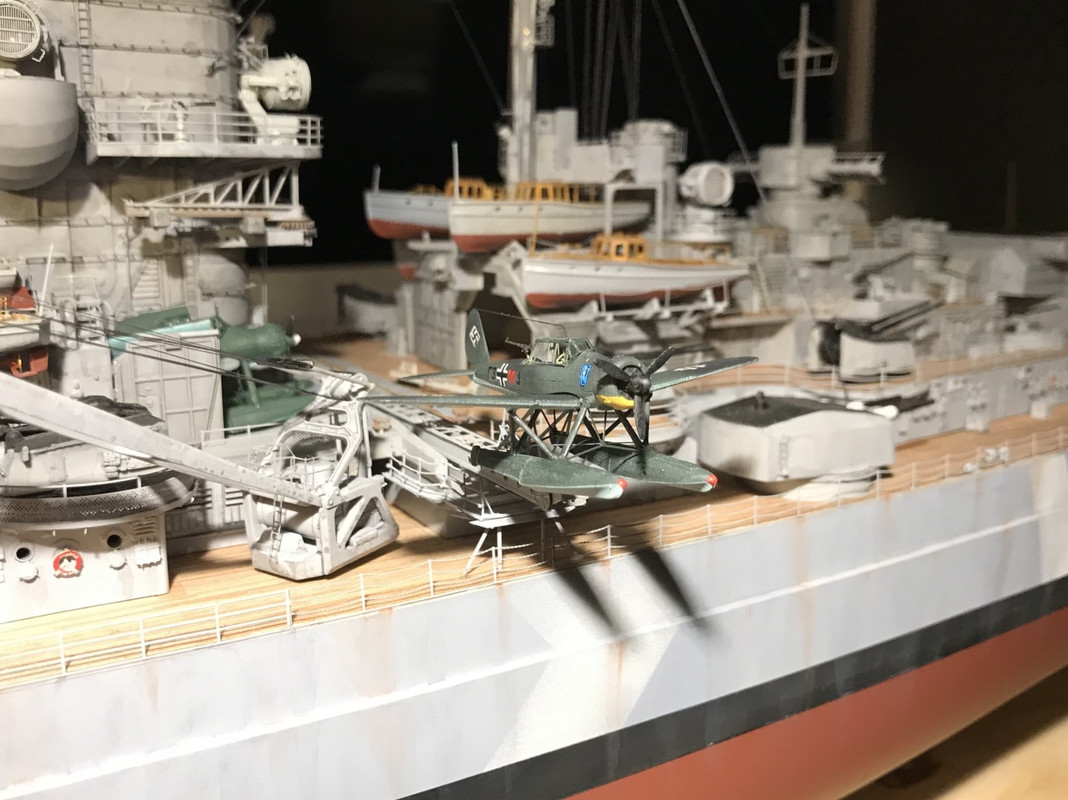
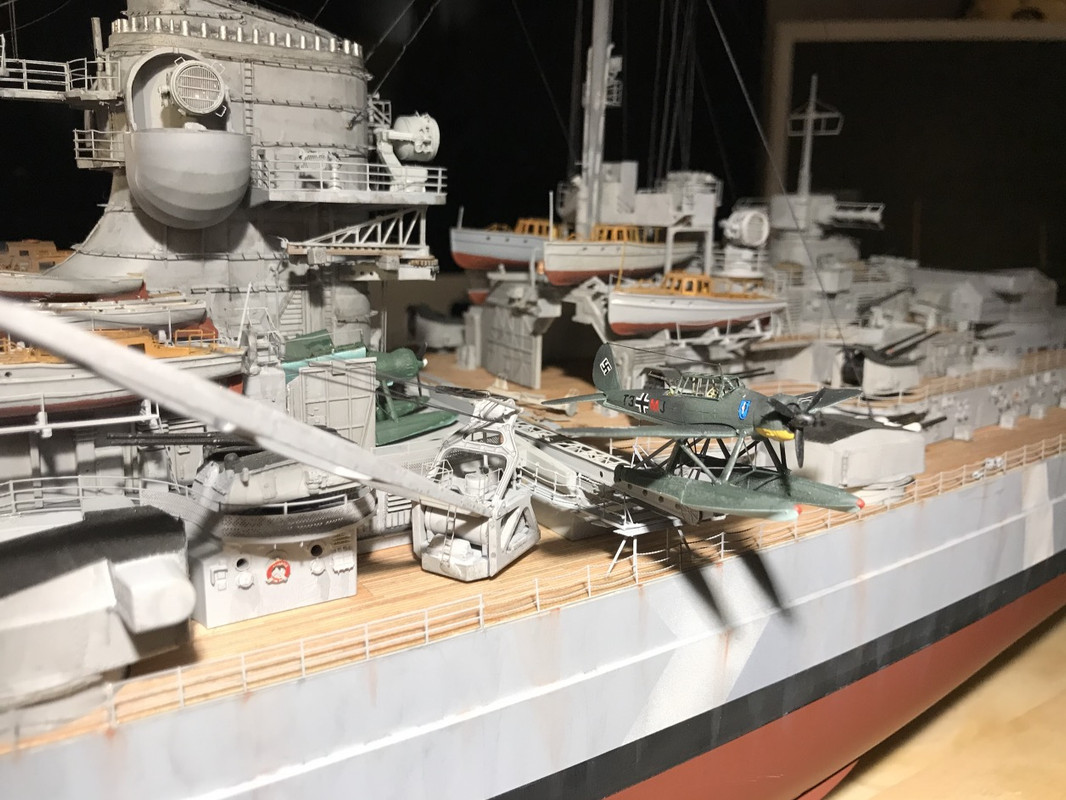
I'm not satisfied with the colors of my Arado, so I'm going to redo them and improve the details with the MK1 EP.
The paint peels off the metal, even before being bent. This is often the problem with painted PE. The problem is to glue efficiently.
I would retouch with RLM 02 (Grey) Revell Matt 45 (Light Olive).
I'm used to this cockpit, I recently built 2 of them, 1/32 Revell, an Arado 196B (Prototype single float) and an A3 (Prinz Eugen, double float).
[img]https://i.postimg.cc/qB1Wv3w9/Screenshot-2020-04-06-21-58-37-267.png[/img]
[img]https://i.postimg.cc/Tw9FmL65/Screenshot-2020-04-06-21-59-37-987.png[/img]
I removed the plastic with the Dremel to install the cockpit.
[img]https://i.postimg.cc/MHp4Y66P/Screenshot-2020-04-06-21-56-37-667.png[/img]
[img]https://i.postimg.cc/gjt7SCrY/Screenshot-2020-04-06-21-58-00-154.png[/img]
The Arado factory is running at full capacity today..
[img]https://i.postimg.cc/JnBrgmcP/Screenshot-2020-04-10-21-49-12-117.jpg[/img]
[img]https://i.postimg.cc/rpHyQzWD/Screenshot-2020-04-10-21-56-44-803.jpg[/img]
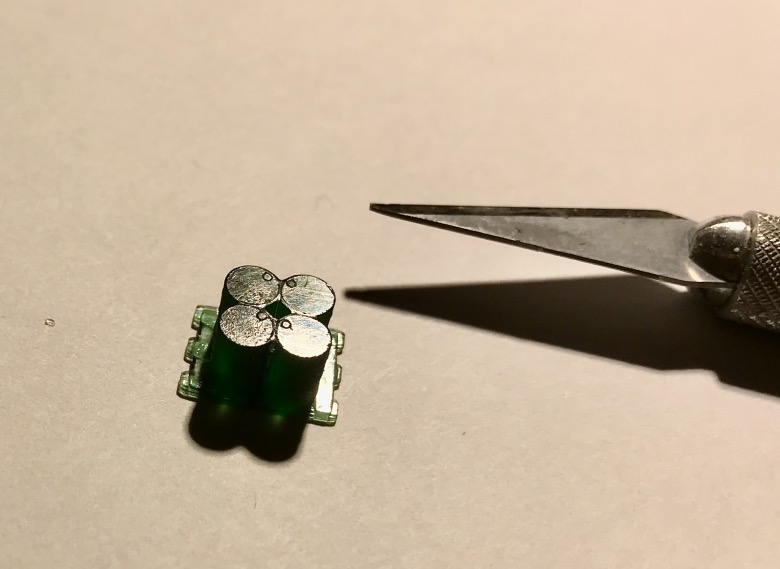
A last one. 25 pi�ces by plane..
[img]https://i.postimg.cc/8CcrSyh0/Screenshot-2020-04-11-23-04-41-320.jpg[/img]
I made some progress on this ship today.
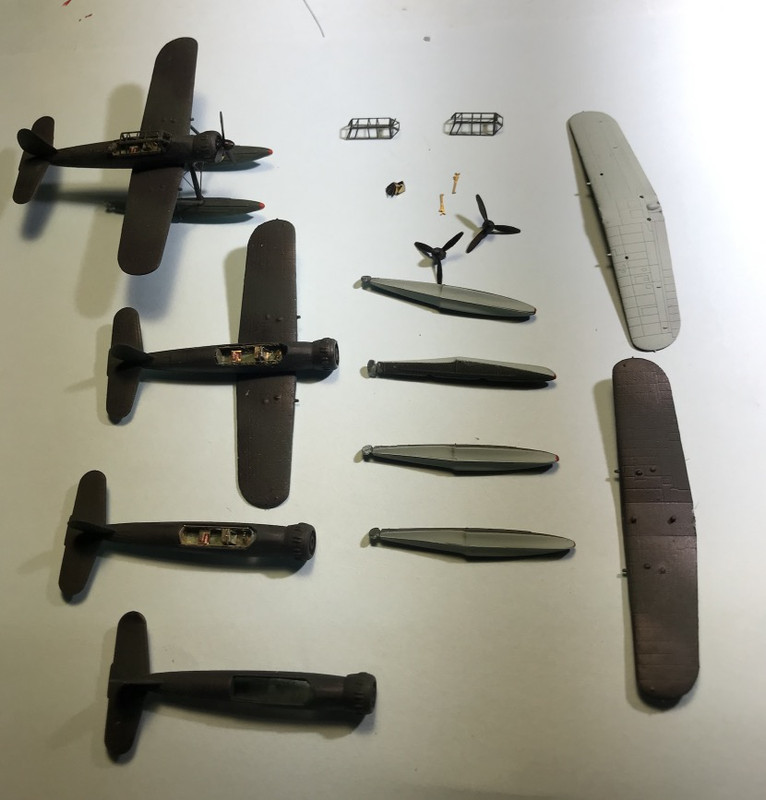
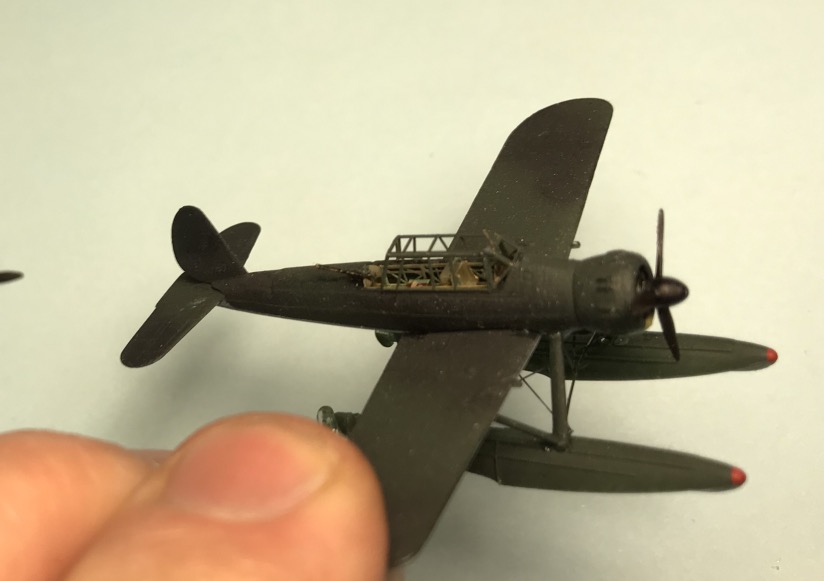
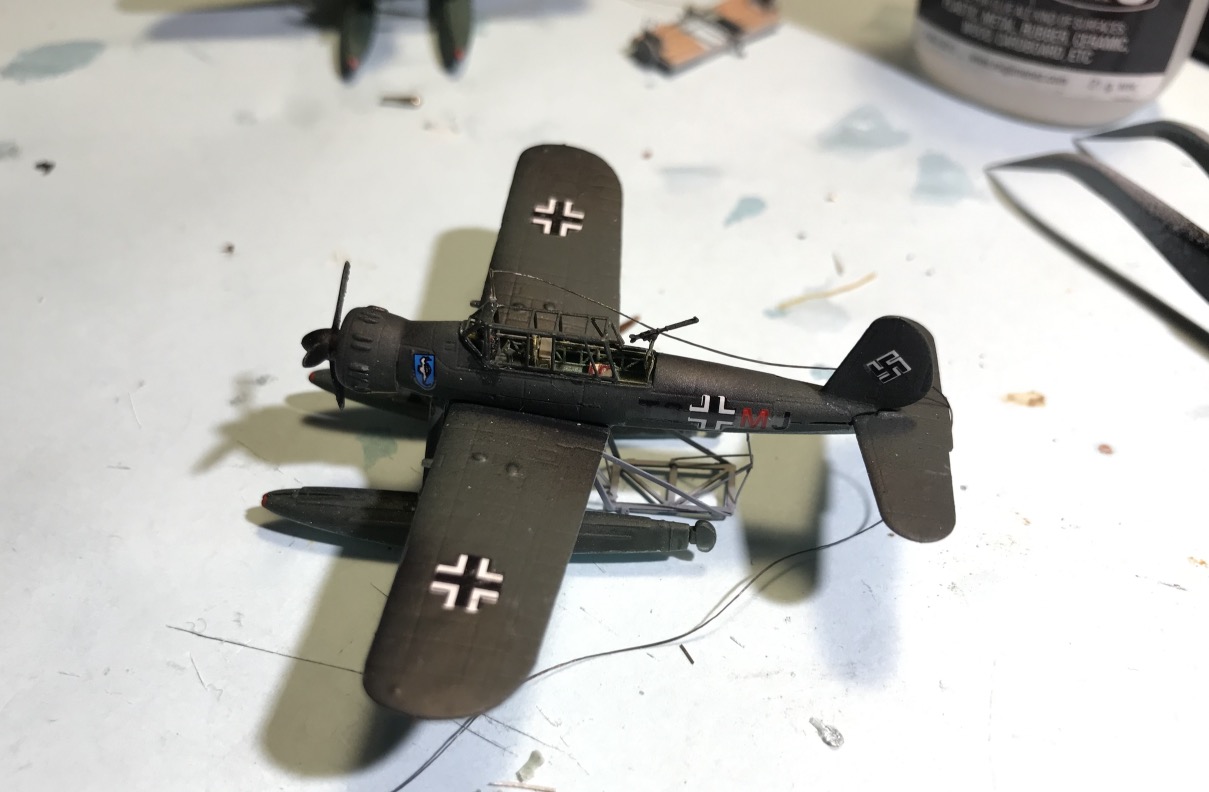
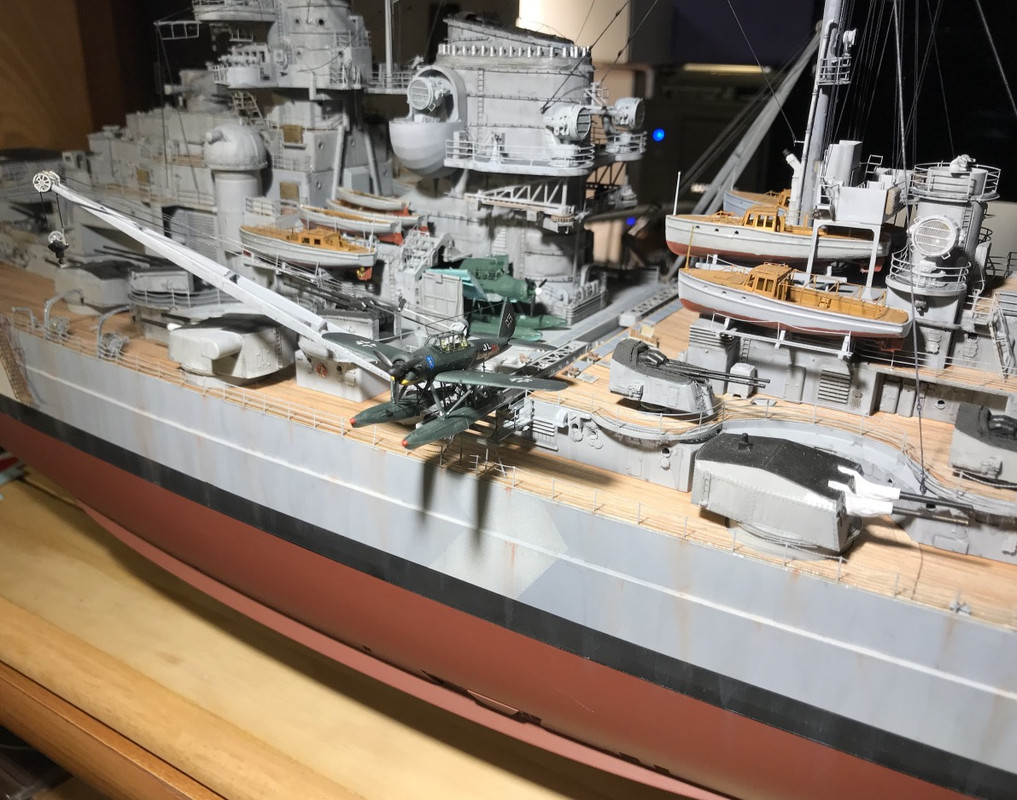
I finished one of the Arado's completely, I had a set of decals left, so I put it on his catapult trolley and on the port catapult for good.
You can see the difference in colour between the first Arado I'd ridden and the last ones, which were much more neat on all levels, in total I would have ridden 8 of them for the fun of it. Only 4 will be used on this ship for the staging.
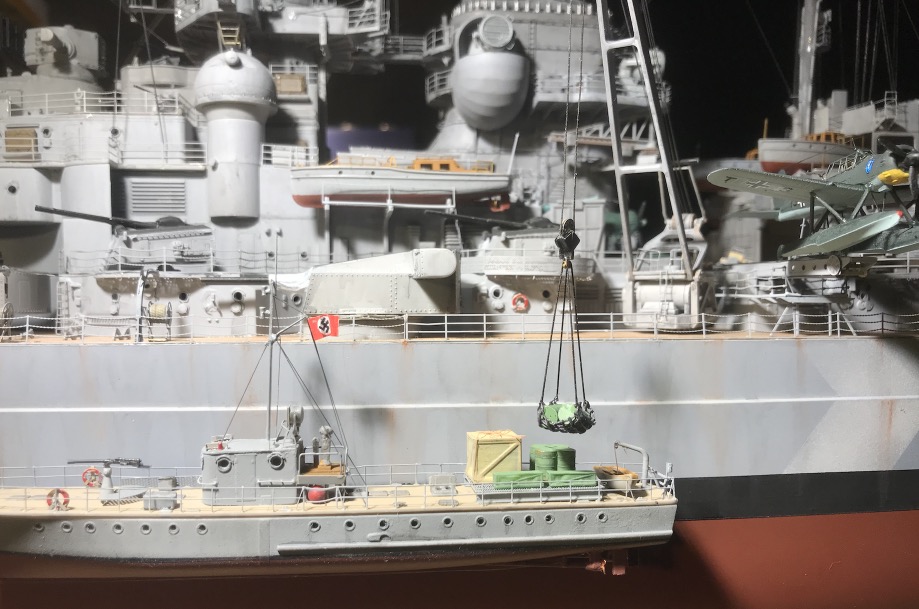
The port crane is not glued yet, I have to add the control wheels (Scratch) and probably a sailor later at the controls. The purpose is to make him lift a load, a wooden box for example, the box coming from a small supply ship upright, along the edge. this small ship will be fixed to the hull by very thin and invisible metal rods. it can be removed if necessary.
I have set my sights on this normally armed 1/200 Russian patrol boat which I will transform into a small supply ship by disarming it. I have not found any other ship suitable for this 1/200 role.
It is North Star which manufactures this pretty small patrol boat, I will paint it with the German colors.
MO-4 Soviet WWII small guard ship.
[img]https://northstarmodels.com/wp-content/uploads/2016/09/nsa200-p-901-1.jpg[/img]
For Arado this is what it looks like:
[img]https://i.postimg.cc/x1KZkxGx/Screenshot-2020-04-12-22-21-55-953.jpg[/img]
[img]https://i.postimg.cc/rw6bwX4R/Screenshot-2020-04-12-22-22-13-253.jpg[/img]
[img]https://i.postimg.cc/mZ5JKF2w/Screenshot-2020-04-12-22-23-08-604.jpg[/img]
It's finally taking shape.
[img]https://i.postimg.cc/sX9S7WHR/Screenshot-2020-04-12-22-14-44-889.jpg[/img]
[img]https://i.postimg.cc/4dTVYP55/Screenshot-2020-04-12-22-16-17-765.jpg[/img]
[img]https://i.postimg.cc/PJXD4q0v/Screenshot-2020-04-12-22-17-15-575.jpg[/img]
[img]https://i.postimg.cc/vmn58kWT/Screenshot-2020-04-12-22-18-03-947.jpg[/img]
[img]https://i.postimg.cc/7P90LgT3/Screenshot-2020-04-12-22-18-38-097.jpg[/img]
[img]https://i.postimg.cc/sxTh0rR6/Screenshot-2020-04-12-22-19-16-598.jpg[/img]
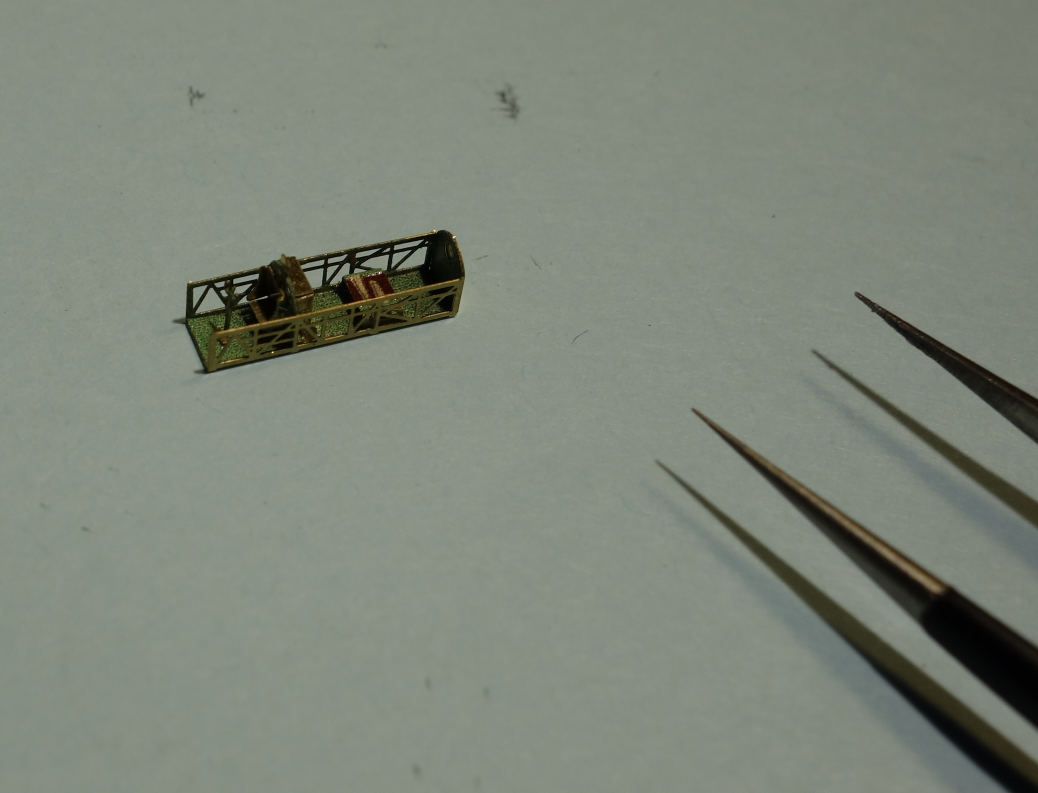
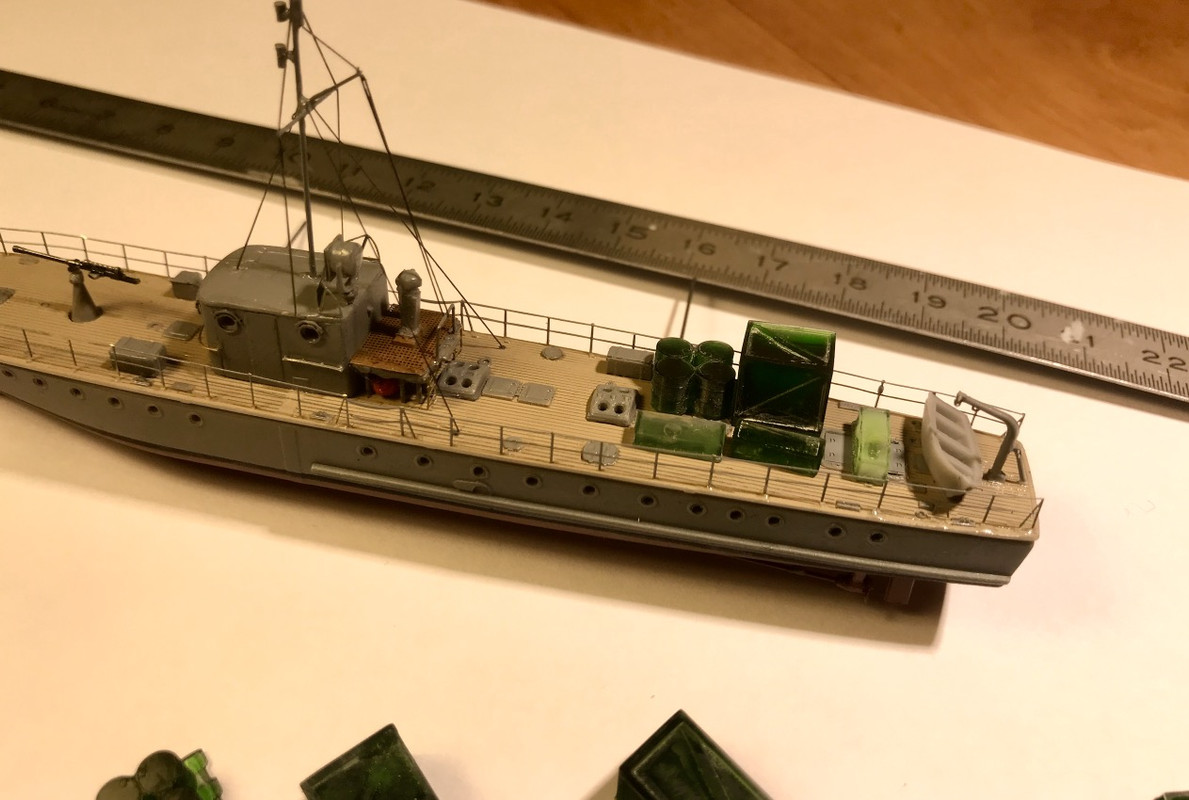
I'm making some progress with the construction of the launch boat that's coming to an end.
I also made crates and 200-litre drums of oil and other things with the 3D printer to furnish the boarding scene with the crane with these spare parts and consumables, and probably the Schnaps of Admiral G�nther L�tjens and Commander Ernst Lindemann, donated by the F�hrer ...
It's all still to be painted.
I used 3D files at scale 1 found for free on the canvas, but as it's made hollow when I reduce the scale to make different sizes of crates with the same basic model, the thickness is much too thin for the smaller ones, I didn't miss anything.
I think I'll make some more myself at the right scale. On the other hand, the barrels and others on wooden pallet are successful, you can even see the filler cap on the top.
It remains to paint all that. I can't wait to get my grey resin, because the crystal green to work with is not really great...
[img]https://i.postimg.cc/RZ3CFDJY/Screenshot-2020-05-10-22-35-29-477.jpg[/img]
[img]https://i.postimg.cc/sxBHS7P3/Screenshot-2020-05-10-22-42-34-492.jpg[/img]
[img]https://i.postimg.cc/YShFtRt2/Screenshot-2020-05-10-22-20-49-057.jpg[/img]
[img]https://i.postimg.cc/W1prHjKk/Screenshot-2020-05-10-22-23-18-042.jpg[/img]
[img]https://i.postimg.cc/CxvDyXT6/Screenshot-2020-05-10-22-25-35-724.jpg[/img]
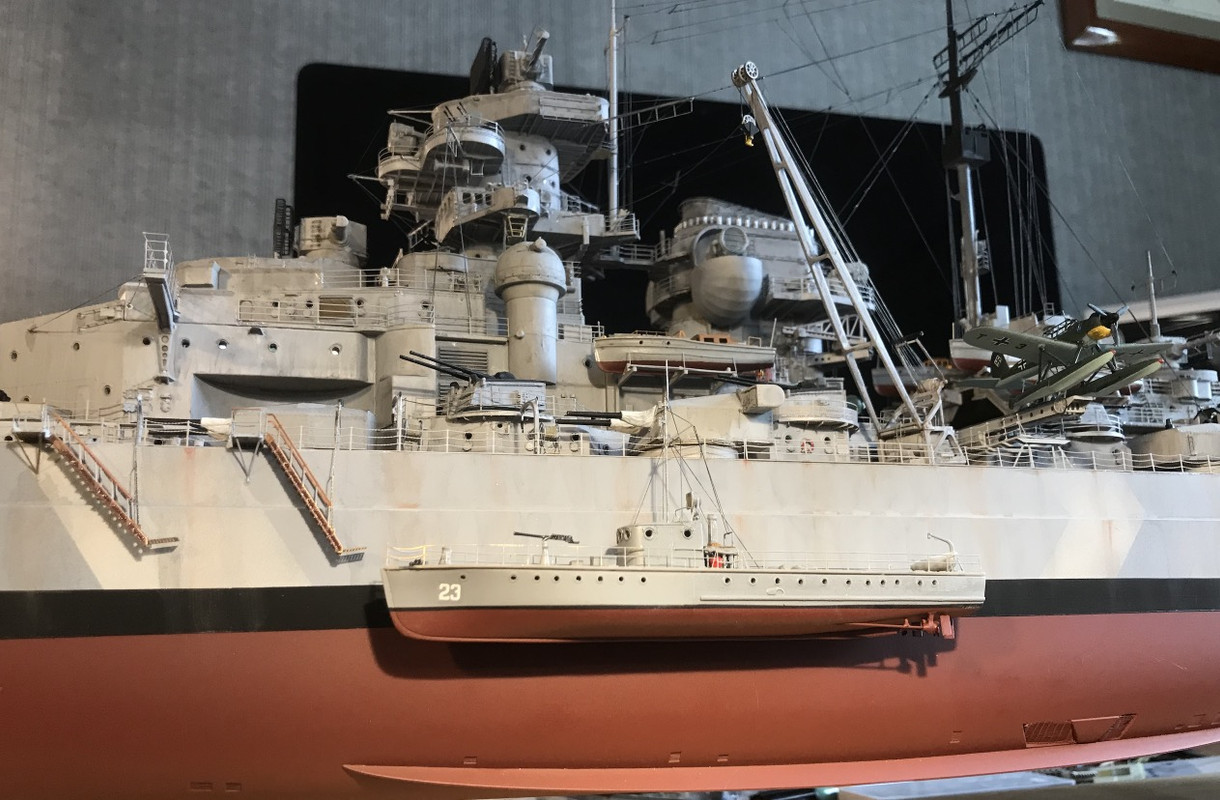
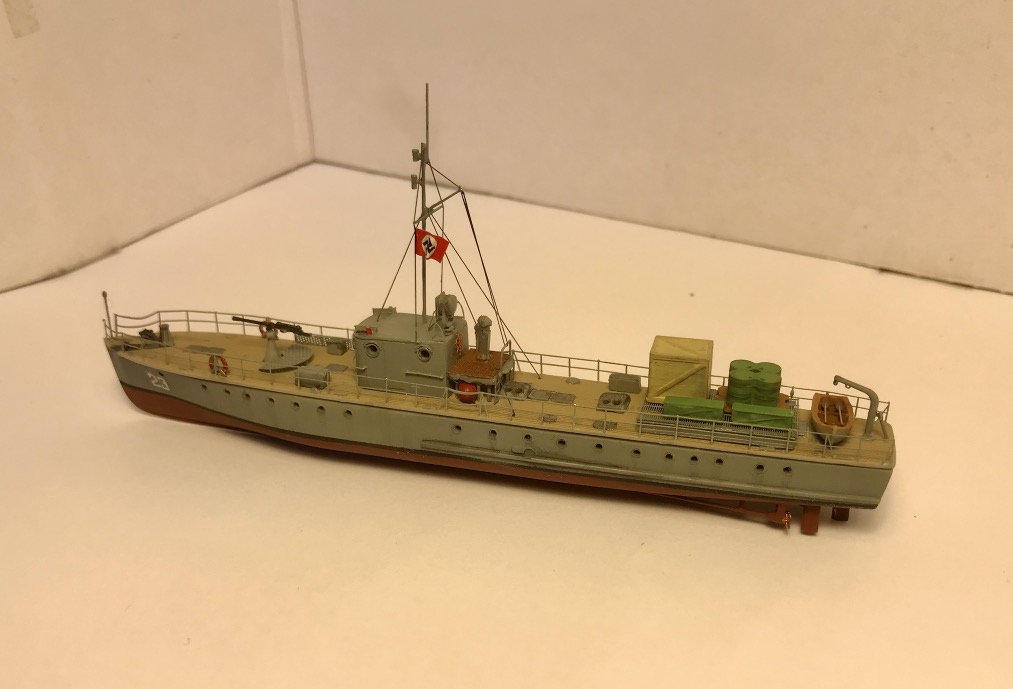
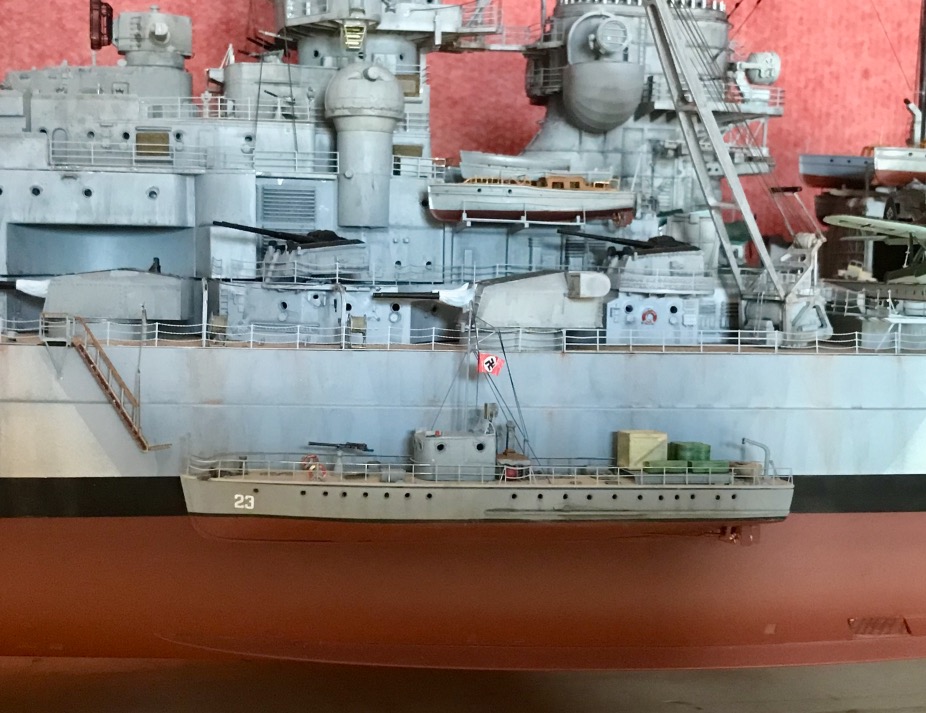
The launch boat is almost complete.
spent the day questioning details, a bit of weathering, a bit of blackening of the side exhaust pipes, painting of the boxes and cans.
I made a load platform out of leftover radar (PE), and some plastic I-beam that I just received. I also added a half platform for the front machine guns. Flag, front flagpole, small oars in the dinghy.
High beam lights are in place!
[img]https://i.postimg.cc/cJs6ND9j/Screenshot-2020-05-11-18-54-40-743.jpg[/img]
[img]https://i.postimg.cc/6QYq6dFQ/Screenshot-2020-05-11-18-55-34-135.jpg[/img]
[img]https://i.postimg.cc/MTHTnn8m/Screenshot-2020-05-11-18-58-14-058.jpg[/img]
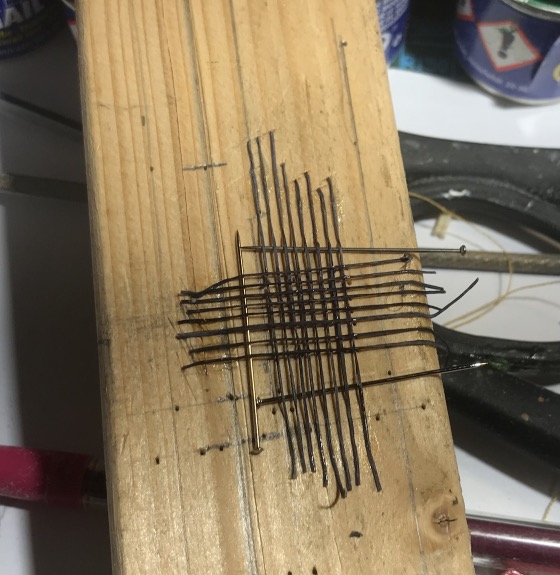
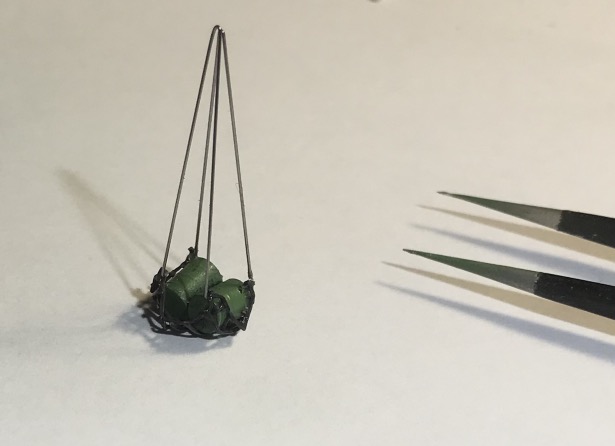
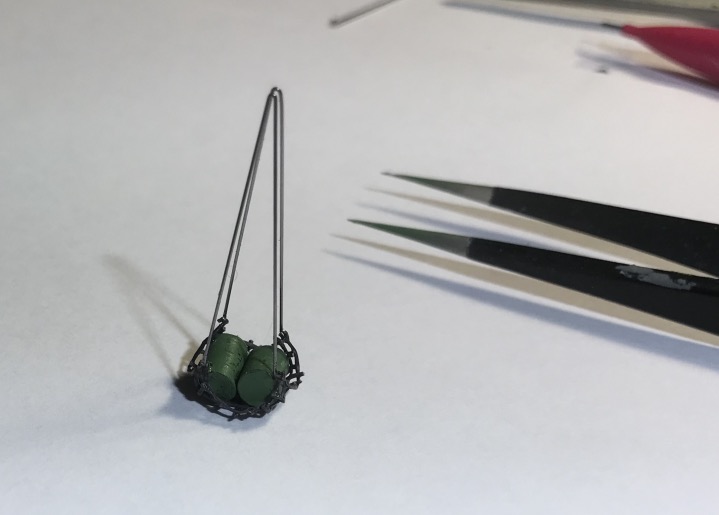
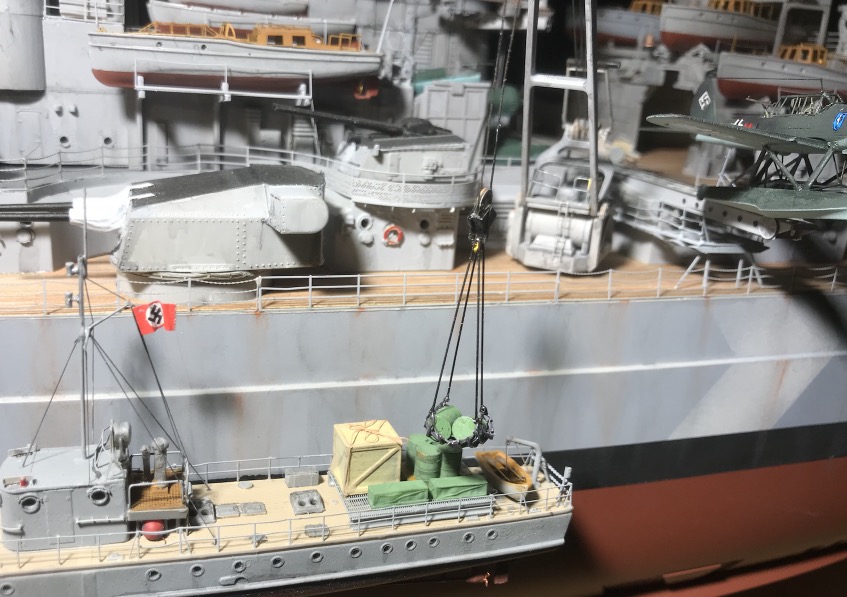
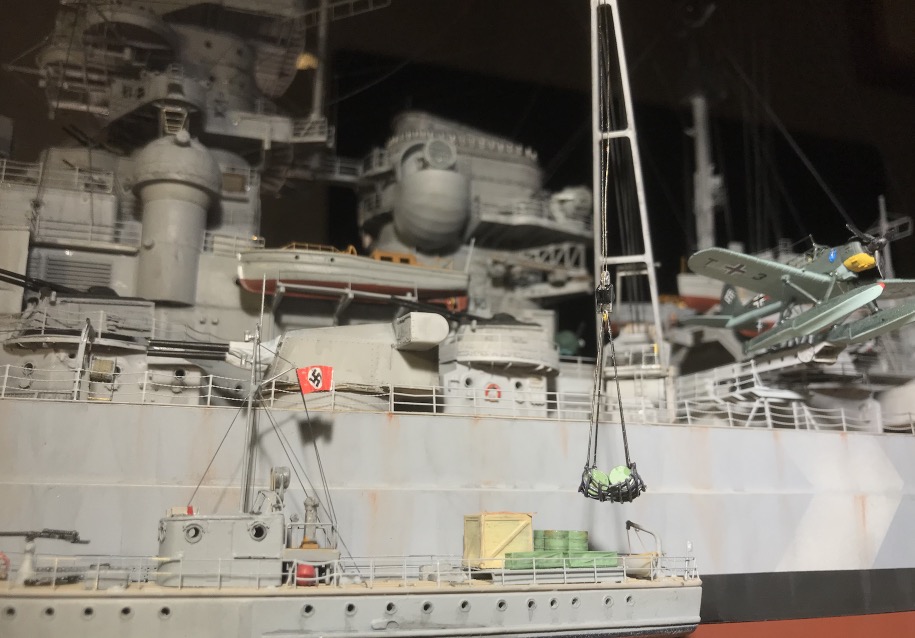
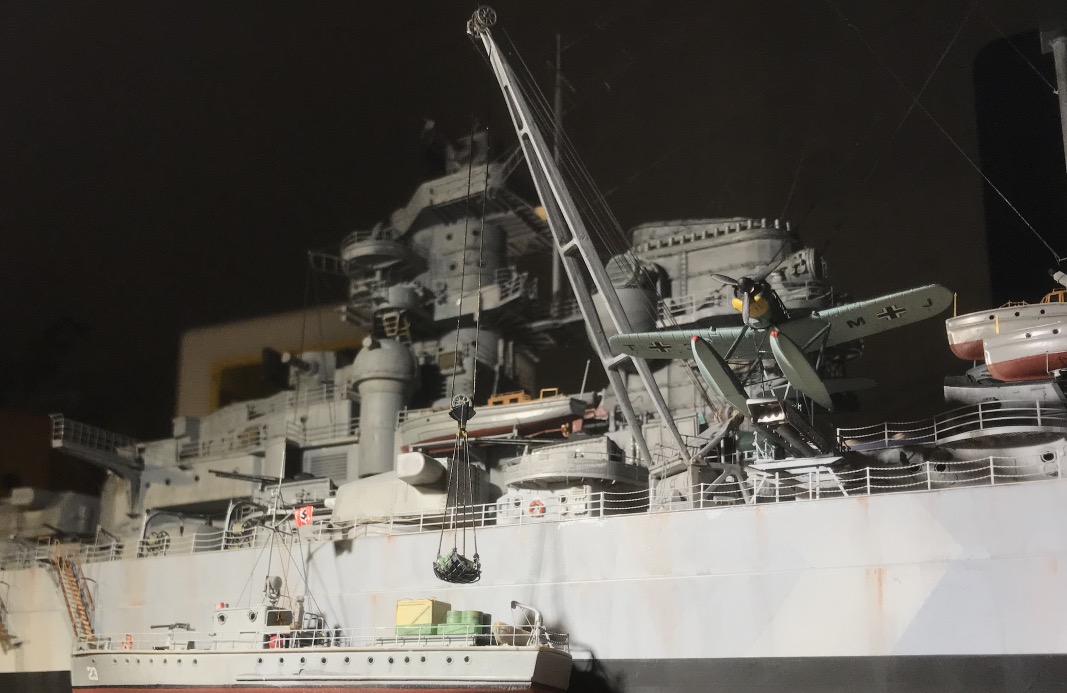
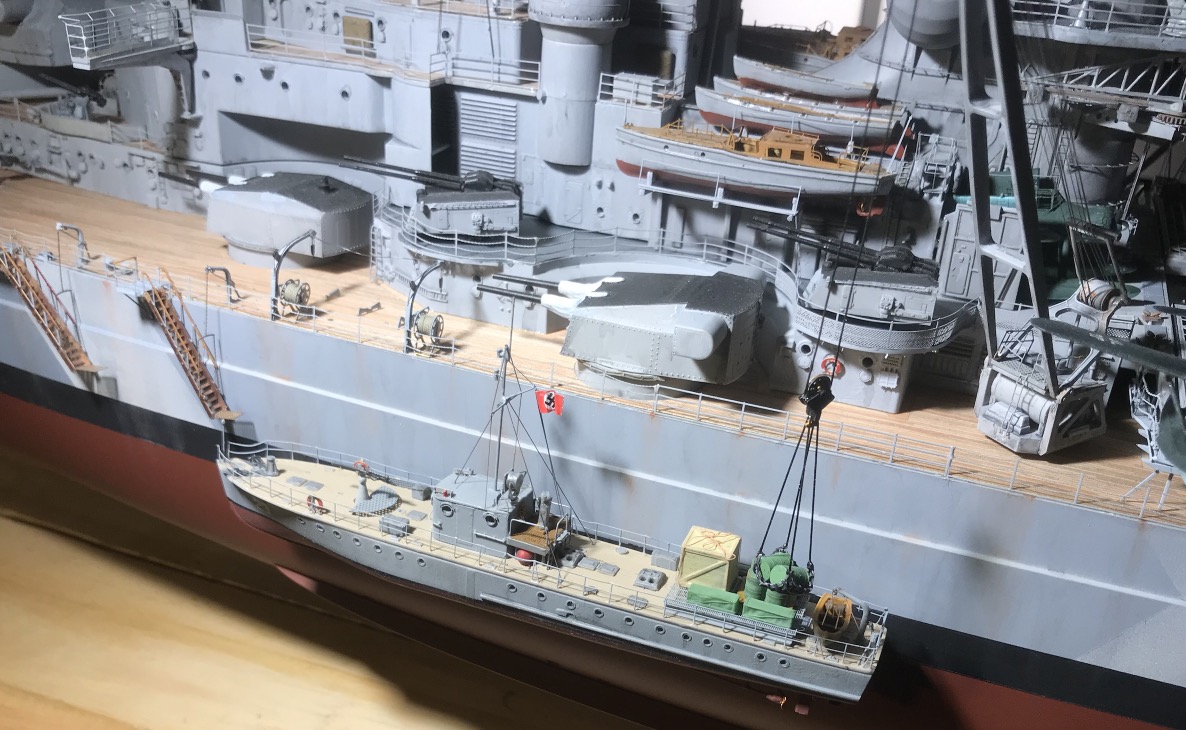
Manufacture of a net for the port crane in EZ line heavy. I put 0.3mm piano wire for the 'lines' to give the impression of weight. I re-manufactured 40 cans of 200 lts in 3D printing, I have stock now! The Hornet will need them too.
I'm almost done with the launch, I have the crew to add. The crane needs to be revised a little and I'll put a crane operator on it. I changed the hoisting cable that was made of PE, it was too short and not suitable for the stage. A little paint touch up here and there.
[img]https://i.postimg.cc/mgMK7LF1/Screenshot-2020-05-14-12-31-26-645.jpg[/img]
[img]https://i.postimg.cc/SNnBN7Sr/Screenshot-2020-05-14-12-32-14-037.jpg[/img]
[img]https://i.postimg.cc/xTBWkJqS/Screenshot-2020-05-14-12-32-44-992.jpg[/img]
[img]https://i.postimg.cc/pTV7NKcK/Screenshot-2020-05-14-12-33-32-995.jpg[/img]
[img]https://i.postimg.cc/TPJSHt0R/Screenshot-2020-05-14-12-33-54-684.jpg[/img]
[img]https://i.postimg.cc/9fhKp6G8/Screenshot-2020-05-14-12-34-53-346.jpg[/img]
[img]https://i.postimg.cc/SsZPmjH3/Screenshot-2020-05-14-12-35-34-115.jpg[/img]
[img]https://i.postimg.cc/MHvFHqST/Screenshot-2020-05-14-12-36-35-808.jpg[/img]
[img]https://i.postimg.cc/zv6PR6zk/Screenshot-2020-05-14-12-37-17-015.jpg[/img]
[img]https://i.postimg.cc/QxgwxpH9/Screenshot-2020-05-14-21-21-23-123.jpg[/img]
some of the sailors on general supply duty. The crane operator's there, too, of course.
[img]https://i.postimg.cc/vZQj1cVP/Screenshot-2020-05-14-21-22-25-735.jpg[/img]
[img]https://northstarmodels.com/wp-content/uploads/2016/11/MO-4-nsa200p901-boxart-1.jpg[/img]