Pomeranian Rahschlup 1846 � 1/160 scale � Baltic trader

Post a reply

Confirmation code
Enter the code exactly as it appears. All letters are case insensitive.
Smilies
:smallsmile: :wave_1: :big_grin: :thumbs_up_1: :heh: :cool_1: :cool_2: :woo_hoo:
View more smilies

BBCode is ON
[img] is ON
[url] is ON
Smilies are ON

Topic review
   

Expand view Topic review: Pomeranian Rahschlup 1846 � 1/160 scale � Baltic trader

Re: Pomeranian Rahschlup 1846 � 1/160 scale � Baltic trader

by DrPR » Tue Apr 21, 2026 10:02 pm

Eberhard,

I make close up macro photos of my modeling work, and parts that look very nice at arm's length show huge imperfections in the photos! But on the completed model these flaws just aren't noticeable.

Nice work on the barrel. Again, I have tool envy seeing what you do with your watchmaker's lathe.

Re: Pomeranian Rahschlup 1846 � 1/160 scale � Baltic trader

by wefalck » Tue Apr 21, 2026 2:20 pm

Some more deck details

There were some deck details of which the location puzzled me a bit. These included the down-pipes into the chain-locker for the anchor-chains (to be discussed later), the chimney(s) for the stove(s) in the crew- and captain’s quarters, the mandatory drinking-water barrel, and to some extent the bilge-pump (also to be discussed later).

Chimney
By the middle of the 19th century small cast-iron stoves were in common use on ships like the Rahschlup. Looking at illustrations of the time, the more traditional square, sheet-metal lined wooden chimneys were gradually replaced by round sheet-metal stove pipes. The chimney could be removed and the passage through the deck closed with a cap, so that they would not get in the way when handling the anchors or sails.
I found a good image in my collection of a model of a Jagt in the Museet for Søfart in Helsingør/Danmark, that shows exactly the sort of arrangement that I had in mind.

Image
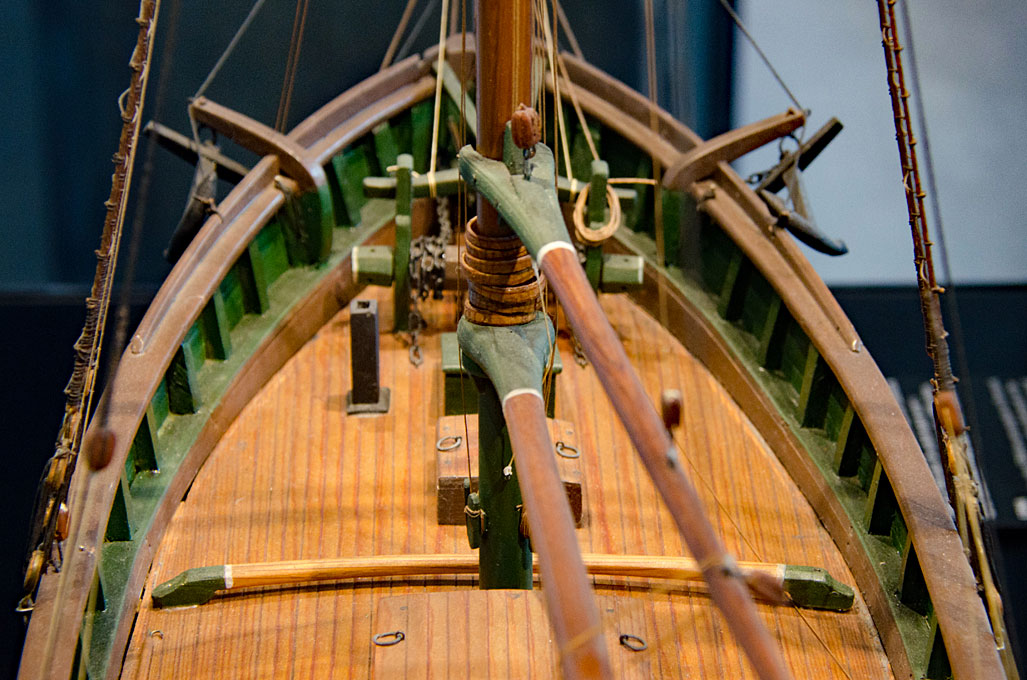
Model of a Jagt in the Museet for Søfart in Helsingør/Danmark

Perhaps the best illustration of the interior arrangement is that of ‘Caboteur Danois’, i.e. a Danish ‘jagt’, from Paris’ ‘Souvenirs de la Marine’ (Planche 213). It gives even more details than the drawings for DE FIRE BRØDERE and CASTOR from Nielsen‘s ‚Danske Bådtyper‘.
According to this the stove in the crew quarters is placed next to the access ladder, at the rear bulkhead, while the placement of the one in the captain’s quarters depends on the layout of that cabin. Again, it is likely placed against the forward bulkhead.

Image
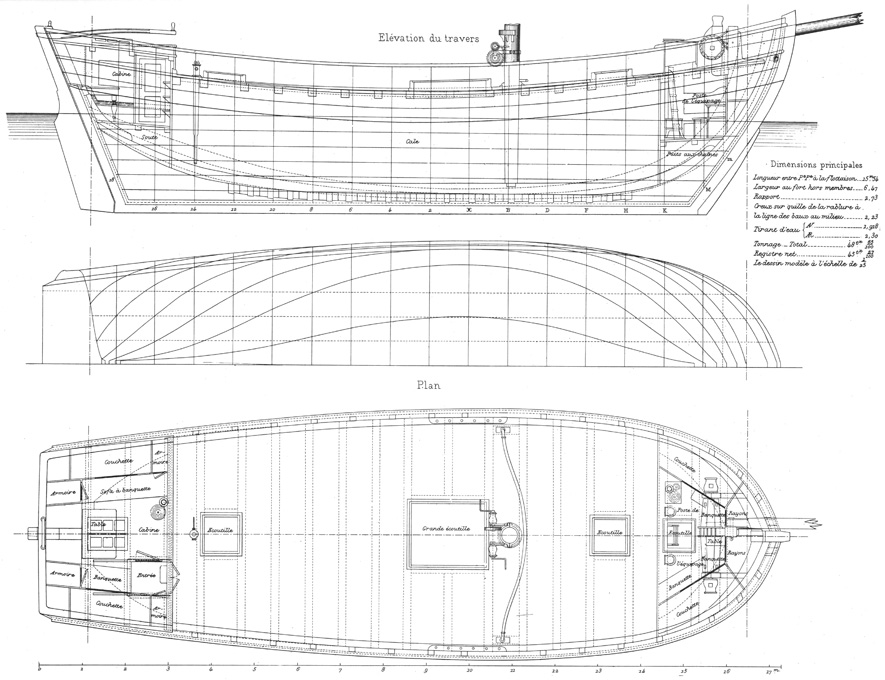
Caboteur Danois (jagt), Pl. 213 of the Souvenirs de la Marine by E. de Pâris

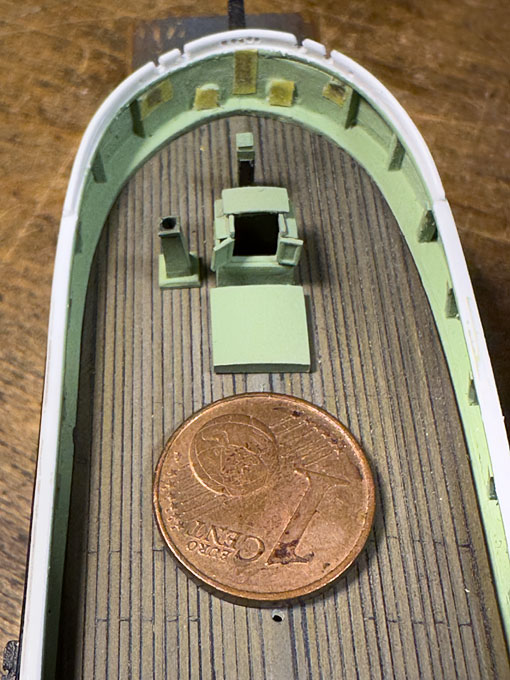
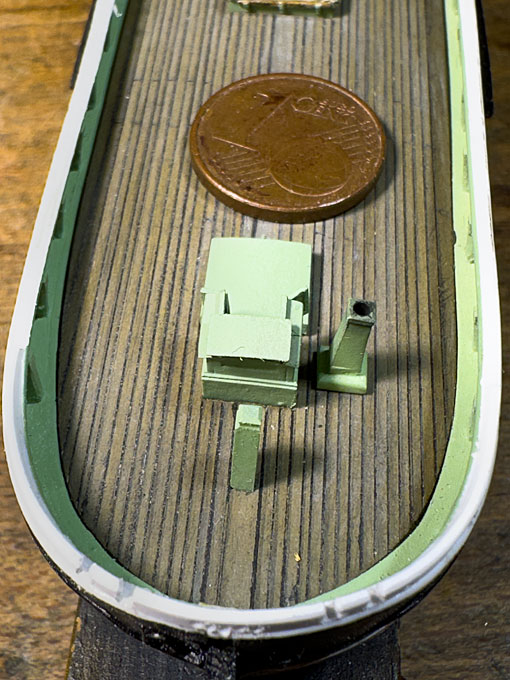
As the model will be shown moored alongside a quay, the chimney will be rigged and will be placed on the port side of the crew companionway. Although, I envisage a summer setting, it is shown, because the stove would have been used for cooking as well.
I am not sure, where the stove for the main cabin would have been placed, but I am showing it as closed with a cap on the port side of the companionway.
The forward chimney was milled from a piece of 2 mm x 2 mm polystyrene rod with the base as a separate piece cut from 1 nm x 3.2 mm polystyrene.

Image

Image

Drinking-water barrel
According to pictorial evidence, the placement of the barrel was quite variable, probably at a place where it did not get in the way of the operation of the ship and where it was somewhat protected. Often it was placed near the bulwark or near a companionway. As there is quite a distance between the main cabin companionway and the main hatch, I put it in front of the companionway.
The barrel was turned from a length of 4 mm acrylic rod, giving a barrel of of about 60 cm diameter, which appeared about right according to photographs of the time. With a length of about 5 mm (= 80 cm) such a barrel would hold about 200 l, which should be sufficient for a few days for a crew of 5 to 6.

Image
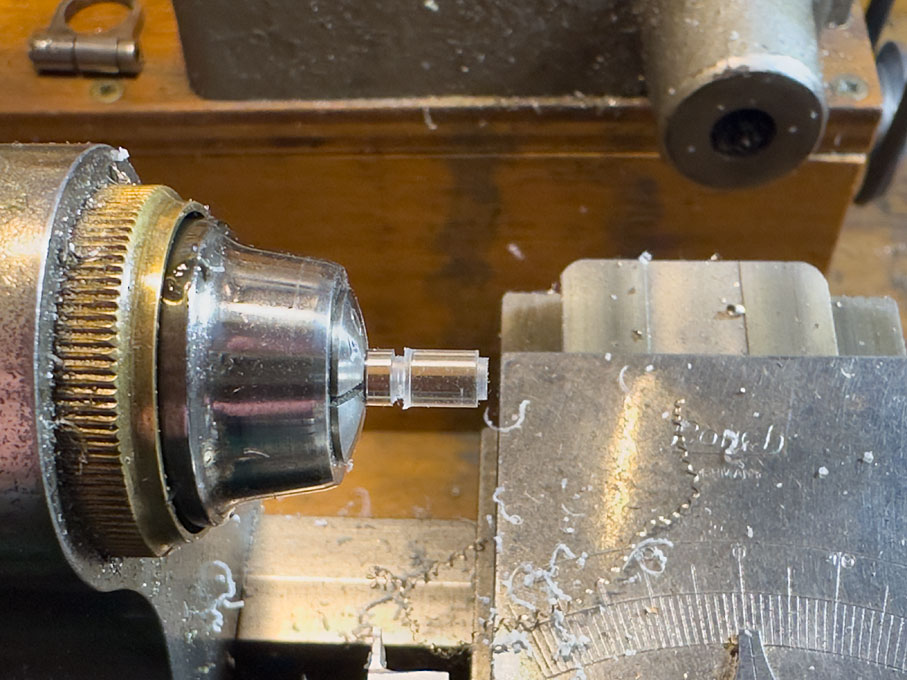
Determining the overall dimensions of the barrel

The curvature of the barrel was turned with the help of the radius turning attachment I made some years ago, held in the quick-change tool-post (QCTP). The geometries were worked out on my CAD software, i.e. the radius of the curvature was set to 9 mm and the minimum diameter would be 3 mm. Accordingly, a step with 3 mm diameter was turned on each side of the blank and then the attachment set to the middle of the future barrel. The whole radius turning tool was lowered in steps until the tool arrived at the minimum diameter.

Image
Initial steps of turning the curvature with the radius turning tool

Image
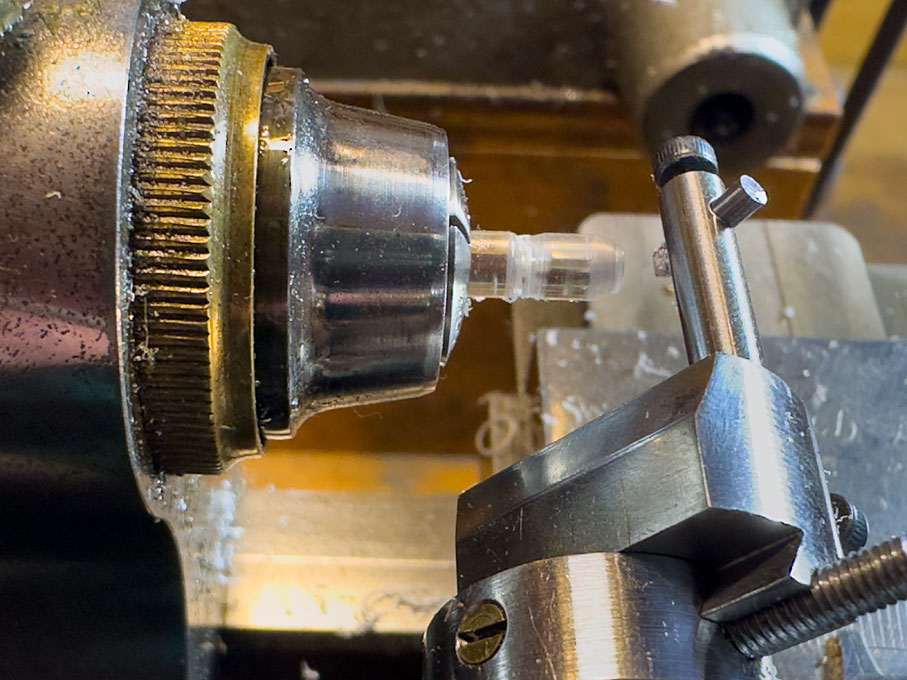
Final shape of the barrel

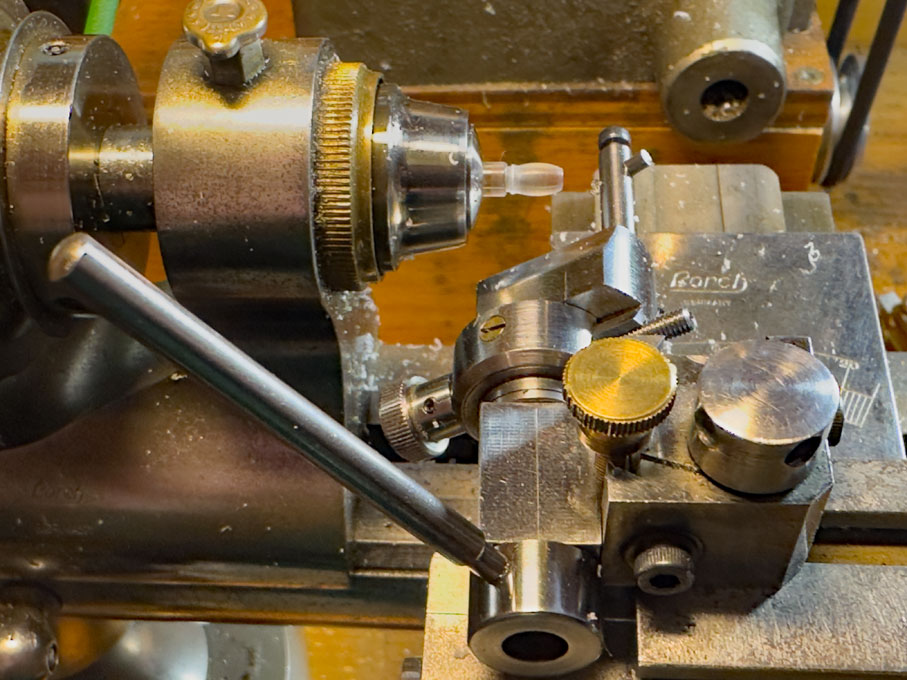
Without changing any other settings, the cutting tool was turned by 90° so that it cut lengthwise. The radius now was reduced by 0.1 mm to lightly engrave the staves. An Internet-consultation revealed that the staves should be about 10 cm wide at the large circumference. For a 60 cm diameter barrel this results in about 20 staves. Using the built-in dividing disc of the watchmakers lathe these 20 staves were engraved one by one.

Image
Engraving the staves

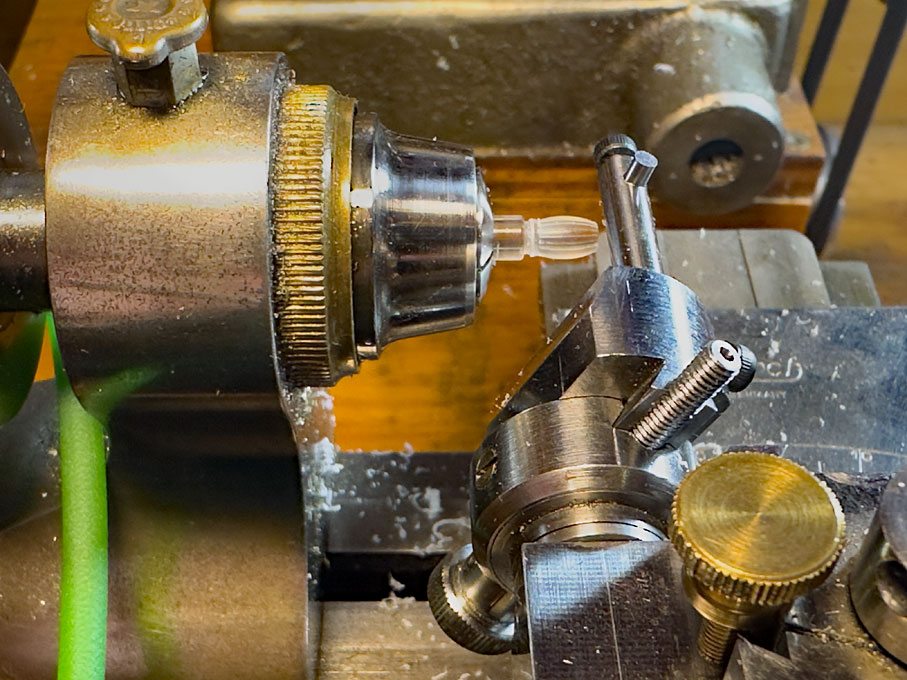
The recesses for the lids were simply cut with an end-mill that cuts over the centre. Holding the barrel once it has been parted off the stock was a bit tricky, but the watchmakers’ collets pinch at the front, so that even bulbous parts can be held for light operations.

Image
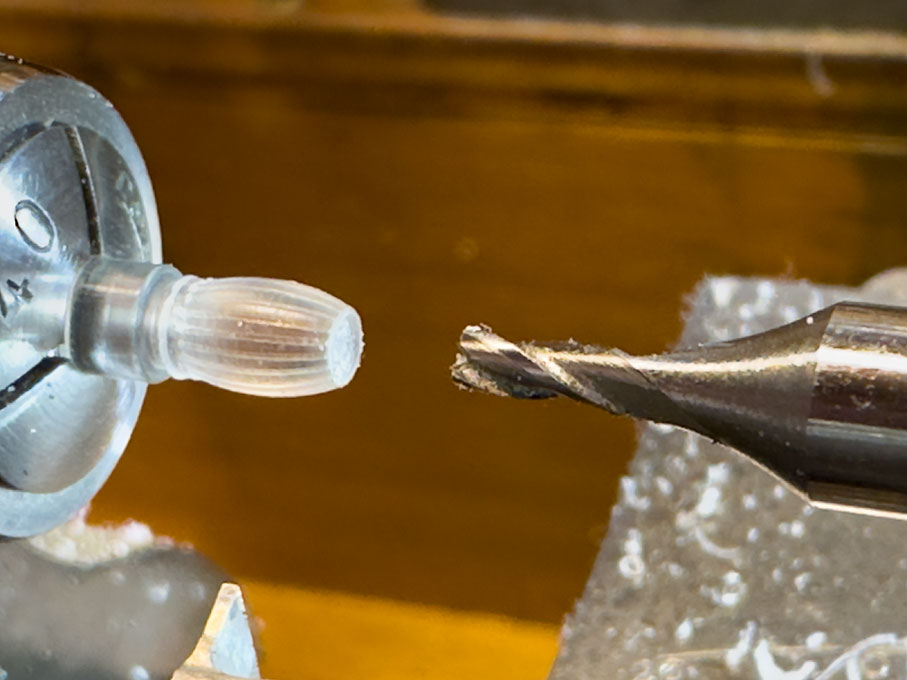
Cutting the recesses for the lids

The cradle was fabricated from tiny pieces of various polystyrene profiles.
Barrel and cradle were given a base-coat of the same green as the other deck furniture. The barrel-hoops and the retaining straps are thin pre-painted strips of paper.

Image
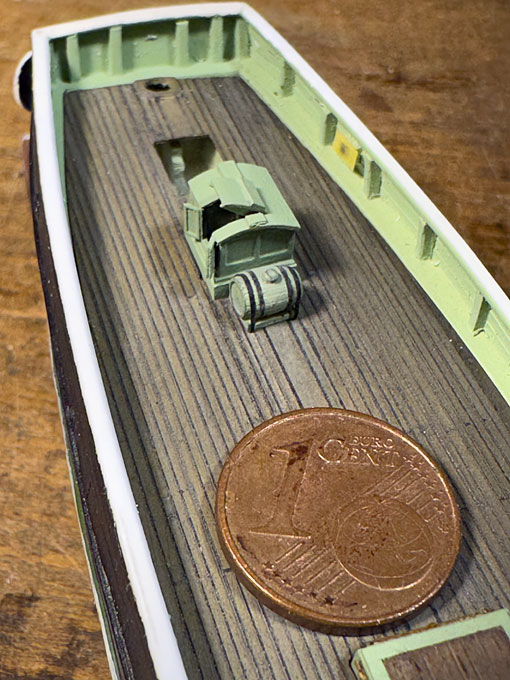
The painted water barrel at its future location

Image
… and a horribly sobering close-up shot of the water barrel

To be continued …

Re: Pomeranian Rahschlup 1846 � 1/160 scale � Baltic trader

by wefalck » Mon Apr 13, 2026 2:38 pm

Jim, I would have indeed used decal strips (as I did on SMS WESPE), if the colour didn't need to go around the edge of the wale. OK, perhaps a white decal strip and then painting over it and the edge ... I could still do that.

Re: Pomeranian Rahschlup 1846 � 1/160 scale � Baltic trader

by JIM BAUMANN » Mon Apr 13, 2026 2:29 pm

ahoi wefalck

Looking nice!-- I also loathe masking for its--in my hands anyhow--lack of precision !

I think you may obtain a sharper definition / demarcation of the white lines using thin decal striping

images below are from the 170 mm loa model of 1891 HMS Hood
Image


Image

Re: Pomeranian Rahschlup 1846 � 1/160 scale � Baltic trader

by wefalck » Sat Apr 11, 2026 2:36 am

Thanks, Marijn,

Indeed, enamels would have been an option, I still have a box full of decade old Humbrol tins. As I always stored them upside-down, they may be still good. However, I never liked the mess of cleaning brushes with them too much, even though I discovered early on in my life, that washing powder meant for wool (the German 'Rei') works very well and saves on expensive thinners.

The other option I had in the back of my mind was oils, but their long drying times is a drawback, also it can be shortened by using turpentine instead of lineseed oil as medium.

Good brushes help indeed. Unfortunately, sable-brushes are ruined quite quickly by acrylics and are not recommended. I usually use the Da Vinci brand synthetics. Buying brushes is another matter. Even in shops one often finds that they are already damaged.

Re: Pomeranian Rahschlup 1846 � 1/160 scale � Baltic trader

by marijn van gils » Fri Apr 10, 2026 5:12 am

Great job on the paintwork Eberhart! Especially the striping; not easy in this scale... :thumbs_up_1: :thumbs_up_1: :thumbs_up_1:

Another paint type that I find very useful for brush-applied basecoats that need adjusting (like the stripes or the stern carvings) is enamel. I always liked Humbroll, but with all the formula changes I prefer Revell nowadays.

Just like gouache, it can be removed or 'pushed around' with a damp brush (but white spirit instead of water of course) after application. But not forever like gouache, so it is best to apply a small area, adjust with the damp brush, paint the next area etc.
The main advantages over gouache: it is waterproof, so it doesn't need a protective coat, and it is easier to obtain a smooth surface.

I have also found that for detail painting, one of the most important factors is the quality of the brush. So far, I haven't found anything better than the Winsor & Newton series 7. Expensive, but such a joy to paint with...


When applying thin and long decals, it can help to cut them in shorter sections and apply those one at a time. Of course, that can make it a bit more difficult to make the line perfectly follow the curve of the sheerline without any minor kinks, which is really important for these lines.

I'm looking forward to the next steps!

Re: Pomeranian Rahschlup 1846 � 1/160 scale � Baltic trader

by wefalck » Thu Apr 09, 2026 7:17 am

Thanks, I am aware of 'retarders', but I have actually never used them, as the fast drying in most cases is a desirable property.

The Vallejo and Schmincke acrylics that I am using just require water for thinning. Other brands may use a mixture of water and alcohol as solvents and then one can use alcohol for thinning. Using an incompatable solvent for thinning can lead to a breakdown of the acrylic emulsions and coagulation. Acrylics using alcohol as solvent are likely to dry even faster.

Re: Pomeranian Rahschlup 1846 � 1/160 scale � Baltic trader

by Pieter » Thu Apr 09, 2026 7:05 am

Nice paint work. About acrylic paint drying too fast, all marks of acrylic paint offer a 'retarder' that makes the paint dry slower without attacking the piant layer below it. Acrylic 'thinners' do attack older paint layers which can be useful sometimes, for weathering for example or for doing carrier decks. I used acrylic thinner on my HMS Glory.

Re: Pomeranian Rahschlup 1846 � 1/160 scale � Baltic trader

by wefalck » Wed Apr 08, 2026 3:28 pm

The work again was interrupted by two business-related trips abroad that were almost back to back …

Painting continues

I am not a great friend of masking, but some masking and covering was be unavoidable. The wale and the hull below the waterline were sprayed in Vallejo model air 71.077 (wood). After the paint had the chance to thoroughly dry because of my absence, these areas were masked off with the yellow Tamiya tape – the waterline was eye-balled and the tape applied slightly above the designed waterline, as it is custom. Also, all openings in the bulwark were taped off from the inside to prevent the hull paint from entering. The hull then was sprayed in black.

Image
The masked hull

Image
The basic colour-scheme after demasking showing the need of some touch-up

Image
The basic colour-scheme after adjusting the colours of the wale and the underwater body

At this stage I worked on the wale to give it the appearance of oiled wood. The base-coat was worked over with Staedtler PITT artist brush pen 180 ‘raw umber’ to give the ‘wood’ more depth and a slightly more brownish tint. The hull below the waterline was given several washes in Schmincke aerocolor ‘burnt umber’ to simulate the colour of wood treated repeatedly with wood tar (Stockholm tar) – wooden ships not venturing south beyond the Channel at that time did not need a specific protection against Terredo navalis.
The edges of the wale were painted white, extending slightly onto the vertical surface. Originally, I was not too concerned about getting a clean edge on the wale, as the edges were meant to be separated by dark green stripes from the scraped part of the wale. However, the overall width of the wale is only 2 mm, so having five different coloured bands, with the middle one even being wider was a technical challenge and the optical weight did not seem to be right. In consequence, I opted for the colour scheme as seen on the Danish jagt in C.W. Eckersberg’s painting below

Image
A jagt (‘The Sea’), C.W. Eckersberg, 1831, Louvre, Paris

Somehow, I am struggling with brush-painting acrylic paints, because they dry too fast. Getting a clean white edge was difficult. Therefore, I resorted to white gouache, which allows corrections to be made even later with a humid brush. In this way, I managed to get a reasonably clean separation between the white stripe and the scraped part – but at the expense of this not being waterproof. It had to be protected, therefore, by a thin spray of satin acrylic varnish.
The green stripe required several attempts. The original idea was to produce painted strips of decal. To this end 0.7 mm wide strips were cut from a clear inkjet-printer decal sheet. The strips were taped to a piece of cardboard covered in clingfilm and then spray-painted with the airbrush. First, I choose a green too dark, that was barely visible on the black of the hull. The next version with a lighter green (Vallejo model air 71.094 ‘green zinc oxide’) would not separate from the clingfilm cleanly and detach from the decal sheet. Also applying the long narrow decal without breaking it proved very difficult (perhaps I don’t have enough practice in handling decals). Finally, I spray-painted a wide strip of thin tissue paper in Vallejo 71.094 and cut this into the narrow strips required. These were applied to the hull using clear satin varnish.

Image
The final colour scheme of the hull.

At this stage also the mouldings on the transom were picked out in white – another exercise in holding my breath and a lot of touching up. Painting 3D surfaces is much more difficult than painting on a flat sheet.

Image
A stern-view

To be continued ...

Re: Pomeranian Rahschlup 1846 � 1/160 scale � Baltic trader

by wefalck » Sun Apr 05, 2026 4:01 am

HAPPY EASTER to all !

More on painting coming soon ...

Re: Pomeranian Rahschlup 1846 � 1/160 scale � Baltic trader

by JIM BAUMANN » Wed Mar 11, 2026 4:07 am

Ah now-
-with the flaked canvas,... the main hatch does look far more interesting!

pencils are my best friend too

good work!

JIM B :wave_1:

Re: Pomeranian Rahschlup 1846 � 1/160 scale � Baltic trader

by wefalck » Tue Mar 10, 2026 1:40 pm

A quick update on some more paintwork.

The tarpaulin over the main hatch
I have tried out a new method to make tarpaulins. The idea was to show the tarpaulin over the main hatch half thrown back. The folds should halfway realistic, as the thickness of the material. In the past I have used 9 g/m2 silk paper for this, about the thinnest available on the market and used, for instance in the restoration of books. However, I found that the surface structure still looks a bit rough, even when soaked in acrylic paint. Although very thin, it is not so easy to create realistic folds.
Therefore, I used ordinary household aluminium foil. A piece slightly larger than needed was cut and the edges folded back and burnished down to create a ‘seam’. This ‘tarpaulin’ was draped over the hatch and the folded-back part and creases created and molded with a pair of tweezers.
This ‘tarpaulin’ was given a base-coat of Vallejo Model air 71.288 (Portland stone). Shadows were painted with 71.023 (hemp) and highlights accentuated with 71.132 (aged white). A somewhat dirty and used appearance then was created by lightly dusting it with grey pastel, taken up in a soft bristle-brush.
The ‘tarpaulin’ was attached to the hatch with a few drops of matt acrylic varnish, which was also used to glue on the last batten, which ties down the tarpaulin at one end.
A disadvantage of using aluminium foil for the ‘tarpaulin’ is that one needs to check very carefully after installation that no bright spots of bare metal are left by either omission or handling. They become only visible, when observing at different angles with different illumination.

Image

Painting the anchor-winch
Some parts of the anchor-winch had already been painted together with other ‘wooden’ details. What was missing was picking out the iron-work in black acrylic paint. Once dry a soft (9B) pencil was rubbed onto the black paint to give it a slightly metallic sheen. Everything was pulled together by giving the parts a light brushing in matt acrylic varnish.

Image

The deck-furniture has only been placed loosely, as everything will have to be taken off for painting the outside of the hull.

To be continued …

Re: Pomeranian Rahschlup 1846 � 1/160 scale � Baltic trader

by wefalck » Sat Mar 07, 2026 1:09 pm

I have been travelling for a few days, which in a way was good, as it gave the paint to dry thoroughly. For acrylics this is a somewhat lengthy process until full consolidation, although the initial drying is very fast. The solvent, water, needs time to diffuse out between the crosslinking acrylic molecules and the paint may retain a somewhat rubbery consistency for some time. Masking may rip off the paint.
However, in between I turned my attention to painting some details, such as the pin-rails, belaying cleats, bollards, the barrels of the anchor winch and details around the main hatch.

Main hatch
The main hatch has some covering panels that previously had been cut from Bakelite paper and engraved and which were sprayed now in Vallejo model air 71.077 (wood) and somewhat aged with Vallejo model air 71.032 (aged white).
During not so nice weather, the hatch would be covered in a tarpaulin that was secured with wooden battens laid in wooden cleats. The battens would be secured with wedges driven in from both sides into the cleats, but I ignored that detail at this small scale.
The battens and the cleats were cut from Canson-paper with the laser-cutter as per the template below. Some parts are really tiny, 0.5 mm x 0.7 mm square … To facilitate assembly, I also combined parts of the cleats with the battens.
The parts were soaked in varnish and then cemented together with the same varnish.
The battens were given the same treatment as the hatch cover, but the cleats were painted in the same green as the hatch coaming. They were attached with tiny drops of matt acrylic varnish. Eventually, there will be also a partly removed tarpaulin, but I will make this later.

Image
Template for laser-cutting the tie-down battens of the main hatch

Image
Battens fitted to the main hatch - as usual, close-ups are quite sobering ...

Painting details
The other parts were first given a spray with Vallejo model air 71.077 (wood), this was followed by a light touch with a Faber-Castell PITT artist pen brush Raw Umber 180. Finally, light coat with Faber-Castell PITT artist pen brush Orange glaze 113 gave the parts the appearance and ‘depth’ of varnished wood. I found it necessary to spread the paint from the pens more equally with a normal paint brush. To tie the slightly varying shines together, these parts were also sprayed with satin varnish.
For the bare wood barrels and drums of the winch the orange glaze was omitted and the wood aged as for the hatch cover. Everything was sprayed in matt varnish and then the iron banding was picked out in black, as was the ratchet-wheel. It was done in this sequence to underline the different sheen of the bare wood and the painted bands.

Image
The collection of detail parts ready for installation

This painting is quite time consuming actually, as in spite of the fast initial drying of the acrylics, one better waits a day between paint coats and successive washes.
Some more ageing or weathering will be needed eventually to give the ship a used look, but this can only be done, once all deck details have been installed in order to ‘tie’ everything together visually. On the other hand, I first want to finish the outside painting of the hull, as this requires quite bit of handling for masking and blocking of bulwark openings.

To be continued …

Re: Pomeranian Rahschlup 1846 � 1/160 scale � Baltic trader

by wefalck » Sun Feb 22, 2026 1:00 pm

Colour-Scheme

In the first half of the 19th century, the hull of the merchant vessels in northern Europe tended to be quite colourful, even though the predominant colour tended to be black. Occasionally, hulls were painted green, blue or even white. Apart from prevailing fashion, there are simple economic reasons for that: most pigments other than black are rather expensive and white, while relatively cheap as pigment, is expensive to maintain, particularly, when the harbour waters became increasingly dirty due to the presence of grimy steamships.
The colourful outward appearance came largely from the wales and perhaps adjacent strakes being lined in different colours. Most common colours again are white, green, blue and black. Importantly, in most cases one band was scraped-clean natural wood, but treated with some concoction of line-seed oil, tar and other components.
The inside of bulwarks, deckhouses, the tips of spars, mast doublings, etc. where usually painted in some colour, rather than the later more common white. Apart from the apparent preference of the time for pastel hues, there may also be economic reasons behind, as expensive pigments were stretched with the comparatively cheaper white. Thus, one often sees pale greens, ochres, and blues on historic images.

Image
Water-colour by Friis-Pedersen of a slup

When vessels did not normally venture beyond the Bay of Biscay, hulls were treated with repeated coats of Stockholm tar, because at that time teredo navalis had not yet penetrated into the North Sea as it is observed today, and the salinity in the Baltic is too low for it. When vessels traded in the Mediterranean or overseas, they had to be sheathed in copper or quite often in the cheaper zinc.
One has to also remember that ready-made paints became only available in the second half of the century and being expensive probably were not common in the economically more marginal areas of Pomerania and Mecklenburg.
Based on these considerations I opted for a colour-scheme similar to the one in the above water-colour by Friis-Pedersen, which seems to be quite representative. The hull above the waterline will be black, with much of the wale in oiled wood, framed by a dark green and a white stripe above and below. Below the waterline, the hull will be tarred bare wood. The inside of the bulwark will be Vallejo model air 70.009 (duck-egg green), a pale green that the French would most likely associate with the famous maker of ‘macarons’, La Durée. All the inboard woodwork, deckhouses, coamings, cheeks of the windlass, etc. will be in the same green. The main rail and the scrollwork etc. on the transom will be white.

Image
Some basic paint on the hull

As one can see from the picture above, I managed to lighten the deck a bit with pastel-pens. The deck-furniture has been only put into place for the photograph.

To be continued …

Re: Pomeranian Rahschlup 1846 � 1/160 scale � Baltic trader

by wefalck » Thu Feb 19, 2026 2:48 pm

Painting the Deck

I normally prefer to delay painting until the last possible moment, as handling the model while trying out and fitting parts may damage the paintwork. However, the building has now progressed to a stage, where elements have to be permanently installed in order to be able to fit other parts to them. This includes in particular the deck.
One has to think about the sequence of painting in order to avoid unnecessary masking and wrapping. Thus, I will begin with the deck, proceed with the inside of the bulwark and then move on to the outside of the hull. In most cases I do not prime, as the parts will see very little handling and leaving the acrylic paints sufficient time to settle, reduces the risk of damage. However, I have primed the outside of the hull this time in order to be able to better see any blemishes or gaps in the planking, particular at the bulwark.

Image
Deck airbrushed with a basecoat of RAL 1001 ‘beige’.

Painting the deck is a relatively elaborate process. The Rahschlup is a working vessel, the deck is not regularly ‘holy-stoned’ as was practice on naval vessels, and she is not to be depicted in a brand-new state, but after a few years of rough trade. Thus, the deck will have greyed without necessarily having degraded. It started off with a base-coat of Vallejo model air 71.075 (RAL 1001 beige). This was followed by a wash of 70.834 (transparent wood) and several thin washes of 71.023 (hemp) to achieve the desired aged look. This base colour was sealed with a spray of gloss varnish in preparation for lining out the plank seams.

Image
Deck after a light wash with Vallejo ‘transparent wood’ and ‘hemp’.

The lightly engraved plank seams were followed with a Faber-Castell PITT acrylic artists pen brush in black. Excess was wiped off immediately with the finger. The gloss varnish prevented any smear on the underlying paint, resulting in reasonably crisp lines. Once dry, the deck was lightly rubbed down with fine steel wool (000), which essentially left the black only in the engraved lines.
In the next step, individual planks were picked out with Faber-Castell PITT artist pen brushes 116 (abricot) and 180 (raw umber). Finally, the deck was given washes with Vallejo model air 71.132 (aged white) to ‘grey’ its appearance. The gloss varnish protected the previous paintwork, so that any unsatisfactory washes could be wiped off, when needed.

Image
Deck with seams filled in black and individual planks picked out by different washes.

Lastly, the deck was sealed with a spray of matt varnish to give it a uniform matt look.
Overall, I am not 100% satisfied with the appearance, as the base-coat turned out to be too dark. I had aimed for a more whiteish-greyish look. Changing this would have meant to make a completely new deck, as scraping off the paint completely would have been too difficult without damaging the engraved seams.

To be continued …

Re: Pomeranian Rahschlup 1846 � 1/160 scale � Baltic trader

by wefalck » Sun Feb 08, 2026 3:47 pm

Rudder and helm

Another little item to be added were the rudder and the helm. The helm as drawn in the original plans had a rather strange, baroque shape and didn’t look very practical. I decided to go for something simpler and straightforward shape. Being a waterline model, there will be only one pintle visible.

Image
Rudder and helm laid

The shape of both were drawn in the drawing programme and then printed out at the correct scale. The drawings then were pasted on some scrap of 1 mm acrylic glass sheet to be cut out with the scroll saw. The final shaping was done on the disc-sander and with various files.

At this size/scale I did not attempt to reproduce functional pintles, but rather just went for the (hopefully) the right kind of look using some 0.5 mm Ø polystyrene rod and ‘irons’ cut from 0.1 mm sheet.

Image
Rudder provisionally installed (these close-ups are terribly sobering …)

The rudder is only loosely put into position at this point and only will be finally installed, when the model is installed in its scenic setting.

To be continued …

Re: Pomeranian Rahschlup 1846 � 1/160 scale � Baltic trader

by wefalck » Mon Feb 02, 2026 4:19 pm

I don't think this was my original idea Marijn, but it is a simple method for the catheads and the likes, when you can hide the joint under paint.

***********************************************************

Channels

According to the original drawings, the Rahschlup was supposed to be fitted with, by this time, somewhat old-fashioned channels. Perhaps the designer felt it was necessary to give the lower rigging a wider spread for more stability of the rather lofty rig.
Their thickness and length can be taken off the drawings, but their width had to be worked with the still rudimentary rigging plan. They have to be so wide that the shrouds including the deadeyes clear the main rail. The dimensions on the model worked out at 19.4 mm length, just under 0.6 mm thickness and 0.8 mm width.

Image
Milling the slots in the channels for the chains.

As I did not have styrene of 0.6 mm thickness, I settled on rods of 0.5 mm x 1 mm. Two lengths were fixed onto a small faceplate with double-sided tape, which seemed to be a more convenient option for the following milling operation than shimming them up by 0.5 mm in the small mill-vice, which has a depth of 1 mm. The milling concerned the slots for the chains. Their position and width were taken off the original drawing. They were cut to a depth of 0.4 mm, allowing for 0.2 mm thick chain-material and that the width of the channels has to be reduced from 1 mm down to 0.8 mm once they have been installed.

Image
The channels cleaned up and ready for installation

In the same set-up on the mill, also 0.2 mm holes were pre-drilled in the first and last slot for short lengths of steel-wire to be inserted for additional strength.
Channels were usually supported by knees. For this a length of 1 mm x 1 mm styrene rod was taped to the faceplate and half-round hollow profile milled in. From this stock 0.5 mm wide slices were cut on the guillotine.

Image
Milling the profile for the knees

Image
Chopping off the knees on the guillotine

It would be better to face now the channel with a thin (half-round?) batten, but as I am not sure yet of how I will fabricate the chains and deadeyes I will leave this for latter. It may be easier to assemble these on the bench, rather than in situ.

Image
Channels and knees cemented into place

To be continued …

Re: Pomeranian Rahschlup 1846 � 1/160 scale � Baltic trader

by marijn van gils » Sun Feb 01, 2026 5:18 am

I second that! :thumbs_up_1: :thumbs_up_1: :thumbs_up_1:

Also very clever to cut the slots in the end of the cathead, and then close the end by gluing a piece to it. Ingenious in its simplicity, and very effective!
I wish I thought of that, as it would have made my catheads a lot better.

Re: Pomeranian Rahschlup 1846 � 1/160 scale � Baltic trader

by JIM BAUMANN » Tue Jan 27, 2026 6:17 am

As ever a magnificent instructive posting in the use of material and tool. most excellent

I am still watching!
Jim Baumann

Re: Pomeranian Rahschlup 1846 � 1/160 scale � Baltic trader

by wefalck » Sat Jan 24, 2026 12:54 pm

Well, it has been almost a month since the last post just after Christmas. I got side-tracked a bit by something that has been on my to-do list for quite a while. Some two and a half years ago I inherited a nearly two-feet pile of naval artillery related photocopies and other material. This came originally mainly from one of the authors of a German book on the history of naval artillery and was passed on through inheritance to another German colleague and when he sadly died some three years ago, it was passed on to me, because I am actually working on some papers on the development of guns in the second half of the 19th century. The material had to be looked through for its actual value and eventual digitisation before disposal (except for any original material of possible historical value). I also spent considerable time trying to identify the source of the material as the ones who collected it didn’t note archival references or bibliographic details. In some cases, I knew the source and had either the original or a digital copy. In other cases, some detective work yielded results. A new avenue I explored successfully was to plug scanned images or pages of books into ChatGPT and asking it to identify the source (don’t think of the carbon-footprint of this method …). Sometimes, ChatGPT insisted on hallucinated results though.
Although this took a considerable amount of my spare time (and is not finished yet), I managed to work on some pieces.

Catheads

The catheads are depicted in the original drawings, but it is not very clear how far they extend inboard and they are also unusually placed below the rails, rather than at the same height or above, as is common. There are various designs for small ships like this. Sometimes they are made from a crooked piece of wood and are placed against the bulwark like a crane and sometimes they are straight and are set into the pawl-bit of the windlass. Below, these two variants are shown on museum models from Altona (Hamburg) of the period in question.

Image
Cathead of the crane design

Image
Straight cathead that extends to the pawl-bit

I opted for the straight version, although it would have been interesting to shape the crane design. However, the inboard end doubles also as a pin-rail for the outhauls and downhauls of the headsails.
Blanks for the 1.25 mm x 1.25 mm (equivalent to roughly 20 cm x 20 cm in full size) cathead where cut from a 1.5 mm sheet of acrylic glass and then milled to size.
The openings in the bulwark are located where it is doubled with timbers of the same size as the (cant-)frames. A pilot hole with 0.8 mm diameter was drilled aiming at the pawl-bit. The hole was filed square with a 1 mm x 1mm file, always aiming towards the pawl-bit.

https://www.maritima-et-mechanika.org/m ... up-106.jpg
Squaring the holes for the catheads

Image
Cathead blanks in place, meeting the pawl-bit

The catheads have to sheaves at the end. Most people would drill just four holes for the runner, but that would lead to a very unnatural run of the rope. I therefore cut two 0.25 mm slots for the sheaves into which discs of the same thickness will be set. This should lead to a more natural run of the rope without sharp bends.

Image
Set-up for sawing the slots into the catheads

Image
Sawing two 0.25 mm slots into the catheads

First, I tried to cut the sheaves from 1 mm polystyrene rod, but my old stock turned out too brittle for that. I then tried to punch them with a 1 mm hollow punch from 0.25 mm polystyrene strips, but this kind of thickened the resulting discs and they would not fit into the slots, though the strip itself perfectly slit into it – I had no thinner sheet or strips. So, I resorted to paper soaked in varnish. Perhaps I should have made myself a punch-and-die set with solid punches or bought a commercial one (which are quite expensive for what they are).
Once the sheaves were in place, a thin piece of acrylic was cemented to the front and sanded back to the same profile as the cathead. The front was actually given the shape of a hipped roof on the milling machine, using again the square collet in the dividing attachment.
I didn’t take pictures of the last two operations.

Image
The completed cathead temporarily installed

The catheads cannot be installed yet, as their exact inboard length can only be determined once the pawl-bit has been finally installed. There are a few more building steps to be completed, before this can be done.

To be continued …

Top