Now that I'm happy with the hull shape and plating I've decided to tackle the next step in hull construction, the bulwark supports. On my previous Straat C project I tried to achieve an in scale appearance by folding cut down PE railings and glueing them to the inside of the bulwarks, adding Krystal Klear to the corners to get the three dimensional shape of the supports. The result looked like this:
- mbulwarks1.JPG (79.64 KiB) Viewed 6103 times
I tried to do this again but kept getting 'wobbly' and uneven support stanchions. I tried John Bowen's method of using small paper triangles and got even more wobbly results.
I was not very happy with this so I have decided to use Momoon's method even though this means the stanchion thickness will be slightly over scale.
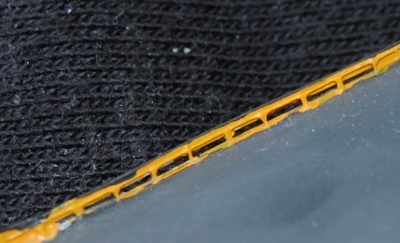
Using the deck plans as a guide I drew the support positions on the deck with a sharp pencil and glued .3mm square styrene rod to the sides.
The tops were cut off flush to the bulwarks using a nail cutter.
And the process was repeated on the other side of the deck.
I find that this is a surprisingly quick and easy way to get convincing bulwark support stanchions. Thanks Momoon!
Now that I'm happy with the hull shape and plating I've decided to tackle the next step in hull construction, the bulwark supports. On my previous Straat C project I tried to achieve an in scale appearance by folding cut down PE railings and glueing them to the inside of the bulwarks, adding Krystal Klear to the corners to get the three dimensional shape of the supports. The result looked like this:
[attachment=3]mbulwarks1.JPG[/attachment]
I tried to do this again but kept getting 'wobbly' and uneven support stanchions. I tried John Bowen's method of using small paper triangles and got even more wobbly results.
I was not very happy with this so I have decided to use Momoon's method even though this means the stanchion thickness will be slightly over scale.
Using the deck plans as a guide I drew the support positions on the deck with a sharp pencil and glued .3mm square styrene rod to the sides.
[attachment=2]supports1.JPG[/attachment]
The tops were cut off flush to the bulwarks using a nail cutter.
[attachment=1]supports2.JPG[/attachment]
And the process was repeated on the other side of the deck.
[attachment=0]supports3.JPG[/attachment]
I find that this is a surprisingly quick and easy way to get convincing bulwark support stanchions. Thanks Momoon!