NORMANDIE in 1/700 scale - a non-grey fleet ship !
Moderators: BB62vet, MartinJQuinn, JIM BAUMANN, Jon, Dan K
-
MartinJQuinn

- Posts: 8561
- Joined: Tue Jan 11, 2005 1:40 pm
- Location: New Jersey
Re: NORMANDIE in 1/700 scale - a non-grey fleet ship !
WOW. Those funnels are incredible. I think I said this before, but it bears repeating. I'm so glad I sold this kit. 
Martin
"Tomorrow is the most important thing in life. Comes into us at midnight very clean. It's perfect when it arrives and it puts itself in our hands. It hopes we've learned something from yesterday." John Wayne
Ship Model Gallery
"Tomorrow is the most important thing in life. Comes into us at midnight very clean. It's perfect when it arrives and it puts itself in our hands. It hopes we've learned something from yesterday." John Wayne
Ship Model Gallery
-
Mr. Church
- Posts: 669
- Joined: Tue Oct 23, 2018 2:00 pm
Re: NORMANDIE in 1/700 scale - a non-grey fleet ship !
Fantastic work. Looking forward to seeing more updates. Normandie was such a beauty, she really was. You are doing her proud there.
-
ModelMonkey
- Model Monkey

- Posts: 4111
- Joined: Sat Aug 20, 2005 9:27 pm
- Location: USA
- Contact:
Re: NORMANDIE in 1/700 scale - a non-grey fleet ship !
Wow.

Have fun, Monkey around. TM
-Steve L.
Complete catalog: - https://www.model-monkey.com/
Follow Model Monkey™ on Facebook: - https://www.facebook.com/modelmonkeybookandhobby
-Steve L.
Complete catalog: - https://www.model-monkey.com/
Follow Model Monkey™ on Facebook: - https://www.facebook.com/modelmonkeybookandhobby
-
Willie

- Posts: 690
- Joined: Sat Apr 29, 2006 7:36 am
- Location: Vigo, Spain
Re: NORMANDIE in 1/700 scale - a non-grey fleet ship !
Hi there, all Normandie experts,
Something I have always wanted to know, and please excuse my ignorance: What is this section marked between the two arrows, and why is is it projecting outboard, and not straight with the vertical lines of the hull ?
I have seen that this feature is shared by many other older liners.
TIA, and best regards from this side,
Willie.[/size]
Something I have always wanted to know, and please excuse my ignorance: What is this section marked between the two arrows, and why is is it projecting outboard, and not straight with the vertical lines of the hull ?
TIA, and best regards from this side,
Willie.[/size]
Amen dico tibi, hodie mecum eris in paradiso (Lk 23,43).
-
Willie
- Posts: 690
- Joined: Sat Apr 29, 2006 7:36 am
- Location: Vigo, Spain
Re: NORMANDIE in 1/700 scale - a non-grey fleet ship !
Mr. Church wrote:Fantastic work. Looking forward to seeing more updates. Normandie was such a beauty, she really was. You are doing her proud there.
You can bet your head !!!!! Simply compare her majestic lines with this UF(loating)O...
Nice going,
Willie.[/size]
Amen dico tibi, hodie mecum eris in paradiso (Lk 23,43).
-
JIM BAUMANN

- Posts: 5687
- Joined: Mon Jan 10, 2005 5:30 pm
- Location: Nr Southampton England
Re: NORMANDIE in 1/700 scale - a non-grey fleet ship !
Good day all and thank you for your comments
@ Marijinn
yep-- red on the funnels....it is one of my rare forays into airbrushing...!
@ Willie ! ref promenade deck boxing out.... its a good question !
alas... I have no definite answer !
but examination of photos shows that,
the outboard projection is usually the Promenade deck, above which is the lifeboat deck.
on some of the ships there was a continuous walkway aroud the vessel--others not.
You are right--it is a common feature of many ships of that type.... but not all !
ie TITANIC class, BREMEN , ILLE de FRANCE, WILHEM GUSTLOFF, NORNMANDIE, QUEEN MARY , QUEEN ELIZABETH , Empress of Britain ( I)
after WW2 , the FRANCE also had that overhanding promenade deck, as had the UNITED STATES and MICHEANGELO / RAFFAELO
but many of contemporaries of the above did not...
for example Mauretania/ LUSITANIA, CARONIA, MAUREANTIA II,
after WW 2 for example .... QUE 2, Canberra , EMPRESS OF BRITAIN (II), none of the UNION CASTLE LINE ships ,
meanwhile
There has been some further progress on the Normandie!
I added the diagonal bracing ( brass)
with square join plate)( paper) inside the aft aft funnel,
using some PE brass 'RIGGING ' as the source
black under-coated with indelible marker,
the result was sufficiently subtle compared to the real thing
============================================================================
installing the delicate and very fragile railings is quiet a challenge-- the wastage and mis-cut rate is high!
The large staircases aft in particular took some doing-- in total-- !!
to maintain alignment of the railing without looking ' too much '.
in that vein, whilst the centre staircase railings were actually --on the real ship-- two railing side by side
HOWEVER-- on the model that just looked all TOOOOOO dense...
hence the comprise of a single rail fro the overall look
White paint can be a problem colour at best -- as the slightest unevenness shows shadows very obviously!
The juncture' twixt resin and PE was such a conundrum-- filling and sanding in situ being infeasible
( I had also previously tried filling with paint and paring flat with a scalpel blade- that worked OK with an acceptable result
BUT
... the edge demarcation of stair edge/ railing on the PE was not good enough
so I resorted to an old favourite dodge of mine--to cover the join with a homogenising layer of material
in the interests of a sharper 'overall 'appearance.
THIN white decal strip-
-cut into fine strips from a larger size to eliminate the carrier strip edge
I guess the even better way of doing it would be to have COMPLETE shaped decal overlays -- but making the templates thereto
with the stairs installed ( DELICATE !! ) is a bit of an issue
but that would assume thinking ahead and that I had not glued the stairs in place already...
...but... on the next model...
mean while
the overall effect of the demarcation of stair to rail -- once backfilled ith paint ( two thin coats so far-- will add another two coats )
is satisfactorily pleasing to the eye
and the overall look from a " normal " viewing distance
is much more pleasing !
I have started to add an ' impression' of all the surface (!) wiring to the lights--hence the thin copper wire sticking out...!
more soon
JB
@ Marijinn
yep-- red on the funnels....it is one of my rare forays into airbrushing...!
@ Willie ! ref promenade deck boxing out.... its a good question !
alas... I have no definite answer !
but examination of photos shows that,
the outboard projection is usually the Promenade deck, above which is the lifeboat deck.
on some of the ships there was a continuous walkway aroud the vessel--others not.
You are right--it is a common feature of many ships of that type.... but not all !
ie TITANIC class, BREMEN , ILLE de FRANCE, WILHEM GUSTLOFF, NORNMANDIE, QUEEN MARY , QUEEN ELIZABETH , Empress of Britain ( I)
after WW2 , the FRANCE also had that overhanding promenade deck, as had the UNITED STATES and MICHEANGELO / RAFFAELO
but many of contemporaries of the above did not...
for example Mauretania/ LUSITANIA, CARONIA, MAUREANTIA II,
after WW 2 for example .... QUE 2, Canberra , EMPRESS OF BRITAIN (II), none of the UNION CASTLE LINE ships ,
meanwhile
There has been some further progress on the Normandie!
I added the diagonal bracing ( brass)
with square join plate)( paper) inside the aft aft funnel,
using some PE brass 'RIGGING ' as the source
black under-coated with indelible marker,
installing the delicate and very fragile railings is quiet a challenge-- the wastage and mis-cut rate is high!
The large staircases aft in particular took some doing-- in total-- !!
to maintain alignment of the railing without looking ' too much '.
in that vein, whilst the centre staircase railings were actually --on the real ship-- two railing side by side
hence the comprise of a single rail fro the overall look
White paint can be a problem colour at best -- as the slightest unevenness shows shadows very obviously!
The juncture' twixt resin and PE was such a conundrum-- filling and sanding in situ being infeasible
BUT
... the edge demarcation of stair edge/ railing on the PE was not good enough
so I resorted to an old favourite dodge of mine--to cover the join with a homogenising layer of material
in the interests of a sharper 'overall 'appearance.
THIN white decal strip-
-cut into fine strips from a larger size to eliminate the carrier strip edge
with the stairs installed ( DELICATE !! ) is a bit of an issue
but that would assume thinking ahead and that I had not glued the stairs in place already...
...but... on the next model...
mean while
the overall effect of the demarcation of stair to rail -- once backfilled ith paint ( two thin coats so far-- will add another two coats )
is satisfactorily pleasing to the eye
is much more pleasing !
more soon
JB
....I buy them at three times the speed I build 'em.... will I live long enough to empty my stash...?
http://www.modelshipgallery.com/gallery ... index.html
IPMS UK SIG (special interest group) www.finewaterline.com
http://www.modelshipgallery.com/gallery ... index.html
IPMS UK SIG (special interest group) www.finewaterline.com
-
wefalck

- Posts: 2109
- Joined: Wed Sep 28, 2011 12:04 pm
- Location: Paris
- Contact:
Re: NORMANDIE in 1/700 scale - a non-grey fleet ship !
Jim continues to challenge what concerns fine detail ...
Eberhard
Former chairman Arbeitskreis historischer Schiffbau e.V. (German Association for Shipbuilding History)
--------------------------------------------------------------------------------------------------------------------------------------------------------------------------------------------


Former chairman Arbeitskreis historischer Schiffbau e.V. (German Association for Shipbuilding History)
--------------------------------------------------------------------------------------------------------------------------------------------------------------------------------------------
-
EJFoeth
- Posts: 2919
- Joined: Wed Jan 21, 2009 1:51 pm
Re: NORMANDIE in 1/700 scale - a non-grey fleet ship !
Indeed! And that is some very thin PE in that railing too... 
-
zs180

- Posts: 678
- Joined: Sun Oct 12, 2008 3:55 am
- Location: Budapest, Hungary
Re: NORMANDIE in 1/700 scale - a non-grey fleet ship !
The fineness of your work is unsurpassed - those funnels and those railings are unbelievably nice!
-
JIM BAUMANN
- Posts: 5687
- Joined: Mon Jan 10, 2005 5:30 pm
- Location: Nr Southampton England
Re: NORMANDIE in 1/700 scale - a non-grey fleet ship !
Thank you for your encouragement !
slowly but steadily tangible progress is made.
Normandie had VERY large wooden ' taff-rails ' on her railings on the aft decks.
The stern , swimming pool and 2 decks up featured these large wooden rails
The deep cross-section can be gauged in this view
Over a year ago ( ! ) I had made for me some PE in stainless steel of these rails.
I had quite a few versions and duplicates done-- -just as well as it turned out !!
The PE was made directly off the PDF plans and the digital render.;
alas not everything is EXACTLY the right size-
hence the spares were very useful when I ' cut and shut ' two halves to make a whole
or elongated sections to make them fit and work for me
The pool taff rail surround was a bit too narrow hence it was made of of four pieces
the rails on the sides were a tiny bit short-so were spliced together from the spares
Despite being a bit over-scale....the overall effect is not displeasing !
For the sports deck and boat deck--where the rails circular in section and were much smaller-
deft panting of the larger toprail will suffice !
==============================================================================================
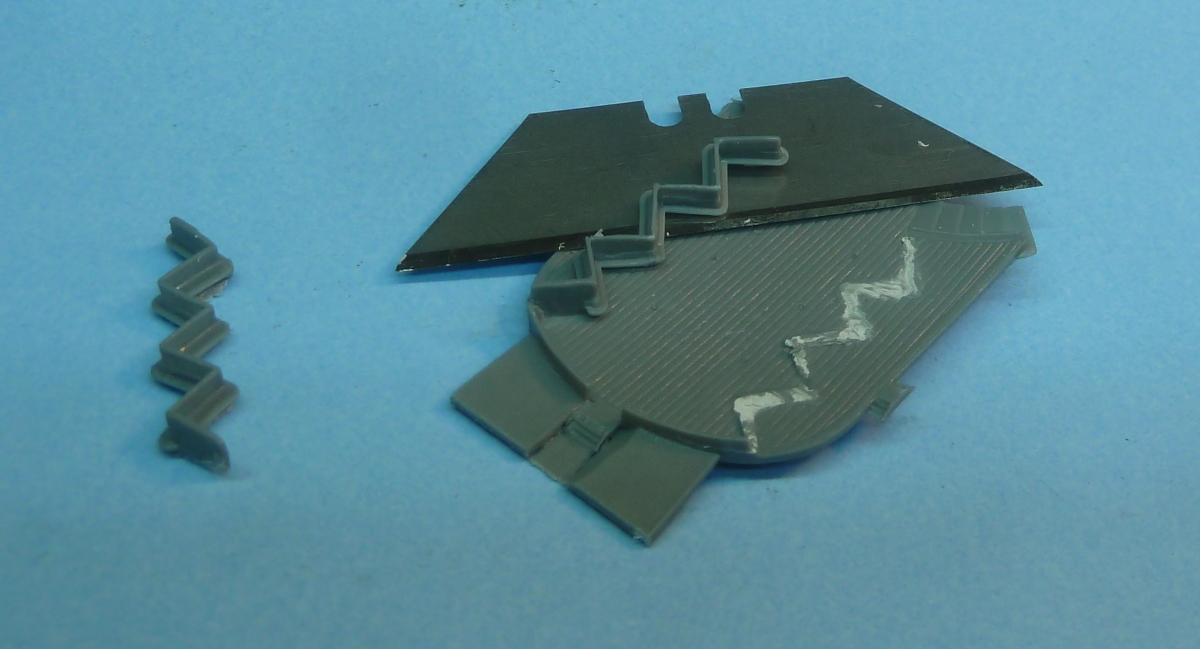
Meanwhile; On the Nomandie there was strict segregation of access for first and second class....(!)
as such various areas of the outer decks had wooden barriers -or dividers --these inhibited both access and view
In this view can be detected that the panels in the window sections may have been removable
or could be rotated around a vertical central pivot
The PE supplied with the kit was pretty good in rendition of shape --
formed up of 2 layers of PE so as to have panelling detail on both sides
Alas the PE was possibly based on photos during the build, when indeed they had no inset panels!!
==> but when the ship was commissioned at all times theyhad panels installed as far as I can ascertain
Note in the image that the 'zig zag' seating also had not been fitted with panels yet either ...!
To gain solidity and relief for the panel outlines I used white glue to ' fill' the apertures
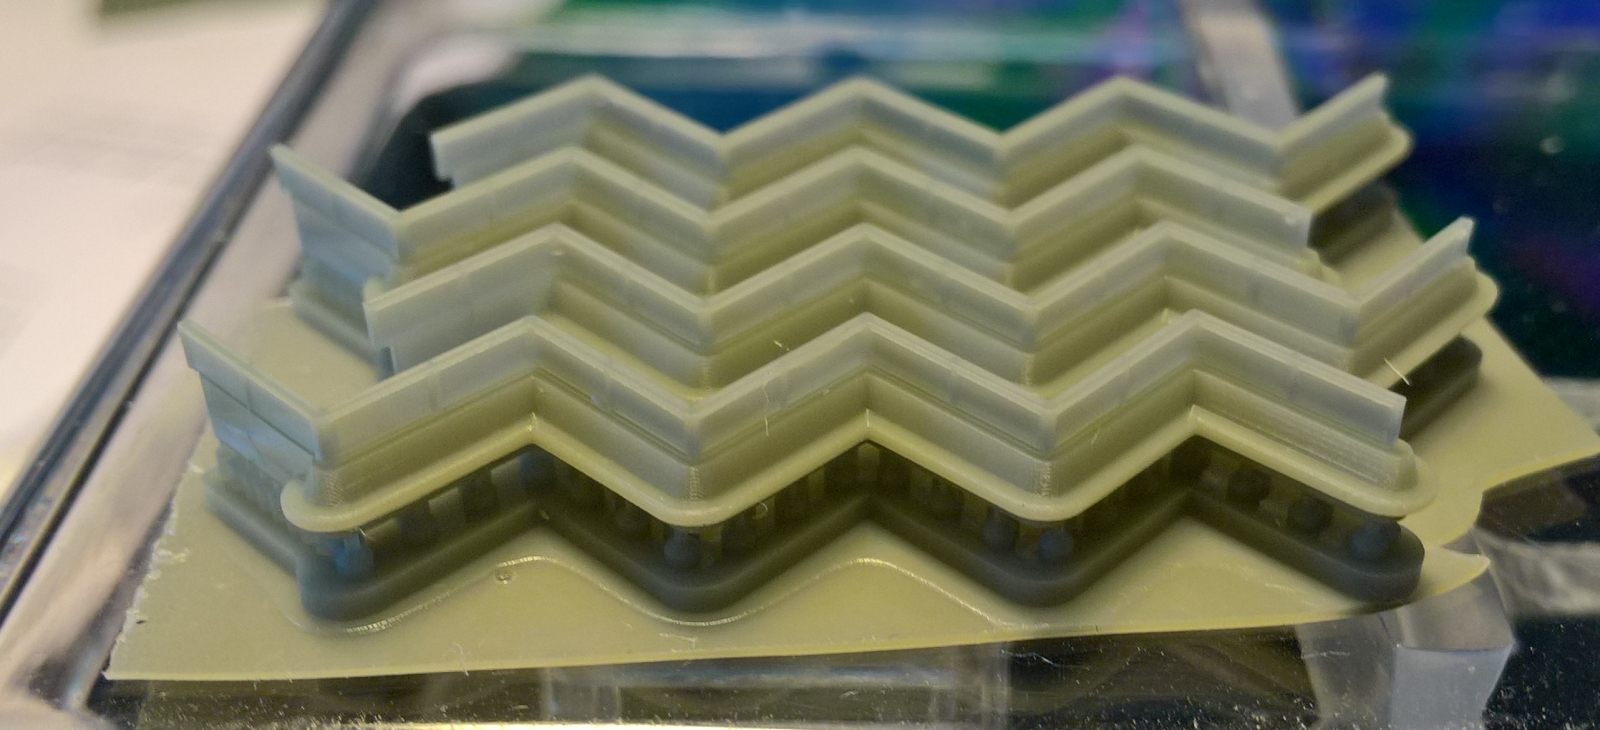
The position of the dividers can only be found once the zig zag seating is in place .... !
hey ho hum --onwards we go!
more soon!
slowly but steadily tangible progress is made.
Normandie had VERY large wooden ' taff-rails ' on her railings on the aft decks.
The stern , swimming pool and 2 decks up featured these large wooden rails
The deep cross-section can be gauged in this view
Over a year ago ( ! ) I had made for me some PE in stainless steel of these rails.
I had quite a few versions and duplicates done-- -just as well as it turned out !!
The PE was made directly off the PDF plans and the digital render.;
alas not everything is EXACTLY the right size-
hence the spares were very useful when I ' cut and shut ' two halves to make a whole
or elongated sections to make them fit and work for me
The pool taff rail surround was a bit too narrow hence it was made of of four pieces
For the sports deck and boat deck--where the rails circular in section and were much smaller-
deft panting of the larger toprail will suffice !
==============================================================================================
Meanwhile; On the Nomandie there was strict segregation of access for first and second class....(!)
as such various areas of the outer decks had wooden barriers -or dividers --these inhibited both access and view
or could be rotated around a vertical central pivot
formed up of 2 layers of PE so as to have panelling detail on both sides
Alas the PE was possibly based on photos during the build, when indeed they had no inset panels!!
==> but when the ship was commissioned at all times theyhad panels installed as far as I can ascertain
Note in the image that the 'zig zag' seating also had not been fitted with panels yet either ...!
To gain solidity and relief for the panel outlines I used white glue to ' fill' the apertures
hey ho hum --onwards we go!
more soon!
....I buy them at three times the speed I build 'em.... will I live long enough to empty my stash...?
http://www.modelshipgallery.com/gallery ... index.html
IPMS UK SIG (special interest group) www.finewaterline.com
http://www.modelshipgallery.com/gallery ... index.html
IPMS UK SIG (special interest group) www.finewaterline.com
-
LE BOSCO

- Posts: 2261
- Joined: Thu Aug 27, 2009 11:05 am
- Location: Paris France
Re: NORMANDIE in 1/700 scale - a non-grey fleet ship !
Hello Jim
always precise work a real monk work  Jim, I think you know this anecdote but in the contrary case , did you know that a Blackburn Baffin from the Gosport naval air base had "landed" on the Normandie ?
cheers
Nicolas
always precise work
cheers
Nicolas
-
Frank Spahr

- Posts: 450
- Joined: Thu Jun 23, 2005 3:47 pm
Re: NORMANDIE in 1/700 scale - a non-grey fleet ship !
Each time I return to this thread and see what has happened, I am utterly stunned and in awe of the skills displayed, and even more of the uncompromising dedication.
Jim, this will be the crown jewel of your model ship fleet!
Jim, this will be the crown jewel of your model ship fleet!
AKA "Doc Bear" (a bear of very little brain ...)
VMF'06 - German Gamblers
Veritable Modelling Friends 2006, Germany
VMF'06 - German Gamblers
Veritable Modelling Friends 2006, Germany
-
Chuck Bauer

- Posts: 670
- Joined: Tue Mar 01, 2011 7:26 pm
- Location: USA
-
USSCYCLOPS

- Posts: 104
- Joined: Mon Jul 17, 2017 8:19 pm
- Location: RUSSIAN FEDERATION
Re: NORMANDIE in 1/700 scale - a non-grey fleet ship !
Incredible! That's one hell of a work you got there Jim. Very looking forward to see the final piece. She really should stay in a maritime museum!
-
Dan K
- Posts: 9067
- Joined: Tue Jan 11, 2005 10:56 am
- Location: New York City
Re: NORMANDIE in 1/700 scale - a non-grey fleet ship !
Magnificent work, Jim. Love the funnels, pool, stairs, railings, all of it. Fantastic attention to detail.
-
marijn van gils
- Posts: 2693
- Joined: Tue Feb 06, 2007 10:24 am
- Location: Belgium
Re: NORMANDIE in 1/700 scale - a non-grey fleet ship !
Great work on those railings Jim!
This makes them really look like an integrated part of the liner, instead of some PE bits stuck on it.
How are you going to simulate the water in the pool?
This makes them really look like an integrated part of the liner, instead of some PE bits stuck on it.
How are you going to simulate the water in the pool?
-
JIM BAUMANN
- Posts: 5687
- Joined: Mon Jan 10, 2005 5:30 pm
- Location: Nr Southampton England
Re: NORMANDIE in 1/700 scale - a non-grey fleet ship !
Once again thank you for your kind words !
Marijinn wrote>> How are you going to simulate the water in the pool? <<
well.... the kit contained a neat piece of semi opaque clear -I guess-resin
with a very lightly frosted top.
unless I can think of something MUCH better--I may well use it.
BUT the pool walls and its surround will be receiving rather more work
more thereto another time
meanwhiles;
the zig zag seating-- way back(!) in November 2018 (!) I removed the cast resin zig zag seating
from the cast resin deck
subsequently I replaced that entire deck with a 3D printed version
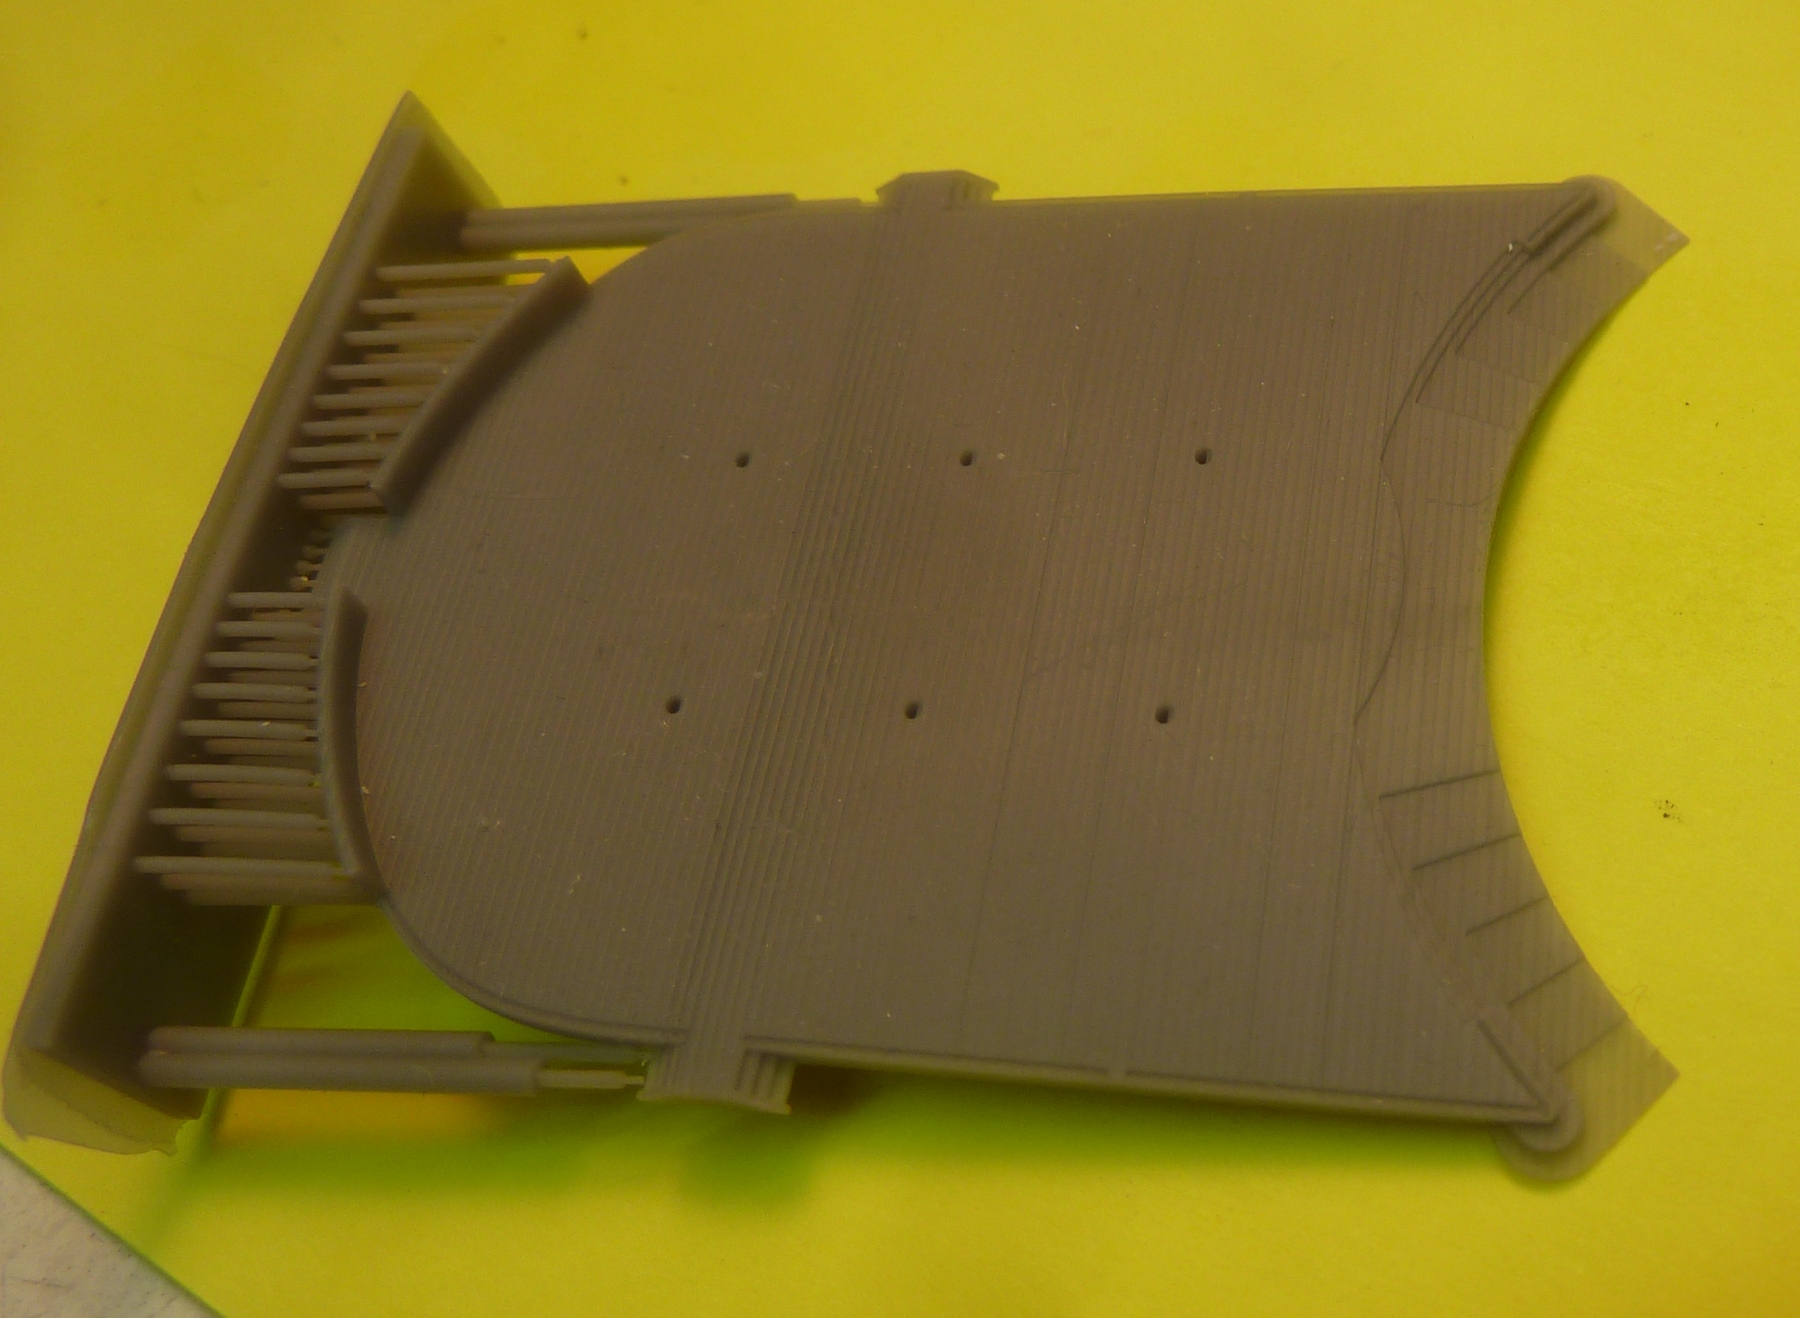
and also the zig zag seating
which are now painted !
and installed !
what however is noteworthy is that the PE class-divider-screens were not quite perfect,
being a bit too short when the seats were installed in the correct position
hence renewed cutting and adjustments in situ !!
so as to get sharper demarcation between wood and white on this tiny panelling
I used white Decal sheet for the white portions
==> but first had to make some templates in paper
The base of the railings on the zig-zag deck on the real ship had dark mahogany cappings,
I simulated this by laying thin brown wire along the base of the PE rail
(which sits in a neat recess )
The aft wall of the zig-zag deck had an overhanging capping on the outside face
To simulate this I added more wire
To add more detail that CAN be seen by the casual observer-- I added the triangular gussets
to the three ' walls' , one on the bridge roof, one ahead of funnel three and the inside face of the zig zag deck
I cut the triangular gussets of paper ( using the PE fret surround as my cutting mat !! )
)
they were installed using thinned matt ( enamel) varnish, ( grabs well)
and after adjustment they had thinned matt varnish
washed over them to seal and give additional adhesion.
The installed gussets are seen here on the bridge deck windbreak;
even in 1/700 this is worthwhile , despite being a little bit fiddly ,
but being cut from a tiny paper strip
-one can afford to be a little wasteful..--and only use the perfect triangles!
while up on the bridge deck --I was always displeased with the fwd end of the funnel housing casting
( older image)
but was unable to locate a decent image --
the best I could find was this ;
seems that this structure was not solid--but a kind of egg-crate type of air intake
It was a bit late now (!!) to do much serious re-cutting....
so the best I can do is to 'suggest ' that something is there
I found some suitably spaced PE ( elderly GMM ( stainless steel)
aircraft carrier 1/700 -part of - a radar part )
These were made and attached --I intend later to lightly dry-brush the black areas with grey,
so as to try and dilute the harsh contrasts- to hopefully " imply " it looks like the real thing ....
I then added some thin wire to the surround ( which was a little bit undersized I think anyhow)
to retro-create a curved edge overhang ,
which I then filled with diluted white glue
- three times --to self level
next update I will ( hopefully !) show the results--it it works out!
Marijinn wrote>> How are you going to simulate the water in the pool? <<
well.... the kit contained a neat piece of semi opaque clear -I guess-resin
with a very lightly frosted top.
unless I can think of something MUCH better--I may well use it.
BUT the pool walls and its surround will be receiving rather more work
more thereto another time
meanwhiles;
the zig zag seating-- way back(!) in November 2018 (!) I removed the cast resin zig zag seating
from the cast resin deck
subsequently I replaced that entire deck with a 3D printed version
and also the zig zag seating
which are now painted !
and installed !
what however is noteworthy is that the PE class-divider-screens were not quite perfect,
being a bit too short when the seats were installed in the correct position
hence renewed cutting and adjustments in situ !!
I used white Decal sheet for the white portions
==> but first had to make some templates in paper
The base of the railings on the zig-zag deck on the real ship had dark mahogany cappings,
I simulated this by laying thin brown wire along the base of the PE rail
(which sits in a neat recess )
To simulate this I added more wire
to the three ' walls' , one on the bridge roof, one ahead of funnel three and the inside face of the zig zag deck
I cut the triangular gussets of paper ( using the PE fret surround as my cutting mat !!
and after adjustment they had thinned matt varnish
washed over them to seal and give additional adhesion.
The installed gussets are seen here on the bridge deck windbreak;
even in 1/700 this is worthwhile , despite being a little bit fiddly ,
but being cut from a tiny paper strip
-one can afford to be a little wasteful..--and only use the perfect triangles!
( older image)
the best I could find was this ;
so the best I can do is to 'suggest ' that something is there
I found some suitably spaced PE ( elderly GMM ( stainless steel)
aircraft carrier 1/700 -part of - a radar part )
These were made and attached --I intend later to lightly dry-brush the black areas with grey,
so as to try and dilute the harsh contrasts- to hopefully " imply " it looks like the real thing ....
I then added some thin wire to the surround ( which was a little bit undersized I think anyhow)
to retro-create a curved edge overhang ,
- three times --to self level
next update I will ( hopefully !) show the results--it it works out!
....I buy them at three times the speed I build 'em.... will I live long enough to empty my stash...?
http://www.modelshipgallery.com/gallery ... index.html
IPMS UK SIG (special interest group) www.finewaterline.com
http://www.modelshipgallery.com/gallery ... index.html
IPMS UK SIG (special interest group) www.finewaterline.com
-
wefalck
- Posts: 2109
- Joined: Wed Sep 28, 2011 12:04 pm
- Location: Paris
- Contact:
Re: NORMANDIE in 1/700 scale - a non-grey fleet ship !
Keep going.
Eberhard
Former chairman Arbeitskreis historischer Schiffbau e.V. (German Association for Shipbuilding History)
--------------------------------------------------------------------------------------------------------------------------------------------------------------------------------------------
Former chairman Arbeitskreis historischer Schiffbau e.V. (German Association for Shipbuilding History)
--------------------------------------------------------------------------------------------------------------------------------------------------------------------------------------------
-
Chuck Bauer
- Posts: 670
- Joined: Tue Mar 01, 2011 7:26 pm
- Location: USA
Re: NORMANDIE in 1/700 scale - a non-grey fleet ship !
It is amazing to see your continued commitment to replicating every possible detail that can be found. The ingenuity and care taken is very visible in the stunning results. Each time I check in here I see something astonishing and educational. I can practically hear the music from "Rocky" in the background.
It's nice to know you will actually finish this masterpiece; when it is finished it will be a landmark achievement.
I agree with wefalck: Please "keep going" and keep educating.
It's nice to know you will actually finish this masterpiece; when it is finished it will be a landmark achievement.
I agree with wefalck: Please "keep going" and keep educating.
-
JIM BAUMANN
- Posts: 5687
- Joined: Mon Jan 10, 2005 5:30 pm
- Location: Nr Southampton England
Re: NORMANDIE in 1/700 scale - a non-grey fleet ship !
Thank you both for your positive thoughts--I need them !!
small steps at at various positions;
following on from the last image posted;
The wire surround-with-white-glue worked out quite well
the ' air-intakes' still need a bit more attention
-lesson learnt-- ==> should have noticed and done something about it EARLIER !!!
==================================================================
meanwhile-- I had previously noted that the aftermost 3 x winch platforms were different from the remaining fwd ones,
having a grating platform over the drums
from above
and from the side ( I will add the-still-missing side hand rails to the edge of the grating much later in the build-very exposed and vulnerable! )
the arrowed cut away railings gave me a few heart stopping moments--as I needed to cut away the railings- in situ..!
but in the end it was OK ....
I made the platforms of old1/700 PE WEM Askold Torpedo net shelving
cut and painted- 12 needed--but cut lost extra -with numerous spares
these were placed on the drums using matt varnish as the adhesive
=====================================================================================
The sloping steps from the first class section ahead of the zig zag steps
had a curved, gently sloping handrail,==> to replicate this gentle incline was tricky
usual stairways are around 45 deg ,-- these are nearer 10 deg
Dedicated PE would have been the way ahead ( I should have planned for this as well I reckon...!  )
)
The real thing had 3 horizontals, I was unable to successfully drag the delicate PE rail out without distotion or destruction,
suffering non-stop endless repeated failures in my attempts to do so....
made me resort to using some matching railing with 2 horizontals to try and get an effect
( and this was hard enough!!! )
With the bottom rail cut away to leave just the naked stanchions,
this was gently curved to follow the curvature of teh steps
Alas the ( un-natural ) metal distortions can be readily seen in close-up !!!
and yet -- despite all the above--- once installed on the model it looks acceptable I think
==========================================================================================
Lastly for this up-date --to make me feel that "we " are moving forward towards completion of this behemoth build!
--I installed the last missing sections of the boat deck railing
and added the triangular gussets ( just visible in some images )
-- The class divider barriers acted much like a Barn-door at 30 knots, the air resistance must have been considerable !
So they required some supportive bracing--on the aft face only
================================================================================
more soon--
I look forward- albeit with quite some degree of trepidation I have to admit--to trying to install the lifeboats -evenly an squarely in every plane...
wish me luck!
small steps at at various positions;
following on from the last image posted;
The wire surround-with-white-glue worked out quite well
the ' air-intakes' still need a bit more attention
-lesson learnt-- ==> should have noticed and done something about it EARLIER !!!
meanwhile-- I had previously noted that the aftermost 3 x winch platforms were different from the remaining fwd ones,
having a grating platform over the drums
from above
and from the side ( I will add the-still-missing side hand rails to the edge of the grating much later in the build-very exposed and vulnerable! )
I made the platforms of old1/700 PE WEM Askold Torpedo net shelving
cut and painted- 12 needed--but cut lost extra -with numerous spares
The sloping steps from the first class section ahead of the zig zag steps
had a curved, gently sloping handrail,==> to replicate this gentle incline was tricky
usual stairways are around 45 deg ,-- these are nearer 10 deg
The real thing had 3 horizontals, I was unable to successfully drag the delicate PE rail out without distotion or destruction,
suffering non-stop endless repeated failures in my attempts to do so....
made me resort to using some matching railing with 2 horizontals to try and get an effect
( and this was hard enough!!! )
this was gently curved to follow the curvature of teh steps
Alas the ( un-natural ) metal distortions can be readily seen in close-up !!!
==========================================================================================
Lastly for this up-date --to make me feel that "we " are moving forward towards completion of this behemoth build!
--I installed the last missing sections of the boat deck railing
and added the triangular gussets ( just visible in some images )
-- The class divider barriers acted much like a Barn-door at 30 knots, the air resistance must have been considerable !
So they required some supportive bracing--on the aft face only
more soon--
I look forward- albeit with quite some degree of trepidation I have to admit--to trying to install the lifeboats -evenly an squarely in every plane...
wish me luck!
....I buy them at three times the speed I build 'em.... will I live long enough to empty my stash...?
http://www.modelshipgallery.com/gallery ... index.html
IPMS UK SIG (special interest group) www.finewaterline.com
http://www.modelshipgallery.com/gallery ... index.html
IPMS UK SIG (special interest group) www.finewaterline.com