HMS Victory and Le Redoutable at Trafalgar (1/300)
Moderators: BB62vet, MartinJQuinn, JIM BAUMANN, Jon, Dan K
-
wefalck

- Posts: 2112
- Joined: Wed Sep 28, 2011 12:04 pm
- Location: Paris
- Contact:
Re: HMS Victory and Le Redoutable at Trafalgar (1/300)
Looking very convincing! How did you paint the lines separating the copper panels, with a pen or a brush?
Eberhard
Former chairman Arbeitskreis historischer Schiffbau e.V. (German Association for Shipbuilding History)
--------------------------------------------------------------------------------------------------------------------------------------------------------------------------------------------




Former chairman Arbeitskreis historischer Schiffbau e.V. (German Association for Shipbuilding History)
--------------------------------------------------------------------------------------------------------------------------------------------------------------------------------------------
-
Pieter
- Posts: 1608
- Joined: Sat Sep 17, 2005 9:19 am
Re: HMS Victory and Le Redoutable at Trafalgar (1/300)
Looks like you have a very steady hand on those copper plate boundaries. Beautiful work.
-
SG1
- Posts: 413
- Joined: Mon Apr 17, 2017 2:43 am
- Contact:
Re: HMS Victory and Le Redoutable at Trafalgar (1/300)
S P E E C H L E S S ! Great achievement, Bravissimo
-
marijn van gils
- Posts: 2697
- Joined: Tue Feb 06, 2007 10:24 am
- Location: Belgium
Re: HMS Victory and Le Redoutable at Trafalgar (1/300)
Many thanks for your high praise gentlemen! 

Painting those fine lines is more a matter of technique and patience than a steady hand.
4 aspects are very important:
- a high quality sharp-pointed brush (I use Windsor & Newton series 7, size 000 for this work). This is the easy part: simply spend some money!
- brush-control: getting both the consistency of the paint and the amount of paint on the brush right for every single brush-load.
Consistency: I place my paint on a tear-of palette, and thin it for every brush-load on the palette. I test the consistency by quickly painting a line on the palette. It has to be thin enough to at least flow well enough from the brush. But it can be thinned much more for translucent effects.
Amount of paint: There should be enough paint on the brush so the paint flows smoothly from it, but not so much that it flows uncontrollably. The latter is what most people struggle with, but the solution is simple: take away any excess paint. If it is too much, I touch the brush to a paper towel to unload it; but if it is only a little, I unload it by painting lines on the palette. When the brush doesn't leave any thicker 'drops' at the end of the lines when I leave the point, it is perfect.
Each brush-load only gives me a couple of centimeters of line, so I spend more time (and paint! ) on the palette than on the model.
- correcting: my lines are also a bit uneven and wobbly, but then I correct them. I do this before the paint hardens (so after every couple of centimeters of painting a line). I use the same type of brush, but clean and slightly moistened with mineral spirits, to re-activate the borders of the lines where they are wobbly and 'push' and wipe the paint to the correct position. This is the reason I use oils or enamels for this work instead of acrylics.
When I don't get it to my liking, I wipe the line away (almost) completely at the offending location and re-do it.
- patience. It simply takes time. The lines for these plates took me about 7 to 8 hours. There is a reason why I have been painting this hull for 6 months now...
Something that should work very well however, and probably much faster and easier than paint, are color pencils. AK sells 'weathering pencils' nowadays that would work perfectly, but similar stuff can be found in the art supply store. Just draw them on, making sure to sharpen to point regularly. Different degrees of transparency should also be possible, as well as some degree of correcting.
But I'm a bit wary of how well they will stay on the model in the future, especially since this part will mostly be covered with resin water or acrylic gel.
The verticals were painted last. I did use a ruler to space these properly for the top row only, and from these the rest were painted by eye.
Painting those fine lines is more a matter of technique and patience than a steady hand.
4 aspects are very important:
- a high quality sharp-pointed brush (I use Windsor & Newton series 7, size 000 for this work). This is the easy part: simply spend some money!
- brush-control: getting both the consistency of the paint and the amount of paint on the brush right for every single brush-load.
Consistency: I place my paint on a tear-of palette, and thin it for every brush-load on the palette. I test the consistency by quickly painting a line on the palette. It has to be thin enough to at least flow well enough from the brush. But it can be thinned much more for translucent effects.
Amount of paint: There should be enough paint on the brush so the paint flows smoothly from it, but not so much that it flows uncontrollably. The latter is what most people struggle with, but the solution is simple: take away any excess paint. If it is too much, I touch the brush to a paper towel to unload it; but if it is only a little, I unload it by painting lines on the palette. When the brush doesn't leave any thicker 'drops' at the end of the lines when I leave the point, it is perfect.
Each brush-load only gives me a couple of centimeters of line, so I spend more time (and paint!
) on the palette than on the model. - correcting: my lines are also a bit uneven and wobbly, but then I correct them. I do this before the paint hardens (so after every couple of centimeters of painting a line). I use the same type of brush, but clean and slightly moistened with mineral spirits, to re-activate the borders of the lines where they are wobbly and 'push' and wipe the paint to the correct position. This is the reason I use oils or enamels for this work instead of acrylics.
When I don't get it to my liking, I wipe the line away (almost) completely at the offending location and re-do it.
- patience. It simply takes time. The lines for these plates took me about 7 to 8 hours. There is a reason why I have been painting this hull for 6 months now...
With a brush. Ink from a pen would be impossible to correct like I can with paint. Also, I wouldn't be able to vary the consistency for more transparent effects (like I used a lot with the wood planking effect).wefalck wrote:How did you paint the lines separating the copper panels, with a pen or a brush?
Something that should work very well however, and probably much faster and easier than paint, are color pencils. AK sells 'weathering pencils' nowadays that would work perfectly, but similar stuff can be found in the art supply store. Just draw them on, making sure to sharpen to point regularly. Different degrees of transparency should also be possible, as well as some degree of correcting.
But I'm a bit wary of how well they will stay on the model in the future, especially since this part will mostly be covered with resin water or acrylic gel.
No, just by eye. The 'water line' had been airbrushed before with the help of masking tape, so that gave me a straith line to start from. So I worked from the top down, painting only the horizontals first. They are only about 1,5 mm apart, so you can judge this fairly easily by eye and correct accordingly.JIM BAUMANN wrote:did you use a tape/pencilled guideline for the horizontals? a longitudinal template?
The verticals were painted last. I did use a ruler to space these properly for the top row only, and from these the rest were painted by eye.
-
Martocticvs

- Posts: 239
- Joined: Tue Jan 26, 2016 7:59 am
- Contact:
Re: HMS Victory and Le Redoutable at Trafalgar (1/300)
Quite spectacular. And as usual, basically impossible to remember that this thing is barely bigger than a gnat.
-
Iceman 29

- Posts: 1945
- Joined: Tue Sep 29, 2020 4:35 pm
- Location: Bretagne, France
Re: HMS Victory and Le Redoutable at Trafalgar (1/300)
Truly a work of art, thank you for sharing your techniques with us. 
Pascal
�Battleship Bretagne 3D: https://vu.fr/FvCY
�SS Delphine 3D: https://vu.fr/NeuO
�SS Nomadic 3D: https://vu.fr/tAyL
�USS Nokomis 3D: https://vu.fr/kntC
�USS Pamanset 3D: https://vu.fr/jXGQ
�Battleship Bretagne 3D: https://vu.fr/FvCY
�SS Delphine 3D: https://vu.fr/NeuO
�SS Nomadic 3D: https://vu.fr/tAyL
�USS Nokomis 3D: https://vu.fr/kntC
�USS Pamanset 3D: https://vu.fr/jXGQ
-
marijn van gils
- Posts: 2697
- Joined: Tue Feb 06, 2007 10:24 am
- Location: Belgium
Re: HMS Victory and Le Redoutable at Trafalgar (1/300)
Many thanks guys!
On the other hull, I will be using the exact same techniques. So, I will try to photograph them a little bit more in depth.
On the other hull, I will be using the exact same techniques. So, I will try to photograph them a little bit more in depth.
-
wefalck
- Posts: 2112
- Joined: Wed Sep 28, 2011 12:04 pm
- Location: Paris
- Contact:
Re: HMS Victory and Le Redoutable at Trafalgar (1/300)
Clearly, I have to work on my painting technique ... or change back to oils/enamels for certain tasks, as I seem to struggle with the fast drying acrylics when brush-painting.
Eberhard
Former chairman Arbeitskreis historischer Schiffbau e.V. (German Association for Shipbuilding History)
--------------------------------------------------------------------------------------------------------------------------------------------------------------------------------------------
Former chairman Arbeitskreis historischer Schiffbau e.V. (German Association for Shipbuilding History)
--------------------------------------------------------------------------------------------------------------------------------------------------------------------------------------------
-
marijn van gils
- Posts: 2697
- Joined: Tue Feb 06, 2007 10:24 am
- Location: Belgium
Re: HMS Victory and Le Redoutable at Trafalgar (1/300)
You can paint anything with acrylics too, as many many figure painters do. Only, instead of correcting with a clean brush with mineral spirits, you have to use a brush with paint on it.wefalck wrote:Clearly, I have to work on my painting technique ... or change back to oils/enamels for certain tasks, as I seem to struggle with the fast drying acrylics when brush-painting.
When I see the boat you last painted, the paint coats look a bit thick and uneven indeed. Maybe you can try to thin the paint more and apply more thin layers for a smoother effect. And at the same time, reduce the amount of paint on the brush to keep it from flowing uncontrollably. Aaargh, this would be so much simpler to just show it in the flesh...
For thinning acrylics, AK acrylic thinner ( https://ak-interactive.com/product/ak11 ... ner-100ml/ ) works well for brush-painting too. It has less surface tension than water, which helps with fine work. I think it is a mix of water with some type of alcohol. A little trick I learned from Calvin Tan...
But nothing wrong with going back to enamels or oils! I use any type of paint, for different purposes, but that is mostly personal preference.
-
wefalck
- Posts: 2112
- Joined: Wed Sep 28, 2011 12:04 pm
- Location: Paris
- Contact:
Re: HMS Victory and Le Redoutable at Trafalgar (1/300)
Actually, the ship's boat was spray-painted. What looks like a thick and uneven paint-coat is actually the paper soaked in varnish (perhaps to generously applied). I would have preferred to use styrene, but my laser-cutter is too low-powered to cut styrene. Styrene (or bakelite paper) has the potential for a much cleaner build. As attractive as laser-cut paper is, I might go back to hand-cutting plastics.
Eberhard
Former chairman Arbeitskreis historischer Schiffbau e.V. (German Association for Shipbuilding History)
--------------------------------------------------------------------------------------------------------------------------------------------------------------------------------------------
Former chairman Arbeitskreis historischer Schiffbau e.V. (German Association for Shipbuilding History)
--------------------------------------------------------------------------------------------------------------------------------------------------------------------------------------------
-
EJFoeth
- Posts: 2922
- Joined: Wed Jan 21, 2009 1:51 pm
Re: HMS Victory and Le Redoutable at Trafalgar (1/300)
Masterclass?marijn van gils wrote: Aaargh, this would be so much simpler to just show it in the flesh...
Superb painting work! You added a highlight line on some of the planks (with great effect); not so for the copper plates?(Just wondering and dare I ask, isn't there one stretch of plates running horizontally along the waterline?)
-
pascalemod

- Posts: 2013
- Joined: Sat Jul 30, 2016 5:33 pm
- Location: Stockholm, Sweden
Re: HMS Victory and Le Redoutable at Trafalgar (1/300)
Man I love a well weathered lower hull. You are spoiling me for ideas mister marijn van gils. 
 Just super work all around. You should be proud of this, like a painting.
Just super work all around. You should be proud of this, like a painting.- @Shipific on IG
my gallery
my gallery
-
marijn van gils
- Posts: 2697
- Joined: Tue Feb 06, 2007 10:24 am
- Location: Belgium
Re: HMS Victory and Le Redoutable at Trafalgar (1/300)
I was only referring to the rubbing strake, not the general texture which comes from the paper indeed (and is not so bad when seen with the naked eye I think). Sorry, I didn't specify this, so it was confusing indeed!wefalck wrote:Actually, the ship's boat was spray-painted. What looks like a thick and uneven paint-coat is actually the paper soaked in varnish (perhaps to generously applied).
Looking at the photos again, there are also some inprecisions in the delineation of the different colours (along the 'wood' for example). I think this is just a matter of correcting: going back with the other colour and touching up the edges. You may need to go back and forth a couple of times with the different colours to get it perfect, but it should be a pretty quick fix.
For this too, multiple quick passes with thinned paint tend to work better than one thick coat.
Well spotted!EJFoeth wrote:You added a highlight line on some of the planks (with great effect); not so for the copper plates?
The real plates overlap. I wanted to avoid making it look like there are deep grooves in between the plates, and I didn't trust my ability to make a highlight look like the top edge of a plate rather than the lower half of a groove. Maybe one day on another project, or on a larger scale...

Good question, of course you can ask!EJFoeth wrote:Just wondering and dare I ask, isn't there one stretch of plates running horizontally along the waterline?
I followed to only plan I have of Victory that shows the coppering, which is in Longridge's 'Anatomy of Nelson's ships'. Dafi also followed this pattern, and I usually trust his research on Victory more than my own...
But there certainly was some variation.
For example, on Redoutable I plan to follow what Gerard Delacroix wrote here: https://5500.forumactif.org/t137-positi ... -coque#952
Three or four parallel strakes forward:

But going up like on Victory at the stern:
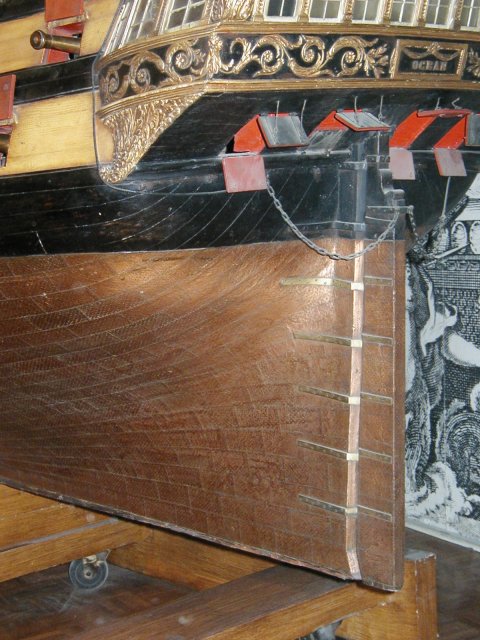
-
Martocticvs
- Posts: 239
- Joined: Tue Jan 26, 2016 7:59 am
- Contact:
Re: HMS Victory and Le Redoutable at Trafalgar (1/300)
I believe there were two different plating schemes used, the one used here being the 'simple' type, if you like, whilst the other was to divide the lower hull into two broad bands, the lower section plated from the keel up, giving quite a steep rise forward, and the upper from the waterline down, possibly parallel to plank sheer (can't quite remember), so it would still rise up at the bow but not as sharply as the same upper section of the 'simple' type.
It's probably impossible to know how Victory was plated at the time. Presumably she has been completely recoppered a couple of times in the intervening years, and these days only has plates on the rudder, as far as I can remember.
It's probably impossible to know how Victory was plated at the time. Presumably she has been completely recoppered a couple of times in the intervening years, and these days only has plates on the rudder, as far as I can remember.
-
Neptune

- Posts: 2464
- Joined: Sun Mar 13, 2005 11:51 am
- Location: Belgium
Re: HMS Victory and Le Redoutable at Trafalgar (1/300)
Astonishing, you're like Geoff Hunt in 3D... 
The merchant shipyard
-
Guest
Re: HMS Victory and Le Redoutable at Trafalgar (1/300)
Hi there Marijin and all,
Please keep the updates coming, and very best regards from this side,
Willie
Absolutely true. You keep setting the bar higher and higher with every update. There little else that I can say.Neptune wrote:Astonishing, you're like Geoff Hunt in 3D...
Please keep the updates coming, and very best regards from this side,
Willie
-
marijn van gils
- Posts: 2697
- Joined: Tue Feb 06, 2007 10:24 am
- Location: Belgium
Re: HMS Victory and Le Redoutable at Trafalgar (1/300)
Many thanks guys!
So, here is the next update:
I started on the other hull, of Le Redoutable. And I promised to go a little bit more in-depth on the painting techniques. Otherwise, it would only be the same as for Victory�
With only the base colours applied, this is what it looks like:


(I made the stern facing as a separate part to allow room for later installation of the upper gundeck, so it is missing here)
Close-up:

My setup for the first step:
- different colours of oil paint on a tear-off paper palette.
- a container with white spirit (mineral spirits in the USA?) to thin the paint.
- a set of brushes: one for each paint colour (to apply them on the model), a bigger one for wetting the surface of the model, and another one for blending the colours on the model.
- a piece of paper towel.
The paint is thinned on the palette for every brushload.

I start by wetting the surface of the model with clean white spirit:

Next, I thin each of the oil colours heavily and apply random splodges of them:

Before everything dries, I take a clean brush, moisten it with white spirit (but wipe of the excess on the paper towel), and blend the colours. The upper area has been blended; below the brush not yet:
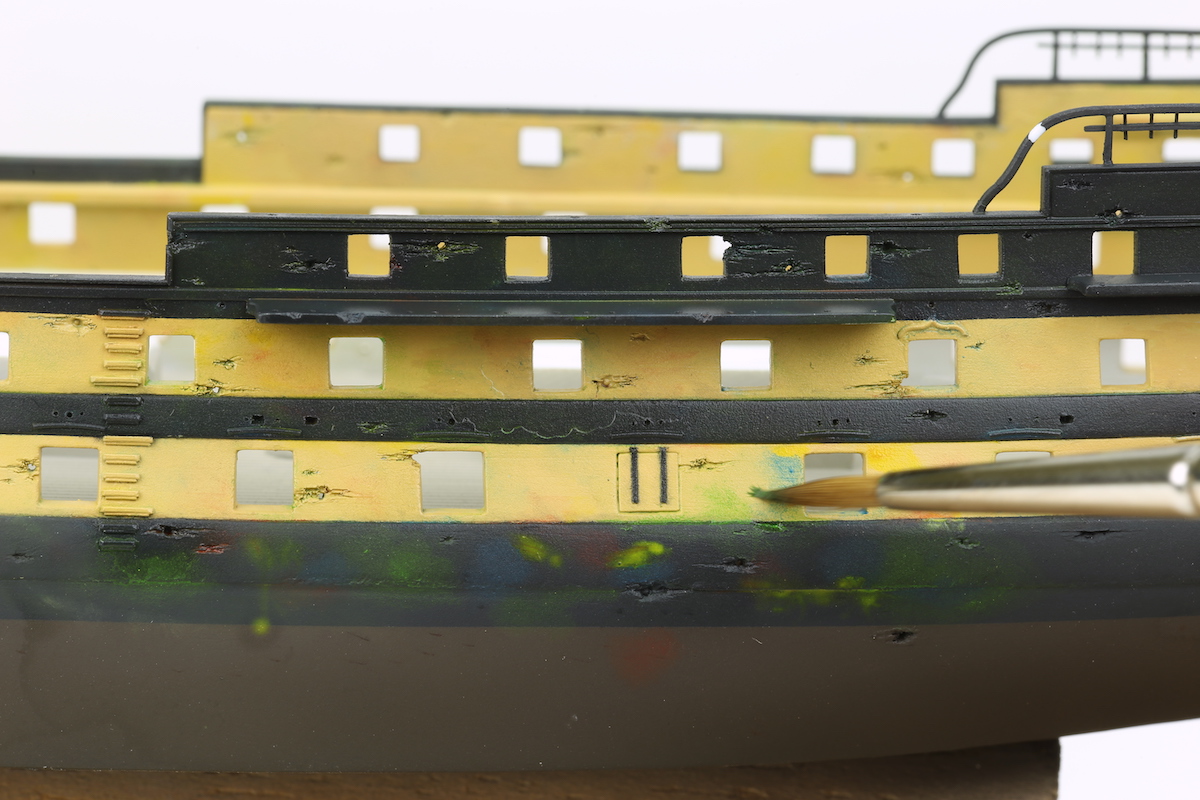
The blending serves to remove the excess colour and blend the edges. The goal is to turn a completely monochrome surface into a surface with a lot of subtle variation in colour tones. The green oil paint will lend a more greenish tone to the base colour underneath, the red spots will lend a more reddish tone to the base colour, etc.
When the oil colours get mixed, they will turn into �dirty� brown tones. It is ok to have some of that, but too much will only give a dirty muddy result without much colour variation. So it is ok if the colours start to mix a little here-there during blending, but be careful not to blend everything together.
The result after drying:

And on the complete model:


I like this technique as a start for weathering. It breaks the monochrome appearance of the base-colour and gives a more scale appearance without making a model look very dirty. I would also use this on ships that are supposed to be as clean as a whistle.
I�m not sure what name to give it. It follows the principle of the �oil dot technique�, but I prefer to apply the colours heavily thinned, thus more like �filters�. But I apply them a bit more �wet� than filters�
It is of course possible to apply certain colours to certain areas to pull them towards certain tonalities on purpose. That can work very well with larger scales (AFV and airplane models for example), but on this subject and in small scale, I wanted a simple random application.
So, here is the next update:
I started on the other hull, of Le Redoutable. And I promised to go a little bit more in-depth on the painting techniques. Otherwise, it would only be the same as for Victory�
With only the base colours applied, this is what it looks like:
(I made the stern facing as a separate part to allow room for later installation of the upper gundeck, so it is missing here)
Close-up:
My setup for the first step:
- different colours of oil paint on a tear-off paper palette.
- a container with white spirit (mineral spirits in the USA?) to thin the paint.
- a set of brushes: one for each paint colour (to apply them on the model), a bigger one for wetting the surface of the model, and another one for blending the colours on the model.
- a piece of paper towel.
The paint is thinned on the palette for every brushload.
I start by wetting the surface of the model with clean white spirit:
Next, I thin each of the oil colours heavily and apply random splodges of them:
Before everything dries, I take a clean brush, moisten it with white spirit (but wipe of the excess on the paper towel), and blend the colours. The upper area has been blended; below the brush not yet:
The blending serves to remove the excess colour and blend the edges. The goal is to turn a completely monochrome surface into a surface with a lot of subtle variation in colour tones. The green oil paint will lend a more greenish tone to the base colour underneath, the red spots will lend a more reddish tone to the base colour, etc.
When the oil colours get mixed, they will turn into �dirty� brown tones. It is ok to have some of that, but too much will only give a dirty muddy result without much colour variation. So it is ok if the colours start to mix a little here-there during blending, but be careful not to blend everything together.
The result after drying:
And on the complete model:
I like this technique as a start for weathering. It breaks the monochrome appearance of the base-colour and gives a more scale appearance without making a model look very dirty. I would also use this on ships that are supposed to be as clean as a whistle.
I�m not sure what name to give it. It follows the principle of the �oil dot technique�, but I prefer to apply the colours heavily thinned, thus more like �filters�. But I apply them a bit more �wet� than filters�
It is of course possible to apply certain colours to certain areas to pull them towards certain tonalities on purpose. That can work very well with larger scales (AFV and airplane models for example), but on this subject and in small scale, I wanted a simple random application.
-
marijn van gils
- Posts: 2697
- Joined: Tue Feb 06, 2007 10:24 am
- Location: Belgium
Re: HMS Victory and Le Redoutable at Trafalgar (1/300)
You can also use different colours for different effects. And you can blend them in other ways to get different effects.
In the photo�s above, you may notice the effect is most noticeable on the lighter areas but not on the dark (black). That is because of the colours I chose. For more effect on a dark background, lighter colours are needed.
At the same time, I wanted a lived-in, dusty-salty-sunbleached look for the model.
So I chose light dusty colours, and re-did the exercise.
The surface was wetted again (after the previous layer dried overnight!):

Thinned oil colours are applied. I mixed two light dust colours: a light one and a very light one.

And blended. This time, I blended them more in a vertical streaking way. I also kept removing and blending paint while it was already drying to the touch, because with the light colours on a dark background you can only really see the effect you�re getting when they are �dry�.

BTW, this is about the surface size I would treat at once. After finishing (a matter of minutes), I move onto the adjacent area, and the then next, etc. until the entire model is covered.
(on the photo of the wetted surface, you can see a part of the previously finished area on the left)
Finished:

And the entire hull:
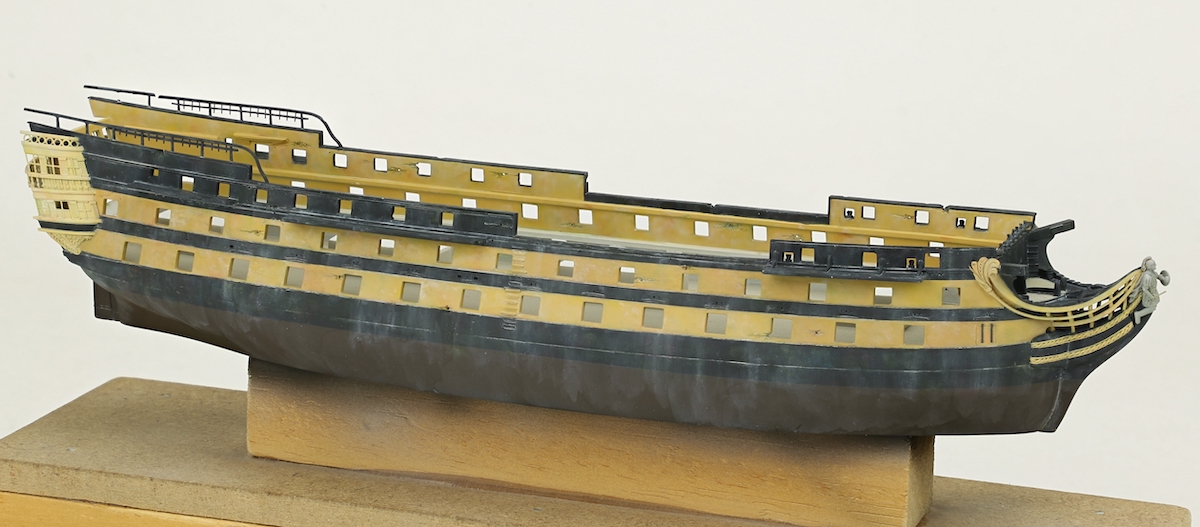

The effect may look overdone now, but it needs to be because the effects that follow will partly cover it again and tone it down. If I wouldn�t �overdo� it now, not much would remain visible at the end and the result would be too and lack the �life� I am aiming for.
This technique doesn�t require fine motoric skills, and doesn�t take much time (about 1 to 1,5 hours for each layer). You only have to be careful to make the effect look random, and on how heavy or light you want the result to look.
In the photo�s above, you may notice the effect is most noticeable on the lighter areas but not on the dark (black). That is because of the colours I chose. For more effect on a dark background, lighter colours are needed.
At the same time, I wanted a lived-in, dusty-salty-sunbleached look for the model.
So I chose light dusty colours, and re-did the exercise.
The surface was wetted again (after the previous layer dried overnight!):
Thinned oil colours are applied. I mixed two light dust colours: a light one and a very light one.
And blended. This time, I blended them more in a vertical streaking way. I also kept removing and blending paint while it was already drying to the touch, because with the light colours on a dark background you can only really see the effect you�re getting when they are �dry�.
BTW, this is about the surface size I would treat at once. After finishing (a matter of minutes), I move onto the adjacent area, and the then next, etc. until the entire model is covered.
(on the photo of the wetted surface, you can see a part of the previously finished area on the left)
Finished:
And the entire hull:
The effect may look overdone now, but it needs to be because the effects that follow will partly cover it again and tone it down. If I wouldn�t �overdo� it now, not much would remain visible at the end and the result would be too and lack the �life� I am aiming for.
This technique doesn�t require fine motoric skills, and doesn�t take much time (about 1 to 1,5 hours for each layer). You only have to be careful to make the effect look random, and on how heavy or light you want the result to look.
-
wefalck
- Posts: 2112
- Joined: Wed Sep 28, 2011 12:04 pm
- Location: Paris
- Contact:
Re: HMS Victory and Le Redoutable at Trafalgar (1/300)
How much time do you leave between the second and the first step?
When you apply white spirit all over a surface previous painted with oils too early, it should start to partially dissolve them, particularly when worked 'lean', that is with a lot of thinner, because the binder in the oil paint (lineseed oil) has not had time to polymerise, which can normally take days.
When you apply white spirit all over a surface previous painted with oils too early, it should start to partially dissolve them, particularly when worked 'lean', that is with a lot of thinner, because the binder in the oil paint (lineseed oil) has not had time to polymerise, which can normally take days.
Eberhard
Former chairman Arbeitskreis historischer Schiffbau e.V. (German Association for Shipbuilding History)
--------------------------------------------------------------------------------------------------------------------------------------------------------------------------------------------
Former chairman Arbeitskreis historischer Schiffbau e.V. (German Association for Shipbuilding History)
--------------------------------------------------------------------------------------------------------------------------------------------------------------------------------------------
-
marijn van gils
- Posts: 2697
- Joined: Tue Feb 06, 2007 10:24 am
- Location: Belgium
Re: HMS Victory and Le Redoutable at Trafalgar (1/300)
That is very true!
Luckily, the oils paints are applied very very thinly, which makes them harden much faster. The white spirit for thinning the paint also seems to help, I guess it dissolves and removes part of the lindseed oil?
I usually leave it overnight and never had problems. I think in most cases, only about 6 to 10 hours would be sufficient too.
But indeed, if you would apply the oils (much) thicker, it could take several days, but not when applied thin like this.
Slow drying time is often used as an argument against oils, but I have found that to be no issue at all. As a hobbyist, I have never been frustrated that I had to let something dry overnight...
Luckily, the oils paints are applied very very thinly, which makes them harden much faster. The white spirit for thinning the paint also seems to help, I guess it dissolves and removes part of the lindseed oil?
I usually leave it overnight and never had problems. I think in most cases, only about 6 to 10 hours would be sufficient too.
But indeed, if you would apply the oils (much) thicker, it could take several days, but not when applied thin like this.
Slow drying time is often used as an argument against oils, but I have found that to be no issue at all. As a hobbyist, I have never been frustrated that I had to let something dry overnight...