The Ship Model Forum

The Ship Modelers Source
It is currently Sun Sep 14, 2025 12:45 pm

All times are UTC - 6 hours [ DST ]


Post new topic Reply to topic  [ 1100 posts ]  Go to page Previous  1 ... 51, 52, 53, 54, 55
Author Message
PostPosted: Wed Jul 16, 2025 11:51 am 
Offline
User avatar

Joined: Mon Mar 12, 2012 11:13 am
Posts: 972
Location: Ludwigsburg/Germany
And once again I've made a mistake. This drawing from 1815 shows the loading of the large launch with barrels of drinking water.

Image

And so, of course, I had to know how big the barrels were in order to put them in my launch. These large barrels are so-called Leaguers with the equivalent of 480 liters. So with wood, they weigh over half a ton. And then 14 of them in the boat, making well over 7 tons.

The research was somewhat difficult, as the volumes are often mentioned, but not the exact dimensions. In the meantime, I have researched the sizes of the whole family more or less reliably, so that I was able to start on the models.

Here are the 3 sizes for the model: Leaguer 480 liters, Puncheon 318 liters, Hogshead 200 liters and a small powder keg. Each in three parts, as I don't want the supports to be visible as usual.

Image

Family picture with avatar.

Image

And after priming and inking came the challenge: blackening the hoops.

Image


At the back right was with the brush. On a good day, I get a few hoops, but then it's all over. Okay, that wasn't a particularly good day anyway. So I tried the back left with a felt-tip pen, which was better, but still uneven and above all an unpleasant metallic-reddish sheen.

And in front a completely different approach, because I remembered that the prints are made of black resin. I quickly tried to see if sanding the hoops worked, and lo and behold ...

Image

... it works like a charm!

Image

The powder keg was given its copper hoops and light-colored withy rings and joined the others. No iron hoops on purpose, because they could cause sparks and that would be really stupid. The copper is also nicely embedded between the withy rings so that it doesn't stick out. There are wonderful artifacts showing this, recovered from the HMS Invincible, which sank in 1758.

And that brings us very close to what I wanted :-)

XXXDAn

_________________
To Victory and beyond ...
viewtopic.php?f=59&t=99050&start=60

See also our german forum for the age of Sail and History:
http://www.segelschiffsmodellbau.com


Report this post
Top
 Profile  
Reply with quote  
PostPosted: Mon Jul 28, 2025 9:55 am 
Offline
User avatar

Joined: Mon Mar 12, 2012 11:13 am
Posts: 972
Location: Ludwigsburg/Germany
At the same time, work continued on the boats, especially on the 32-foot launch.

The nice thing about printing is that you can simply repeat, so suddenly there were 4 hulls in front of me. What am I supposed to do with them again?

Image

The little devilish voice inside me then came immediately: Build it! Build it!

Well, that's the way it happened.

Image

Here are the 4 steps of the interior: Priming black to prevent flashes, dark brown for the inner body, thin black ink for depth and usage, and white drybrush to bring out the textures again.

On the other hand, I painted the interior parts with a lighter shade of brown, inked and brushed them to emphasise them a little. It could also have been interpreted as different wood.

But when I looked at it ...

Image

... and compared it with the first launch at the front in a completely lighter colour ...

Image

... it looked too much like a toy to me, and the dafi had to do what it does best - tear it down! - and everything flew out again ...

Image

... ... and the inside of the boats has been coloured lighter. Fits much better now :-)

Image

Here is a picture showing how the barrels fit - that's easily over 7 tonnes of weight -, in the middle the rowing version, and the third one still without thwarts , where you can see the height of the stretchers above the inner floor. Then you can also see that the rowers' feet would otherwise have been hanging in the air and intensive pulling would not have been so successful.

So that I don't always get the thwarts mixed up, I have given them markings on the underside. The stretchers too, by the way.

XXXDAn

_________________
To Victory and beyond ...
viewtopic.php?f=59&t=99050&start=60

See also our german forum for the age of Sail and History:
http://www.segelschiffsmodellbau.com


Report this post
Top
 Profile  
Reply with quote  
PostPosted: Fri Aug 01, 2025 6:03 am 
Offline

Joined: Mon Apr 17, 2017 2:43 am
Posts: 315
Great outcome dafi! Wooden effect is perfectly rendered :cool_2:

_________________
http://www.3xblackcats.wordpress.com


Report this post
Top
 Profile  
Reply with quote  
PostPosted: Fri Aug 01, 2025 7:53 am 
Offline

Joined: Tue Jan 11, 2005 10:56 am
Posts: 8865
Location: New York City
Ditto that. Beautiful.


Report this post
Top
 Profile  
Reply with quote  
PostPosted: Sun Aug 03, 2025 6:52 am 
Offline
User avatar

Joined: Mon Mar 12, 2012 11:13 am
Posts: 972
Location: Ludwigsburg/Germany
Thank you SG and Dan! Very appreciated.


In the meantime, a whole small flotilla has emerged from my 32-foot launch :-)

Image

The 7-oared pinnace is in a race with the fully loaded 14-oared launch, which has to pull the fully loaded launch with the water barrels. Next to it is another boat with fully stowed equipment and one where the launch is helping to weigh anchor. And of course a setting with set sails. Always the same hull, but with different contents and task each time. More on the individual deployment options soon. It remains exciting.

Here is the comparison one more time ...

Image

... of the single-banked pinnace with the rowers always sitting on the opposite side ...

Image

... and the double-banked 32-foot launch.

Image

Image

_________________
To Victory and beyond ...
viewtopic.php?f=59&t=99050&start=60

See also our german forum for the age of Sail and History:
http://www.segelschiffsmodellbau.com


Report this post
Top
 Profile  
Reply with quote  
PostPosted: Sun Aug 03, 2025 6:54 am 
Offline
User avatar

Joined: Mon Mar 12, 2012 11:13 am
Posts: 972
Location: Ludwigsburg/Germany
And another little tip on the technical side:

And I always propagate not to cold bend resin parts. After painting, the oars got quite a bend in the shaft. That's why I briefly dipped the parts in hot water.

Image

You could really see how the parts straightened out in the water within 2-3 seconds by themselves. Like memory metals, really strong :-)

The bent parts at the top and the hot-bathed and straightened parts at the bottom. The fact that the far left side still has a bend is not a mistake, but the curved rudder blades of the small and medium-sized boats.

XXXDAn

And I still have 2 boat shells.

... what do I do now, what do I do now ...

_________________
To Victory and beyond ...
viewtopic.php?f=59&t=99050&start=60

See also our german forum for the age of Sail and History:
http://www.segelschiffsmodellbau.com


Report this post
Top
 Profile  
Reply with quote  
PostPosted: Sun Aug 10, 2025 5:04 am 
Offline
User avatar

Joined: Mon Mar 12, 2012 11:13 am
Posts: 972
Location: Ludwigsburg/Germany
Next the barrels were continued. The number of hoops is interesting here. As an average layman, one would assume 4. However, Nelson's brandy leaguer shows a completely different number, and the double hoops are particularly interesting. I found several references to the fact that larger barrels have a double hoop at the top. So once again, nothing with once programming 1 barrel and scaling it to all sizes ;-)

Each barrel format is unique, and I have attempted to develop a reasonably plausible number of hoops. After all, a 675-litre Leaguer weighs over 0.8 modern tonnes, so there is a considerable amount of self-weight to bear, especially during transport when dynamic forces are added.

The result was a nice family picture:

Image

The 1.55-metre-high, 104-cm-diameter tun is the largest in the series, but I have not yet come across it in a maritime context, probably because it is too unwieldy. The smallest here is the firkin, with a capacity of 9 gallons, a height of 56 cm and a diameter of 43 cm. The powder keg on the Invincible has almost identical dimensions and, in my opinion, is a firkin with special hoops.

The picture clearly shows that the size range of the different sizes could be reasonably accurate. Using this overview picture, I was able to compare the shapes of the different sizes.


And here are the next samples of the barrels. The differentiation between the various number of hoops results in a pleasant visual impression for eye of the beholder ;-)

The selected sizes are, in descending order, leaguer, puncheon and hogshead, as these are always mentioned when stowing the hold, plus the kilderkin as it is a basic measure and the smaller firkin for boats and as the probable size of powder barrels.

Image

Image

Image

Image

The stacking in the boats is based on historical data, so special launches for first and second rates could hold 14 to 16 leaguers, which is a mere 8 to 10 modern tonnes in weight. I dare to doubt how much freeboard was left, but perhaps there wasn't as much heavy stuff in there as liquids ...

Image

Image

XXXDAn

_________________
To Victory and beyond ...
viewtopic.php?f=59&t=99050&start=60

See also our german forum for the age of Sail and History:
http://www.segelschiffsmodellbau.com


Last edited by dafi on Mon Aug 11, 2025 7:20 am, edited 1 time in total.

Report this post
Top
 Profile  
Reply with quote  
PostPosted: Mon Aug 11, 2025 3:23 am 
Offline
User avatar

Joined: Mon Mar 12, 2012 11:13 am
Posts: 972
Location: Ludwigsburg/Germany
And we continued with the lugger-rigged version of the large launch.

First came the masts. I took the measurements from W. E. May's summary, but they also correspond fairly closely to the French measurements. The strength of the lugger rig is its simplicity. Insert the pre-rigged mast, hook in the pairs of backstays on both sides with the standing end, hook the tackles in the middle, and belay the free end. The halyard of the sail is already sheared through in the masthead, so the sail is immediately hoisted, the tack, sheet and brail are secured, and off you go.

Image

In my scrap box, I charmingly found a sample from my sandwich sail tests from 2017 – yes, I actually keep such things for that long – and the sizes I need fit quite well, even avoiding the messy areas. I developed the material back then to combine the advantages of fabric as an elastic material and paper for a more true-to-scale surface. Thin strips of restoration repair paper are ironed onto both sides of a layer of silk to create a sandwich that resembles closely the visual properties of the sails. It is also unbeatable for folding and stowing. However, at the time, I did not yet have a model that was ready for me to use it on ...

Image


I took the angles from Steel's drawings, but I had to mark the radius at the bottom – one of the differences to French sails – with a pen and thread, as the radius is larger than my templates.

Image

I shortened the furled sails by approx. 25%, i.e. below the lower reefing band, which I had also omitted for this purpose.

The surrounding leech was glued on and the eyes for the brails were added.

Image

If necessary, I'll even clamp a sail in a vice ;-)

Image

And then it was time to fold and fiddle around.

Image

And then it was adjusted to fit the storage space.

Image


Together with the masts in place looks quite cheerful and full. Two barrels have also found their way there. Who can find them?

Image

Image

Image

It's great to finally be able to use the sails developed eight years ago in a model myself. Some modeling friends have already impressively demonstrated their potential. Thank them for that.

And I'm already testing out the next crazy ideas for my boat collection...

Image

Image

XXXDAn

_________________
To Victory and beyond ...
viewtopic.php?f=59&t=99050&start=60

See also our german forum for the age of Sail and History:
http://www.segelschiffsmodellbau.com


Report this post
Top
 Profile  
Reply with quote  
PostPosted: Wed Aug 13, 2025 5:57 am 
Offline
User avatar

Joined: Mon Mar 12, 2012 11:13 am
Posts: 972
Location: Ludwigsburg/Germany
Okay, let's talk about something we guys know more about: guns.

Or at least we think we do.

In the past, model guns were mostly rotational pieces, and only larger-scale models were retrofitted with details such as ignition pans and coats of arms. These were custom-made or complex castings. With the printing the excuse of the effort involved no longer applies. That's why I finally finished the new guns for my Victory.

And here starts a new point of discussion about how to present the guns. Not saying that the classical we usually show is wrong, but as an opener for mind and possibilities.

The version we usually show is with an exposed touch hole and without a tompion is simply how we know these things from museums and recovered from wrecks.

But in real seafaring life this appearance was probably rather rare, it was probably mostly different:
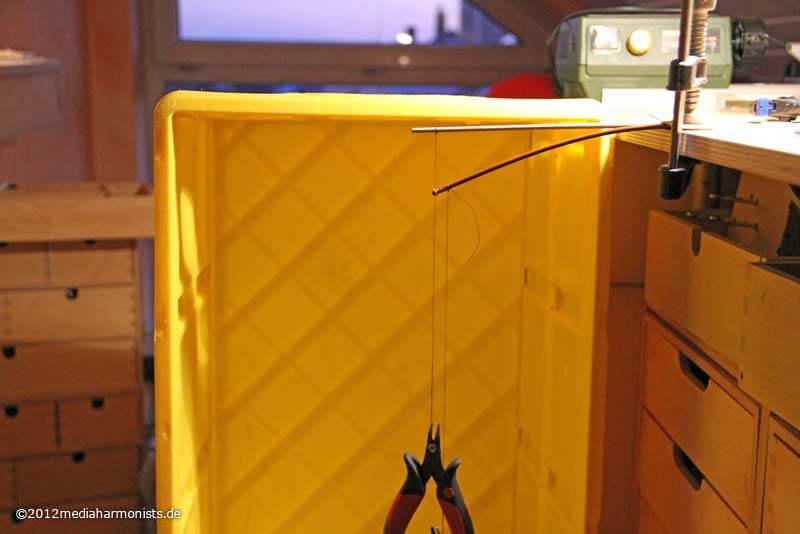
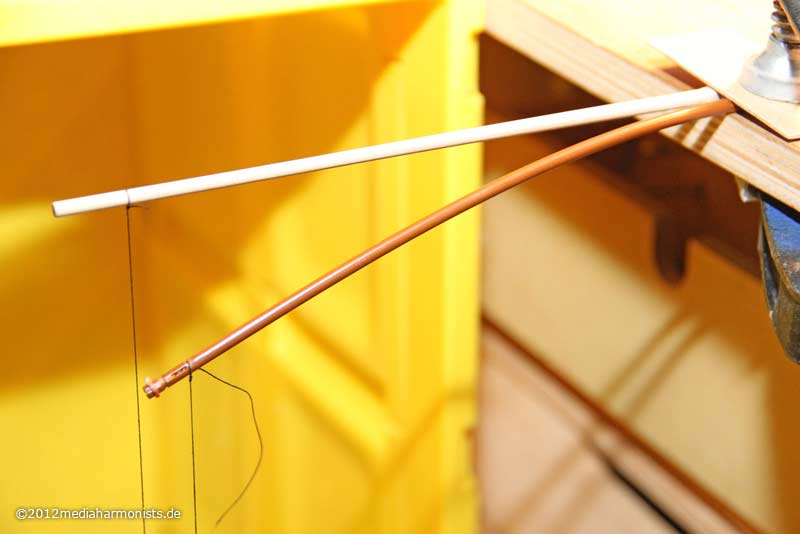
There are enough orders, records and wreck finds that describe the guns as most of the times ‘loaded’ during the period of 1800 and before. This also means that the powder charge stored inside the barrel had to be protected from water and moisture. For this purpose, tompions, simple wooden turned parts, were used as plugs at the front. They can be seen in many paintings, mostly white.

The sensitive touch hole also had to be protected. Lead covers were used for this purpose, which protected the touch hole of dirt and, if the gun was equipped with one, the gunlock, and above all protected the hole against fire and sparks.

When the gun was made ready for battle, the tompion was removed as late as possible and the cover of the touch hole was removed also only shortly before the shot was to be fired.

Thus, in real life, there were mainly the following 2 conditions:
- Stowed, lashed down, run out with cover over the touch hole or gunlock and with tompion
- Shortly before firing, without cover over the touch hole or gunlock and without tompion

Here we have the triad of touch hole, gunlock and cover in comparison:

Image

Image

Image

And here are the five gun sizes required for the Victory:
32-pounder medium lower battery deck, 24-pounder medium middle battery deck, 12-pounder long upper battery deck, 12-pounder medium aft, 12-pounder short quarterdeck.


The classic ‘pure’ representation with open touch hole

Image

Image

Image


With gun lock. It is worth considering that the tompion could also be set if the enemy is not yet within firing range.

Image

Image

Image


And with cover and tompion.

Image

Image

Image

I adapted the colour of the lead covers to the artefacts from Thorsminde. The same applies to the fastening holes. This also results in the rear fastening via the ring, as all other types of fastening would slip off.
The colours of the tompions – natural wood, white, red – are taken from the artefacts and paintings and should, of course, be uniform on the model. The wood-coloured ones were probably the most common, as the tompions were carried as prefabricated spindles in sets of about a dozen and simply sawed off as needed. I doubt that they were painted every time.


Side discussion:
Also this involves in my humble opinion the presentation of the tackles. If stowed it is clear that those have to be properly set to hold the gun, plenty of drawings show this. If ran out but gun secured (Touch hole and muzzle protected) those tackles should be secured too but probably not laying on deck. If ran out for "clear for action“ (touchhole and possibly muzzle protected) the tackles should be open, but secured on the carriage, the free ends in a way that it wont become knotted. And just straight before the shot: no muzzle, gunlock or vent hole open and the tackles be held by the crew.

Is there any place for the nice spirals we like to show, especially with an tackle not made fast? Try this in real life and the guns will run amok at the first wave ...


HTo round the theme up, here are two scale pictures of the barrels above :-)

Image

[img]https://www.mediaharmonists.de/bilder/Sammler42/Victory-Guns-250810_3524.jpg[/img

Enjoy :-)

XXXDAn

_________________
To Victory and beyond ...
viewtopic.php?f=59&t=99050&start=60

See also our german forum for the age of Sail and History:
http://www.segelschiffsmodellbau.com


Report this post
Top
 Profile  
Reply with quote  
PostPosted: Mon Aug 18, 2025 3:13 am 
Offline

Joined: Tue Feb 06, 2007 10:24 am
Posts: 2612
Location: Belgium
Beautiful work Daniel!
It was also really interesting to follow the whole boat-saga! :thumbs_up_1: :thumbs_up_1: :thumbs_up_1:


Report this post
Top
 Profile  
Reply with quote  
PostPosted: Mon Aug 18, 2025 11:02 am 
Offline

Joined: Tue Jan 11, 2005 10:56 am
Posts: 8865
Location: New York City
Agreed. But it raises the question of how you are planning to display the ship and guns - ready for battle or just day-to day?


Report this post
Top
 Profile  
Reply with quote  
PostPosted: Thu Aug 21, 2025 7:04 am 
Offline
User avatar

Joined: Mon Mar 12, 2012 11:13 am
Posts: 972
Location: Ludwigsburg/Germany
You never stop learning, you never stop learning.

For 10 years now, I've been showing these gunlocks sitting centrally above the tube's ignition pan, when someone else points out that this isn't the case, that they're off-centre. So I took another close look at the few pictures on the internet, and sure enough.

So, the gunlock has been moved to the correct position, and I hope it's now a little closer to the original :-)

Flanged to the starboard side of the ignition pan of the barrel, the retaining bolt(s) pass horizontally through it, so the barrel itself does not need to be weakened. The pan of the lock protrudes above the pan of the barrel.

Image

Image

Image

Image

There were also corresponding changes to the lead cover, with the cap moving slightly off-centre.

Image

Accordingly, there are again three variants of the representation, with cover, flintlock and open ignition pan.

Image

Image

Image

Image

Image

Image

Image

Image

Image

The flintlock shows that the printer is at its limit, and when the metallic paint is added, it looks a bit washed out in close-up. Here is the lock with just primer, which adheres better.

Image

Image

Image

And here is the dimensions-based visualisation.

Image

Image

Have fun :-)

XXXDAn

_________________
To Victory and beyond ...
viewtopic.php?f=59&t=99050&start=60

See also our german forum for the age of Sail and History:
http://www.segelschiffsmodellbau.com


Report this post
Top
 Profile  
Reply with quote  
PostPosted: Tue Aug 26, 2025 6:20 am 
Offline
User avatar

Joined: Mon Mar 12, 2012 11:13 am
Posts: 972
Location: Ludwigsburg/Germany
Time to continue with the big launch.

The masts have been redesigned, with details taken from Steel.

Image

I keep noticing that thin printed parts such as oars and masts warp after painting. See the upper half of the picture.

Image

After a quick dip in hot water, they are straight again, see bottom half :-) I simplified the rigging of the launch and combined various sources. As with the Hermione boats, the eye bolts were no longer attached to the top of the gunwale but underneath on the frames. It looks much clearer. Here is the first dummy rig with the newly positioned attachment points.

Image

Once rigged, it looks like this. I actually wanted to work without stays, but due to the stubborn rigging, this is hardly possible without curvature. The mainstay should then of course lead to the foot of the foremast.

Image

Image

Image

Image

Image

Here are the attachment points in detail. The running end is wrapped around a cleat, but not yet stowed.

Image

Image

Image

And the sails are also waiting to be processed :-)

Image

XXXDAn

_________________
To Victory and beyond ...
viewtopic.php?f=59&t=99050&start=60

See also our german forum for the age of Sail and History:
http://www.segelschiffsmodellbau.com


Report this post
Top
 Profile  
Reply with quote  
PostPosted: Thu Aug 28, 2025 2:56 am 
Offline

Joined: Tue Feb 06, 2007 10:24 am
Posts: 2612
Location: Belgium
Simply beautiful! :thumbs_up_1: :thumbs_up_1: :thumbs_up_1:

There is certainly no denying the benefits of 3D-designing and printing. But maybe the flexibility of the resin makes it not very suited for (rigged) masts and spars, and another more rigid material like wood or metal wood be better? I would be interested what your thoughts on this!


Report this post
Top
 Profile  
Reply with quote  
PostPosted: Fri Aug 29, 2025 5:25 am 
Offline
User avatar

Joined: Mon Mar 12, 2012 11:13 am
Posts: 972
Location: Ludwigsburg/Germany
Hello Marijn,

of course you are comletely right. I usually also do exchange the spars to wood or to brass. This one was a test, as the printed masts are much more rigid than I thought, the foremast 1.4 mm and the main 1.6 mm in diameter.

Had i not taken the stay out it would even have worked :-)

But still enough things to try out, one never stops ...

By the way, here is a test I did some years ago with the jibboom of my Victory. Once plastic oob and once wooden replacement, both with the same weigth.

Image

Image

XXXDAn

_________________
To Victory and beyond ...
viewtopic.php?f=59&t=99050&start=60

See also our german forum for the age of Sail and History:
http://www.segelschiffsmodellbau.com


Report this post
Top
 Profile  
Reply with quote  
PostPosted: Sat Aug 30, 2025 3:55 am 
Offline
User avatar

Joined: Wed Sep 28, 2011 12:04 pm
Posts: 1985
Location: Paris
Examplary research and execution on the barrels and the ship's boats :thumbs_up_1:

As I am pondering, whether to use steel, brass or acrylic glass for the masts on my current project, the same question re. the 3D-printed masts came to my mind. However, I would be more concerned about the brittleness than the flexibility in this case.

_________________
Eberhard

Former chairman Arbeitskreis historischer Schiffbau e.V. (German Association for Shipbuilding History)

--------------------------------------------------------------------------------------------------------------------------------------------------------------------------------------------

Image Image Image Image


Report this post
Top
 Profile  
Reply with quote  
PostPosted: Thu Sep 04, 2025 3:04 am 
Offline
User avatar

Joined: Mon Mar 12, 2012 11:13 am
Posts: 972
Location: Ludwigsburg/Germany
It depends very much upon the resin used. This standard resin is quite stable and did the job surprisingly well, better than the plastic from the kit. As a trial it was good for the experience, as with a stay it could really be used. Espesially if compered the ratio of the little diameter of 1,47 mm in relation th the extreme length of 73 mm at the foremast.

XXXDAn

_________________
To Victory and beyond ...
viewtopic.php?f=59&t=99050&start=60

See also our german forum for the age of Sail and History:
http://www.segelschiffsmodellbau.com


Report this post
Top
 Profile  
Reply with quote  
PostPosted: Sat Sep 06, 2025 5:38 pm 
Offline
User avatar

Joined: Tue Jan 11, 2005 1:40 pm
Posts: 8374
Location: New Jersey
Mind blowing work. Those boats are works of art unto themselves

_________________
Martin

"Tomorrow is the most important thing in life. Comes into us at midnight very clean. It's perfect when it arrives and it puts itself in our hands. It hopes we've learned something from yesterday." John Wayne

Ship Model Gallery


Report this post
Top
 Profile  
Reply with quote  
PostPosted: Sun Sep 07, 2025 2:40 am 
Offline

Joined: Mon Apr 17, 2017 2:43 am
Posts: 315
MartinJQuinn wrote:
Mind blowing work. Those boats are works of art unto themselves


I second that! ..and the guns.. :cool_2:

dafi have you planned any "differentiating surgery" on the rowing crews? mostly on the heads postures maybe, not much can be done on the arms i reckon

great progress, keep this up!

_________________
http://www.3xblackcats.wordpress.com


Report this post
Top
 Profile  
Reply with quote  
PostPosted: Mon Sep 08, 2025 2:17 am 
Offline
User avatar

Joined: Mon Mar 12, 2012 11:13 am
Posts: 972
Location: Ludwigsburg/Germany
Thank you Martin and SG1.

Of course the crew will become a bit more alive still. This version was just to give a fast try to see if the ergonomics of the oars do work.

XXXDAn

_________________
To Victory and beyond ...
viewtopic.php?f=59&t=99050&start=60

See also our german forum for the age of Sail and History:
http://www.segelschiffsmodellbau.com


Report this post
Top
 Profile  
Reply with quote  
Display posts from previous:  Sort by  
Post new topic Reply to topic  [ 1100 posts ]  Go to page Previous  1 ... 51, 52, 53, 54, 55

All times are UTC - 6 hours [ DST ]


Who is online

Users browsing this forum: Yuth and 74 guests


You can post new topics in this forum
You can reply to topics in this forum
You cannot edit your posts in this forum
You cannot delete your posts in this forum
You cannot post attachments in this forum

Jump to:  
Powered by phpBB® Forum Software © phpBB Group