I thought, that for the benefit of those who have questions about the process of Stretching sprue, I would post a FAQ on the subject. I will post what I know, and I'm sure others will be able to add to it.
Question #1: What is sprue? Sprues is the plastic frames that the pieces in a plastic kit are attached to.
Question #2: What uses does stretched sprue have? Stretched Sprue can bu used for rigging, masts, antennae, and guns, depending on how thin you stretch it.
Question #3: How is sprue stretched? Sprue is stretched by heating it over a candle or open flame and litterally stretched. Hold the sprue over the candle until it is soft enough to twist, and then pull the two ends apart. Pull slowly, and evenly. A six-inch piece of sprue will usually yield three or four feet. I like to tape the sprue down to the table, so that it will cool straight, and not curve.
Question #4: Can I only use sprue? No, I haved used plastic rod, like that available from Evergreen and Plastruct to create stretched sprue.
Question #5: Can I only use round pieces? No, you can also use square pieces and plastic tubing. Sprue will carry it's shape when it's stretched, so if you use square pieces, you will end up with square rigging.
Question #6: When I pull the sprue apart, it breaks. What am I doing wrong? One of three things usually. Either you are pulling to fast, the plastic is to hot, or the plastic is to soft. Try pulling slowly, and not allowing the plastic to heat up as much.
Question #7: I am only making thin pieces. How to I make thick pieces? Pull slower, allowing the plastic to cool more as you pull.
Question #8: I am only making thick pieces. How to I make thin pieces? Allow the plastic to become more heated, or try using softer plastic.
Question #9: I can't get the pieces to stay straight when I try to rig my model. Try Gluing one end on first, and allow that to dry before supergluing the other.
There! that about covers it. Others can of course add to this.
Hope this Helps all those who have questions!
Stretching Sprue FAQ (Long Post)
Moderator: JIM BAUMANN
-
Avery Boyer

- Posts: 934
- Joined: Mon Apr 24, 2006 4:56 pm
- Location: Berks County, Pennsylvania
- Contact:
Stretching Sprue FAQ (Long Post)
"It is best to remain silent and let others assume you are dumb than to speak up and remove all doubt"
http://nssavannah.wordpress.com/
http://nssavannah.wordpress.com/

-
Willie

- Posts: 690
- Joined: Sat Apr 29, 2006 7:36 am
- Location: Vigo, Spain
Re: Stretching Sprue FAQ (Long Post)
Avery,Avery Boyer wrote: There! that about covers it. Others can of course add to this. Hope this Helps all those who have questions!
That�s an excellent article. I have always considered that the potential of stretched sprue, if correctly done, is simply inmense.
Here is my two cents.
The pics belong to some of my constructions and are not new, as they have also been uploaded somewhere else, but can be of some help here.
The first think to know is that stretched sprue is a thinner tube of plastic, and can therefore be reworked -- I mean, re-heated -- to make new profiles and shapes.
For example, take a piece of a stretched sprue, lit a candle and put it close to the blue part of the flame, but not too close. It will produce a nail or a rivet, depending the thickness of the stretched sprue you are working with :

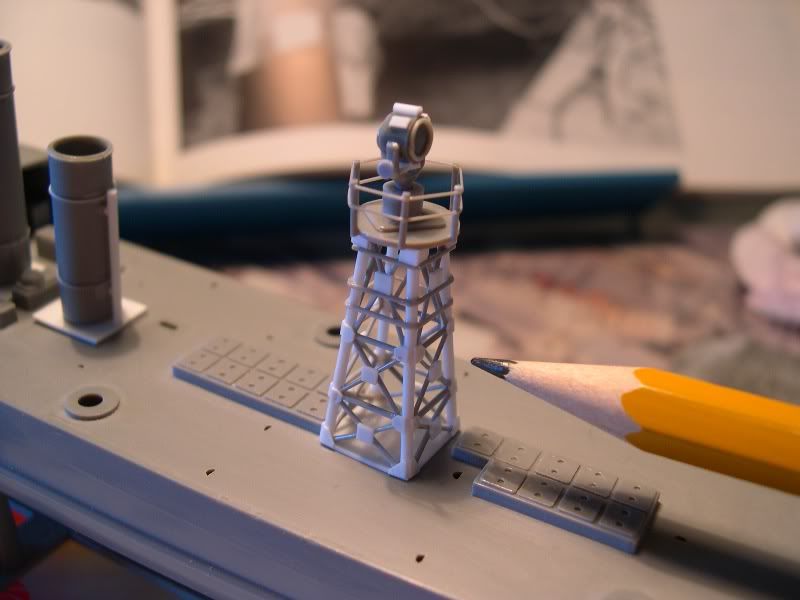
Sand away the tip of the head of this rivet until it is flat, and you will have all kinds of wheels for anything. For example, the wheel handles for a search light :

Take another piece of stretched sprue while it is still fresh. Wind it around the handle of your file, in very close lines. Put it briefly on the fire again, and you will have a very nice spring -- ideal for any 1/72 20mm. Oerlikon machine gun, for example.
Take a slice of this new spring, whose tips will be open, reverse the opening, and seal with a drop of lyquid poly. You will have circles of any diameter, depending on what basis or tool you are using :
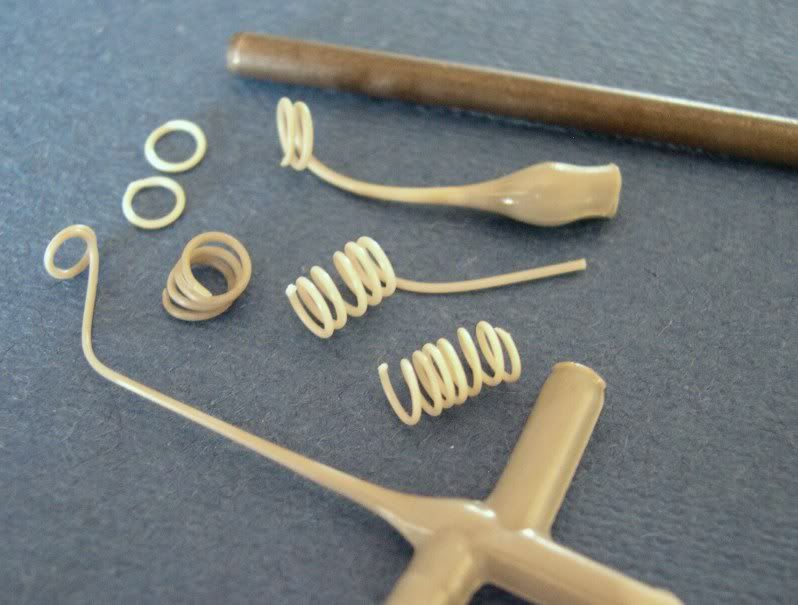


With these circles, that at the same time have got a round section, you will be able to do a lot of parts that otherwise would be possible only with PE�s, which at the same time as well would be only flat.
Take a look, with all these methods combined :
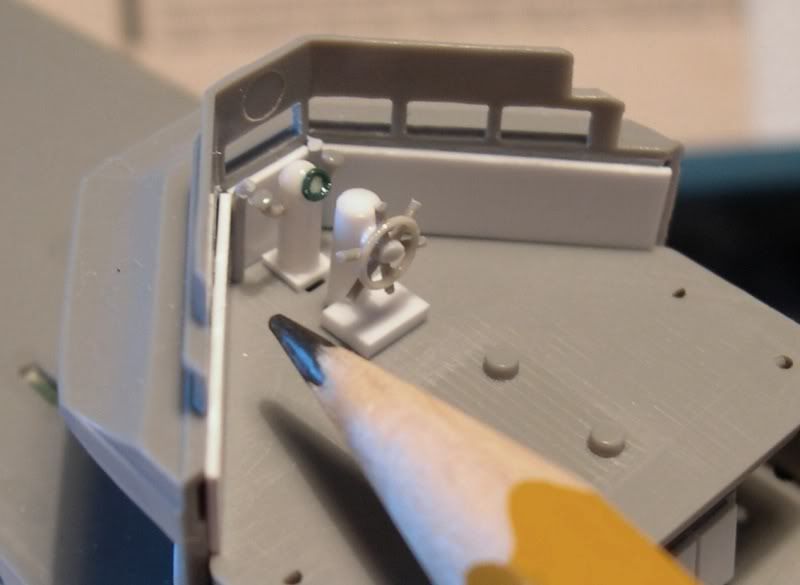
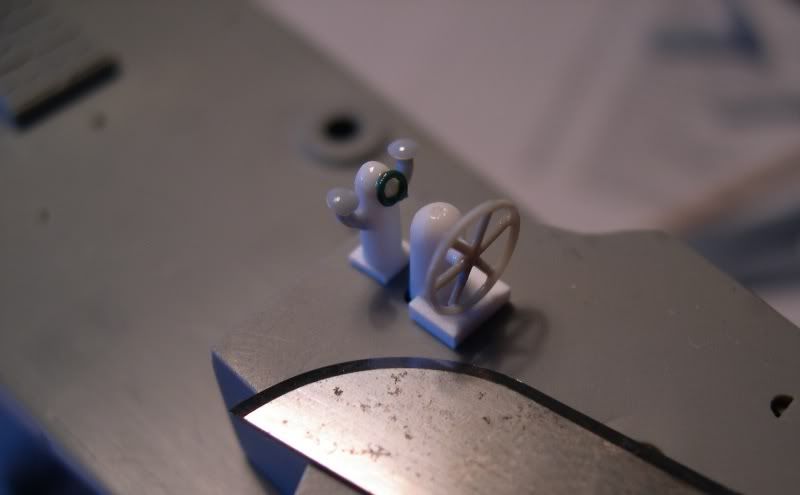
Actually, with a combination of straight and curved stretched sprue, virtually anything can be done. The details that can be seen in the following pics are 90% stretched sprue :

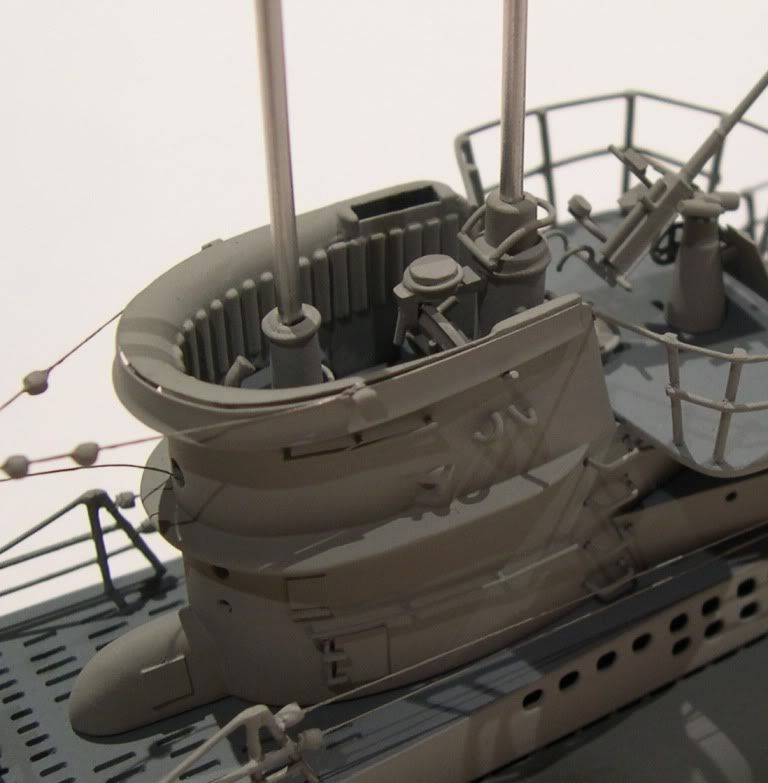
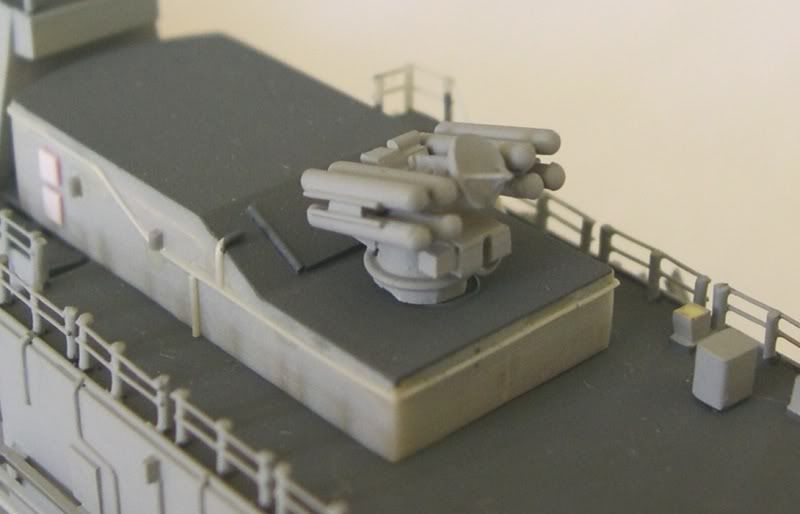
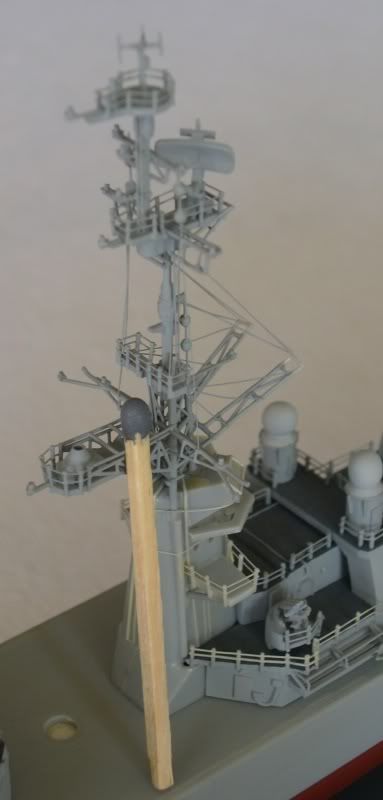
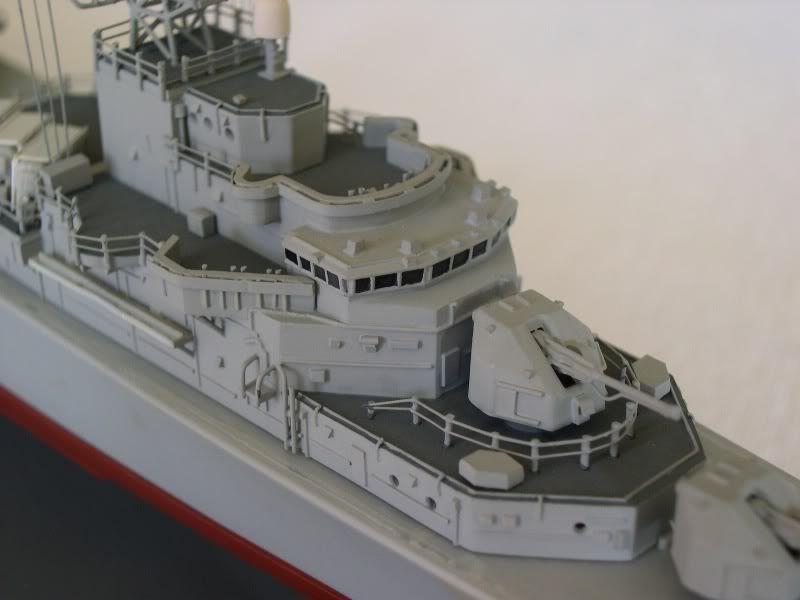
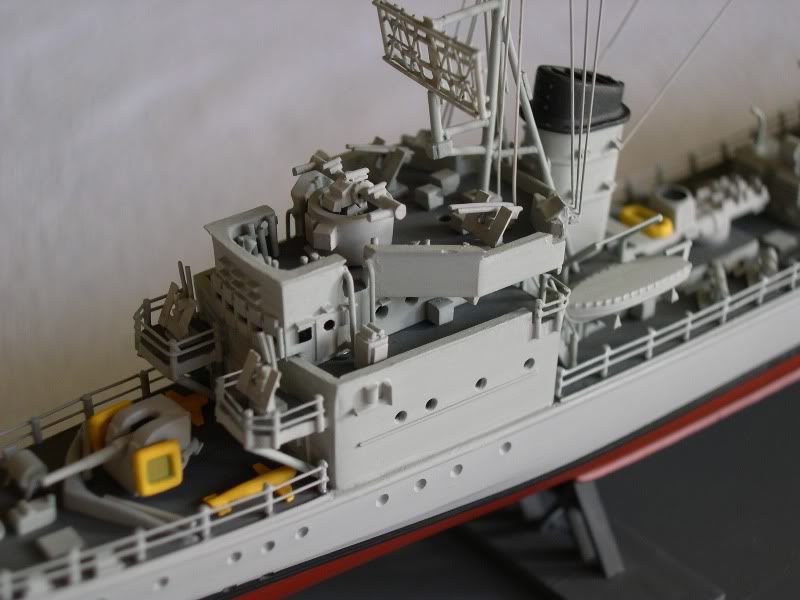
So that�s all. I hope it was of some help.
Best regards from the Old Europe,
Willie.
Amen dico tibi, hodie mecum eris in paradiso (Lk 23,43).
-
JIM BAUMANN

- Posts: 5689
- Joined: Mon Jan 10, 2005 5:30 pm
- Location: Nr Southampton England
Good call on the subject Avery!-nice FAQ.
Willie-nice illustrations of the versatility of the medium--most impressive stuff on the old Revell four-stacker( do I get a prize for guessing....? )
)
The only thing I can add is that stretched sprue is the ideal material for adding inter-deck supporting stanchions in 1/700
1) strecth sprue
2) cut a length a tiny bit longer than required.
3) dip one end into liquid cement(revell Proffesional works for me)-and attach to the deck overhead in the desired position
4) allow to set for 30-50 seconds-ie grabbed but still flexible. add a small drop of fresh liquid cemnt to the base of the upright and position until it is vertical in all planes--the advantage here is that because the srue was slightly overlength the melting effect is both adhesive as well as fine tuning the fit...
5) I use the above technique in painted and unpainted situations- as long as it is not a structural or loaded piece the adhesive qualities onto paint work fine for me!
JIM Baumann

Willie-nice illustrations of the versatility of the medium--most impressive stuff on the old Revell four-stacker( do I get a prize for guessing....?
)The only thing I can add is that stretched sprue is the ideal material for adding inter-deck supporting stanchions in 1/700
1) strecth sprue
2) cut a length a tiny bit longer than required.
3) dip one end into liquid cement(revell Proffesional works for me)-and attach to the deck overhead in the desired position
4) allow to set for 30-50 seconds-ie grabbed but still flexible. add a small drop of fresh liquid cemnt to the base of the upright and position until it is vertical in all planes--the advantage here is that because the srue was slightly overlength the melting effect is both adhesive as well as fine tuning the fit...
5) I use the above technique in painted and unpainted situations- as long as it is not a structural or loaded piece the adhesive qualities onto paint work fine for me!
JIM Baumann
....I buy them at three times the speed I build 'em.... will I live long enough to empty my stash...?
http://www.modelshipgallery.com/gallery ... index.html
IPMS UK SIG (special interest group) www.finewaterline.com
http://www.modelshipgallery.com/gallery ... index.html
IPMS UK SIG (special interest group) www.finewaterline.com
-
JIM BAUMANN
- Posts: 5689
- Joined: Mon Jan 10, 2005 5:30 pm
- Location: Nr Southampton England
And now to add to the stretching of sprue...
I employ a slightly different method of stretching-reasoms outlined below....
For all of my rigging in 1/700 I use stretched sprue; the trick is to use the RIGHT kind of sprue.
I have always found great success with AIRFIX CLASSIC SHIPS (sailboats,old,large..) in particular a kit of HMS VICTORY that I have been melting down the sprue runners on for years; when I run out I will start on the yard arms, by my retirement I may start melting the masts... The main feature of this plastic is that it is BLACK, it requires no painting, hence keeping it thin and light.
Here is my method:
Light end of sprue runner until it just catches flame, blow out and dab one end onto piece of paper/card on workbench and slowly but firmly pull until the desired line thickness is achieved.The trick is to pull initially real fast to get it thin, then as the plastic cools, slow down the speed of pulling.
Pulling in one direction only has advantages over the traditional method of holding sprue over candle and then pulling in both direc tions...-reasoning below..
By pulling sprue in only one direction there are no blobs formed as first ione side cools and then the other...so you achieve completely consistent line thickness
If you are going to need LOTS, set up two paint tinlets on bench, and follow the procedure above but when you run out of space simply bend it around the paint tinlet and continue on till plastic cools and your thread breaks.
You will need to practice a little to get consistently thin sprue. Black sprue is THE cheapest modelling material we will ever use pro rata, so if you are not satisfied with result simply discard it and start again.
To rig, use a small pool of liquid cement ( Revell proffessional is best!) on bench, dab the end of chosen rigging piece in cement and then with tweezers attach to ship/yard of choice --let set for 5-10 seconds and draw the other end to your chosen attachment point. Dab on a minute amount of liquid cement usig cocktail stick that has been pared down with a blade--and draw the sprue piece thru the cement and let set.
With fresh liquid cement on the end of a sharpened toothpick, melt the surplus plastic end of the sprue and ..voila !--you have a neat attachment with no furry ends or bungling scissors in your fine rigging etc
Having rigged, some shrouds for example,-- you may wish to tighten them.
Well known is the fact that a heat source can tighten stretched sprue..like magic!
However... traditional methods of glowing match or soldering iron are not precise, controllable but most importantly directionally controllable sources of heat
Hold model over a consistent smoke source such as inscence or cigarette (I gave up, hence joss sticks) in a an air-still room- and the hot smoke will rise in a deadstraight line. It can be used directionally by holding the model at the chosen angle above the smoke source to intersect with the chosen piece of rigging.
The hot smoke will tighten the rigging like magic. My advice is take a very old/scrap model and practice ---as it is very easy to completely rig a model and then at the tightening stage get too close to heat source and completely UN-RIG the model.... with resultant fury, frustration and vulgar language...!! Laughing
In my model gallery are numerous examples of models rigged with sprue
http://www.modelshipgallery.com/gallery ... index.html
I employ a slightly different method of stretching-reasoms outlined below....
For all of my rigging in 1/700 I use stretched sprue; the trick is to use the RIGHT kind of sprue.
I have always found great success with AIRFIX CLASSIC SHIPS (sailboats,old,large..) in particular a kit of HMS VICTORY that I have been melting down the sprue runners on for years; when I run out I will start on the yard arms, by my retirement I may start melting the masts... The main feature of this plastic is that it is BLACK, it requires no painting, hence keeping it thin and light.
Here is my method:
Light end of sprue runner until it just catches flame, blow out and dab one end onto piece of paper/card on workbench and slowly but firmly pull until the desired line thickness is achieved.The trick is to pull initially real fast to get it thin, then as the plastic cools, slow down the speed of pulling.
Pulling in one direction only has advantages over the traditional method of holding sprue over candle and then pulling in both direc tions...-reasoning below..
By pulling sprue in only one direction there are no blobs formed as first ione side cools and then the other...so you achieve completely consistent line thickness
If you are going to need LOTS, set up two paint tinlets on bench, and follow the procedure above but when you run out of space simply bend it around the paint tinlet and continue on till plastic cools and your thread breaks.
You will need to practice a little to get consistently thin sprue. Black sprue is THE cheapest modelling material we will ever use pro rata, so if you are not satisfied with result simply discard it and start again.
To rig, use a small pool of liquid cement ( Revell proffessional is best!) on bench, dab the end of chosen rigging piece in cement and then with tweezers attach to ship/yard of choice --let set for 5-10 seconds and draw the other end to your chosen attachment point. Dab on a minute amount of liquid cement usig cocktail stick that has been pared down with a blade--and draw the sprue piece thru the cement and let set.
With fresh liquid cement on the end of a sharpened toothpick, melt the surplus plastic end of the sprue and ..voila !--you have a neat attachment with no furry ends or bungling scissors in your fine rigging etc
Having rigged, some shrouds for example,-- you may wish to tighten them.
Well known is the fact that a heat source can tighten stretched sprue..like magic!
However... traditional methods of glowing match or soldering iron are not precise, controllable but most importantly directionally controllable sources of heat
Hold model over a consistent smoke source such as inscence or cigarette (I gave up, hence joss sticks) in a an air-still room- and the hot smoke will rise in a deadstraight line. It can be used directionally by holding the model at the chosen angle above the smoke source to intersect with the chosen piece of rigging.
The hot smoke will tighten the rigging like magic. My advice is take a very old/scrap model and practice ---as it is very easy to completely rig a model and then at the tightening stage get too close to heat source and completely UN-RIG the model.... with resultant fury, frustration and vulgar language...!! Laughing
In my model gallery are numerous examples of models rigged with sprue
http://www.modelshipgallery.com/gallery ... index.html
....I buy them at three times the speed I build 'em.... will I live long enough to empty my stash...?
http://www.modelshipgallery.com/gallery ... index.html
IPMS UK SIG (special interest group) www.finewaterline.com
http://www.modelshipgallery.com/gallery ... index.html
IPMS UK SIG (special interest group) www.finewaterline.com
-
Francisco P. de Nanclares
- Posts: 306
- Joined: Tue Apr 12, 2005 5:30 am
- Location: Spain
Wow 
Just when you think stretched sprue is what it is, and that is it, Avery shows up and starts this extraordinary thread on a supposedly simple subject. The answers from Willie and Jim are simply fantastic and round it up.
Well done, and thanks to all three!.
Anyone for more info?.
Cheers.
Pachi.
Just when you think stretched sprue is what it is, and that is it, Avery shows up and starts this extraordinary thread on a supposedly simple subject. The answers from Willie and Jim are simply fantastic and round it up.
Well done, and thanks to all three!.
Anyone for more info?.
Cheers.
Pachi.
 I will miss you Werner. Fair winds and following seas.
-
rokket

- Posts: 20
- Joined: Tue Nov 29, 2005 5:18 pm
- Location: Australia
- Contact:
Avery - geat stuff. I have heard and heard about it, but my attempts always failed and I never belived it was possible to gte good results. But my mates do wonderous stuff with it. You have a concise and helpful article, Thank You!
Jim - excellent info and reasoning, smoke very clever,Thanks!
Willie - Beautiful!(and mighty glad to see a lovely u-bot in there!) Springs and hanwheels, so well done.
Thanks guys, I am going to try to expand my limited horizons. (at least with sprue)
Jim - excellent info and reasoning, smoke very clever,Thanks!
Willie - Beautiful!(and mighty glad to see a lovely u-bot in there!) Springs and hanwheels, so well done.
Thanks guys, I am going to try to expand my limited horizons. (at least with sprue)
AMP: Accurate Model Parts: http://amp.rokket.biz
"It's about the model" - Fabric Flags, Uboat and Gato Resin and PE
Talk Like HAL day - http://www.talklikehal.com/
"It's about the model" - Fabric Flags, Uboat and Gato Resin and PE
Talk Like HAL day - http://www.talklikehal.com/