==> viewtopic.php?f=47&t=47836
I wanted to keep my model butchery and the research thread side seperate
The interesting images of the real ship can be viewed at the thread posted above.
anyhow...
The Yumenatu Carnot kit is not without a number of problems.... ( compounded by no concrete plans being in existence...)
....but nothing much that sharp blade and endless staring at photos cannot go some way to alleviating...
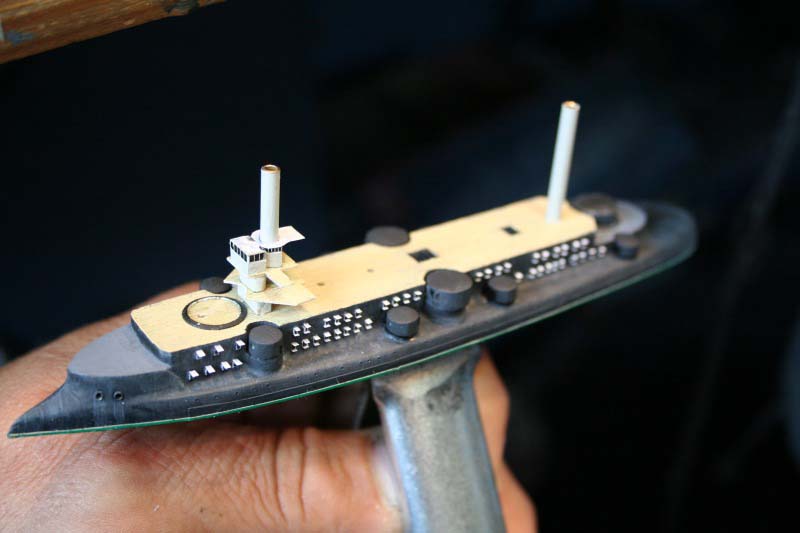
Here is an image summary to date:
The stern is too wide in plan view, far too pointy and the superstructure aft is far too wide
Brutal stuff
The bottom of the open hull had a plate added to remove the hogging warp, the hatches were all removed, the cast on central turret barbettes were ripped off and the platform raised, hull reshaped to accentuate the tumblehome.Aft indents reshaped and the hollows above the aftermost turrets bridged and the deck made up.
Holes in deck filled and all deck structures removed or reshaped. Once faired it looked like this...
The cast on hatches now were all gone--and I wanted to depict most of the hatches open--as the ship both static and underway at speed is often depicted with them open...
The difficulty of cutting this vast number of square holes was quite simply beyond my methodology on a retro-fit kit-build...
So I cheated!
Black squares of decals strip were applied to represent the hole or void, once this has been complemented with the yop and bottom lids it should look fairly convincing....
...==> getting them all straight and in the correct place was done by steadying lies of adhesive tape and ...
mainly eyeball and judgement
Relative proportion is everything!
Once the armour belt( vinyl tape) had been added ( soaked on afterwards with CA)
the ship stared to vaguely(!) resemble the photos of the real thing...
Prior to mounting the ship on her base I started on the fwd bridge structure. From spar deck up all will now be scratchbuilt.
The fwd bridge levels have the distinctive pierced sides - these are made of thin PE strips- cut from a much larger PE structure gleaned from a L'Arsenal 1/350 PE set....( liberty ship )
Its a very fiddly pastime as each brass section is seperate...
The deck itself is made of paper - cut folded in half to give perfect symmetry, then pressed flat and infused with CA.
This gives a 'scale' thin deck....
Carnot had a massive blockhouse really quite a long way up the fwd structure; this required additional bracing through the deck levels to support.
These supporting columns appear from photos to square in section. The positioning of these was tricky- to obtain alignment the decks needed to be affixed firmly-==> however the mainmast - made of copper tube was already well embedded and installed. To obtain the correct positions was a process of trial and error- which meant the decks took a hammering...-These were made good by filling with white glue--with the second coat it self-levelled
I have cut in main deck stairways-positions of which are based on those of other similar contemporary French pre-dreads; inevitably as soon as my model is finished numerous photos of the deck will suddenly surface and prove me wrong!!!
The fwd bridge is making steady progress, the lower and upper circular platforms were of paper, infused with CA glue wrapped around a floor of thin PE brass scrap. The lower platform had the gun notches cut into the paper whilst a flat layout.
As of Christmas day it ( still ) looked like this:
The ship-model was becoming increasingly hard to work on--the screw/clamp handle on the base did not lend itself to being laid down.
Prior to mounting-I had to add the armoured 'shelf belt'
( there are photos of crew members walking along this ledge..!)
Thereafter I used the white styrene strip as the white water-line by virtue of adding a red boot-top
The model was screwed and glued into a pre-cut aperture in some artists watercolor paper
similar to the method I employ here:
viewtopic.php?f=4&t=37223
viewtopic.php?f=4&t=37406
http://www.modelwarships.com/reviews/sh ... eview.html where I used paper to make the hatches.... however for a variety of reasons I wanted to try something different...
Madness prevailed-- and I decided to make the hatch lids--top and bottom of brass--more accurately-- I decided to cut pieces of 1/700 ladderstock into little squares-to get clean edges is harder than it sounds...!!
I used scissors to cut the squares, trimmed back whilst holding in tweezers- and then flattened each one in smooth face pliers to remove the curling caused by the cutting.....
Once set and painted they have quite a pleasing bit of texture-
More soon....
Happy New Year
Jim Baumann