This has probably been asked before but I couldn't find a thread for it anywhere. Could someone advise me on the most suitable computer program to use if I want to design my own PE fret? I would also like to use relief etching... how does one do that?
As I'm based in the UK I could do with a suggestion from someone as to a good company I could use to actually produce the fret.
I am not keen to etch the brass at home so ideally I would design the fret on my PC and then send the design to a company to etch it for me.
Thanks for any help
Max
Photo-etch design and creation
Moderators: MartinJQuinn, JIM BAUMANN, HMAS, Tiny69, Dave Wooley
-
Jon

- Posts: 438
- Joined: Fri Nov 02, 2007 9:20 am
Re: Photo-etch design and creation
I used Corel Draw to create two sets that went into production. I've been using Corel Draw for about 10 years and find it easy to use, but not sure which would be a good program for a novice. Regardless, it always takes a lot more time to create than you think. Corel Draw will be able to draw more fine than you could ever use in photoetch, so no issues with resolution. That's because it is vector based and to draw photoetch you really need to use a vector based program.
With Corel Draw I was able to make snap to gridline rigs that are pre-set for proper railing heights so all you have to do is measure length then creating the bars is quick because they automatically snap into place. I made rigs for 2 bar all the way up to 5 bars. Next I want to make a rig for aircraft carrier deck nettings. But that is proving to be more difficult.
If you have a company in mind that will take your computer drawings and make the etch, I would check with them first and find out what file formats they support. Then chose your software based on that. If you are etching your own work, then it wont matter.
I would like to see a forum where people could attach their drawings they have created for photoetch so others can have them for non-profit personal use.
Good luck,
Jonathan
-
ingura
Re: Photo-etch design and creation
....
Last edited by ingura on Sun Oct 31, 2010 6:53 pm, edited 1 time in total.
-
TCC
- Posts: 107
- Joined: Mon Mar 30, 2009 9:54 am
Re: Photo-etch design and creation
Hi
Try these lads:
http://www.ppdltd.com/
I'm trying to get some etching done myself for a 1:144 LION. I looked into doing it myself but the headache seems to be the actual placing of the mask on the brass. Then it's a case of �20-odd for the chemicals.
These lads are about a �10 a sheet, but there's all sorts of caveats as it's a damn complicated buisness... especially if he/they have to go over your drawing and correct things.
But the guy I've communicated with, 'Jim', seems a really helpful guy.
What pulled the wheels of my etching plan was they only accept certain formats and I had to learn a new program to draw the etch. I happened to have illustrator from the list he gives but that's been a real chore to get started with. So the idea is simmering on the back-burner for now.
i though I was in luck with Ingura post (a step-by-step using Illustrator) but it's in German.
-
ingura
Re: Photo-etch design and creation
...
Last edited by ingura on Sun Oct 31, 2010 6:53 pm, edited 1 time in total.
-
TCC
- Posts: 107
- Joined: Mon Mar 30, 2009 9:54 am
Re: Photo-etch design and creation
Hi Ingura
I didn't mean that as a 'request for help', I suppose I forgot the off the end of it.
Anyway, feel free to add anything you think may be interesting or informative. I'd certainly appreciate it.
When I get motivated again, I'm going to ask these lads if they'll take a file produced in Photoshop as that is a program I'm familiar with. They don't like photoshop that much as the edges of the etch aren't as clean as proper 'drawing' programs.
Could you answer one query? Do you have to mask both sides of the sheet? When I started to look at doing it myself, the 'how to's' I read where mostly PCB based and they only did one side. But the site above wants masks for both, I think. If you just use 1 mask on 1 side, and place it in the etchant, won't the reverse face that is completely open to the acid get eatenn away?
Cheers
p.s that's some nice modelling you did there.
I didn't mean that as a 'request for help', I suppose I forgot the
Anyway, feel free to add anything you think may be interesting or informative. I'd certainly appreciate it.
When I get motivated again, I'm going to ask these lads if they'll take a file produced in Photoshop as that is a program I'm familiar with. They don't like photoshop that much as the edges of the etch aren't as clean as proper 'drawing' programs.
Could you answer one query? Do you have to mask both sides of the sheet? When I started to look at doing it myself, the 'how to's' I read where mostly PCB based and they only did one side. But the site above wants masks for both, I think. If you just use 1 mask on 1 side, and place it in the etchant, won't the reverse face that is completely open to the acid get eatenn away?
Cheers
p.s that's some nice modelling you did there.
-
ingura
Re: Photo-etch design and creation
...
Last edited by ingura on Sun Oct 31, 2010 6:53 pm, edited 1 time in total.
-
TCC
- Posts: 107
- Joined: Mon Mar 30, 2009 9:54 am
Re: Photo-etch design and creation
Ah right, I've got it now. Thank you peter.
You place your mask on 1 side, and then you cover every other bit of surface up. I remember now... there was talk of covering the perimiter of the sheet.
Your drawing No4, they way the etchant from both sides has formed a point in the middle of the sheet? Surely if you leave it a bit longer, the etchant will eventually start eating way at that exposed edge [flank] and thus get rid of the 'point'?
In your drawing No3, why has the etchant eaten away around the edges to you .5mm hole? Wouldn't/shouldn't the mask have prevented this?
I was planning to go with the drawing 3 method... mask from one side only as registration of both sides could be a pain when we're talking about <.5mm tolerances.
Cheers mate
-
Timmy C

- Posts: 12450
- Joined: Mon Jan 10, 2005 6:00 pm
- Location: Ottawa, Canada
Re: Photo-etch design and creation
The mask only protects the surface. It does not extend downwards into the brass. Thus, once the etchant starts eating away the top surface, it will continue eating away not only downwards, but also into the sides, because it also comes into contact with the brass on the sides.TCC wrote: In your drawing No3, why has the etchant eaten away around the edges to you .5mm hole? Wouldn't/shouldn't the mask have prevented this?
De quoi s'agit-il?
-
ingura
Re: Photo-etch design and creation
...
Last edited by ingura on Sun Oct 31, 2010 6:53 pm, edited 1 time in total.
-
cosbymai
- Posts: 12
- Joined: Sun Jul 29, 2007 7:15 am
Re: Photo-etch design and creation
Thank you TCC and Ingura and others for the advice; just what I was hoping for.
Max
Max
-
rohona
- Posts: 1
- Joined: Mon Jan 11, 2010 2:32 am
Re: Photo-etch design and creation
Which is the best software for signage field? Adobe illustrator or Corel draw? I am using coreldraw for signage design making purpose. Which software good for signage designing. Adobe illustrator or coreldraw.
-
ingura
Re: Photo-etch design and creation
...
Last edited by ingura on Sun Oct 31, 2010 6:45 pm, edited 1 time in total.
-
DrPR

- Posts: 1689
- Joined: Sun Mar 07, 2010 12:01 am
- Location: Corvallis, Oregon, USA
- Contact:
Re: Photo-etch design and creation
If you do not already have a program you should consider DesignCAD 3D Max. It is a drafting program (2D and 3D) so you get the advantage of being able to dimension drawings very accurately (thousandths of a millimeter), and it is easy to produce accurately scaled drawings.
I have experimented with photoetch at home, using a photoresist film available from Micro-Mark. I have had mixed results with this method. For fairly large items 2 mm and wider it works fine. When I tried to etch parts finer than 0.5 mm results were less satisfactory. The exposed parts wash away in the developer, leaving a film over areas to be protected. I found that the film does not develop evenly across the sheet. It may look as if the areas to be etched are clear, but a thin film remains in places that prevents etching.
I have obtained some spray-on liquid resist to try another method, but haven't used it yet.
Photo etch is very similar to electronic circuit board etching, and some of the materials and processes are the same.
I printed my masks on clear plastic overhead projector sheets.
There are several things you need to know:
1. Your parts should be oversized by about 1/3 the thickness of the brass sheet. This will help correct the undercutting mentioned in ingura's post. If you want a 0.5 mm (0.020 inch) wide piece in 0.125 mm (0.005 inch) brass you need to design it to be 0.54 mm (0.0216 inch) wide. I got this tip from a fellow who runs a model ship company.
2. You must mask both sides as ingura said. You cannot control fine detail any other way. This means you must have very accurate registration of the masks on both sides. To my surprise I discovered this really isn't too hard to do! Put registration marks (+) on three corners of your masks (this way you won't accidentally reverse one of them). Leave a wide (1 cm or 1/2 inch) margin at the top of the reverse side mask, and a 5 mm (1/4 inch) margin on the top side mask. Line the registration marks on the top and bottom masks carefully, holding them up to a window or back lighted sheet of glass. Then tape the two masks together across the wide margin. Slip the sheet to be exposed between the masks, being careful not to twist along the taped edge, and the masks will be registered correctly.
3. Ink jet printers usually make darker masks than laser printers. Whatever you use, be sure to turn off the "economical" print settings if it has one, or turn on the high resolution or dark print mode. This will give a darker print, and this is important when printing on clear plastic.
4. Reverse print the top side mask (mirror the drawing before printing). You want the ink on the mask to be on the same side of the plastic mask sheet as the metal to be etched. Even very thin sheets of plastic are thick enough that light diffuses in them. If the ink is on the top (opposite side than where the metal is) light will diffuse through the plastic and cause a fuzzy edge to the mask. This will cause unpredictable part thicknesses.
5. When you get good enough at it to try something new, you can double etch to produce patterns in the metal. For this you etch only one side of the sheet at first, removing a thin layer of metal in appropriate places. Then you use a second mask, top and bottom to etch through a different pattern. This trick can be used to put a texture on one side, such as deck plate treads, or patterns of grooves for doors or hatches.
6. Whatever you are etching you must keep the etchant moving over the metal at all times. The etching process produces a residue that can build up on the surface and stop the etching process. This residue must be removed. A fish tank air bubbler can be used to bubble through the etchant to keep it stirred. The residue will settle to the bottom of the etch tank.
7. Last, but not least, don't make the mistake I made the first time I experimented with etching. Don't use an aluminum pan for your etch tank! I majored in chemistry, so I have no excuse! I understood the reactions, and aluminum etches very quickly! I was in a hurry and didn't think. It was a stupid mistake and it made a real mess!
A collision at sea will ruin your entire day. Aristotle
-
Sr. Gopher

- Posts: 1091
- Joined: Mon Dec 28, 2009 2:31 pm
Re: Photo-etch design and creation
Try looking at this page of the Mare Island Build up of Jean and Bruno: viewtopic.php?f=59&t=33372&start=180
They explain the process of which they take, but their sheet supplier is in Europe.
They explain the process of which they take, but their sheet supplier is in Europe.
Current builds:
Hobby Boss 1/700 Type VIIC U-Boat for my AH
Planned builds:
3 more 1/700 AH submarines
Hobby Boss 1/700 Type VIIC U-Boat for my AH
Planned builds:
3 more 1/700 AH submarines
-
Guest
Re: Photo-etch design and creation
Hi
I need help to source materials or a kit to try this. Is there a basic kit of chemicals available? Maplins seems just to stock certain chemicals while I need 'a kit' with maybe a few sheets of metal and a sheet or 2 of the inkjet film or whatever?
We have a [un-used] box of overhead projector film here [anyone want it?] Actually, it is called 'Ink Jet Transparency'. It is white or near translucent but it doesn't take ink well... all the minute ink drops pool into larger, very noticable versions... and it won't dry. [I don't know if it is the film, or that our printer [canon 'bubblejet'] uses dye-based inks? The basic principal behind our Canon printer was designed to work with absorbent material... the sheet of paper MUST draw the ink into the surface! It is fast as well... it'll do an A3+ photo is highest quality in 2-3 minutes.]
I have a handle on the process now for 'photo' etching... as opposed to 'etching'. It is the making of a mask (negative) that gives the 'photo' bit of the name. Is there's 3 stages?
1, Drawing the mask
2, Transfering mask on to sheet metal
3, Immersion of sheet int etching chemical
I am also unsure of how thick a sheet I need for various pieces. How thick a sheet would you use for funnel cages above 1:128 funnels. Same question as to inclined ladders and general deck fittings, same regards bridge cabin walls.
I'm pretty serious about thiss now and the sooner the better as I'm making stuff now that could be very much better if it was etched.
Cheers
-
setori

- Posts: 307
- Joined: Wed Feb 25, 2009 8:31 am
- Location: france
Re: Photo-etch design and creation
Hi
I don't know where you're from but there's a good shop in France
http://www.letrainmagique.com/Tarif_promos_news.htm
I bought their equipment for photoetching and I'm really satisfied
They sell metal sheets too, and all the chemicals you may need
I make my masks with Corel draw
I don't know where you're from but there's a good shop in France
http://www.letrainmagique.com/Tarif_promos_news.htm
I bought their equipment for photoetching and I'm really satisfied
They sell metal sheets too, and all the chemicals you may need
I make my masks with Corel draw
-
NukeMM
- Back-Aft Models

- Posts: 2980
- Joined: Tue Feb 05, 2008 12:44 am
- Location: Omaha, NE, USA
Re: Photo-etch design and creation
Why is it that I am unable to see ingura's posts?
Carl Musselman
(Formerly Back-Aft Models)
Photobucket
https://app.photobucket.com/u/carlomaha
YouTube Channel:
https://www.youtube.com/channel/UCcH4XX ... IHgFtIYhAg
(Formerly Back-Aft Models)
Photobucket
https://app.photobucket.com/u/carlomaha
YouTube Channel:
https://www.youtube.com/channel/UCcH4XX ... IHgFtIYhAg
-
Timmy C
- Posts: 12450
- Joined: Mon Jan 10, 2005 6:00 pm
- Location: Ottawa, Canada
Re: Photo-etch design and creation
You're not the only one - it appears that he decided to remove them for whatever reason.
De quoi s'agit-il?
-
DrPR
- Posts: 1689
- Joined: Sun Mar 07, 2010 12:01 am
- Location: Corvallis, Oregon, USA
- Contact:
Re: Photo-etch design and creation
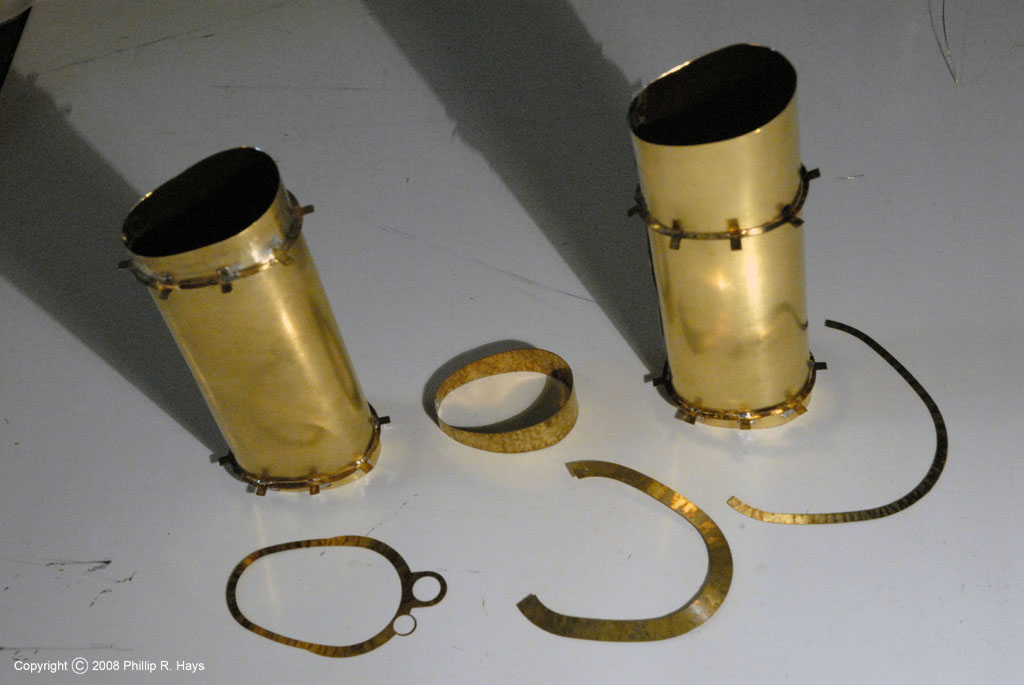
I tried the Micromark photoetch kit, with some good results. However, I have been unable to do fine detail with it (0.010" grids with 0.010" spacing, etc.). It uses a heat laminated photo emulsion - run it through a card laminator (supplied in the kit) to attach the photo resist to the metal. After exposure to UV light you develop it in a bath to remove the photo resist. I had trouble with this last part - a very thin invisible resist film remained over some parts of the plate after developing. This prevented etching, so some parts of the sheet would etch OK and others wouldn't etch at all. The kit has a small etching tank with a fish tank bubbler to keep the etchant circulating around the part, and this works pretty good. Here is a photo of some parts I made with this kit for a Cleveland class cruiser smoke pipe:
http://www.okieboat.com/Copyright%20ima ... 24%20C.jpg
I have ordered some spray-on photo resist, developing solution and a 300 watt UV lamp from Ocean State Electronics - parts of their Datak etching system. It is for printed circuit boards, but the etching is identical to metal foil photo etch. I haven't tried it yet.
The metal thickness must be less than the width of the finest detail you are etching - you can't etch 0.005" gaps in 0.010" thick metal. The etchant doesn't just cut straight through the metal like a saw. Inside the etch channel it cuts in ALL directions, vertical through the sheet and horizontal outward from the etch channel. The result is parts with a " ( " shaped edge cross section, but this is usually barely noticable. The etchant will undercut the photo resist pattern, taking away metal leaving an etch channel through the metal with a " ( ) " shaped cross section where the cut is widest in the middle of the thickness of the metal. If the detail is too fine the etchant will cut through from both edges of the thin part before it cuts through the thickness of the sheet. To avoid this use thinner metal.
To speed up the process and avoid "V" shaped cuts, etch from both sides of the sheet. This will require precise alignment of the photo resist patterns on both sides of the sheet. This isn't as difficult as it sounds - just put alignment targets ("+" marks) on the patterns for both sides and align them carefully with the metal sheet between them.
A friend with experience advised me to make the parts oversized because the etchant will undercut the photo resist. For very thin material (0.002" to 0.003" foil) you won't need to make parts oversize. For 0.005" sheet maybe 0.001" oversized on all edges will do, but for 0.010" you need to make parts oversize by about 0.002". So, if you want a 0.010" wide part using 0.010" thick metal, make the photo resist pattern 0.013" to 0.014" wide to allow 0.002" undercut on both sides.
You can heat the etchant to speed the process, but don't get it much more than 96F/37C (body temperature). Just don't use refrigerated etchant. DO NOT use hot etchant - the reaction may boil over and splatter or you might cook off the photo resist.
You MUST keep the etchant flowing over the work piece. The chemical process produces an inert precipitant that will pool on the sheet and block further etching. You can move the metal by hand, occasionally lifting it out of the bath to drain off the precipitant. It is best to have a vertical etch tank so gravity will pull the precipitant to the bottom of the tank. Still, you need to keep the etchant moving to dislodge the precipitant from the etch channels. Spraying the etchant onto a vertical sheet of metal is the best method, but you will need a non-metallic pump with a fairly high volume flow rate and a confining tank to recover the etchant.
Etch as little metal as possible - cover unused areas between parts with photoresist to reduce the actual etch area. This will prevent rapid depletion of the etchant and minimize precipitant buildup.
Some printers have darkness settings to control the amount of ink/toner that is applied. They normally default to a "medium" setting. In the printer control dialog change this to the darkest setting. This will produce the best photo resist patterns.
Expose the emulsion with the brightest light you can find - direct sunlight is good (if you live where it isn't cloudy all the time).
Be CERTAIN that the ink/toner side of your photo master is against the emulsion before exposure. If it is on the outside of the pattern film sheet the edges of the resist pattern will be "fuzzy" and the actual width of the etch part will be unpredictable.
Last edited by DrPR on Tue May 03, 2011 10:45 am, edited 1 time in total.
A collision at sea will ruin your entire day. Aristotle