Scratch Building the Portuguese Carrack in 1/700th Scale
Moderators: MartinJQuinn, JIM BAUMANN, HMAS, Tiny69, Dave Wooley
-
callen

- Posts: 998
- Joined: Fri Dec 21, 2007 4:10 pm
Re: Scratch Building the Portuguese Carrack in 1/700th Scale
You're the Man, Bruno!!!

Pessimists see the world as it truly is...
Optimists change the world.
Optimists change the world.
-
SvenLittkowski
- Posts: 14
- Joined: Thu Jul 07, 2011 2:34 pm
- Location: 18�00'33.64" N 76�46'50.73" W
- Contact:
Re: Scratch Building the Portuguese Carrack in 1/700th Scale
Amazing! Your ships are so tiny, and still so full of details! You should send me some of your ships by mail, ha ha ha!
Can't wait to see you building some distinctive vessels of the Roman navy! And I will assist you with detail information. What about "The battle of Actium"?
Can't wait to see you building some distinctive vessels of the Roman navy! And I will assist you with detail information. What about "The battle of Actium"?
Thanks for your time, good intentions, ideas and help,
Sven
Forum Navis Romana
http://navis.TerraRomana.org/Forum
-
callen
- Posts: 998
- Joined: Fri Dec 21, 2007 4:10 pm
Re: Scratch Building the Portuguese Carrack in 1/700th Scale
Oh that's great news! I am wanting to get a handle on those big war galleys in particular. Actium sounds interesting... And maybe Kleoptera's Barge as well...SvenLittkowski wrote:Amazing! Your ships are so tiny, and still so full of details! You should send me some of your ships by mail, ha ha ha!
Can't wait to see you building some distinctive vessels of the Roman navy! And I will assist you with detail information. What about "The battle of Actium"?
Pessimists see the world as it truly is...
Optimists change the world.
Optimists change the world.
-
callen
- Posts: 998
- Joined: Fri Dec 21, 2007 4:10 pm
Re: Scratch Building the Portuguese Carrack in 1/700th Scale
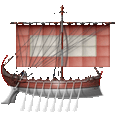
Hello Friends. Time for another Carrack update. We are rapidly approaching a climax for this thread. I anticipate perhaps another two months of activity and then I will be moving on to other modeling subjects. 
Having made a semi-blunder of the Flemish Carrack's paint job, and considering the extensive and beautiful decals Bruno was so kind to provide for me, I thought I ought to make an effort to go back to the Portuguese Carrack as a subject. Towards that end I began work detailing what I had been calling the 'Heavy Carrack' and giving it some proper-looking superstructures. The following pictures detail that effort, though it is still going on. We are now 23 days away from Nationals and I am very much under the gun to get these ships done in time for the biggest Model Convention in North America
I wanted to make a few comments though about Carracks as warships, and in particular some issues I have been mulling over as I work on these models. I'm sure you all are familiar with depictions such as these from the Anthony Roll:
The cannons projecting backwards from the forecastle have been a mystery to many commentators and researchers, to the point where many have even dismissed the likelihood that guns were placed in this way aboard the Mary Rose, or indeed any Carrack of the time.(overlooking the fact that they appear to be trained to 'Anti-Aircraft' Position...) I went ahead and modeled my first carrack, the Beja with guns in that position more out of enthusiasm than any real conviction, and several of you commented on the fact, perhaps wondering, as I have how accurate this kind of placement could have been...
But in reading Dr. Frank Howard's excellent book over the past couple of weeks I came to a startling realization. Remember when I was discussing Carrack combat tactics? In particular the idea of placing the forecastle amidships over the waist of the defending carrack, a sort of 'Reverse Crossing of the T?' Here again is what I'm talking about:
Notice how the head of the attacking carrack's forecastle projects well into the space above the waist of the defending ship. In this position, cannons mounted in the forecastle firing aft, and cannons mounted in the aftercastle firing forward would be in an excellent position to fire point blank into the bulwarks of the attacking Carrack's forecastle. If the gunners aimed their mounts outboard, it could even be done without endangering the opposite end of their own ship. So then, if Dr. Howard is correct in his concept of Carrack warfare, the guns depicted on the Mary Rose in the Anthony Roll (and the other carracks in the roll as well) makes perfect sense. They are designed to smash the forecastle of enemy carracks at the point of attack, a sort of 16th Century Close In Weapons Defense. As far as I know none of the archaeologists or Naval Historians have picked up on this (if it's correct) and thus, we might have actually learned something with our little models here... Would welcome your comments on this.
Ok... Well, on with the Build.
The great issue with carrack castles is how to model the arched opening commonplace to so many of the depictions of carracks from that time. The shipwrights of the day seemed a little bit inspired by stone palaces and villas in their creation of the fighting ports for these castles, and many carracks have a deceptively massive appearance to their gun ports. One is (at first glance) often tempted to believe these castles towered five or six stories high, to judge from the rows of arches and ports etc. In particular the diminishing size of the ports, getting smaller higher up in the castle gives a sense of overwhelming massiveness to them, and (to our eyes) contributes to the notion that Carracks were unwieldy and ponderously top-heavy. The fate of the Mary Rose, of course, does nothing to help this impression, despite the fact that we don't know whether she was sunk by a flaw in design, in loading, or in handling.
But be that as it may I was stumped for quite a while on just how to proceed with these details. I had hoped that Bruno would be able to create relief panels for me from PE that I could overlay onto the castles, but in the event he was unable to do this. I think the reason being that the size of the PE fret was too limited to allow for this kind detailing. It's already four times the size of the model itself, as you can see.
So then, how to create rows of tiny uniformly spaced arches and pillars? I had experimented with creating arches from bent styrene rod on the Beja, but had been unsatisfied both with the uniformity and the fidelity of them. The pillars that are associated with such arches would not be too difficult to do, once I had managed to create the arches themselves. My thoughts immediately turned to my old friend, the 1/700th scale IJN Perforated Bar, one of my very favorite generic PE parts.
I had been able to cut out a small section of bar to create the three arches of the Stern Gallery of the Flemish Carrack. What about doing the same thing, only more? We could then face the arches with rod, creating pillars and lintels, etc. Ok... let's give it a try...
As you can imagine this was a tedious process. The effort of cutting out the bar beneath the holes to create arches was difficult both in terms of uniformity and because it bent and distorted the bar itself each time I created an arch. The resulting arch section was badly bent out of shape and needed careful straightening and flattening, etc.
However, once that was done, they conformed nicely within the blank sides of the castle. The fragile bendable nature of the modified bar made it easy to shape into the curves of the castle. The appearance was still rough and uneven, but I hoped that the rod that I would later face the arches with would help to hide the imperfections.
However, I needed to be able to create more than one kind of arch, otherwise the ship's appearance would be too monotonous and unrealistic looking...although to be honest, there is always something slightly fantastic about the appearance of Carracks... I think the real carracks themselves had a slightly unreal look to them... a model only moreso.
Hmm... What about these Lion Roar IJN Fairleads?
If the 'tongs' of the fairlead were cut off, the remaining part inverted and supported by two styrene 'pillars,' the rivet detail on the bottom of the part might be construed as a kind of 'crowning' filigree for the arch...
Having made a semi-blunder of the Flemish Carrack's paint job, and considering the extensive and beautiful decals Bruno was so kind to provide for me, I thought I ought to make an effort to go back to the Portuguese Carrack as a subject. Towards that end I began work detailing what I had been calling the 'Heavy Carrack' and giving it some proper-looking superstructures. The following pictures detail that effort, though it is still going on. We are now 23 days away from Nationals and I am very much under the gun to get these ships done in time for the biggest Model Convention in North America
I wanted to make a few comments though about Carracks as warships, and in particular some issues I have been mulling over as I work on these models. I'm sure you all are familiar with depictions such as these from the Anthony Roll:
- 400px-AnthonyRoll-2_Mary_Rose.jpg (41.04 KiB) Viewed 1608 times
But in reading Dr. Frank Howard's excellent book over the past couple of weeks I came to a startling realization. Remember when I was discussing Carrack combat tactics? In particular the idea of placing the forecastle amidships over the waist of the defending carrack, a sort of 'Reverse Crossing of the T?' Here again is what I'm talking about:
Ok... Well, on with the Build.
The great issue with carrack castles is how to model the arched opening commonplace to so many of the depictions of carracks from that time. The shipwrights of the day seemed a little bit inspired by stone palaces and villas in their creation of the fighting ports for these castles, and many carracks have a deceptively massive appearance to their gun ports. One is (at first glance) often tempted to believe these castles towered five or six stories high, to judge from the rows of arches and ports etc. In particular the diminishing size of the ports, getting smaller higher up in the castle gives a sense of overwhelming massiveness to them, and (to our eyes) contributes to the notion that Carracks were unwieldy and ponderously top-heavy. The fate of the Mary Rose, of course, does nothing to help this impression, despite the fact that we don't know whether she was sunk by a flaw in design, in loading, or in handling.
But be that as it may I was stumped for quite a while on just how to proceed with these details. I had hoped that Bruno would be able to create relief panels for me from PE that I could overlay onto the castles, but in the event he was unable to do this. I think the reason being that the size of the PE fret was too limited to allow for this kind detailing. It's already four times the size of the model itself, as you can see.
So then, how to create rows of tiny uniformly spaced arches and pillars? I had experimented with creating arches from bent styrene rod on the Beja, but had been unsatisfied both with the uniformity and the fidelity of them. The pillars that are associated with such arches would not be too difficult to do, once I had managed to create the arches themselves. My thoughts immediately turned to my old friend, the 1/700th scale IJN Perforated Bar, one of my very favorite generic PE parts.
Hmm... What about these Lion Roar IJN Fairleads?
Pessimists see the world as it truly is...
Optimists change the world.
Optimists change the world.
-
callen
- Posts: 998
- Joined: Fri Dec 21, 2007 4:10 pm
Re: Scratch Building the Portuguese Carrack in 1/700th Scale
Pessimists see the world as it truly is...
Optimists change the world.
Optimists change the world.
-
callen
- Posts: 998
- Joined: Fri Dec 21, 2007 4:10 pm
Re: Scratch Building the Portuguese Carrack in 1/700th Scale
You can see from earlier pictures that the inboard face of the forecastle was rather crude and rough looking, and would definitely need facing... Finally I had gotten to the point where I could begin doing that.
Dry-fitting the arch for the 'horse-shoe deck/bulkhead' On the Flemish Carrack this essential feature was an actual deck that curved down from the forecastle and ran along either side of the Mainmast across the waist. However, by the time we get to cannon-carracks (late-era 16th Century Carracks, which is what this ship will be) the horseshoe-deck had become an arched bulkhead beneath the castle. I learned from Dr. Howard's book that this feature in English is called a 'cubbridge.' Who knew?
However in considering this, I realized that the arch of the cubbridge would be laying almost on top of the solid back end of the forecastle base, where it should be leading into an open space. Dr. Howard said that, although this is never depicted, carracks must certainly have had temporary bulkheads put in place here during combat. However I wanted the ship to look right, and decided I would need to find a way to hollow out the space behind the cubbridge so that it appeared to lead into the interior of the forecastle... Not fun... SURGERY!!!!!!!!
UGH!!! Not pretty. Well, at the very least if it was a complete failure, at least I could scratch a bulkhead to cover the mess if I had to... as long as I didn't break the castle off trying to hollow out the space beneath... Someday I'll really have a handle on these kinds of ships and think of much better and easier ways to build them.
We'll go at it from the other direction too.
In addition to the hole, there would need to be something to fill it, namely a deck... I was not able to precisely match the color of the existing waist deck, but I got reasonably close. Was not feeling confident about any of this at this point.
Paint it black. At this point I was hearing that phrase 'the operation was a success, but unfortunately the patient died...' echoing somewhere in the back of my head.
Deck piece fitted...
Arch piece glued in place...
Planking the arch...
SURGERY!!!!!!!!
UGH!!! Not pretty. Well, at the very least if it was a complete failure, at least I could scratch a bulkhead to cover the mess if I had to... as long as I didn't break the castle off trying to hollow out the space beneath... Someday I'll really have a handle on these kinds of ships and think of much better and easier ways to build them.
We'll go at it from the other direction too.
In addition to the hole, there would need to be something to fill it, namely a deck... I was not able to precisely match the color of the existing waist deck, but I got reasonably close. Was not feeling confident about any of this at this point.
Paint it black. At this point I was hearing that phrase 'the operation was a success, but unfortunately the patient died...' echoing somewhere in the back of my head.
Deck piece fitted...
Arch piece glued in place...
Planking the arch...
However in considering this, I realized that the arch of the cubbridge would be laying almost on top of the solid back end of the forecastle base, where it should be leading into an open space. Dr. Howard said that, although this is never depicted, carracks must certainly have had temporary bulkheads put in place here during combat. However I wanted the ship to look right, and decided I would need to find a way to hollow out the space behind the cubbridge so that it appeared to lead into the interior of the forecastle... Not fun...
Pessimists see the world as it truly is...
Optimists change the world.
Optimists change the world.
-
SvenLittkowski
- Posts: 14
- Joined: Thu Jul 07, 2011 2:34 pm
- Location: 18�00'33.64" N 76�46'50.73" W
- Contact:
Re: Scratch Building the Portuguese Carrack in 1/700th Scale
Amazing, amazing, amazing...
I have already reconstructions of many Actium ships, among them two of the largest of the battle galley of Antonius and Cleopatra, real floating fortresses.
I also have reconstructions of the smaller vessels of Octavian.
Another idea for your scratch-building "wharf" would be ... fantasy ships! I could give you some sketches, you might like them. What do you think about that?
Also, a question I got is, what are the possible sizes (in scales like "1:72" or "1:700", or in length like "2 cm" or "25 cm")?
Thanks for your time, good intentions, ideas and help,
Sven
Forum Navis Romana
http://navis.TerraRomana.org/Forum
-
callen
- Posts: 998
- Joined: Fri Dec 21, 2007 4:10 pm
Re: Scratch Building the Portuguese Carrack in 1/700th Scale
Wow! I'd love to see pics of your work. You can PM them to me or post them here if you'd like.SvenLittkowski wrote:Amazing, amazing, amazing...
I have already reconstructions of many Actium ships, among them two of the largest of the battle galley of Antonius and Cleopatra, real floating fortresses.
Wonderful!SvenLittkowski wrote:I also have reconstructions of the smaller vessels of Octavian.
I'd love to see them! Modeling is all about the imagination.SvenLittkowski wrote:Another idea for your scratch-building "wharf" would be ... fantasy ships! I could give you some sketches, you might like them. What do you think about that?
The most common scale for kits is 1/700th scale. This is good for large 20th Century Subjects... but makes earlier era ships quite small... as you can see. However, the advantage of 700th scale is the overwhelming representation of so many ship subjects. Other common scales are 350th, 200th, 100th, (a popular scratch building scale) 1/92, and 1/72.SvenLittkowski wrote:Also, a question I got is, what are the possible sizes (in scales like "1:72" or "1:700", or in length like "2 cm" or "25 cm")?
Pessimists see the world as it truly is...
Optimists change the world.
Optimists change the world.
-
callen
- Posts: 998
- Joined: Fri Dec 21, 2007 4:10 pm
Re: Scratch Building the Portuguese Carrack in 1/700th Scale
Pessimists see the world as it truly is...
Optimists change the world.
Optimists change the world.
-
callen
- Posts: 998
- Joined: Fri Dec 21, 2007 4:10 pm
Re: Scratch Building the Portuguese Carrack in 1/700th Scale
Pessimists see the world as it truly is...
Optimists change the world.
Optimists change the world.
-
SvenLittkowski
- Posts: 14
- Joined: Thu Jul 07, 2011 2:34 pm
- Location: 18�00'33.64" N 76�46'50.73" W
- Contact:
Re: Scratch Building the Portuguese Carrack in 1/700th Scale
How do you produce all these fine parts I see being used in these photos here? Do you use some software and a PC to produce them?
Thanks for your time, good intentions, ideas and help,
Sven
Forum Navis Romana
http://navis.TerraRomana.org/Forum
-
Tom L.

- Posts: 173
- Joined: Mon Jan 10, 2005 7:59 pm
- Location: Hamilton, Ohio
Re: Scratch Building the Portuguese Carrack in 1/700th Scale
A "cubbridge", I KNEW there had to be a proper name!
Neal, those arches are looking sweet, sweet, sweet!
Neal, those arches are looking sweet, sweet, sweet!
-
callen
- Posts: 998
- Joined: Fri Dec 21, 2007 4:10 pm
Re: Scratch Building the Portuguese Carrack in 1/700th Scale
Hey Tom!
Good to hear from you man! How are things over in...?(actually I don't know where you live) As you can see, your work is continuing to inspire me.
I miss your Venetian.
Hope you are doing well.
Good to hear from you man! How are things over in...?(actually I don't know where you live) As you can see, your work is continuing to inspire me.
I miss your Venetian.
Hope you are doing well.
Pessimists see the world as it truly is...
Optimists change the world.
Optimists change the world.
-
ARH

- Posts: 2557
- Joined: Mon Jan 10, 2005 10:52 am
- Location: Land of the Cheshire cat
Re: Scratch Building the Portuguese Carrack in 1/700th Scale
callen wrote:Hey Tom!
Good to hear from you man! How are things over in...?(actually I don't know where you live) As you can see, your work is continuing to inspire me.
I miss your Venetian.
Hope you are doing well.
Hamilton, Ohio, USA,
Hi Callen, keep up the good work, even my little parts are large compared to yours,
Simple but effective.
-
SvenLittkowski
- Posts: 14
- Joined: Thu Jul 07, 2011 2:34 pm
- Location: 18�00'33.64" N 76�46'50.73" W
- Contact:
Re: Scratch Building the Portuguese Carrack in 1/700th Scale
How do you produce all these fine parts I see being used in these photos here? Do you use some software and a PC to produce them?
Thanks for your time, good intentions, ideas and help,
Sven
Forum Navis Romana
http://navis.TerraRomana.org/Forum
-
callen
- Posts: 998
- Joined: Fri Dec 21, 2007 4:10 pm
Re: Scratch Building the Portuguese Carrack in 1/700th Scale
What do you think, Ron? Is it the economy of scale? ...Or the scale of our economy?ARH wrote: Hi Callen, keep up the good work, even my little parts are large compared to yours,
I hope someday to have the space and the skills to do the big stuff like what you guys do.
Hey Sven. Good to hear from you.SvenLittkowski wrote:How do you produce all these fine parts I see being used in these photos here? Do you use some software and a PC to produce them?
The parts I am using in the pics above are a combination of Photo Etch 'PE' and strip and rod styrene. Photo Etch is usually made from Brass, but sometimes from Nickel Steel, thin sheets of metal that are put into a bath of light-sensitive acid that creates a 'fret' or sheet of detail parts which can be used to add details to a model. PE has the advantage of being both bendable and bearing finer detail than what is possible in Plastic. If you scroll back through this thread you will find where I'm talking about my friend Bruno Gire who is a PE designer and was able to make a custom detail set for my carracks from Photo-Etched Nickel-Steel.
Some of the parts I have been using are from that. Some of them are from various other kinds of PE frets created for other purposes which I have adapted to my carrack builds. In particular on this page the arch detail I have been creating above involves splitting a 'perforated bar' PE Brass part which is provided in a generic set for people to use on their ship models. This kind of part is most commonly seen on Imperial Japanese Warships of WWII (notably carriers) which were known to have exposed girders in their structures that had regularly spaced lightening holes cut in them to reduce weight. My technique has been to take this part intended to represent a 1/700th scale Steel Girder, and modify it to resemble 1/700th scale Wooden Marquetry of the kind seen on Renaissance-Era warships. The white bits you see in the pictures are various sizes of styrene rod and strip which I combine with the Photo-Etch to create the desired style. The kind of subject I am modeling here is not the 'usua' 700th scale fare, so some improvisation is needed. Bruno has been a great help in providing numerous hard-to-make parts in his etch set, and yes, he creates the etching master on his computer. Without that my efforts would be a lot more challenging, and less successful.
If you look up Free-Time Hobbies and check out the 'Details for Model Ships' section you will see a good selection of the Photo Etch sets that are available to the ship modeler from various companies. It is an industry in itself quite apart from the kits. I have been known to spend twice the cost of a kit on details for the kit. There is a lot out there to choose from, although, apart from Bruno's set, none of it pertains to Renaissance Warships.
I hope that answers your questions, feel free to PM me if you want to know more about the parts I'm using and building.
Pessimists see the world as it truly is...
Optimists change the world.
Optimists change the world.
-
SvenLittkowski
- Posts: 14
- Joined: Thu Jul 07, 2011 2:34 pm
- Location: 18�00'33.64" N 76�46'50.73" W
- Contact:
Re: Scratch Building the Portuguese Carrack in 1/700th Scale
Thanks for this great answer, all my questions are solved.
Yes, it all depends on the software your friend is using, and also on the attached hardware. It seems to me that a hardware device is attached to his computer that etches based on the information the computer sends to this device. Am I right?
What software is your friend using? I use also some 3D software, maybe in case i have the same software, I could assist you as well and create plenty new amazing parts for your ships, so the burden is taken away a little bit from th shoulders of your friend. The etching, however, still has to be done on his system.
Thanks for your time, good intentions, ideas and help,
Sven
Forum Navis Romana
http://navis.TerraRomana.org/Forum
-
Tom L.
- Posts: 173
- Joined: Mon Jan 10, 2005 7:59 pm
- Location: Hamilton, Ohio
Re: Scratch Building the Portuguese Carrack in 1/700th Scale
Hi Neal!callen wrote:Hey Tom!
Good to hear from you man! How are things over in...?(actually I don't know where you live) As you can see, your work is continuing to inspire me.
I miss your Venetian.
Hope you are doing well.
To be brutally honest, things have been going poorly in the extreme. But, better things are on the immediate horizon, and time with a particular early, early Renaissance ship being a BIG priority.
-
callen
- Posts: 998
- Joined: Fri Dec 21, 2007 4:10 pm
Re: Scratch Building the Portuguese Carrack in 1/700th Scale
Well that's good news!Tom L. wrote:Hi Neal!
To be brutally honest, things have been going poorly in the extreme. But, better things are on the immediate horizon, and time with a particular early, early Renaissance ship being a BIG priority.
Keep us posted!
Pessimists see the world as it truly is...
Optimists change the world.
Optimists change the world.
-
callen
- Posts: 998
- Joined: Fri Dec 21, 2007 4:10 pm
Re: Scratch Building the Portuguese Carrack in 1/700th Scale
I believe the etching process is done by hand. From what I understand you immerse the brass sheet sandwiched with the glass patterns of the PE art, and then watch carefully to see how long it takes for the extra metal to be dissolved in the acid. If you don't wait long enough you will have 'flash' and/or and incomplete etching, if you wait too long then some of your parts will be eaten away by the acid. But to be honest, I have never done it, nor have I seen it done, this is just what I've heard from different people. Bruno told me that it took him about four years to learn the process before he was able to etch successfully, and that also the arrangement of the parts on the fret is crucial to the success of the etching process.SvenLittkowski wrote:Thanks for this great answer, all my questions are solved.
Yes, it all depends on the software your friend is using, and also on the attached hardware. It seems to me that a hardware device is attached to his computer that etches based on the information the computer sends to this device. Am I right?
Thank you for your kind offer Sven. Bruno and I actually work pretty closely together. Between Bruno and Rusty White of Flagship Models, who is the other 'partner' in our little endeavor, I have all the collaboration I have time for at the moment. Indeed, I wonder if I have time enough for what we're planning as it is.SvenLittkowski wrote:What software is your friend using? I use also some 3D software, maybe in case i have the same software, I could assist you as well and create plenty new amazing parts for your ships, so the burden is taken away a little bit from th shoulders of your friend. The etching, however, still has to be done on his system.
As far as what software Bruno uses, I really have no idea. Bruno lives in France, and we actually have never met. I don't have either the means or the skill for Photo Etch, so I leave that pretty much in his hands. I'm sure if you do a search for Custom Photo Etch on the Internet you can find more information about it. There are a few modelers I know or have heard of who create Photo Etch themselves. You might also post a question on the main forum if you'd like to find out more about it.
Pessimists see the world as it truly is...
Optimists change the world.
Optimists change the world.