Bob Pink.
Silent Night with the Silent Service GB 11/1-12/25/11
Moderators: MartinJQuinn, JIM BAUMANN, Jon, Dan K
-
Quincy

- Posts: 2217
- Joined: Fri Apr 08, 2005 9:41 am
- Location: Monson, MA.
Re: Silent Night with the Silent Service GB 11/1-12/25/11
I like it! 
Bob Pink.
Bob Pink.
-
D-Boy

- Posts: 1298
- Joined: Wed May 26, 2010 1:57 pm
- Location: Schodack Landing, NY
Re: Silent Night with the Silent Service GB 11/1-12/25/11
Love it! Can you share more about your technique, and what some of the key features you were trying to capture? What do you have to be mindful of when modeling ice?drdoom1337 wrote:I have a very large update. I added a combination of plaster of paris and clear acrylic gel to get the icy feel I wanted for my dio. All that remains is to recoat the snow/ice surface with white paint and add the antennas. Thoughts?
[img]http://i186.photobucket.com/albums/x90/drdoom1337/S6301449.jpg[/img
-
drdoom1337

- Posts: 1161
- Joined: Wed Apr 23, 2008 7:40 pm
- Location: New Jersey
Re: Silent Night with the Silent Service GB 11/1-12/25/11
This was the first time I ever tried to make ice. What I did was build the model and place it into a Styrofoam cutout as seen earlier in the thread. Then I mixed plaster of paris in a very shallow rectangle metal tray. When the plaster cures, smash it with a hammer. Then use acrylic gel medium around the immediate submarine hull and sprinkle on the cracked plaster of paris. When that's all said and done, mix more plaster of paris and pour it directly into the base. It'll fill everything in. Then paint using a combination of sky blue and white which I am almost finished with.D-Boy wrote: Love it! Can you share more about your technique, and what some of the key features you were trying to capture? What do you have to be mindful of when modeling ice?
-
Bob Dedmon

- Posts: 121
- Joined: Thu Jan 20, 2005 7:39 am
- Location: Tide Water, Va
My 1941 Gato class boat
She's finished, this is the Doyusha 1/700 Gato from 1941. I added the screw guards, rails and antenna rigging. I did a little weathering with pastel chalks. This is the first submarine I've done in over 40 years! The kit comes split at the waterline so that part was easy. I set my water up in the usual way with "Water Effects" acrylic paint dry brushed and over coated with clear blue. The kit provides a choice of either extended or retracted dive planes and periscope sheers. I elected to extend the periscope and retract the dive planes. All in all an easy, quick and fun build.


It's easier to beg foregiveness than it is to ask for permission.
-
D-Boy
- Posts: 1298
- Joined: Wed May 26, 2010 1:57 pm
- Location: Schodack Landing, NY
Re: Silent Night with the Silent Service GB 11/1-12/25/11
Bob -
Well done! Can you post a photo of the kit box - want to keep an eye out for this one. And is the "water effects" paint something found at craft stores, model railroad section of a hobby shop, or elsewhere altogether?
D-Boy
Well done! Can you post a photo of the kit box - want to keep an eye out for this one. And is the "water effects" paint something found at craft stores, model railroad section of a hobby shop, or elsewhere altogether?
D-Boy
-
D-Boy
- Posts: 1298
- Joined: Wed May 26, 2010 1:57 pm
- Location: Schodack Landing, NY
Re: Silent Night with the Silent Service GB 11/1-12/25/11
Some progress on the Grayback. (There better be!)
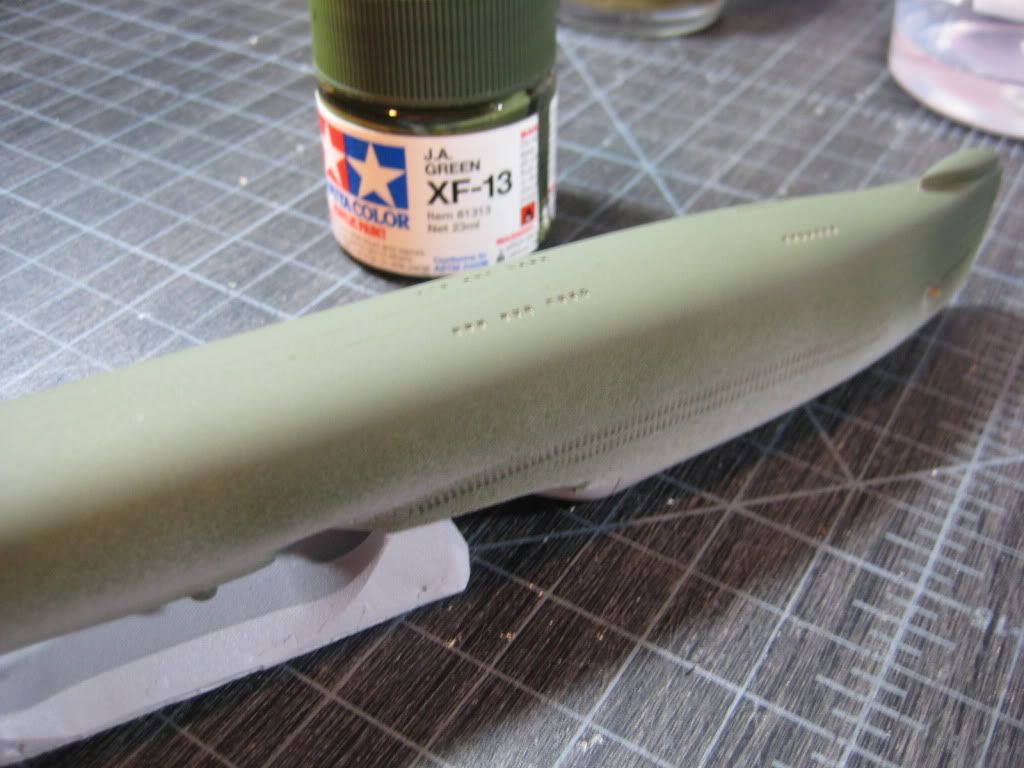
Sail is nearly ready for final detailing. Fairing receiving last putty application before final sanding. Daylight area now has bracing shimmed in place - Plastruct filed in height and thickness to fit - spacing for five windows. Grabrails sanded off in prep for PE applications. Additional sail details researched and planned for - some miscellaneous details will be replicated by PE. Hatch on port side of sail puttied over - no photos I've seen confirm presence.

Fired up my airbrush for the first time in several months - hose malfunctions and a bit of an odyssey to secure replacement parts. Had to review the schematic drawing of the airbrush to make sure I was reassembling properly. Warmed up by shooting some OKB Grigorov stands for several 1:700 sub models under construction and then laid in some Tamiya XF-13 Japanese Army Green as an undercoat for the eventual black on this part of the hull. Seeking some color depth and tone by doing this - who knows if it will work. Key will be light overcoats of thinned black to see if I can preserve some color underneath...
The growing list of finished builds is good to see. Hope to match you soon!
D-Boy
Sail is nearly ready for final detailing. Fairing receiving last putty application before final sanding. Daylight area now has bracing shimmed in place - Plastruct filed in height and thickness to fit - spacing for five windows. Grabrails sanded off in prep for PE applications. Additional sail details researched and planned for - some miscellaneous details will be replicated by PE. Hatch on port side of sail puttied over - no photos I've seen confirm presence.
Fired up my airbrush for the first time in several months - hose malfunctions and a bit of an odyssey to secure replacement parts. Had to review the schematic drawing of the airbrush to make sure I was reassembling properly. Warmed up by shooting some OKB Grigorov stands for several 1:700 sub models under construction and then laid in some Tamiya XF-13 Japanese Army Green as an undercoat for the eventual black on this part of the hull. Seeking some color depth and tone by doing this - who knows if it will work. Key will be light overcoats of thinned black to see if I can preserve some color underneath...
The growing list of finished builds is good to see. Hope to match you soon!
D-Boy
-
Bob Dedmon
- Posts: 121
- Joined: Thu Jan 20, 2005 7:39 am
- Location: Tide Water, Va
Re: Silent Night with the Silent Service GB 11/1-12/25/11
I usually find it at contests at the vendors tables under that name. I figure a well stocked craft shop should have it or you could try Free Time or one of the other online hobbyshops. It comes in at least 2 different colors Pacific blue and Atlantic green. I don't have the box any more (no room) I got this one from Hobby Link Japan a couple months ago. In Japan it's an inexpensive kit (800 yen ~$8.00), it may be available here, the company name IS Doyusha. The kit is incomplete/incorrect in that for a 1941 Gato it lacks the screw guard, that was canabilized from a friends Tamiya Gato.D-Boy wrote:Bob -
Well done! Can you post a photo of the kit box - want to keep an eye out for this one. And is the "water effects" paint something found at craft stores, model railroad section of a hobby shop, or elsewhere altogether?
D-Boy
It's easier to beg foregiveness than it is to ask for permission.
-
Cliffy B

- Posts: 3125
- Joined: Sun Feb 01, 2009 3:55 pm
- Location: Hawaii
- Contact:
Re: Silent Night with the Silent Service GB 11/1-12/25/11
Spectacular builds gentlemen!
Nice Gato there Bob That water effects stuff certainly does the trick well.
Loving the snow effect Doc. Are you done painting the Typhoon or is she still in primer?
D-Boy, she's looking nice, keep it up
Quincy, your Dutch boat is coming along nicely as well! All of those little details really show. How are you going to display her?
Updates on my Type IXC: Sorry about the photos, the lighting sucks in here. I'll take some better shots (probably outside) when I'm all done.
Base is assembled and ready to go. I'm waiting for the gel medium to dry so I can start painting the water. I took a chunk of 1/8" Styrofoam I had from a appliance box (vacuum I think?) and glued it in the corner after cutting a nice jagged edge on it. I sanded a depression into it to form a beach area and sloped it inland. Then came liberal coating of acrylic modeling paste (same as the gel medium just thicker and dries white) to give it some texture and rough up the beach a bit. After I coated the watercolor paper with gel medium and sculpted some gentle breakers into it I scattered my pack ice around (0.5mm sheet styrene cut into random shapes). I may add some more pieces later, I don't know yet. I stuck the sub on and realized my surface wasn't as flat as I had thought. There's a little gap under the sail where the paper dipped that I'll plug later with some more gel. I want the rest to dry first to see if I need to plug any more gaps.
The sub is weathered with watercolors (Payne's Gray and a rusty gray I mixed from multiple colors) after I applied a protective coat of Future. That way I could wash off the wash without ruining the acrylics underneath. I also dry brushed some MM acrylics in random areas as well to accent things. I'll give the entire dio a coat of flat clear when I'm finished.


Once I paint the water I'll coat the ice and shore with some baking soda plus PVA glue. Then I'll add the crew and the rubber boats.
By the way, what color(s) should I paint the crew given they're in the Arctic? Would their foul weather gear be dark gray oilskins? Would the CO retain his signature white cover? I've found plenty of shots of the crew in such garb but none are in color. Thoughts?
Any and all comments, thoughts, questions, etc... are appreciated as always.
-Mike
Nice Gato there Bob
Loving the snow effect Doc. Are you done painting the Typhoon or is she still in primer?
D-Boy, she's looking nice, keep it up
Quincy, your Dutch boat is coming along nicely as well! All of those little details really show. How are you going to display her?
Updates on my Type IXC: Sorry about the photos, the lighting sucks in here. I'll take some better shots (probably outside) when I'm all done.
Base is assembled and ready to go. I'm waiting for the gel medium to dry so I can start painting the water. I took a chunk of 1/8" Styrofoam I had from a appliance box (vacuum I think?) and glued it in the corner after cutting a nice jagged edge on it. I sanded a depression into it to form a beach area and sloped it inland. Then came liberal coating of acrylic modeling paste (same as the gel medium just thicker and dries white) to give it some texture and rough up the beach a bit. After I coated the watercolor paper with gel medium and sculpted some gentle breakers into it I scattered my pack ice around (0.5mm sheet styrene cut into random shapes). I may add some more pieces later, I don't know yet. I stuck the sub on and realized my surface wasn't as flat as I had thought. There's a little gap under the sail where the paper dipped that I'll plug later with some more gel. I want the rest to dry first to see if I need to plug any more gaps.
The sub is weathered with watercolors (Payne's Gray and a rusty gray I mixed from multiple colors) after I applied a protective coat of Future. That way I could wash off the wash without ruining the acrylics underneath. I also dry brushed some MM acrylics in random areas as well to accent things. I'll give the entire dio a coat of flat clear when I'm finished.
Once I paint the water I'll coat the ice and shore with some baking soda plus PVA glue. Then I'll add the crew and the rubber boats.
By the way, what color(s) should I paint the crew given they're in the Arctic? Would their foul weather gear be dark gray oilskins? Would the CO retain his signature white cover? I've found plenty of shots of the crew in such garb but none are in color. Thoughts?
Any and all comments, thoughts, questions, etc... are appreciated as always.
-Mike
Drawing Board:
1/700 Whiff USS Leyte and escorts 1984
1/700 Whiff USN Modernized CAs 1984
1/700 Whiff ASW Showdown - FFs vs SSGN 1984
Slipway:
1/700 Whiff USN ASW Hunter Killer Group Dio 1984
1/700 Whiff USS Leyte and escorts 1984
1/700 Whiff USN Modernized CAs 1984
1/700 Whiff ASW Showdown - FFs vs SSGN 1984
Slipway:
1/700 Whiff USN ASW Hunter Killer Group Dio 1984
-
reigels

- Posts: 788
- Joined: Fri Oct 19, 2007 2:25 pm
- Location: Phoenix, AZ
Re: Silent Night with the Silent Service GB 11/1-12/25/11
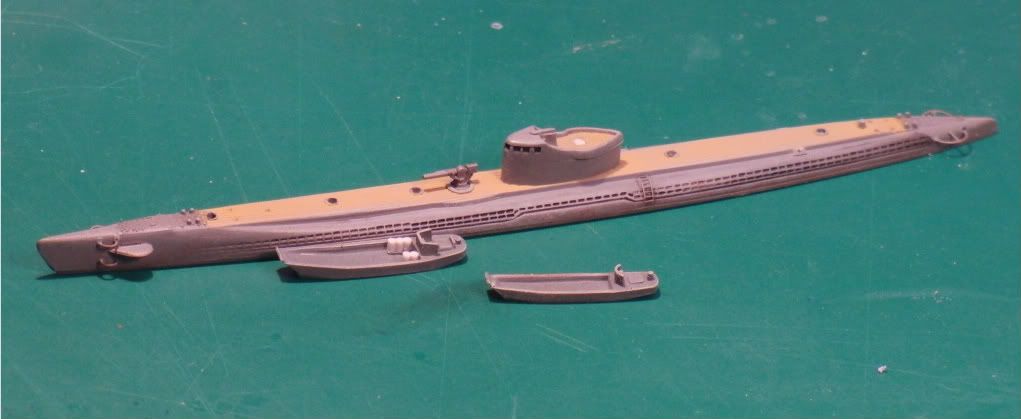
I'm going to see if I can get this Skywave Ro-35 completed by Christmas. Nothing too ambitious on this one. Building her with deck hatches open, offloading supplies to a couple of landing craft "somewhere in the South Pacific". First coat of grey went on a little after this was taken:

-- Scott
-
D-Boy
- Posts: 1298
- Joined: Wed May 26, 2010 1:57 pm
- Location: Schodack Landing, NY
Re: Silent Night with the Silent Service GB 11/1-12/25/11
Scott, what type/brand of putty are you using here?reigels wrote:I'm going to see if I can get this Skywave Ro-35 completed by Christmas. Nothing too ambitious on this one. Building her with deck hatches open, offloading supplies to a couple of landing craft "somewhere in the South Pacific". First coat of grey went on a little after this was taken:
-
reigels
- Posts: 788
- Joined: Fri Oct 19, 2007 2:25 pm
- Location: Phoenix, AZ
Re: Silent Night with the Silent Service GB 11/1-12/25/11
It's Bondo glazing putty (from the car parts store). I like that it dries quickly and sands well.
-- Scott
-
reigels
- Posts: 788
- Joined: Fri Oct 19, 2007 2:25 pm
- Location: Phoenix, AZ
Re: Silent Night with the Silent Service GB 11/1-12/25/11
After a little paint:
I used Mr. Color Kure gray and a Humbrol black wash (wiped off when dry with a drop of paint thinner on a rag to color the limber holes). Not sure if the Mr Color is lacquor or acrylic, but in either case if doesn't notice the paint thinner.
I used Mr. Color Kure gray and a Humbrol black wash (wiped off when dry with a drop of paint thinner on a rag to color the limber holes). Not sure if the Mr Color is lacquor or acrylic, but in either case if doesn't notice the paint thinner.
-- Scott
-
Pieter
- Posts: 1602
- Joined: Sat Sep 17, 2005 9:19 am
Re: Silent Night with the Silent Service GB 11/1-12/25/11
Almost there.
Surcouf now has a water base, 37mm guns
and her aircraft and crane. The aircraft was build and "folded down" together from the parts in the kit, the crane is .3 mm steel rod. Tomorrow I will add some crew and the ships' wake before I will be heading out of town for a few days.
Surcouf now has a water base, 37mm guns
-
D-Boy
- Posts: 1298
- Joined: Wed May 26, 2010 1:57 pm
- Location: Schodack Landing, NY
Re: Silent Night with the Silent Service GB 11/1-12/25/11
Pieter - nice job on this kit! Any issues encountered along the way? What is the PE source?
- D-Boy
- D-Boy
-
Pieter
- Posts: 1602
- Joined: Sat Sep 17, 2005 9:19 am
Re: Silent Night with the Silent Service GB 11/1-12/25/11
The issues with the kit were already mentioned earlier in the thread. Nice shapes but the smaller parts are very difficult to separate from the resin backing. You may noticed I have had to substitute a modified Skywave 25mm gun for one of the 37mm s in the kit as it broke apart when I tried to removed it form the resin backing. The PE is from the spares box. I think it's WEM but I'm not sure.
-
Pieter
- Posts: 1602
- Joined: Sat Sep 17, 2005 9:19 am
Re: Silent Night with the Silent Service GB 11/1-12/25/11
Laatste loodjes.
The submarine now has a crew and the aircraft has her markings (from the old GMM naval decals set).
An overview of Surcouf sailing...
And this is how she would look through a periscope or a lookout position on another vessel in the distance.
Surcouf had a diving time of more than 3 minutes.
The submarine now has a crew and the aircraft has her markings (from the old GMM naval decals set).
- aircraftandsail.JPG (33.73 KiB) Viewed 3599 times
Surcouf had a diving time of more than 3 minutes.
-
Pieter
- Posts: 1602
- Joined: Sat Sep 17, 2005 9:19 am
Re: Silent Night with the Silent Service GB 11/1-12/25/11
Some last pictures.The last things I did was a black wash and some dry brushing and that's it.
I finished a group build.... and it was a fun one.
I'm looking forward to seeing the others when I'm back next tuesday.
I finished a group build.... and it was a fun one.
I'm looking forward to seeing the others when I'm back next tuesday.
-
Quincy
- Posts: 2217
- Joined: Fri Apr 08, 2005 9:41 am
- Location: Monson, MA.
Re: Silent Night with the Silent Service GB 11/1-12/25/11
Great job Pieter! That is one cool looking sub! 
Bob Pink.
Bob Pink.
-
Cliffy B
- Posts: 3125
- Joined: Sun Feb 01, 2009 3:55 pm
- Location: Hawaii
- Contact:
Re: Silent Night with the Silent Service GB 11/1-12/25/11
Hey guys, how are we dealing with the deadline on this build; midnight on the 24th or the 25th? I'm almost done with the seascape, just need to finish painting the last of the bergs and glue down the guys. I'll post shots tomorrow night.
Great looking Surcouf there Peiter, I've always loved that boat
Nice paint work Reigels! How are you planning to incorporate the landing craft into the scene?
Anyone else have a SITREP on their builds?
Great looking Surcouf there Peiter, I've always loved that boat
Nice paint work Reigels! How are you planning to incorporate the landing craft into the scene?
Anyone else have a SITREP on their builds?
Drawing Board:
1/700 Whiff USS Leyte and escorts 1984
1/700 Whiff USN Modernized CAs 1984
1/700 Whiff ASW Showdown - FFs vs SSGN 1984
Slipway:
1/700 Whiff USN ASW Hunter Killer Group Dio 1984
1/700 Whiff USS Leyte and escorts 1984
1/700 Whiff USN Modernized CAs 1984
1/700 Whiff ASW Showdown - FFs vs SSGN 1984
Slipway:
1/700 Whiff USN ASW Hunter Killer Group Dio 1984
-
Quincy
- Posts: 2217
- Joined: Fri Apr 08, 2005 9:41 am
- Location: Monson, MA.
Re: Silent Night with the Silent Service GB 11/1-12/25/11
I just have to submit photos of my build either tonight or tomorrow. The pressure is on! 
Bob Pink.
Bob Pink.