An excessively ambitious 1/72 Revell Gato build...

Moderators: BB62vet, MartinJQuinn, JIM BAUMANN, Jon, Dan K

User avatar
Channell
Posts: 2068
Joined: Mon May 14, 2012 12:18 pm
Location: Salt Lake City, USA

An excessively ambitious 1/72 Revell Gato build...

Post by Channell »

Time to start a new project! :cool_2:

I built a Revell 1/72 Gato a few years ago, but it didn't turn out nearly as good as I wanted it to. For one, I botched my "covered wagon" fairwater mod and made it too low... but the main thing that bothered me about the kit was that for such a freaking, insanely and ridiculously huge model there just wasn't a lot there detail wise. Anyways I got disheartened and never really 100% finished it... I only did the first weathering wash, didn't install all the details/rails/ect.

Image

Well now I'm gonna do something about it... the kit that is. Rather than mess with the old gato, I decided to start fresh with a new one... and after being inspired by a couple of insanely superdetailed online builds of the popular Revell 1/72 U boat I want to give the gato kit a similar treatment.

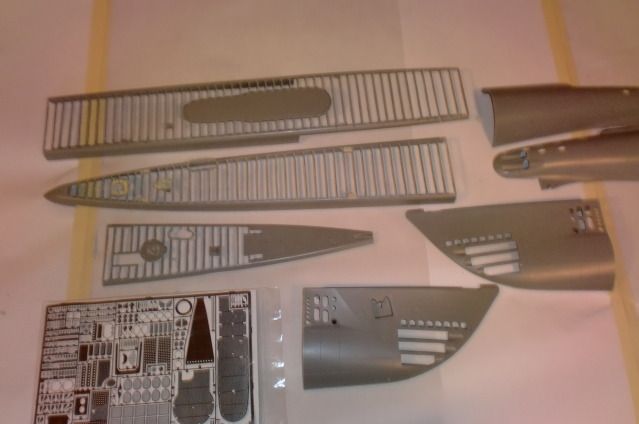
Anyway, it just arrived in the mail the other day! I also ordered the Eduard "Big Ed" PE set and am still waiting for it.

The general plan is to scratchbuild the top of the pressure hull and various goodies underneath the deck, then top it off with PE and a new see-though planked deck, as well as adding all the missing details on the hull itself, plus some realistic oil-canning and a relatively clean but still war-worn weathering job.

I haven't decided on a particular boat to replicate, but anticipate doing so soon... at the moment I'm leaning towards either the Cavalla (wartime configuration) or the Cod... though I've never been a rivet-counter at heart and may just go with a "typical gato" like I was aiming to do with the first one.

(edit 7-27-12... I've since decided to go with the Cobia just after the end of WW2 :thumbs_up_1:)

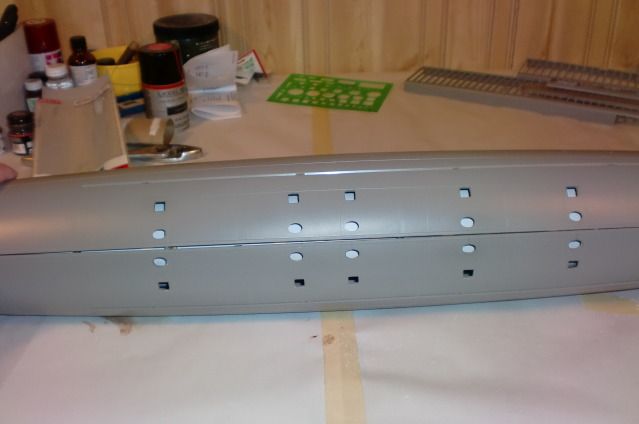
Anyway, while waiting for the PE to come in I've started on what will probably be the most tedious part of the build; opening up the deck.

I decided to do it the insane way and cut the ribs right out of the deck. It's a whole lot more work than just putting the PE on top but I think it will be worth it in the end.

Image

Basically I am marking off the rib locations with 1/16" masking tape, drilling out the molded plating and squaring everything off with an exacto-knife. It's more work than just cutting everything out and replacing the ribs with styrene strips but it does have the advantage of keeping everything straight and strong, plus saving me a bit 'o cash in the process.

More to come, but it might take a year or so to finish! Feel free to spout advice, comments, insults and send cash donations at your leisure! :joker:
Last edited by Channell on Fri Jul 27, 2012 11:32 am, edited 1 time in total.
-Jason Channell

Current Project: 1/200 Bismarck
User avatar
Channell
Posts: 2068
Joined: Mon May 14, 2012 12:18 pm
Location: Salt Lake City, USA

Re: An excessively ambitious 1/72 Revell Gato build...

Post by Channell »

Here's the progress I made over the weekend (sorry about the picture quality... my camera just wasn't cooperating):

Image

Image

She's not much to look at yet... I cut the molded (hidden) deck support from the hull halves and have nearly finished cutting the deck ribs out of the molded deck. I am also trying to figure out how best to add the top of the pressure hull to this mess, and have been scrounging for photos online of what actually lies under there.

I would love to see the work of someone who has already tried this... but try as I might I can't find anyone else online who's gone for a more realistic deck instead of the solid kit deck and/or with the PE just glued on top. Does anyone know of any good examples out in internet-land?
-Jason Channell

Current Project: 1/200 Bismarck
User avatar
Channell
Posts: 2068
Joined: Mon May 14, 2012 12:18 pm
Location: Salt Lake City, USA

Re: An excessively ambitious 1/72 Revell Gato build...

Post by Channell »

I read on one of various superdetailed 1/72 U-boat build logs that the quickest way to ostracize yourself from the modeling community is to build a homemade pressure hull inside your large WW2 submarine model. Apparently it is the the #2 sign that a ship model builder has gone totally insane (#1 is when they start building a 1/24 scale Yamato in the back yard). :whistle:

It must be true to get 150-something views but not a single comment!

Anyway, I've spent hours cutting out stuff but have yet to put a drop of glue on anything (minus the kit display base anyway).

Image

I finally got my Eduard PE set and despite various internet warnings I can see it will be possible to see underneath the deck through the PE:

Image

So all this cutting is looking like it will be worth it after all. :woo_hoo:

I also found some Evergreen styrene strips (.010 x .030) that are exactly the same size as the old molded on "teak" decking and will very nicely allow me to replicate that part of the deck extremely accurately with all the details missing on the monolithic scribed plastic original.

Anyway, the grinding and cutting on the deck framing has gone on for quite a few hours... In process:

Image

And finally finished!

Image

I also cut out the torpedo doors and just started drilling out the umpteen holes that are missing from the kit.

Anyway, the next step (after finishing the holes) will be to scratchbuild the top of the pressure hull. It doesn't look like it will be as hard as it sounds:

http://navsource.org/archives/08/206/0820612c.jpg

It looks like I can get it done by getting the right sized tube, squaring off the rectangular area left on the 2 hull pieces after I cut off the former hidden molded-in deck support, gluing it in with styrene strips on the sides and adding strips across the top of the pressure hull to replicate the framing. Then I can add the bulkheads, induction pipes, scratchbuild the cylindrical conning tower, various pipes, supports and so forth.

It's gonna be a while before I get to that point, so don't give up on me yet. Now if only I could stay focused on this build instead of buying plywood sheets for the Yamato out back... :big_grin: :wave_1:
Last edited by Channell on Tue Jul 03, 2012 9:07 pm, edited 1 time in total.
-Jason Channell

Current Project: 1/200 Bismarck
Russ2146
Posts: 2126
Joined: Tue Nov 03, 2009 9:28 pm
Location: Egg Harbor Twp, NJ

Re: An excessively ambitious 1/72 Revell Gato build...

Post by Russ2146 »

Not being a sub guy, the Navsource photo clarified a few things. What you did with the deck made sense, especially when the PE showed up. But the photo, that really put what you are doing in perspective. :eyes_spinning: So now i am comfortable in concurring that, yes, you are indeed insane. :crazy:

That said, if it comes out as you want, it will be a classic.
User avatar
sirpaul
Posts: 1500
Joined: Sun Jun 12, 2011 10:37 am
Location: Massachusetts.

Re: An excessively ambitious 1/72 Revell Gato build...

Post by sirpaul »

Nice work so far. All the cutting will pay off in the end. I will be following your build and chiming in here and there. Are you going to do the torpedo tubes aswell?
On the Bench
1/350 Independence
1/350 Dunkerque
1/350 Shimakaze
1/350 Sharnhorst Dragon
1/350 Belfast
User avatar
Channell
Posts: 2068
Joined: Mon May 14, 2012 12:18 pm
Location: Salt Lake City, USA

Re: An excessively ambitious 1/72 Revell Gato build...

Post by Channell »

sirpaul wrote:Nice work so far. All the cutting will pay off in the end. I will be following your build and chiming in here and there. Are you going to do the torpedo tubes aswell?
I'm thinking about it... but my main goal in cutting out the exterior doors was to replace them with actual doors and loose the "molded toy" look they give.

That said, I have a feeling I'll be a bit sick of scratchbuilding by that point and will likely just have them closed.
-Jason Channell

Current Project: 1/200 Bismarck
User avatar
Channell
Posts: 2068
Joined: Mon May 14, 2012 12:18 pm
Location: Salt Lake City, USA

Re: An excessively ambitious 1/72 Revell Gato build...

Post by Channell »

Russ2146 wrote:Not being a sub guy, the Navsource photo clarified a few things. What you did with the deck made sense, especially when the PE showed up. But the photo, that really put what you are doing in perspective. :eyes_spinning: So now i am comfortable in concurring that, yes, you are indeed insane. :crazy:

That said, if it comes out as you want, it will be a classic.
Ha! :lol_1:

Some more thinking out loud:

I really do need to decide which boat to model... Maybe I should just stick with the good 'ole Cobia after all.

I've learned all that metal decking is not technically accurate for a WW2 boat; all the Navsource photos seem to show gatos with almost the entire decks done in teak. But the PE is too nice to not use and scratchbuilding the smaller teak section plank by plank is already gonna be a chore. There is one photo of a burial at sea on the Cobia (with the metal plate decking) dated near the very end of the war though...so at least one wartime boat was sporting such a deck... at the end, anyway.

http://www.navsource.org/archives/08/0824515.jpg

I have already decided to ditch the prop guards and have already filled them in... does anyone know if the Cobia was sporting them during the war or are they a later edition?

I really wanted to do a "covered wagon" fairwater as well, but the PE set also contains a lot of upgrades for the standard fairwater that would otherwise be wasted, and more study on my part is showing plenty gatos ended the war without that particular mod anyway. So many choices, so many decisions...
Last edited by Channell on Sat Aug 11, 2012 3:17 pm, edited 1 time in total.
-Jason Channell

Current Project: 1/200 Bismarck
Tom Dougherty
Posts: 649
Joined: Wed May 07, 2008 8:05 pm
Location: Ayer, Ma. USA

Re: An excessively ambitious 1/72 Revell Gato build...

Post by Tom Dougherty »

I really do need to decide which boat to model... Maybe I should just stick with the good 'ole Cobia after all.
Yes, and be sure to choose a particular time period as well. Outfitting changed as the war progressed, and no two boats were alike in details by 1945. Pay particular attention to radio & radar antennas and gun outfittings.
I've learned all that metal decking is not technically accurate for a WW2 boat; all the Navsource photos seem to show gatos with almost the entire decks done in teak. But the PE is too nice to not use and scratchbuilding the smaller teak section plank by plank is already gonna be a chore. There is one photo of a burial at sea on the Cobia (with the metal plate decking) dated near the very end of the war though...so at least one wartime boat was sporting such a deck... at the end, anyway.

http://www.navsource.org/archives/08/0824515.jpg
Actually, many of the boats had the metal plating at extreme fore and aft decks, but teak decking in the area forward and aft of the conning tower fairwater. see, for example,: http://www.navsource.org/archives/08/0823750.jpg and http://www.navsource.org/archives/08/0823749.jpg on Trigger.
I have already decided to ditch the prop guards and have already filled them in... does anyone know if the Cobia was sporting them during the war or are they a later edition?
They were actually an earlier configuration. Early in the war, boats went out with them attached. They were deleted later in the war. Here's USS Whale in 1942 http://www.navsource.org/archives/08/0823908.jpg and same boat in 1945: http://www.navsource.org/archives/08/0823916.jpg. The wreck of the Grunion, lost in 1942 and recently rediscovered has prop guards still visible on the wreck http://navsource.org/archives/08/100/0821663.jpg.
I really wanted to do a "covered wagon" fairway as well, but the PE set also contains a lot of upgrades for the standard fairwater that would otherwise be wasted, and more study on my part is showing plenty gatos ended the war without that particular mod anyway. So many choices, so many decisions...
Correct, Cobia never received the cutdown fairwater. Neither did USS Barb or Tinosa.
Tom Dougherty
Researcher for: "Project Azorian�
https://www.amazon.com/Azorian-Raising- ... B008QTU7QY
"Project Azorian: The CIA and the Raising of the K-129" Book
https://www.usni.org/press/books/project-azorian
User avatar
Channell
Posts: 2068
Joined: Mon May 14, 2012 12:18 pm
Location: Salt Lake City, USA

Re: An excessively ambitious 1/72 Revell Gato build...

Post by Channell »

This weekend I decided to ditch the submarine and build a model rocket instead:

Image

:big_grin:

Actually, this is the part where I build the pressure hull.

As most of this detail will eventually be obscured by the deck, I an not going to stress myself out with accurate to the millimeter, perfect replication and so forth... just get it to look basically the right shape.

"Basically right" was found in the local Big Box home center store. After judging from cross-section photos of prefab gato hull sections from Navsource mixed with the kit's 2 center support crosspieces (basically ready-made cross sections of the hull) I found 2" PVC pipe couplers were very close to the right size. I glued several of them together, cut and spliced some pieces for the sloping front portion of pressure hull and cut circular holes in the kit cross-pieces to slide around the "pressure hull" and get a perfectly strong and serviceable base for the under-deck details.
Image

Image

Image

I also cut out the lower drain holes based on the instructions from the Eduard PE:

Image

And here's a test-fit to make sure this whole thing is gonna work:

Image

Image

After gluing it all together, I need to fill the gap between the pressure hull and the outer hull. First I thought I'd use styrene strips, but now I'm thinking auto body putty might be a better move since it would give yet more strength to the hull and because I will have to smooth out a fair portion of the top while leaving a long open rectangular area filled with styrene "ribs" in the middle to replicate this:

http://navsource.org/archives/08/206/0820915.jpg

Then again, maybe it would be better to do both...

Anyway, the fun goes on!
Last edited by Channell on Mon Nov 12, 2012 4:58 pm, edited 4 times in total.
-Jason Channell

Current Project: 1/200 Bismarck
User avatar
gtbred
Posts: 2712
Joined: Wed Jan 13, 2010 9:10 am
Location: san francisco

Re: An excessively ambitious 1/72 Revell Gato build...

Post by gtbred »

that is crazy good sir! :thumbs_up_1:
User avatar
Rotorhead
Posts: 127
Joined: Thu Dec 25, 2008 5:36 pm

I'm impressed

Post by Rotorhead »

OK Channel..........your insane! But I understand what your trying to do and I LIKE IT!

A super strong steel sewer pipe with this delicate decking and support structure over the sewer pipe. I've been trying for that "look" for a long time and have failed. I will be watching closely. I suspect you just may be onto something here.

Regards
Steve
User avatar
Channell
Posts: 2068
Joined: Mon May 14, 2012 12:18 pm
Location: Salt Lake City, USA

Re: An excessively ambitious 1/72 Revell Gato build...

Post by Channell »

Here's my weekly checkup on the "ambitious gato build"...

I'm waiting to get paid so I can buy all the stuff I need to scratchbuild the pressure hull top... sadly, bills take priority over model ships. I've decided to stick with the Cobia in her wartime guise around 1945, BTW.

So most of the time put into the ship had been to skeletonize yet more pieces of the kit in hopes of getting a more accurate end-product, and opening molded-in doors.

Image

The top 2 pieces are the forward sides of the hull above the pressure hull which will eventually be faced with PE. I opened all the doors on the fairwater and the bottom piece is the once-solid kit conning tower deck and gun platforms which I carved a frame out of for the PE to sit on top.

I decided to jump ahead and do the basic structure assembly on the fairwater since the rest of the boat is pending fundage...

Image

I was quite proud of my Eduard PE frame addition, but I ended up putting it on the wrong side! :bash_2:

Luckily it was easy to adjust the frame piece to fit in backwards, solving the problem (and giving me reason to add more detail to the forward side, which comes next).

Anyway, the see through deck really changes the look... it's honestly a bit TOO see-through, but paint should fix that. It's gonna be very challenging to scratchbuild all the stuff underneath!

Image

Finally, I tried my hand at oil-canning on the bow... this pic isn't great, but I think it will look OK (if not spectacular) with a little bit more work. The new "weld line" is just Testors contour putty pressed in between to pieces of tape; I also tried to "rough up" the way too conspicuous kit weld-lines.

I also flubbed on the torpedo vent holes (behind the tube doors)... I thought I could drill them out by hand but my skills just aren't mad enough to match my ambition. I'll be on the hunt for some suitable PE to do the job instead...

Image
-Jason Channell

Current Project: 1/200 Bismarck
User avatar
Channell
Posts: 2068
Joined: Mon May 14, 2012 12:18 pm
Location: Salt Lake City, USA

Re: An excessively ambitious 1/72 Revell Gato build...

Post by Channell »

Another progress check... this is the first "build log" I've done and it does great things to keep me motivated on such a patience testing project. :thumbs_up_1:

This time I actually have something vaguely resembling a ship to show ya! I finally got the main section of the hull put together and the ribs on the pressure hull top in.

Image

Image


I threw in Das Boot (the long version :cool_2:) and went at it yesterday; it was miserable! I had a hard time getting the rib pieces to stick to the PVC, even with superglue. I had to pre-bend the Evergreen strips to take the spring out of them and made a bit of a mess with the glue in the process. Trying to get the hull sides to match up was also quite difficult, but I managed to get it all together with a minimum of putty and only a little too much flare forward (though it still won't stick out underneath the deck). I filled the forward and aft ends with Bondo body putty this morning; it took three coats and a bit of "cheese grating" the not quite cured putty but I now have the right shape and will be ready for sanding after it all cures.

The one thing that I am very happy with is the hull is immensely strong... I feel like I could use it as a baseball bat and get away with it! It will make an excellent support to build the rest of the deck upon.

I also worked a bit on the bridge details:

Here's the Eduard PE on the aft side of the bridge:
Image

And my detail on forward side, done with evergreen strips:
Image

I'm still debating how far I want to take the detail on this project...

Most of the pressure hull top will be nearly impossible to see; the main benefit to the build will be to have the space itself underneath like the real thing instead of the solid deck of the kit which to me makes the finished product look a bit like a toy. I've already put enough time into this one to completely build 2 standard Revell gatos and it will take many, many hours to accurately replicate the ribs, supports, pipes and so forth underneath.

Plus, my pressure hull is not quite accurate to begin with; what would be the saddle tanks are too low and not flat enough (either that or my pressure hull is too high, but then the conning tower would be floating too high instead of being mounted directly to the pressure hull like it should be). The pressure hull ended up being somewhat too big with the ribs attached too.

I'm thinking the best course of action is to add the very basic shapes like the induction pipes and torpedo loading tubes, go all out on the escape chamber (since it will be seen down the stairway on the forward part of the boat, paint it all black inside (like the real thing) and call it good.

Any thoughts?
-Jason Channell

Current Project: 1/200 Bismarck
User avatar
Channell
Posts: 2068
Joined: Mon May 14, 2012 12:18 pm
Location: Salt Lake City, USA

Re: An excessively ambitious 1/72 Revell Gato build...

Post by Channell »

Here's some photos of the various basic elements put together, hopefully to show what I'm trying to accomplish here (and maybe add some "eye candy" to the thread too :big_grin:) :

Image

Image

Image

Image

Image

Image

Image
-Jason Channell

Current Project: 1/200 Bismarck
User avatar
Timmy C
Posts: 12446
Joined: Mon Jan 10, 2005 6:00 pm
Location: Ottawa, Canada

Re: An excessively ambitious 1/72 Revell Gato build...

Post by Timmy C »

Wow, there's a lot more space between the pressure and outer hull than I thought, especially at the bow - your work is definitely worth the extra effort!
De quoi s'agit-il?
User avatar
sirpaul
Posts: 1500
Joined: Sun Jun 12, 2011 10:37 am
Location: Massachusetts.

Re: An excessively ambitious 1/72 Revell Gato build...

Post by sirpaul »

Yes this build is really comming along. Your ideas so far are turning out great. I will be watching this build.
On the Bench
1/350 Independence
1/350 Dunkerque
1/350 Shimakaze
1/350 Sharnhorst Dragon
1/350 Belfast
User avatar
Channell
Posts: 2068
Joined: Mon May 14, 2012 12:18 pm
Location: Salt Lake City, USA

Re: An excessively ambitious 1/72 Revell Gato build...

Post by Channell »

Timmy C wrote:Wow, there's a lot more space between the pressure and outer hull than I thought, especially at the bow - your work is definitely worth the extra effort!
Yea, it surprised me too. Here's that area on the Silversides and my best reference for scratchbuilding it:

http://www.youtube.com/watch?v=w2DGb5-YaMY

(@ 1:15-1:53) I'm gonna need a good psychiatrist after this project is over. :big_eyes:
-Jason Channell

Current Project: 1/200 Bismarck
User avatar
Channell
Posts: 2068
Joined: Mon May 14, 2012 12:18 pm
Location: Salt Lake City, USA

Re: An excessively ambitious 1/72 Revell Gato build...

Post by Channell »

sirpaul wrote:Yes this build is really comming along. Your ideas so far are turning out great. I will be watching this build.
Don't hesitate to point me straight if something doesn't look right. I'm already feeling like I got myself a bit over my head!

I'm still looking for other gato builders who have done this mod on the Revell kit for some tips/hints/ideas... I can't be the only one!

Somebody?

Anybody?!! :puppy_eyes:
-Jason Channell

Current Project: 1/200 Bismarck
User avatar
Channell
Posts: 2068
Joined: Mon May 14, 2012 12:18 pm
Location: Salt Lake City, USA

Re: An excessively ambitious 1/72 Revell Gato build...

Post by Channell »

Here's another quick update... this week I got the hull together and am knee-deep in putty and sandpaper dust.

Here's a pic with a quick coat of primer sprayed on the seams to help me find trouble spots:

Image

My workspace is a disaster zone too, pardon the mess... :cool_2:

I added a new keel plate with styrene strips and putty to help the poor molded-on kit version and
also went to work on some bow details:

Image

The screens on the bottom and the detail in the vents above the torpedo doors are from the Eduard PE kit.

I got in a bit of a debate with myself over the torpedo tube doors; my research indicates the Cobia currently has flat "Balao style" torpedo doors, but they probably aren't original to the boat. Nobody seems to know what was on there first, but the "spoon style" doors molded on with the kit probably aren't accurate for the Cobia.

At first I was gonna just scratchbuild Balao style doors, but while starting on the first one I looked up at the old Gato, swore to myself and did something rather daft (as the English might say :big_grin:) by cutting the doors out to put on the new Gato :

Image

Meh, there's only room for one big-a$$ submarine in my life anyway!

This is one spot where "damn the torpedoes" seemed an appropriate course of action, and while they *might* not be 100% accurate for the particular boat I'm doing, they are gonna look just fine with a bit less work while still being a vast improvement over the molded-in kit "doors". They aren't glued in yet, BTW... I'm gonna paint the doors and hull separately.

Image

This also means I don't need to bother with the vent holes immediately aft of the tube doors either, as apparently "spoon" shutter doors didn't have them.

The USS Drum for example:

http://www.flickr.com/photos/thoog/5735 ... 0405897402

Yes, I know the Cobia wasn't built at the same yard as the Drum, but honestly... before I built a gato model I didn't even know how many torpedo tubes a Gato had, much less the shutter type! Hopefully Revell knew something that I don't and got it right...

Anway, 1 more problem resolved, 10,059 to go...
Last edited by Channell on Fri Jul 27, 2012 12:27 pm, edited 2 times in total.
-Jason Channell

Current Project: 1/200 Bismarck
User avatar
Channell
Posts: 2068
Joined: Mon May 14, 2012 12:18 pm
Location: Salt Lake City, USA

Re: An excessively ambitious 1/72 Revell Gato build...

Post by Channell »

I've gotta take a moment to cuss out Revell; most of the dozens of hours of modifications I've done would have been very easy to have included in the original kit and made a great out of the box build instead of creating the soul-sucking monster job I've made for myself to get a really great looking large scale Gato.

Come on Revell!!! Trumpeter put a pressure hull in their 1/144 Gato and you can't even see it! 1/72 scale DEMANDS more detail, and most molded in "detail" just looks corny at this scale!

:mad_1:

Sorry about the rant, but after building Trumpeter's awesome 1/200 Arizona this Revell kit is a bit of a dog. :bash_2:
-Jason Channell

Current Project: 1/200 Bismarck
Post Reply

Return to “Works in Progress”