Yea, I would agree with you since the sheer in the hull would show that. I was thinking the banding, per see, was being confused with something like armor belt which we all know wasn't used on the lower hulls. Damn shame there aren't any more close ups of those hulls under construction.
Has anyone come across any hull plans from the Nat Archives that clearly show the plating arrangement? I've personally not seen them myself.
USS Onondaga - Part Deux -1/96th scale
Moderator: ArizonaBB39
-
herrmill

- Posts: 271
- Joined: Sat Aug 05, 2006 8:01 pm
- Location: Xiaoshan, China, home of the "oldest" boat
- Contact:
Re: USS Onondaga - Part Deux -1/96th scale
"China is a sleeping giant. Let her sleep, for when she wakes she will shake the world." ~ Napoleon Bonaparte
-
Devin

- Posts: 2497
- Joined: Mon Jan 10, 2005 10:46 am
- Location: Hoboken, NJ
- Contact:
Re: USS Onondaga - Part Deux -1/96th scale
Never have, either. I've got that big honkin' book of Monitor plans, but she was truly a one-off, so her lower hull is of no help.
I may be able to visit the archives in D.C. in October. I'll be on the hunt for "new" plans and photos.
I may be able to visit the archives in D.C. in October. I'll be on the hunt for "new" plans and photos.
We like our history sanitized and theme-parked and self-congratulatory, not bloody and angry and unflattering. - Jonathan Yardley
-
mcg
- Posts: 201
- Joined: Thu Apr 28, 2005 8:46 pm
Re: USS Onondaga - Part Deux -1/96th scale
From your photos, Devin, we might guess that on the Tecumseh hull, the pattern of the bands' edges follows the buttock lines of the hull.
If this is the case, the CAD drawing problem, for Tecumseh anyway, seems a little more approachable. We commonly draw a hull or fuselage and then "baloney slice" it into sections, using vertical planes, in order to create the bulkheads or formers.
In this instance, the vertical slices would be longitudinal instead of transverse, but the intersections of the slicing planes and the hull should mark and define the edges of the bands.
I have from the national archives the lines, waterlines and buttock lines for the Dictator. I bought them from Maryland Silver. Traveling now but next month I will take a look at them. Also, IIRC, the Old Steam Navy - Ironclads chapter on monitors has a collection of ships lines. Might be something there.
Came across this archived 1863 New York Times story about the ironclads then under construction. The writer remarks on the USS Onondaga.
http://www.nytimes.com/1863/04/15/news/ ... mphis.html
Thanks for the reference to Jerry Harlowe's book. I found one on Abebooks.
-
Roscoe
- Posts: 296
- Joined: Thu Jul 07, 2011 5:12 pm
Re: USS Onondaga - Part Deux -1/96th scale
Thanks guys for the great technical info and pics, I really enjoyed it. It's been a little quiet on my end with this project, but I'll try to get it rolling again over the weekend.
Don't forget to check out my partner in crime's thread (Owen aka teamonster) of his detailed Onondaga CAD model WIP, located here: viewtopic.php?f=27&t=108311
I'm sure a little encouragement would help jump-start his efforts also.
Take care,
Dean
Don't forget to check out my partner in crime's thread (Owen aka teamonster) of his detailed Onondaga CAD model WIP, located here: viewtopic.php?f=27&t=108311
I'm sure a little encouragement would help jump-start his efforts also.
Take care,
Dean
-
tea monster

- Posts: 275
- Joined: Sat Jun 11, 2011 5:02 pm
- Contact:
Re: USS Onondaga - Part Deux -1/96th scale
Thanks for the plug!
Hopefully these will be of use:
Owen
Hopefully these will be of use:
-
Roscoe
- Posts: 296
- Joined: Thu Jul 07, 2011 5:12 pm
Re: USS Onondaga - Part Deux -1/96th scale
Nice pics Owen, thanks!
OK, here's a quick way to add a set of banding on the hull of the CAD model, now this is only one of a few ways to do it in SW.
First I added a single plane at an angle to the hull (I just eyeballed the angle), then offset a few more with the same spacing to cover the scope of the hull surface. You could make the planes at multiple angles to get a better looking set of bands, but I just went with offsetting for this quickie.
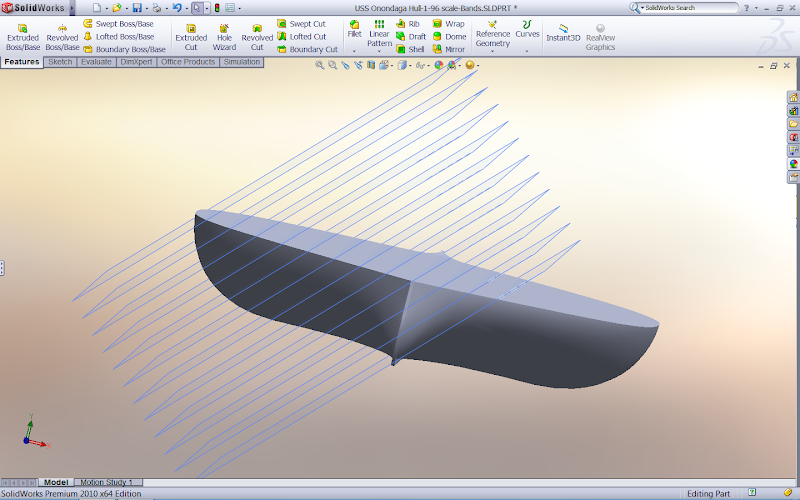
Then using "Split Line", which splits just the surface of the hull body where it intersects the planes, I selected all the Planes, then the surface of the hull I wanted to split up.
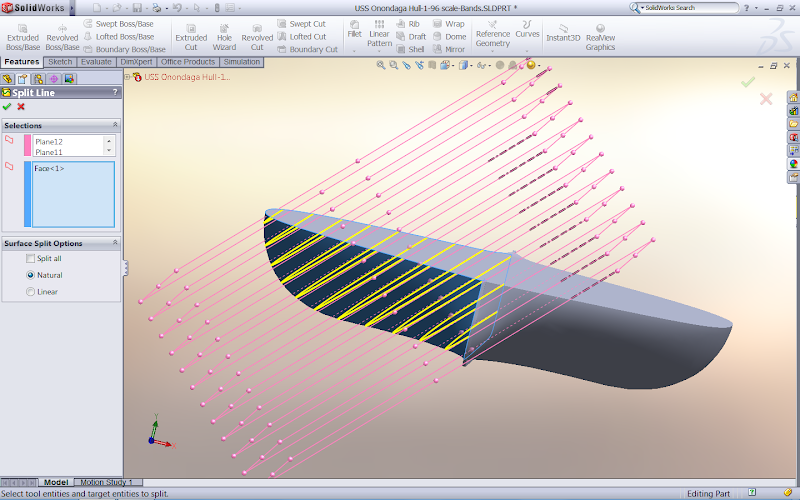
Next, every other one of those split surfaces were selected and then offset, I went with a .015" offset. I also changed the color to white so you could see them better.

Once the surfaces were offset, I used the "Thicken" feature, which as the name suggests, thickens the surface and merges them to the hull body. In the pic you can see I thickened them past the hull body surface.

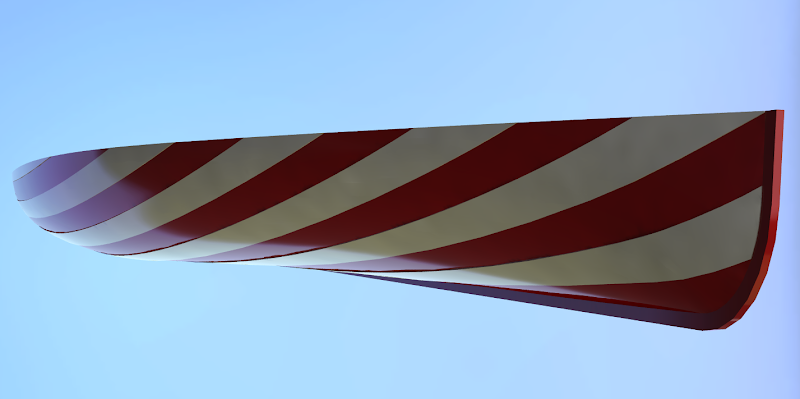
Now Mirror the bands to the other side and that's it. I did a quick render which shows the bands a little better.
Like I mentioned, you could just as easily offset the hull surface, Extruded some bands through the hull, and trimmed the bands using the offset surface. Just two of the easier ways to do it in SW.
-Dean
OK, here's a quick way to add a set of banding on the hull of the CAD model, now this is only one of a few ways to do it in SW.
First I added a single plane at an angle to the hull (I just eyeballed the angle), then offset a few more with the same spacing to cover the scope of the hull surface. You could make the planes at multiple angles to get a better looking set of bands, but I just went with offsetting for this quickie.
Then using "Split Line", which splits just the surface of the hull body where it intersects the planes, I selected all the Planes, then the surface of the hull I wanted to split up.
Next, every other one of those split surfaces were selected and then offset, I went with a .015" offset. I also changed the color to white so you could see them better.
Once the surfaces were offset, I used the "Thicken" feature, which as the name suggests, thickens the surface and merges them to the hull body. In the pic you can see I thickened them past the hull body surface.
Now Mirror the bands to the other side and that's it. I did a quick render which shows the bands a little better.
Like I mentioned, you could just as easily offset the hull surface, Extruded some bands through the hull, and trimmed the bands using the offset surface. Just two of the easier ways to do it in SW.
-Dean
-
mcg
- Posts: 201
- Joined: Thu Apr 28, 2005 8:46 pm
Re: USS Onondaga - Part Deux -1/96th scale
A beautiful thing to behold! I especially admire that final rendering.
Thank you for the clearly described method as well. I can replicate this particular technique in Rhino3D. It reminds me a bit of a method for setting up small boat hulls for lap strake planking.
I hope there exist detailed drawings and ideally a plating map for the USS Onondaga.
My guess would be that Onondaga was designed by the Navy, by Isherwood and Lenthall, and modified on the ways to use Ericsson turrets and turret machinery. It is not clear to me the source of the engine design.
Before Hampton Roads, Isherwood and Lenthall were ready with a twin turret Monitor-esque design and had even obtained congressional approval to fund its construction in quantity. Their concept is cited in the histories as "The Bureau Design." and featured twin Cole turrets, all iron construction, and twin screws.
A derivative of the "Bureau Design" was ultimately constructed as a series of four twin turret monitors, including USS Monadnock.
It would be my guess, at this point, that the USS Onondaga was a Navy-designed precursor of these four monitors. Nominally the designer was the contractor, George Quintard, but I am wondering now if the ship's real designers were not Isherwood and Lenthall.
This engineering history was no doubt obscured by the ferocious political infighting between Ericsson and his partners and Isherwood/Lenthall. But some drawings exist in the national archives and some may also exist in the archives of the French navy. Maryland Silver has a few Onondaga drawings available, listed on the catalog page here:
http://www.marylandsilver.com/Ship.htm
If, as I am beginning to suspect, John Ericsson did not get involved much in the design of the USS Onondaga, then from our point of view that's good, since so many of Ericsson's drawings were destroyed by his executor.
Anyway Dean, aesthetically, I hope those beautiful bands depicted in your rendering turn out to have actually existed -- they are really striking! Thank you for showing how to achieve these!
Michael
-
herrmill
- Posts: 271
- Joined: Sat Aug 05, 2006 8:01 pm
- Location: Xiaoshan, China, home of the "oldest" boat
- Contact:
Re: USS Onondaga - Part Deux -1/96th scale
Fantastic work, Dean! 
"China is a sleeping giant. Let her sleep, for when she wakes she will shake the world." ~ Napoleon Bonaparte
-
Roscoe
- Posts: 296
- Joined: Thu Jul 07, 2011 5:12 pm
Re: USS Onondaga - Part Deux -1/96th scale
Thanks guys, and your welcome Michael.
It would be interesting to find out whether the Navy just passed on their design to George Quintard, or if he actually did design it, good stuff Michael.
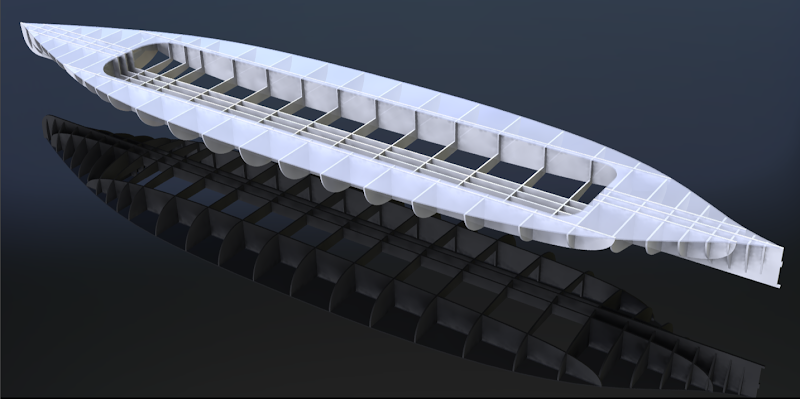
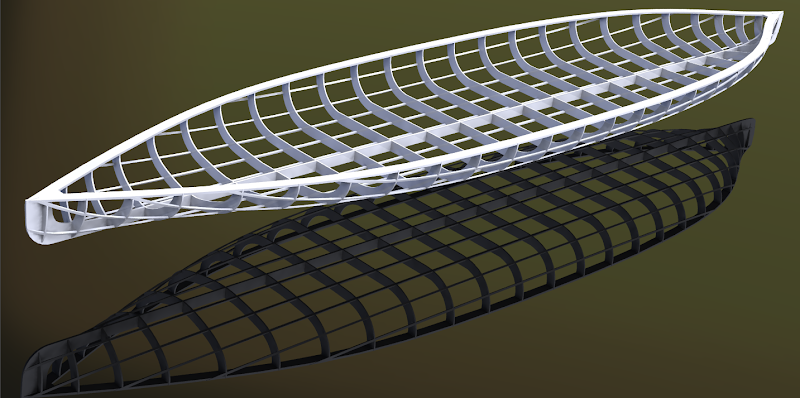
I started on a preliminary hull design layout today, it's still pretty basic and missing a few items, but I thought I'd put it out there to get some feedback from you guys before I go any further.
The keel is shown attached, but that will be a separate part so the hull can be finished before adding it. And that cutout section in the center can be used for RC equipment should anyone decide to do so. I also plan on boxing that area in with side panels and a floor so it can be made into a nice watertight compartment.

-Dean
It would be interesting to find out whether the Navy just passed on their design to George Quintard, or if he actually did design it, good stuff Michael.
I started on a preliminary hull design layout today, it's still pretty basic and missing a few items, but I thought I'd put it out there to get some feedback from you guys before I go any further.
The keel is shown attached, but that will be a separate part so the hull can be finished before adding it. And that cutout section in the center can be used for RC equipment should anyone decide to do so. I also plan on boxing that area in with side panels and a floor so it can be made into a nice watertight compartment.
-Dean
-
herrmill
- Posts: 271
- Joined: Sat Aug 05, 2006 8:01 pm
- Location: Xiaoshan, China, home of the "oldest" boat
- Contact:
Re: USS Onondaga - Part Deux -1/96th scale
My, oh MY! 
Looks like I need to get started on a new smoke generator to fit inside this shallow hull.
Looks like I need to get started on a new smoke generator to fit inside this shallow hull.
"China is a sleeping giant. Let her sleep, for when she wakes she will shake the world." ~ Napoleon Bonaparte
-
Roscoe
- Posts: 296
- Joined: Thu Jul 07, 2011 5:12 pm
Re: USS Onondaga - Part Deux -1/96th scale
I plan on carving out the bottom of the deck half too, it should give you a tiny bit more room.
-Dean
-Dean
-
tea monster
- Posts: 275
- Joined: Sat Jun 11, 2011 5:02 pm
- Contact:
Re: USS Onondaga - Part Deux -1/96th scale
That is looking cool! You would plank that hull, right? Or do you have something else in mind?
Owen
Owen
-
mcg
- Posts: 201
- Joined: Thu Apr 28, 2005 8:46 pm
Re: USS Onondaga - Part Deux -1/96th scale
Wow, looks great.
I know there are million things to consider at this point but here is a thought about the waterline.
This is a 1:64 r/c model of the the semi-submersible ram, USS Katahdin. It was designed and built by another modeler. I owned it for a couple of years and it is now, I think, patrolling ponds over in New Jersey.
One problem with a low freeboard model is getting the darn thing to sink to its scale waterline.
For this particular model, the designer added to the carved-and-glassed hull's considerable weight with this heavyweight sealed battery from Graupner. The battery essentially defined the width and depth of the r/c compartment.
Like the USS Onondaga, the USS Katahdin had twin screws. These can be used differentially to help turn the long hull. The props could even be spun in opposite directions to achieve a bulldozer turn. I got a lot of help from the r/c submarine forums in setting up the ESC's to accomplish this. Nowadays....I suspect a programmable radio xmtr would make quick work of it.
http://www.flickr.com/photos/thoog/3226 ... 956005607/
FWIW I found these additional flickr snaps of the USS Onondaga at the Mariner's Museum.
Michael
I know there are million things to consider at this point but here is a thought about the waterline.
- Graupner battery, USS Katahdin for r/c
One problem with a low freeboard model is getting the darn thing to sink to its scale waterline.
For this particular model, the designer added to the carved-and-glassed hull's considerable weight with this heavyweight sealed battery from Graupner. The battery essentially defined the width and depth of the r/c compartment.
Like the USS Onondaga, the USS Katahdin had twin screws. These can be used differentially to help turn the long hull. The props could even be spun in opposite directions to achieve a bulldozer turn. I got a lot of help from the r/c submarine forums in setting up the ESC's to accomplish this. Nowadays....I suspect a programmable radio xmtr would make quick work of it.
http://www.flickr.com/photos/thoog/3226 ... 956005607/
FWIW I found these additional flickr snaps of the USS Onondaga at the Mariner's Museum.
Michael
-
herrmill
- Posts: 271
- Joined: Sat Aug 05, 2006 8:01 pm
- Location: Xiaoshan, China, home of the "oldest" boat
- Contact:
Re: USS Onondaga - Part Deux -1/96th scale
Here are photos of Steve Lund's 1:72 build showing how a shallow draft model is done.
- Attachments
-
-
"China is a sleeping giant. Let her sleep, for when she wakes she will shake the world." ~ Napoleon Bonaparte
-
Roscoe
- Posts: 296
- Joined: Thu Jul 07, 2011 5:12 pm
Re: USS Onondaga - Part Deux -1/96th scale
Thanks for the input and pics guys, much appreciated.
Owen,
I really hadn't decided yet on what to do about covering the hull, that was going to be my next question for the ship building guys, but after looking at those pics, I had another similar idea.
Now, here's what I was thinking.
Borrowing from my scratchbuilt RC Airplane designs, instead of making the frames tall like they are, make them more like Airplane formers, much thinner (shorter, like in the RC Onondaga pic above). Adding notches for stringers the length of the hull, then it can be sheeted and glassed. It's less tedious and time consuming than planking, and still gives you more room for the electronics's. It can also be done on the deck half too.
Let me know what you guys think.
-Dean
-
herrmill
- Posts: 271
- Joined: Sat Aug 05, 2006 8:01 pm
- Location: Xiaoshan, China, home of the "oldest" boat
- Contact:
Re: USS Onondaga - Part Deux -1/96th scale
Yea, that should work but not sure how you'll get away from planking. Here's another of the hull construction for better reference.
For those who don't have Steve & Bill's book, you can download a free PDF copy at http://walternelson.com/ironclads.pdf
For those who don't have Steve & Bill's book, you can download a free PDF copy at http://walternelson.com/ironclads.pdf
- Attachments
-
"China is a sleeping giant. Let her sleep, for when she wakes she will shake the world." ~ Napoleon Bonaparte
-
Roscoe
- Posts: 296
- Joined: Thu Jul 07, 2011 5:12 pm
Re: USS Onondaga - Part Deux -1/96th scale
The sheeting will take the place of the planking, using 1/16th inch thick balsa sheet, you can cover more area in one shot, and it'll conform to the shape just as well with less work involved. Then glassing it to seal and strengthen it.
Like I mentioned, I haven't done any ship models this way, but I've used this method on my planes and it turned out to be very solid and strong. A little OT, but here's a couple construction pics using this method, minus the glassing, just using Ultrakote iron on covering over the sheeting made it very tough.
-Dean
- Attachments
-
-
-
-
Roscoe
- Posts: 296
- Joined: Thu Jul 07, 2011 5:12 pm
Re: USS Onondaga - Part Deux -1/96th scale
Here's a concept for the hull that I worked on last night, it's a little overkill on the frames as is, but that will change, as the spacing between them will increase to lessen the overall number. The idea was to sheet it with either 1/16" or 1/32" basswood, then either glass it, or just seal the wood with shellac or some other wood sealer and paint it.
Now for the deck half, that will be redone from the earlier version to open up the interior for more room, and so that the hull will actually slide up into it (I just cut out a section of the old deck for visual purposes so you can get an idea of what I'm after). The reasoning behind this is, both halves can be built flat on a table or building board, then when finished, the hull slides into the deck half and the two halves glued together. It's not shown in the pics, but there will be a ledge in the deck half that mates the two, and also a hatch on the top of the deck for access. I went this route so I wouldn't have to add that slight curve on the hull aft where it meets the bottom of the deck half.
Let me know what you guys think, and as always, your suggestions and crits are most welcome.


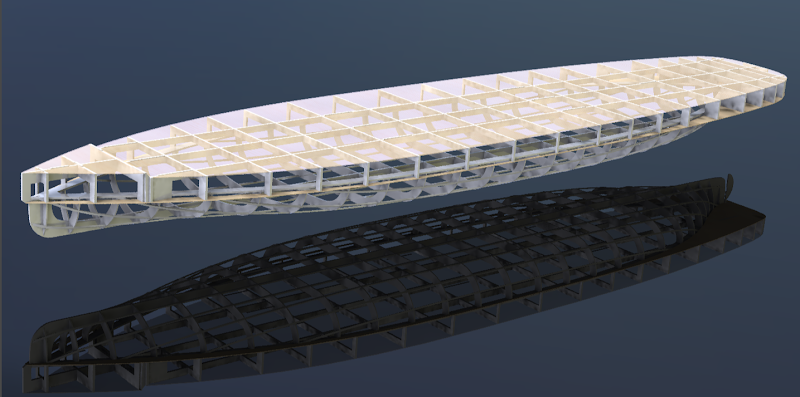
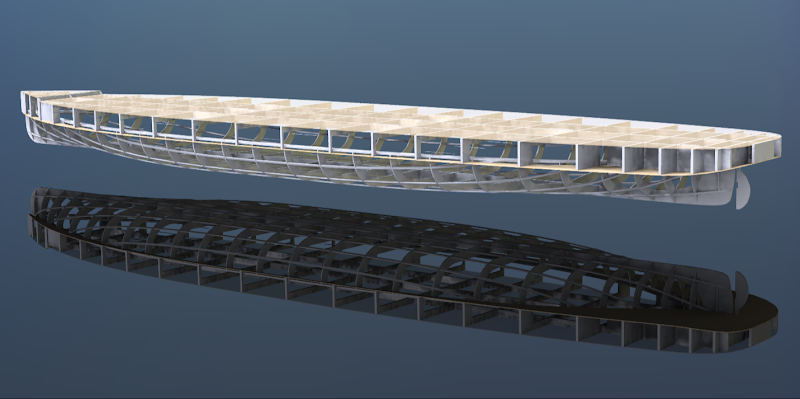
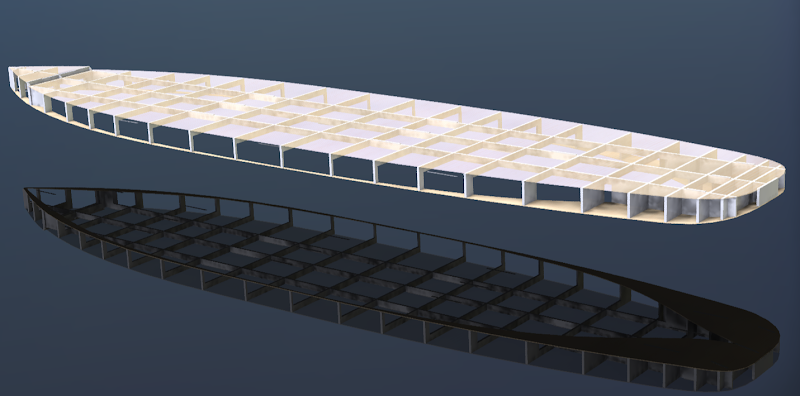
-Dean
Now for the deck half, that will be redone from the earlier version to open up the interior for more room, and so that the hull will actually slide up into it (I just cut out a section of the old deck for visual purposes so you can get an idea of what I'm after). The reasoning behind this is, both halves can be built flat on a table or building board, then when finished, the hull slides into the deck half and the two halves glued together. It's not shown in the pics, but there will be a ledge in the deck half that mates the two, and also a hatch on the top of the deck for access. I went this route so I wouldn't have to add that slight curve on the hull aft where it meets the bottom of the deck half.
Let me know what you guys think, and as always, your suggestions and crits are most welcome.
-Dean
-
herrmill
- Posts: 271
- Joined: Sat Aug 05, 2006 8:01 pm
- Location: Xiaoshan, China, home of the "oldest" boat
- Contact:
Re: USS Onondaga - Part Deux -1/96th scale
Sure is purdy!
I am truly amazed at what you can turn out, Dean.
I am truly amazed at what you can turn out, Dean.
"China is a sleeping giant. Let her sleep, for when she wakes she will shake the world." ~ Napoleon Bonaparte
-
Devin
- Posts: 2497
- Joined: Mon Jan 10, 2005 10:46 am
- Location: Hoboken, NJ
- Contact:
Re: USS Onondaga - Part Deux -1/96th scale
That's looking really nice! I like the stringer approach, too. It opens up space for R/C equipment, and it also allows those that build static to have a bit of internal room for modeling interior spaces.
We like our history sanitized and theme-parked and self-congratulatory, not bloody and angry and unflattering. - Jonathan Yardley