Thanks guys!
I should have the deck half sorted out over the weekend, so I'll post some pics when it's done for you guys to comment on.
Take care,
Dean
USS Onondaga - Part Deux -1/96th scale
Moderator: ArizonaBB39
-
Roscoe
- Posts: 296
- Joined: Thu Jul 07, 2011 5:12 pm
Re: USS Onondaga - Part Deux -1/96th scale
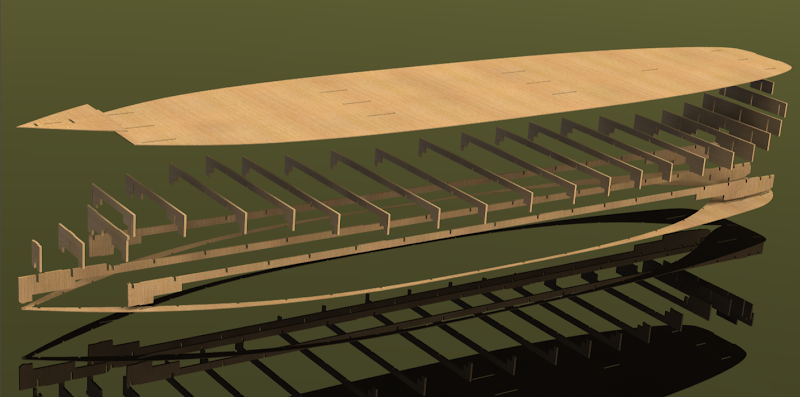
The deck half has been adjusted, tabbed and notched except for the hatch, which I'm still thinking about. I did make a temporary one in the pic below, but I'm leaning towards opening it up more for better access.
I've only been working on this project for a few hours on the weekends, otherwise it would have been finished by now. So if there's any suggestions on the hatch, or anything else, I welcome the input, I'm looking to have the design pretty much finalized this coming weekend, or early next week.

-Dean
I've only been working on this project for a few hours on the weekends, otherwise it would have been finished by now. So if there's any suggestions on the hatch, or anything else, I welcome the input, I'm looking to have the design pretty much finalized this coming weekend, or early next week.
-Dean
-
Devin

- Posts: 2497
- Joined: Mon Jan 10, 2005 10:46 am
- Location: Hoboken, NJ
- Contact:
Re: USS Onondaga - Part Deux -1/96th scale
That looks great!
What are your thoughts on how this would cut in acrylic in, oh, let's say, 1/96th scale (just to throw out a random number)?
As far as the hatch goes, I'm looking at the overhead plans and I don't really see a great natural break for you to do that, so you can pretty much do it however you want. The area will be planked by the builder, so it's up to them how to best hide it. I thought at first that maybe having the turrets be the forward and aft most parts of the hatch, but the forward turret is too far towards the bow for that, in my opinion.
We like our history sanitized and theme-parked and self-congratulatory, not bloody and angry and unflattering. - Jonathan Yardley
-
mcg
- Posts: 201
- Joined: Thu Apr 28, 2005 8:46 pm
Re: USS Onondaga - Part Deux -1/96th scale
Beautiful work Dean -- it is a delight to watch this one come together. I especially admire the perfect hull framing and those elegant mirror images under the model.
Re the hatch, there was an r/c USS Monitor model reported in a series of articles in Flying Models around 1991-2. The whole raft was made to form the hatch. It must have taken gaskets, vaseline and screws to make it watertight. But there were no hatch lines visible.
Michael
Re the hatch, there was an r/c USS Monitor model reported in a series of articles in Flying Models around 1991-2. The whole raft was made to form the hatch. It must have taken gaskets, vaseline and screws to make it watertight. But there were no hatch lines visible.
Michael
-
Roscoe
- Posts: 296
- Joined: Thu Jul 07, 2011 5:12 pm
Re: USS Onondaga - Part Deux -1/96th scale
Thanks guys, I appreciate the input.
Devin,
It won't be a problem scaling it to 1/96th, but I think you should talk to your friend that said he has cut acrylic before. I really have no experience with how that stuff cuts, and you remember what those test parts of Styrene looked like, not good.
I thought about that too, doing the hatch from turret to turret, with possibly hiding some wing-nuts or something under them to secure it. But like you said, there's really not a good natural break in the deck that would look good.
Michael,
Thanks, I'm pretty happy with the hull too, maybe I should think about redoing the deck half to match.
I do like to use the mirror floor when rendering these frame-ups, it gives you a much better overall view without having to show it from 5 different angles. Plus to me, it just looks cool.
That was my other thought on the hatch, having the whole, or mostly whole deck be the hatch. It would definitely need some type of gasket, or form of weather stripping to make it watertight. I guess I could go with something like the screw/wing-nut idea under the turrets to secure it.
I'll have to do some more brainstorming on this one.
-Dean
-
herrmill

- Posts: 271
- Joined: Sat Aug 05, 2006 8:01 pm
- Location: Xiaoshan, China, home of the "oldest" boat
- Contact:
Re: USS Onondaga - Part Deux -1/96th scale
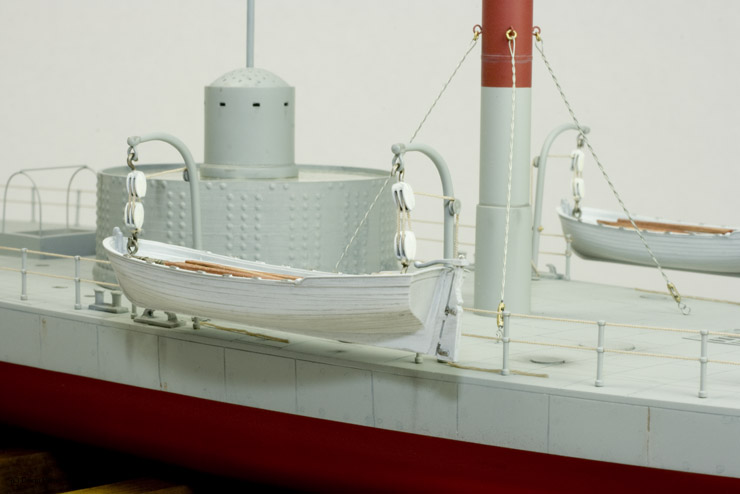
I'd recommend going with a larger section of removable deck to allow greater access to the hull for turret rotation, ballast & battery placement. On my 1:72 Canonicus, I followed Steve's example with a removable deck covering the entire width starting in front of the turret to just abaft of the small whale boat amidships.
I went the simple route & used 3mm marine ply, coated with epoxy, for the deck & the plating conceals the joints well enough so that they are barely noticed - I've since found thinner fiberglass sheet that I'll use for my next project. The deck is held in place with 8 small rare earth magnets on the corners & sides, sealed with vaseline; the magnets pull it down so tight that you need a knife edge to pry open the deck. So far, I've not had a drop of water in the hull.
I went the simple route & used 3mm marine ply, coated with epoxy, for the deck & the plating conceals the joints well enough so that they are barely noticed - I've since found thinner fiberglass sheet that I'll use for my next project. The deck is held in place with 8 small rare earth magnets on the corners & sides, sealed with vaseline; the magnets pull it down so tight that you need a knife edge to pry open the deck. So far, I've not had a drop of water in the hull.
- Attachments
-
-
-
-
-
Last edited by herrmill on Mon Sep 03, 2012 7:19 pm, edited 1 time in total.
"China is a sleeping giant. Let her sleep, for when she wakes she will shake the world." ~ Napoleon Bonaparte
-
Roscoe
- Posts: 296
- Joined: Thu Jul 07, 2011 5:12 pm
Re: USS Onondaga - Part Deux -1/96th scale
Yep, that's along the lines of what I was thinking, except making the whole deck removable. I thought about rare earth magnets for attachment too, but wasn't sure if that would be good enough to make it watertight, now I do, thanks. I like the fiberglass sheet idea also, the only thing, I don't know how well fiberglass will take to laser cutting, I'll have to look into that.
I'm thinking of doing the beta build myself, just as a proof of concept for sheeting the hull instead of planking it. It's not a matter of whether it can be done or not, but how strong I can make it, and I have a few ideas on how to make it strong enough without glassing it.
Thanks for the pics Chuck, love that little Ironclad.
-Dean
-
Devin
- Posts: 2497
- Joined: Mon Jan 10, 2005 10:46 am
- Location: Hoboken, NJ
- Contact:
Re: USS Onondaga - Part Deux -1/96th scale
The thing about rare earth magnets is that they usually hold TOO well. As Chuck related with his experience, you really need something to hold on to, or the ability to slide the two surfaces apart, to separate them. Go with as tiny as you can find, and they'll be plenty.
Chuck, instead of using Vaseline, what about ultra-thin weather seal, like they use around windshields, windows, etc.?
Chuck, instead of using Vaseline, what about ultra-thin weather seal, like they use around windshields, windows, etc.?
We like our history sanitized and theme-parked and self-congratulatory, not bloody and angry and unflattering. - Jonathan Yardley
-
herrmill
- Posts: 271
- Joined: Sat Aug 05, 2006 8:01 pm
- Location: Xiaoshan, China, home of the "oldest" boat
- Contact:
Re: USS Onondaga - Part Deux -1/96th scale
Yea, the thin weather seal sounds like a better approach than vaseline. I've come across an interlocking silicone seal in outdoor gear here that is similar to the connection used in a "ziplock" bag but haven't been find it in its bulk form. Also have considered using a thin silicone strip used in woman's fashion to hold up strapless dresses & tops & is readily found in local fabric markets. Its quite sticky & thin enough once compressed so should suit the purpose well.
"China is a sleeping giant. Let her sleep, for when she wakes she will shake the world." ~ Napoleon Bonaparte
-
Roscoe
- Posts: 296
- Joined: Thu Jul 07, 2011 5:12 pm
Re: USS Onondaga - Part Deux -1/96th scale
Yeah, I use those small, about 1/8" in diameter rare earth magnets on my R/C planes battery hatches. I usually break off the end of an old Xacto blade and glue that on the plane side, and glue the magnets on the hatch itself. Even like that it has a really strong grip, there's no worries at all of the hatch blowing off going 80 mph. 
I like the weather seal idea too, no mess to clean up, and the better half doesn't have to wonder why your using up all the vaseline.
-Dean
I like the weather seal idea too, no mess to clean up, and the better half doesn't have to wonder why your using up all the vaseline.
-Dean
-
DrPR

- Posts: 1689
- Joined: Sun Mar 07, 2010 12:01 am
- Location: Corvallis, Oregon, USA
- Contact:
Re: USS Onondaga - Part Deux -1/96th scale
Here's a thought. You have two problems, 1) you want the hull water tight, and 2) you don't want obvious seams around the edge of the hatch to access the innards.
Why not build the hull with a sealed sub deck with a large water tight hatch, and overlay a single piece cosmetic deck held on with magnets? That way you would have a sealed hull and no seams in the visible deck.
Phil
Why not build the hull with a sealed sub deck with a large water tight hatch, and overlay a single piece cosmetic deck held on with magnets? That way you would have a sealed hull and no seams in the visible deck.
Phil
A collision at sea will ruin your entire day. Aristotle
-
Roscoe
- Posts: 296
- Joined: Thu Jul 07, 2011 5:12 pm
Re: USS Onondaga - Part Deux -1/96th scale
Another good idea Phil, thanks.
I am leaning towards the whole top of the deck being removable, it looks like I have my work cut out for me getting this sorted out.
-Dean
I am leaning towards the whole top of the deck being removable, it looks like I have my work cut out for me getting this sorted out.
-Dean
-
Devin
- Posts: 2497
- Joined: Mon Jan 10, 2005 10:46 am
- Location: Hoboken, NJ
- Contact:
Re: USS Onondaga - Part Deux -1/96th scale
Having the whole deck removable would work great, unless someone wants to do rotating turrets or some other such thing. With the deck pulling off, the only seam would be along the sides of the hull, and that's correct for the way they clad the ironclads (photo below of Weehawken, showing the seam along the hull side between deck and side plating).
We like our history sanitized and theme-parked and self-congratulatory, not bloody and angry and unflattering. - Jonathan Yardley
-
DrPR
- Posts: 1689
- Joined: Sun Mar 07, 2010 12:01 am
- Location: Corvallis, Oregon, USA
- Contact:
Re: USS Onondaga - Part Deux -1/96th scale
Turrets could lift out, although you would want some latching mechanism to keep them in place in case the model turned turtle.
A large thin deck would be pretty flimsy (bend easily) and that would play havoc with things like boats in davits, life rails and cable supports for smoke pipes. It would be good to have some longitudinal and transverse support beams under the deck, but they would complicate the structure.
Something to think about.
Phil
A collision at sea will ruin your entire day. Aristotle
-
Roscoe
- Posts: 296
- Joined: Thu Jul 07, 2011 5:12 pm
Re: USS Onondaga - Part Deux -1/96th scale
It would be pretty easy to mount servos on the underside of the deck hatch for rotating turrets, a simple servo mount could be made and glued in place, or even glue the servo itself if your feeling lazy. Also use servo extensions so you could take the deck off far enough for easy access to everything.
For added deck/hatch support, I'm thinking of designing it in, I already have a few ideas on that. But you could just as easily glue strips of plastic or Popsicle sticks to it as support beams.
-Dean
For added deck/hatch support, I'm thinking of designing it in, I already have a few ideas on that. But you could just as easily glue strips of plastic or Popsicle sticks to it as support beams.
-Dean
-
Roscoe
- Posts: 296
- Joined: Thu Jul 07, 2011 5:12 pm
Re: USS Onondaga - Part Deux -1/96th scale
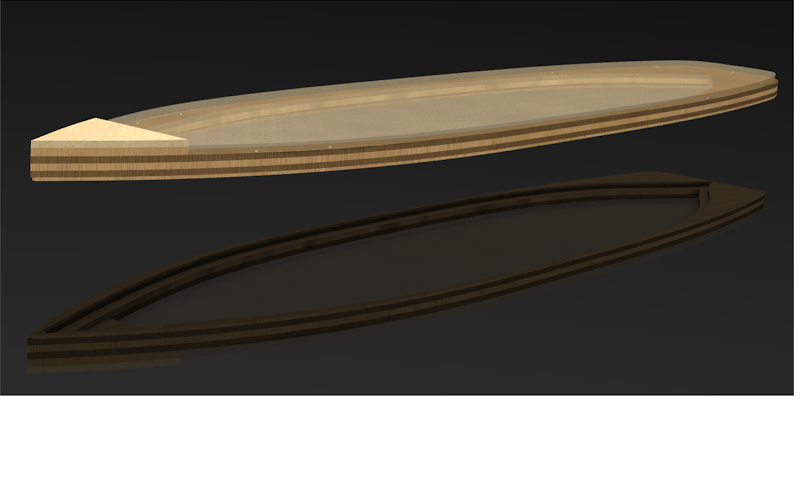
Well, it's been awhile since the last update, works been keeping me pretty busy and not much in the mood for doing more CAD work when I get home. But I did come up with a slightly different idea on the whole deck and hatch layout. Instead of doing a series of interlocking frames and longerons, I was thinking of doing the deck as layers, which would eliminate the need for a sub frame, and be able to have the main deck as one big hatch. The layers will stack up one on top of another, and will be aligned during construction with dowels, through holes that are cut in-line though each layer. Each layer is 3/32" thick, and the hatch will be a 1/4" thick, with support beams to keep it flat, and will align it when attached.
Now there's two ways to do this, make the layers longer, which will leave steps at the stern that will need to be sanded to get that slight bend on the underside before the bottom sheet is applied. Or make them the correct length, which will leave slight gaps on each side when the bottom sheet is applied and bent into shape. But by doing it that way, the sides can either be sheeted to cover the gaps or just filled and sanded.
Let me hear what you guys think, and of course I have a couple pics to give you an idea of what I'm talking about. The hatch is shown semi transparent, and without the support beams included yet.
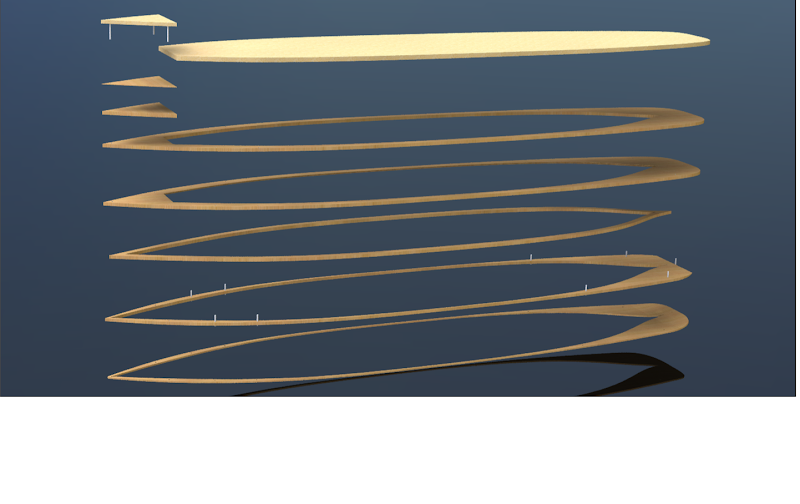
-Dean
Now there's two ways to do this, make the layers longer, which will leave steps at the stern that will need to be sanded to get that slight bend on the underside before the bottom sheet is applied. Or make them the correct length, which will leave slight gaps on each side when the bottom sheet is applied and bent into shape. But by doing it that way, the sides can either be sheeted to cover the gaps or just filled and sanded.
Let me hear what you guys think, and of course I have a couple pics to give you an idea of what I'm talking about. The hatch is shown semi transparent, and without the support beams included yet.
-Dean
-
mcg
- Posts: 201
- Joined: Thu Apr 28, 2005 8:46 pm
Re: USS Onondaga - Part Deux -1/96th scale
Smart solution, Dean, I really like it. Are the layers basswood? Would you consider doing the whole model as a "bread and butter" hull? It would be a heavier build than plank-on-frame but in this instance, the extra weight is probably helpful.
Never thought about it before, but a laser subtracts a lot of the work out of the bread and butter technique. And you have established perfect alignment with those registration pins. A cool design direction to follow. Michael
Never thought about it before, but a laser subtracts a lot of the work out of the bread and butter technique. And you have established perfect alignment with those registration pins. A cool design direction to follow. Michael
-
Roscoe
- Posts: 296
- Joined: Thu Jul 07, 2011 5:12 pm
Re: USS Onondaga - Part Deux -1/96th scale
Thanks Michael,
Yes, I would definitely want to use basswood for the layers, but they will still need to be split up into smaller sections so they will fit on a sheet. And to align those up, I'll have little jigsaw like tabs, or fingers that interlock, so it's easy to glue each layer section together before assembling the whole.
I actually thought about doing the hull with the bread & butter technique at one time, but I have a plan I want to try out with sheeting the hull, instead of going with the tried and true planking route. I'll be using rather thin (1/16") basswood sheeting for that, along with a little trick I learned sheeting R/C Airplanes. I'll go into more detail with that after I get the hull cut and start building it, to hopefully prove out the concept. And if it doesn't work out to my liking, I just may go back to the bread & butter.
Take care,
Dean
-
Devin
- Posts: 2497
- Joined: Mon Jan 10, 2005 10:46 am
- Location: Hoboken, NJ
- Contact:
Re: USS Onondaga - Part Deux -1/96th scale
Dean,
On a bread-and-butter design, would the laser be able to cut the lower hull pieces with the required flare and angles, or would it still require stacking them up and sanding to shape?
-Devin
On a bread-and-butter design, would the laser be able to cut the lower hull pieces with the required flare and angles, or would it still require stacking them up and sanding to shape?
-Devin
We like our history sanitized and theme-parked and self-congratulatory, not bloody and angry and unflattering. - Jonathan Yardley
-
Roscoe
- Posts: 296
- Joined: Thu Jul 07, 2011 5:12 pm
Re: USS Onondaga - Part Deux -1/96th scale
Some lasers can "tilt" somewhat to cut at an angle, but to get the compound curves needed for the hull, you would need a 2 axis head, which I haven't found any that have that. So to answer your question, yeah, you would still have to sand the layers to shape. Believe me, if that could be done, I'd be all over it, I hate sanding.
-Dean
-Dean