Dreadnought with Pontos detail set.

Moderators: BB62vet, MartinJQuinn, JIM BAUMANN, Jon, Dan K

User avatar
Rob 2
Posts: 157
Joined: Sun Apr 11, 2010 1:22 pm

Dreadnought with Pontos detail set.

Post by Rob 2 »

I decided to give my Scharnhorst build a break especially as Dreadnought and its Pontos set was looking so appealing.

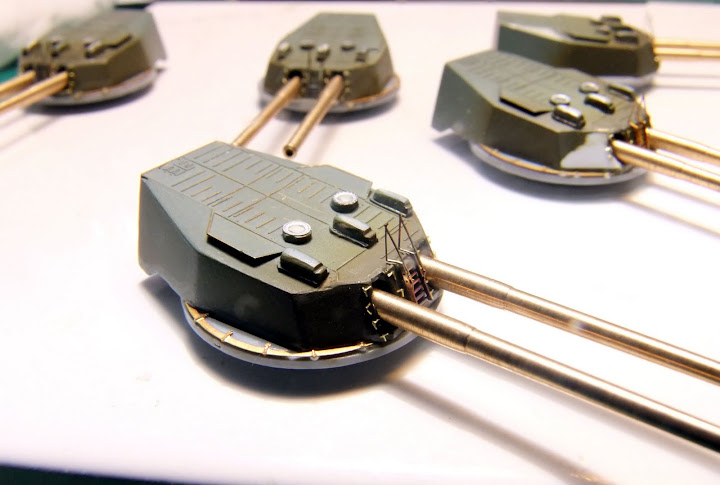
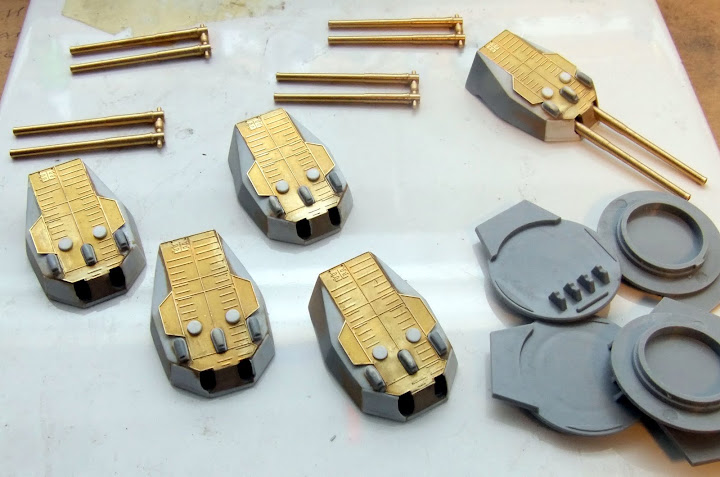
The Pontos set provides the missing turret detail as etch which is placed on top of the kit part covering the solidly moulded platform wings.
Image

Image

To improve this I removed the moulded wings and sighting hoods and built up the angled portion of the turret top so the etched part sat flush. The sighting hoods were glued to plastic card to replace material lost during their removal as well as simulating the missing flange I wanted to model the turrets without blast bags so something of the turned brass trunnions provided by Pontos could be seen.

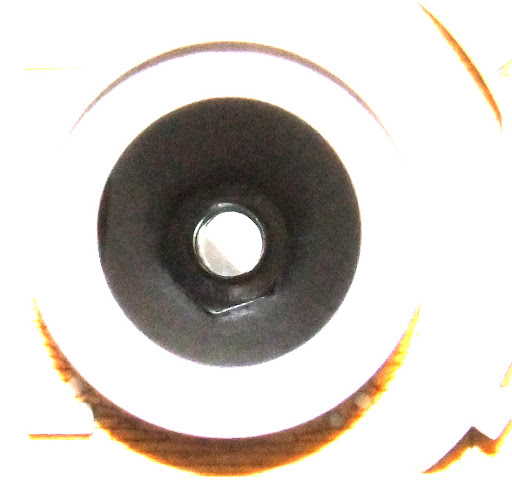
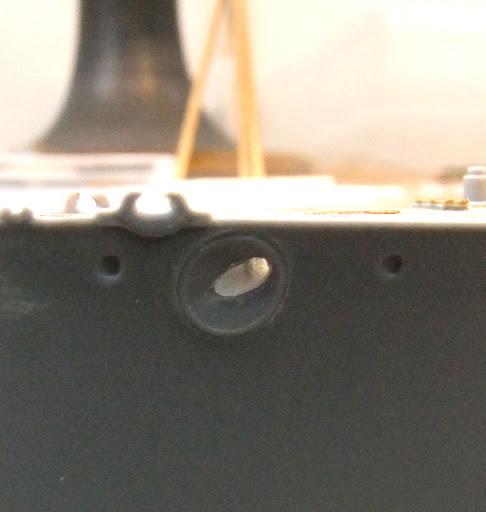
This created a problem as the front of the turrets are not moulded correctly having the barrel openings cutting into the cheeks of the turret (see picture from the Steel Navy review of the kit).
Image
I built up the front of the turrets to correct this to some degree. At the same time I also corrected the shape of the upper part of the opening and added the fittings for the blast bags. I also built up the mountings for the 12 pound guns.
Image

Image

Image

Image

Image

Image

Some heavy handling with the tweezers resulted in one set of turret ladders going into low earth orbit. What was left of them turned up in the vacuum after I had requested a replacement set from Pontos. I�m hoping to pick them up in person at Telford. The remains were assembled piece by piece on the turret with bits of fret replacing the missing treads.

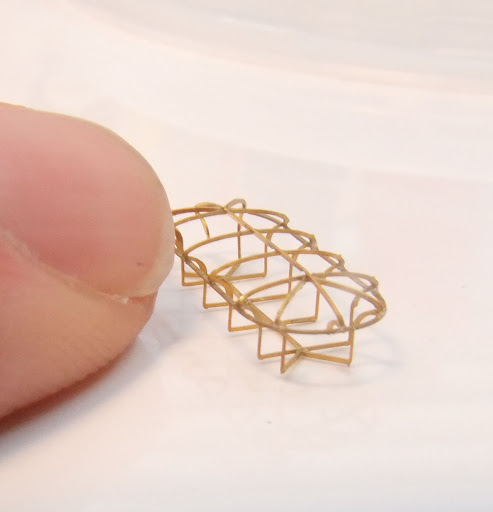
The funnel caps are little works of art and beautifully etched. I replaced the round fittings on the top with punched out foil discs as it was easier than cutting them from the fret. I thinned out the turrets so the caps would fit.

Image

Image

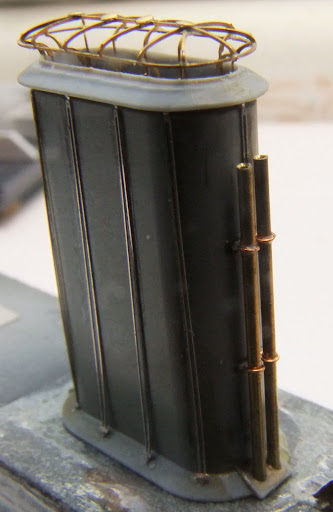
The funnel platform is incredibly fine, the finest etchings I have worked with. However part of the platform was slightly over etched which meant that the fine cross pieces (Far finer than a hair) had no centres and one side broke free while I was bending it. The pipes on the funnels were replaced with brass tube thinned at the upper end with a drill bit while the cowl was made from aluminium tube thinned with an emery board.

Image

Image

Image

Image

Image

The quality of the etch is demonstrated by the radio antenna screen with its stepped joint it was a snap fit onto its base.
Image

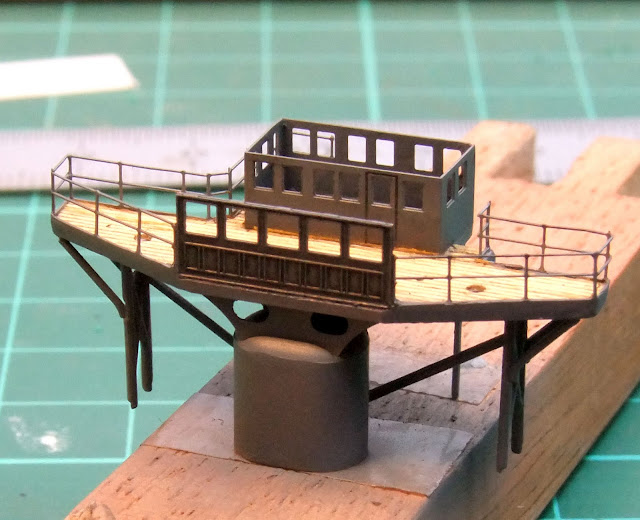
Sighting platform

Image

Bridge support structure

Image

I have also started the hull and would like to replicate the plating detail as Roy has done with his build. If anyone has any reference they could share I would be very grateful.

Thanks,
Rob.

User avatar
Bill Gormley
Posts: 279
Joined: Mon Mar 19, 2012 4:25 am

Re: Dreadnought with Pontos detail set.

Post by Bill Gormley »

How do you rate the Zvezda kit? Will you be making it full hull with the torpedo net deployed? It's an unusual and (in my opinion) really cool way to present the ship. In fact, the moment I saw the Pontos Model build photos the HMS Dreadnought zoomed to the top of my Christmas wish list. In any event, very nice work so far.
User avatar
Rob 2
Posts: 157
Joined: Sun Apr 11, 2010 1:22 pm

Re: Dreadnought with Pontos detail set.

Post by Rob 2 »

Hi Bill,
The few parts of the kit I have assembled have fitted quite well. The top of the bow has a slight miss match that will require some attention and the sprue attachments are a bit heavy leaving small holes in some cases despite careful removal but nothing a touch of filler wouldn�t put right. The detail is rather soft in places but I have been spoilt of late by the Dragon Scharnhorst I�m also building which is super sharp.

For the money I would say it was good value but the pictures I have seen of the Trumpeter Dreadnought look more detailed and the turrets look more accurate, I�ll have to see one in the flesh to be sure.

She will be built full hulled because I like to see the underwater hull form. As for the torpedo nets I have considered it but she may not fit in the cabinet and wow would they be delicate. Would make for a stunning display though.

Rob.
User avatar
Christian Bruer
Posts: 574
Joined: Tue Nov 21, 2006 7:44 am
Location: Germany
Contact:

Re: Dreadnought with Pontos detail set.

Post by Christian Bruer »

Hi,

a good start :thumbs_up_1: I will looking forward to your WIP!
Cheers,
Christian
_________________
AKA "Painter"
VMF'06 - German Gamblers
Veritable Modelling Friends 2006, Germany
User avatar
LE BOSCO
Posts: 2261
Joined: Thu Aug 27, 2009 11:05 am
Location: Paris France

Re: Dreadnought with Pontos detail set.

Post by LE BOSCO »

Rob

I will follow your thread with a great pleasure :thumbs_up_1:
Nicolas
User avatar
Rob 2
Posts: 157
Joined: Sun Apr 11, 2010 1:22 pm

Re: Dreadnought with Pontos detail set.

Post by Rob 2 »

Thanks Guys for your encouragement.
I�m long overdue an update on my build, so here goes.
I have assembled the spotting tops from the Pontos set. I have to say this is possibly the best etch I have worked with; the parts almost click into place. The detail under the kit supplied roofs is a neat addition.
Image
Image
Image
I have also started assembly of the masts. The foremast required a simple jig to hold it for assembly. The dimensions were taken from the kit to ensure the mast fit.
Image
Image
Image
Image
Image
Image
Image
Image
I wanted to try the wooden deck and being new to this technique I went with fitting the smallest components first on the bridge. I built up some of the surface detail to ensure it was higher than the deck with pieces of Evergreen. I had to increase the width of the second level deck to cover the cabin. I�m not sure how the original kit cabin would have fared here so I don�t know if the Pontos supplied one is larger. I trimmed the last stanchion and about half a mil of rail from the forward railing to prevent it overlapping the forward bridge structure. The excess rail was cut from the stanchion before it was glued back in place.
Image
Image
Image
Image
Image
Image
An opening had to be cut in the rear superstructure, here shown without its etched frame.
Image
The kit supplied boats had their hulls thinned and a grate made up from etched mesh. I need to add duck boards yet but I need additional reference. If anyone has access to a copy of the �Anatomy of the ship� book that could scan these pages for me I would be very grateful.
Image
They also had the solid thwarts ground away to make the most of the Pontos etched replacements.
Image
The motor launches had their etched cabins added after the plastic ones were trimmed. If left full size they prevented they forced the joints in the etch ones open. I also added some 700th scale portholes. The vents were also replaced with smaller hollow replacements. The rear was also lined with plastic card to create bulwarks and to hide the joint between the two halves of the hull.
Image
Image
Image
The admirals walk has had its railings added. I had to add strips in certain places to improve the fit of the inner railing.
Image
The Pontos resin search lights have been removed from their pouring blocks and carefully drilled out so I could fit 2.5 mm lenses from Little Cars. These were then covered in several layers of clear acrylic before having their etched frames added.
Image

The skylights have been folded up and still require their hinged covers. I have cut the plastic ones from the deck and have built a �box� under the deck to prevent light leaking in. This will also help support the deck while applying the wooden one and when I�m fitting the hawse pipes between the deck and the hull.
Image
Image
I have also cut any structures from the deck so they can be built up to retain their height over the wooden deck. I might cheat with the hawse and just build up their edges.
Image
Image
The rear compass platform has also been assembled.
Image
I want to represent the hull plating but I�m struggling for reference so if anyone can supply me with some reference scans from the Anatomy book it would be most appreciated.
I�m off now to the shed, I know my place!
Image
Thanks for looking,
Rob.
User avatar
codythecatt
Posts: 311
Joined: Sat Oct 20, 2012 11:01 pm
Location: Concrete, USA

Re: Dreadnought with Pontos detail set.

Post by codythecatt »

Rob, you save up 5 months of works to dump on us in one post? For shame! I about wore the wheel off my mouse!

By the way: love the wood deck work! :thumbs_up_1:
???????? ??? ???????, ??????? ?????? ???????? ????????? ??????? ????? ??? ??????? ???????! - ?. ?. ?????

Hello from Elk & Steelhead country and Cody the Incorrigible Cat

Image
User avatar
Captain pugwash
Posts: 422
Joined: Sun Jan 08, 2012 5:36 am
Location: LA/Cornwall-UK

Re: Dreadnought with Pontos detail set.

Post by Captain pugwash »

I agree with Cody.
Great work by the way.

But eek it out a little, to much Information can dampen the effect.

Your work is Imppecable and very good pictures to-boot.

Take your time and enjoy the build.
I know how it feels however, as ye get older!!!!!. :wave_1:
Cornwall UK
User avatar
Christian M.
Posts: 967
Joined: Sat Oct 06, 2012 4:34 pm
Location: Cologne / Germany, sometimes Poznan/ Poland and Chessington/ UK

Re: Dreadnought with Pontos detail set.

Post by Christian M. »

LE BOSCO wrote:Rob

I will follow your thread with a great pleasure :thumbs_up_1:
Nicolas
Only signed ... particularly because combination of Pontos + Zvezda kit. :thumbs_up_1:
The advantage of wisdom is that you can play dumb; conversely, it is more difficult.
User avatar
MartinJQuinn
Posts: 8592
Joined: Tue Jan 11, 2005 1:40 pm
Location: New Jersey

Re: Dreadnought with Pontos detail set.

Post by MartinJQuinn »

Mighty fine work.
Martin

"Tomorrow is the most important thing in life. Comes into us at midnight very clean. It's perfect when it arrives and it puts itself in our hands. It hopes we've learned something from yesterday." John Wayne

Ship Model Gallery
User avatar
Rob 2
Posts: 157
Joined: Sun Apr 11, 2010 1:22 pm

Re: Dreadnought with Pontos detail set.

Post by Rob 2 »

Thanks everyone for the encouragement.
I�m still struggling for reference as detailed in my post, so if anyone can help it would be much appreciated.
Thanks,
Rob.
User avatar
LE BOSCO
Posts: 2261
Joined: Thu Aug 27, 2009 11:05 am
Location: Paris France

Re: Dreadnought with Pontos detail set.

Post by LE BOSCO »

HI Rob
The latest advances are superb,the details raises the level of your model :thumbs_up_1:
cheers
Nicolas
User avatar
Christian Bruer
Posts: 574
Joined: Tue Nov 21, 2006 7:44 am
Location: Germany
Contact:

Re: Dreadnought with Pontos detail set.

Post by Christian Bruer »

Hi Rob,

nice progress with the highly detailed parts :thumbs_up_1: Looking really good!

I was wondering about the wooden deck at the nearly finished bridge. Do you plan to mask the deck before painting or do I missed an information about your technique in your text?!
Cheers,
Christian
_________________
AKA "Painter"
VMF'06 - German Gamblers
Veritable Modelling Friends 2006, Germany
User avatar
ArizonaBB39
Posts: 1321
Joined: Sat Jan 08, 2005 7:29 pm
Location: Tempe, Arizona
Contact:

Re: Dreadnought with Pontos detail set.

Post by ArizonaBB39 »

Excellent work, can't wait to see more!
User avatar
Rob 2
Posts: 157
Joined: Sun Apr 11, 2010 1:22 pm

Re: Dreadnought with Pontos detail set.

Post by Rob 2 »

Thanks Abram, more to follow soon.

You haven�t missed anything Christian as I will be masking the wood deck. This is the first time I have used a veneer deck and I wanted to ensure a good bond so stuck it directly onto the plastic surface after degreasing it. Also I want to conceal the edge of the wood so I have filled and sanded the edges before painting. It�s not obvious in the pictures but the upper deck of the bridge is still loose so masking should be pretty painless.
Rob.
User avatar
Rob 2
Posts: 157
Joined: Sun Apr 11, 2010 1:22 pm

Re: Dreadnought with Pontos detail set.

Post by Rob 2 »

Since my last post I have assembled the main hull components after drilling two holes in the bottom and capturing in thick plastic card a couple of suitable sized nuts.
Image
Image
I applied the wooden deck and to maintain the hatch height above the deck I built up all the coamings with plastic card before applying the etch.
Image
Image
Some of the fittings suffered from poorly aligned molding and are easier to scratch build than clean up.
Image
The bollards were removed from the deck as part of the building up process and were replaced with plastic card.
Image
Image
The entries in the deck for the anchor chain were built up with plastic card and the domed covers crash molded over a burnishing tool.
Image
To prevent the see through effect of the hawse holes they were packed with Miliput which once set was drilled out.
Image
All the removed deck fittings have had their bases built up and been glued back in position.
Image
I�m hoping to receive some reference from the AOTS book soon so I can start replicating the hull plating.
Thanks for looking.
litvin70
Posts: 298
Joined: Sun Mar 06, 2011 6:19 am

Re: Dreadnought with Pontos detail set.

Post by litvin70 »

Excellent work :thumbs_up_1:
User avatar
Christian M.
Posts: 967
Joined: Sat Oct 06, 2012 4:34 pm
Location: Cologne / Germany, sometimes Poznan/ Poland and Chessington/ UK

Re: Dreadnought with Pontos detail set.

Post by Christian M. »

Beside excellent work you show here, it is for me a very important thread now! ;-) :-)

Why?
Next kit after my current Sevastopol is IJN Mikasa from Hasegawa, but then same Dreadnought kit + same Pontos Set will follow. :-)
Normally it was planned to make Borodino, but that was moved to later, because in summer I will get a complete kit + all aftermarket things out of a barter with a French colleague (He gives me some ships + aftermarket stuff, I give him several 1/35 kits and aftermarket things which I will never will build ... because my interest in 1/35 is since 1 year reduced to Vietnam war only since I started buildiung ships, as his is changed from ships to 1/35 area).

So I will observe your progress here with full intrest of course. Your remark about turrets is for example very good to know ...

Cheers
Christian
The advantage of wisdom is that you can play dumb; conversely, it is more difficult.
Dave Spencer
Posts: 121
Joined: Mon Jun 25, 2012 7:28 pm
Location: North Wales

Re: Dreadnought with Pontos detail set.

Post by Dave Spencer »

I hope you are enjoying building this kit as much as I am following it.

It is funny how we all approach builds differently. It surprises me when people attach things such as deck fittings prior to painting them.

Regards, Dave
User avatar
Rob 2
Posts: 157
Joined: Sun Apr 11, 2010 1:22 pm

Re: Dreadnought with Pontos detail set.

Post by Rob 2 »

I haven�t posted for sometime as I have had a lot going on, anyway enough of the excuses.

Some of the etch components are tiny but fit together very well these include the vents and the breakwaters. The eagle eyed amongst you will have noticed gusset on the right hand breakwater with no hole, the original fell victim to the tweezers catapult.

Image

Image

Image

Image

I�m sure you will have noticed the copper wire eyebrows done in the tried and trusted way.

Image

Couldn�t resist trying the turrets, purely to check the fit, honest! :whistle:

Image

Image

I have been keen to try and replicate or at least hint at the plating of Dreadnoughts hull. After a lot of searching I have been able to get hold of a copy of the AotS book and photocopied to the correct scale the plating diagram. This was coloured to denote the recessed plating and masks cut from tape, the idea being to create a stepped edge with paint. Once this was done the top colours were added in light mist coats. The boot topping was reversed masked to take advantage of the black paint I used for this stage. I was after a subtle effect, rather too subtle as it turned out so the edges were further refined with couloured pencils, a propelling one was used for a harder edge. This was further worked with an eraser and a stiff paint brush. Very tricky to photograph but eventually I got some pictures worth posting.

Image

Image

Image

Image

Image

Image

The twelve pounder quick firing guns have also seen a lot of attention (First picture as kit supplied) with bits of etch ladder and copper wire for sights, bits of evergreen and etch gun sights from a WEM set for hand wheels.

Image

Image

I have also been busy painting many of the sub assemblies for the superstructure so a mad mass assembly session to follow soon with more pictures. I like to spray a darker shade first then spray the top colour from above to give a shaded finish.

Image

Next post should be quicker as I'm now unemployed :cry_3:
Thanks for looking.
Post Reply

Return to “Works in Progress”