Thanks!
I've actually got some vinyl from a friend who has a plotter for cutting signs. I'm going to experiment with those on scrap plastic first, though, before I use them for any modeling purposes. It seems to me the trick with that will be getting a realistic and consistent gap between the "plates" when using such a material.
I've actually been looking at the Carondelet build as of late. I've sanded down on my casemate mock-up a bit, but I'm starting to think that the one-piece build of that is going to cause more problems than it's worth. Again, I'm going to try it, though, and if it doesn't come out good, I'll switch to building the casemate with individual frames like the real one. That'll allow better access to building the interior, but it'll also mean I have to start painting a lot sooner than I'd anticipated.
Ironclad USS Chickasaw, 1/200 scale, from CAD model
Moderators: BB62vet, MartinJQuinn, JIM BAUMANN, Jon, Dan K
-
Devin

- Posts: 2497
- Joined: Mon Jan 10, 2005 10:46 am
- Location: Hoboken, NJ
- Contact:
Re: Ironclad USS Chickasaw, 1/200 scale, from CAD model
We like our history sanitized and theme-parked and self-congratulatory, not bloody and angry and unflattering. - Jonathan Yardley
-
Devin
- Posts: 2497
- Joined: Mon Jan 10, 2005 10:46 am
- Location: Hoboken, NJ
- Contact:
Re: Ironclad USS Chickasaw, 1/200 scale, from CAD model
I call this update "Stern-O-Plasty". I'm only going to put a few photos up here, as I just did a write-up on my blog of this process with a dozen images, and I don't want to have to recreate it all here. The entire procedure can be seen HERE.
The upper and lower hulls didn't meet at the stern, due to some heavy-handed steaming and bending on my part (still not used to working with wood), and I needed to bring the two hulls together. Initially the plan was to cut through half-way and bend it down, then fill the offending gap.
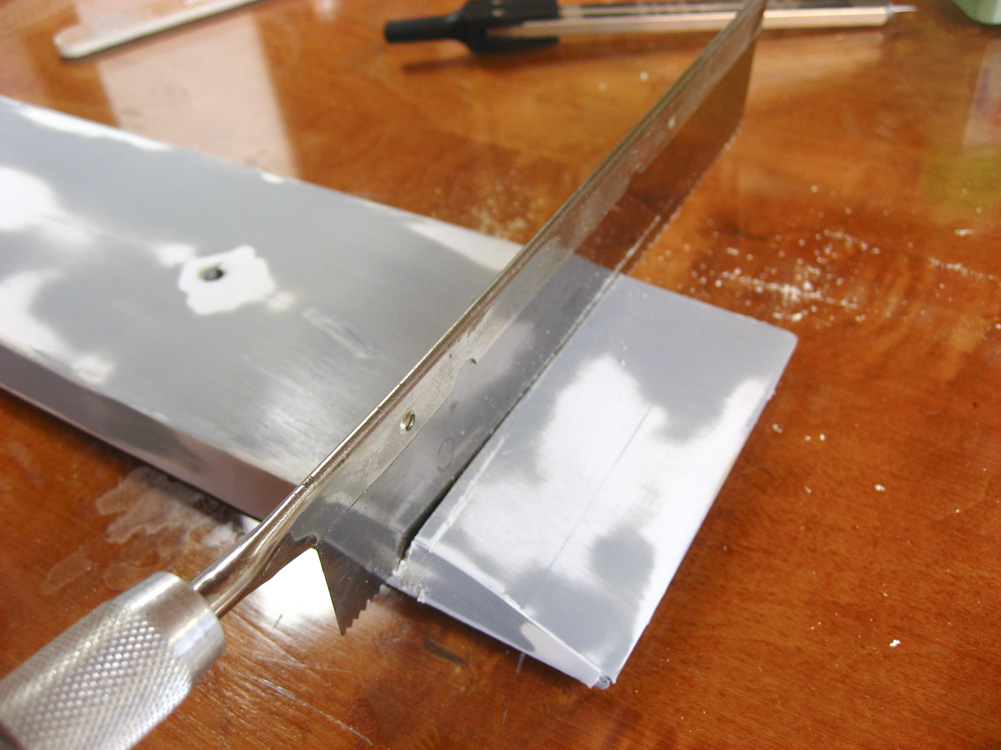
Due to the wood framing inside the stern, swelling, etc, the rear portion just wouldn't lay flat, even after I snipped out most of the interior structure. So, a stern-ectomy of the lower hull. The rest of the lower hull as been aligned and glued into place with 30 minute epoxy.

I framed out the missing area...
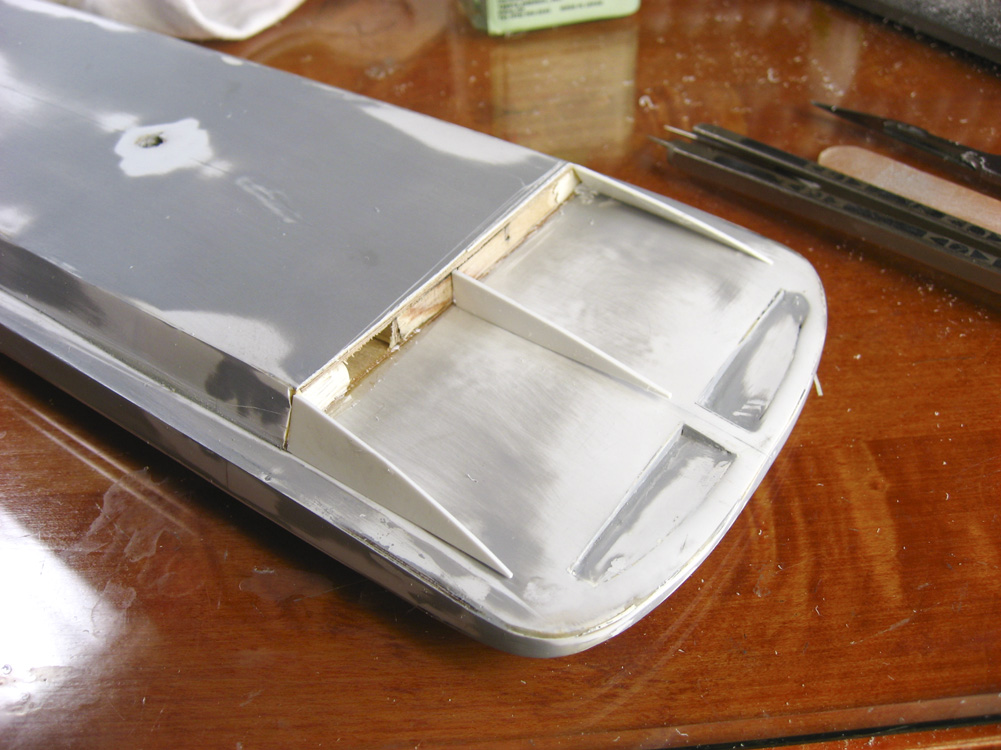
Then filled it with wood putty, and covered with a sheet of styrene.

Cut and trimmed to shape, offending gaps and dips filled and sanded.
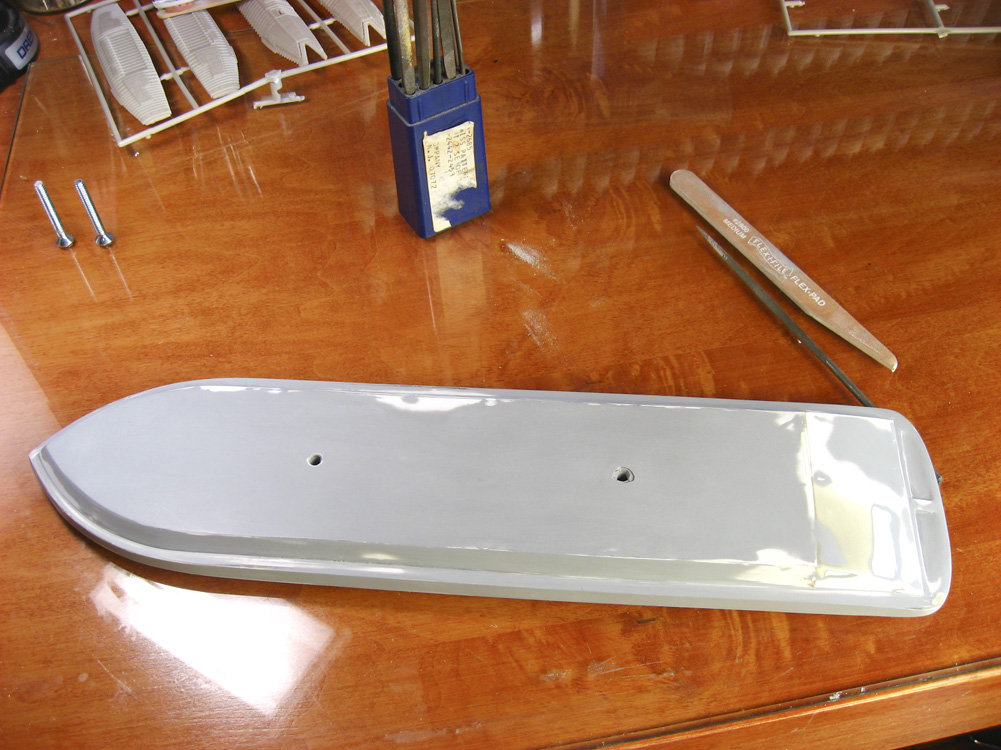
Duplicolor High Build Primer. I'd never use this on a kit with any form of detail, as it's a true automotive filler primer and would hide or soften all detail, but it was perfect for this. I believe this is eight coats of primer and sanding later. Ready for the prop and rudder fillets.

The upper and lower hulls didn't meet at the stern, due to some heavy-handed steaming and bending on my part (still not used to working with wood), and I needed to bring the two hulls together. Initially the plan was to cut through half-way and bend it down, then fill the offending gap.
Due to the wood framing inside the stern, swelling, etc, the rear portion just wouldn't lay flat, even after I snipped out most of the interior structure. So, a stern-ectomy of the lower hull. The rest of the lower hull as been aligned and glued into place with 30 minute epoxy.
I framed out the missing area...
Then filled it with wood putty, and covered with a sheet of styrene.
Cut and trimmed to shape, offending gaps and dips filled and sanded.
Duplicolor High Build Primer. I'd never use this on a kit with any form of detail, as it's a true automotive filler primer and would hide or soften all detail, but it was perfect for this. I believe this is eight coats of primer and sanding later. Ready for the prop and rudder fillets.
We like our history sanitized and theme-parked and self-congratulatory, not bloody and angry and unflattering. - Jonathan Yardley
-
Devin
- Posts: 2497
- Joined: Mon Jan 10, 2005 10:46 am
- Location: Hoboken, NJ
- Contact:
Re: Ironclad USS Chickasaw, 1/200 scale, from CAD model
A little more progress, but it's all so small to the naked eye at this point that there hasn't been much point in posting updates. I got both turrets primed and ready for use. The hull is all set except for alittle white putty you see on the bow, a stubborn divot there that I hope isn't from a flexing joint causing fractures.
The other photo is of a test section of styrene (I easily use more styrene testing stuff and doing mock-builds than I do in the actual models!). Here are the three riveting* techniques I'll be using on the model. Closest to the camera are recessed/flush rivets that will cover the entire deck of the ship. They're done with a jewelry punch tool, and have to be put on one at a time. Time consuming, but I actually enjoy it, and there's no other way to replicate it properly. The middle row is the Archer Transfers raised resin rivets. They're on water slide decal sheets, and they're applied the same way as regular decals. The far rows, under the hull red, are done with a ponce wheel, like the aircraft modelers use. Those will only be on the lower hull, so not entirely visible.
*I call it riveting because that's what all modelers know the process as. Ironclads didn't have rivets, though, the armor was held on with carriage bolts: very large versions of what holds together a lot of furniture, with a rounded end (visible on the outside) a long threaded shaft passed through the armor and wood backing, held in place with a large nut assembly.
- Attachments
-
-
Last edited by Devin on Thu May 02, 2013 5:23 pm, edited 1 time in total.
We like our history sanitized and theme-parked and self-congratulatory, not bloody and angry and unflattering. - Jonathan Yardley
-
Dan K
- Posts: 9037
- Joined: Tue Jan 11, 2005 10:56 am
- Location: New York City
Re: Ironclad USS Chickasaw, 1/200 scale, from CAD model
I saw these rivets last nite in person. Excellent!
-
Rdutnell

- Posts: 822
- Joined: Mon Dec 19, 2011 9:11 pm
- Location: Norman, Oklahoma
Re: Ironclad USS Chickasaw, 1/200 scale, from CAD model
Happy Birthday USS Chickasaw (a day late).
She was commissioned May 14, 1864.
She was commissioned May 14, 1864.
Completed:
1/350 USS Missouri (BB-63) * 1/350 USS England (DE-635) * "Underway Personnel Transfer" Diorama
In Progress:
1/350 USS Bennington (CV-20)
1/144 USS Greenling (SSN-614) - ACAD/3D Printing
1/144 USS Batfish (SS-310) - ACAD/3D Printing
1/350 USS Missouri (BB-63) * 1/350 USS England (DE-635) * "Underway Personnel Transfer" Diorama
In Progress:
1/350 USS Bennington (CV-20)
1/144 USS Greenling (SSN-614) - ACAD/3D Printing
1/144 USS Batfish (SS-310) - ACAD/3D Printing
-
Devin
- Posts: 2497
- Joined: Mon Jan 10, 2005 10:46 am
- Location: Hoboken, NJ
- Contact:
Re: Ironclad USS Chickasaw, 1/200 scale, from CAD model
I'm pulling this one out and knocking off the dust. With the USS Benson done and on the display shelf, I want to finish a "nearly there" project or two before starting the Merit CV-5 kit.
The last thing I did on Chickasaw was to cut the fillets/mounts for the 3 rudders and 4 props. I'll do a deep dusting of the model (seriously, she needs a bath) and test fit these fillets to make sure they fit, and then make the rudders that attach to them. Once that's done, I can start thinking about rivets/bolts and paint.
So, almost two years later, I'm back at work on Chickasaw.
- Attachments
-
- Don't zoom in too much on this photo or you'll see the dust. The 3D printed turrets have absolutely no degradation after 2 years under a lacquer primer coat.
-
- I'm really glad I numbered these way back when.
We like our history sanitized and theme-parked and self-congratulatory, not bloody and angry and unflattering. - Jonathan Yardley
-
Devin
- Posts: 2497
- Joined: Mon Jan 10, 2005 10:46 am
- Location: Hoboken, NJ
- Contact:
Re: Ironclad USS Chickasaw, 1/200 scale, from CAD model
Upon picking up Chickasaw again, the first thing I noticed was that the keel extension for the central rudder was not right. I mean it was WAY OFF in shape. So I got my feet wet (again) by ripping that out and making a paper template of what it should be. I used plans and the wood part from the laser cut pieces to get it close. The wooden shape isn't valid anymore as my construction methods reshaped that area of the stern, but it got me close. Paper pattern was cut, tested, and stuck to styrene to be cut.
Also in the photo you can see the number and letter markings for where the other prop and rudder mounts go. Those are written in with Sharpie. I learned the hard way with another project that those Sharpie markings will bleed through almost any paint, be it lacquer, enamel or acrylic. I'll sand them off and remark with a pencil.
Also in the photo you can see the number and letter markings for where the other prop and rudder mounts go. Those are written in with Sharpie. I learned the hard way with another project that those Sharpie markings will bleed through almost any paint, be it lacquer, enamel or acrylic. I'll sand them off and remark with a pencil.
- Attachments
-
We like our history sanitized and theme-parked and self-congratulatory, not bloody and angry and unflattering. - Jonathan Yardley
-
Devin
- Posts: 2497
- Joined: Mon Jan 10, 2005 10:46 am
- Location: Hoboken, NJ
- Contact:
Re: Ironclad USS Chickasaw, 1/200 scale, from CAD model
Still working on these rudder and prop supports. Turns out hand sanding these complex curves is a little tricky. I also notched the prop supports so that it'll be easier to add the screws after painting is complete, and made the three rudders, to ensure that the angles on everything match up once finally assembled.
At this point I'll prime and take care of the inevitable filling and sanding that's required where these mate with the hull, then I can look to scribing the panel lines and adding the rivets.
At this point I'll prime and take care of the inevitable filling and sanding that's required where these mate with the hull, then I can look to scribing the panel lines and adding the rivets.
- Attachments
-
- Rudder and prop supports. I made the initial ones from the wooden laser cut patterns, but each one had to be shaped specifically for their attachment point.
-
- Some of these had to be attached, snapped off, and reattached a few times to get the spacing and alignment correct. I'm sure they're not perfect, but they LOOK right, and that's all that matters.
We like our history sanitized and theme-parked and self-congratulatory, not bloody and angry and unflattering. - Jonathan Yardley
-
Dan K
- Posts: 9037
- Joined: Tue Jan 11, 2005 10:56 am
- Location: New York City
Re: Ironclad USS Chickasaw, 1/200 scale, from CAD model
Looking good.
-
Devin
- Posts: 2497
- Joined: Mon Jan 10, 2005 10:46 am
- Location: Hoboken, NJ
- Contact:
Re: Ironclad USS Chickasaw, 1/200 scale, from CAD model
Holy crap is this thing taking a LOT more work than I expected. Last weekend I was sure I had it licked, all primed and ready, when I noticed that the starboard rudder support was NOWHERE near straight. Snapped it off and started over. Now they're all attached, faired into the hull, and looking good. I added the keel strip down the center of the hull, and looking at the photo below I realize I need to trim it from over the mounting holes. Also a test sample of the red paint I'll be using for the lower hull. There's no concise information on what they used on the lower hulls of this class of ironclad, so I'm going with ol' reliable red lead.
Now I'm truly at the point where I can start in with the rivet wheel on the lower hull. Unless something else turns up that needs fixing, that is.
Now I'm truly at the point where I can start in with the rivet wheel on the lower hull. Unless something else turns up that needs fixing, that is.
- Attachments
-
We like our history sanitized and theme-parked and self-congratulatory, not bloody and angry and unflattering. - Jonathan Yardley
-
MartinJQuinn

- Posts: 8512
- Joined: Tue Jan 11, 2005 1:40 pm
- Location: New Jersey
Re: Ironclad USS Chickasaw, 1/200 scale, from CAD model
Nice work. I looks very futuristic - almost like part of the "Seaview"!
Martin
"Tomorrow is the most important thing in life. Comes into us at midnight very clean. It's perfect when it arrives and it puts itself in our hands. It hopes we've learned something from yesterday." John Wayne
Ship Model Gallery
"Tomorrow is the most important thing in life. Comes into us at midnight very clean. It's perfect when it arrives and it puts itself in our hands. It hopes we've learned something from yesterday." John Wayne
Ship Model Gallery
-
Devin
- Posts: 2497
- Joined: Mon Jan 10, 2005 10:46 am
- Location: Hoboken, NJ
- Contact:
Re: Ironclad USS Chickasaw, 1/200 scale, from CAD model
The USS Chickasaw has been pulled down off the Shelf of Doom. While I don't yet have more down-time due to the quarantine -- the model shop I work at is walking distance from home, and we're transitioning to all CAD/Digital work tomorrow for the foreseeable -- I have been taking stock of what I want to finish and what to start next.
Starting off slow, right now I'm assessing the state of the hull. The styrene sheeting over the plywood frames has cracked in a few places. I've slathered some Mr. Surfacer over those areas, I'll first sand that down to see if that fixes the issues. I'm not entirely confident that the assembly will survive long-term, so my goal is to get it plated, bolted (not riveted, ironclads did not have rivets) and then cast a resin copy of the hull for the rest of the project.
I put Chickasaw aside due to the usual project fatigue, and being stuck on how to do several things. As you can see, it's been over 4 years since I last worked on her, and I've learned a LOT in that time. I'll be leaning on my experience in CAD, specifically Rhinoceros v6, and my resin 3D printer at home, the Epax X1, to make the turrets, guns, props, and anything else along those lines.
- Attachments
-
- The hull with noticable splotches of Mr. Surfacer. The printed turret is not for Chickasaw, but rather another project, the USS Monitor, in 1/200 scale; basically testing my printer. The X-Wing in the background is the in-progress 1/72nd scale Bandai kit.
We like our history sanitized and theme-parked and self-congratulatory, not bloody and angry and unflattering. - Jonathan Yardley
-
Dan K
- Posts: 9037
- Joined: Tue Jan 11, 2005 10:56 am
- Location: New York City
Re: Ironclad USS Chickasaw, 1/200 scale, from CAD model
Behold the Resurrection!
-
JIM BAUMANN

- Posts: 5678
- Joined: Mon Jan 10, 2005 5:30 pm
- Location: Nr Southampton England
Re: Ironclad USS Chickasaw, 1/200 scale, from CAD model
never wrong to rescue an abandoned project.....
I have a few of those also...
to quote you a few years back:
>>> So, almost two years later, I'm back at work on Chickasaw. <<<
best wishes to see it through!
JIM B
I have a few of those also...
to quote you a few years back:
>>> So, almost two years later, I'm back at work on Chickasaw. <<<
best wishes to see it through!
JIM B
....I buy them at three times the speed I build 'em.... will I live long enough to empty my stash...?
http://www.modelshipgallery.com/gallery ... index.html
IPMS UK SIG (special interest group) www.finewaterline.com
http://www.modelshipgallery.com/gallery ... index.html
IPMS UK SIG (special interest group) www.finewaterline.com
-
Neptune

- Posts: 2453
- Joined: Sun Mar 13, 2005 11:51 am
- Location: Belgium
Re: Ironclad USS Chickasaw, 1/200 scale, from CAD model
Great to see you get back to this one! The amount of Mr Surfacer seems limited so far.
Hope to see more progress
Hope to see more progress
The merchant shipyard
-
Devin
- Posts: 2497
- Joined: Mon Jan 10, 2005 10:46 am
- Location: Hoboken, NJ
- Contact:
Re: Ironclad USS Chickasaw, 1/200 scale, from CAD model
Thanks, guys. Yes, I'm continuing on with her. I'll likely post photo updates tomorrow; right now it's mostly filling and sanding, and reverse-engineering the sizes of the turrets and such needed.
We like our history sanitized and theme-parked and self-congratulatory, not bloody and angry and unflattering. - Jonathan Yardley
-
Devin
- Posts: 2497
- Joined: Mon Jan 10, 2005 10:46 am
- Location: Hoboken, NJ
- Contact:
Re: Ironclad USS Chickasaw, 1/200 scale, from CAD model
I don't have a lot to show, but I said I'd post, so here goes. The majority of the last week was made up of the model maker's meditation of "fill, sand, prime, repeat." Tedious work, but I've come to enjoy it, and now I have the hull smooth and ready for detailing.
It's been years since I last worked on this kit, and during that time the Shapeways prints have degraded. As you can see in the photo, the unpainted turret is growing what looks like rust from a shipwreck, and the surfaces have gone soapy. It's hard to tell from the photo, but even the turret that was primed years ago has started to break down, too, exhibiting a glittery and waxy texture as the material leeches out through the primer.
Needless to say, this won't do. I don't have any of these files that the parts were printed from, so out came the calipers and I made dozens of measurements to figure out what the diameter should be, as the parts are no longer perfectly cylindrical. I mocked up a quick turret shell, which I printed on my Epax 3D printer to test the size. It came out just a little small, so I tried small strips of styrene into the gap until I got the right thickness -- too small of a gap to get calipers into -- then offset the drawings in CAD by that amount. The next print should now be the proper diameter.
I've started preliminary work on the CAD work for the turret. Basically what you see is that turret shell I drew, with the face unrolled to a flat plane. That one teeny tiny dot just above the flat face is the first of the bolts that will cover the turret face.
- Attachments
-
- Turrets showing signs of breaking down.
-
- Slight gap between the hull and the 3D print.
-
- The VERY start of the CAD word for turrets.
We like our history sanitized and theme-parked and self-congratulatory, not bloody and angry and unflattering. - Jonathan Yardley
-
tea monster

- Posts: 275
- Joined: Sat Jun 11, 2011 5:02 pm
- Contact:
Re: Ironclad USS Chickasaw, 1/200 scale, from CAD model
Nice to see this continuing!
I'm shocked to see the Shapeway's parts suffering from deterioration. Are modern resin parts going to suffer similarly?
- Owen
I'm shocked to see the Shapeway's parts suffering from deterioration. Are modern resin parts going to suffer similarly?
- Owen
-
JIM BAUMANN
- Posts: 5678
- Joined: Mon Jan 10, 2005 5:30 pm
- Location: Nr Southampton England
Re: Ironclad USS Chickasaw, 1/200 scale, from CAD model
>>>> I'm shocked to see the Shapeway's parts suffering from deterioration. Are modern resin parts going to suffer similarly? <<<<
hear hear !! that was the question that immediately arose in my mind as I read your posting
but Owen ( ) beat me to it!!!
on the Normandie.... I am using quiet a few --albeit very small-- 3 D printed parts-- granted modern 3D print-
but still...
if you have any thoughts on this I would like to hear your opinion...( ..??! or may be not ...eh!! )
regards
JB
hear hear !! that was the question that immediately arose in my mind as I read your posting
but Owen (
on the Normandie.... I am using quiet a few --albeit very small-- 3 D printed parts-- granted modern 3D print-
but still...
if you have any thoughts on this I would like to hear your opinion...( ..??! or may be not ...eh!! )
regards
JB
....I buy them at three times the speed I build 'em.... will I live long enough to empty my stash...?
http://www.modelshipgallery.com/gallery ... index.html
IPMS UK SIG (special interest group) www.finewaterline.com
http://www.modelshipgallery.com/gallery ... index.html
IPMS UK SIG (special interest group) www.finewaterline.com
-
Guest
Re: Ironclad USS Chickasaw, 1/200 scale, from CAD model
This is a pretty well known issue for folks that print via shapeways. Supposedly it's because the printers were tweaked to run faster or something... been a long time ago since it came to light. Shapeways even involved some of us in an experiment on how we handled and finished items to see if that was impacting the finished parts. I try to brush my parts with a fiberglass brush before finishing. I've not had any finished items degrade, but I have had unfinished ones develop the crust on them.JIM BAUMANN wrote:>>>> I'm shocked to see the Shapeway's parts suffering from deterioration. Are modern resin parts going to suffer similarly? <<<<
hear hear !! that was the question that immediately arose in my mind as I read your posting
but Owen (
on the Normandie.... I am using quiet a few --albeit very small-- 3 D printed parts-- granted modern 3D print-
but still...
if you have any thoughts on this I would like to hear your opinion...( ..??! or may be not ...eh!! )
regards
JB