I'm in awe!!!!!
James
Zuiderzee-Botter
Moderators: BB62vet, MartinJQuinn, JIM BAUMANN, Jon, Dan K
-
lvsquarerigger

- Posts: 398
- Joined: Tue Feb 17, 2009 12:26 am
- Location: Albuquerque, NM
-
wefalck

- Posts: 2079
- Joined: Wed Sep 28, 2011 12:04 pm
- Location: Paris
- Contact:
Re: Zuiderzee-Botter
The smithy of the boatyard has been busy and turned out various pieces of ironwork for rigging and other purposes:
The mast is held in its tabernacle by a latch hinging on eyebolts.
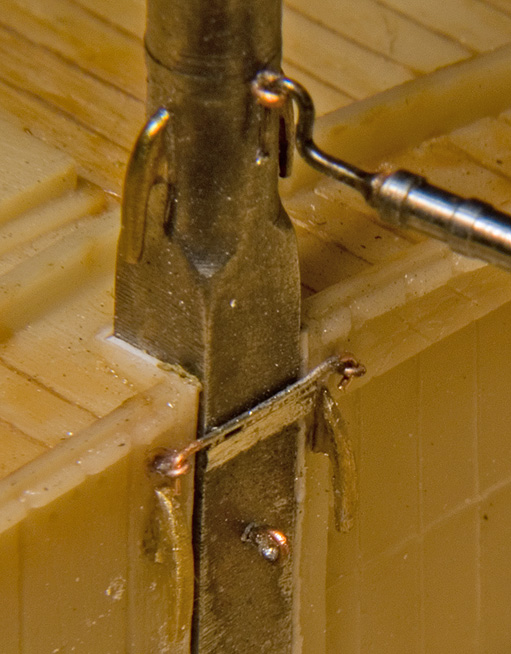
Mast tabernacle
There is a complex piece of ironwork that guides and holds down the running bowsprit (which will not be shown on the model, as it was normally left home during the winter season, when a reduced rig was used). The ring was turned from a piece of brass rod, while stay was fashioned from a piece of steel rod on both the lathe and the mill, as it has partially a square section. In fact, various parts of the ironwork do have square sections, inter alia to prevent them from turning, or because they have made from square bar, hammered to a round cross-section where needed.
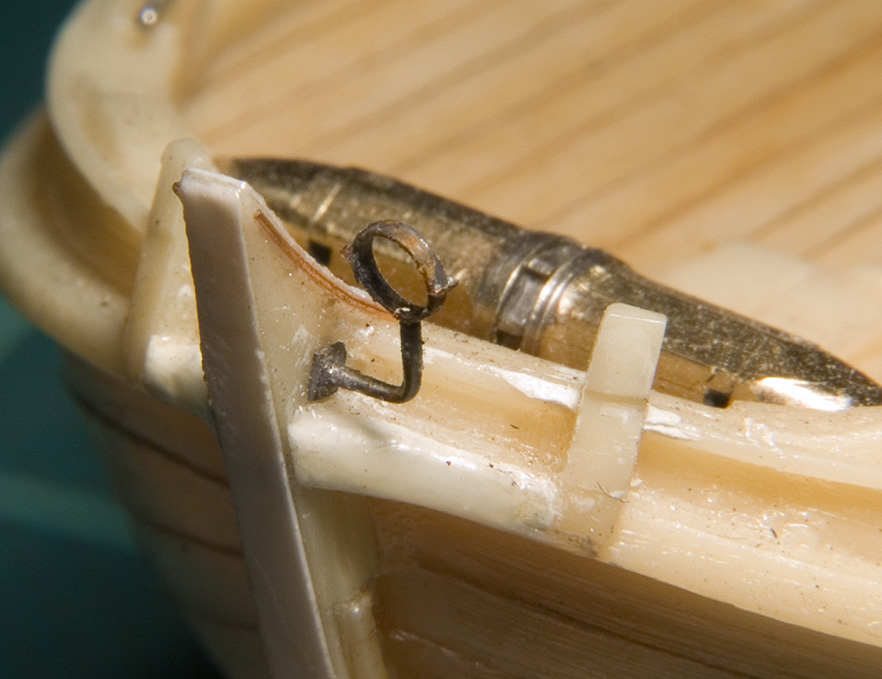
Bowsprit guide
The leeboards are held by sort of square rings that slip over the leeboard-bollards. These rings were made from brass strips soldered together and filed to shape. The leeboard pivots on a bolt that is held by these rings.

Various ironwork
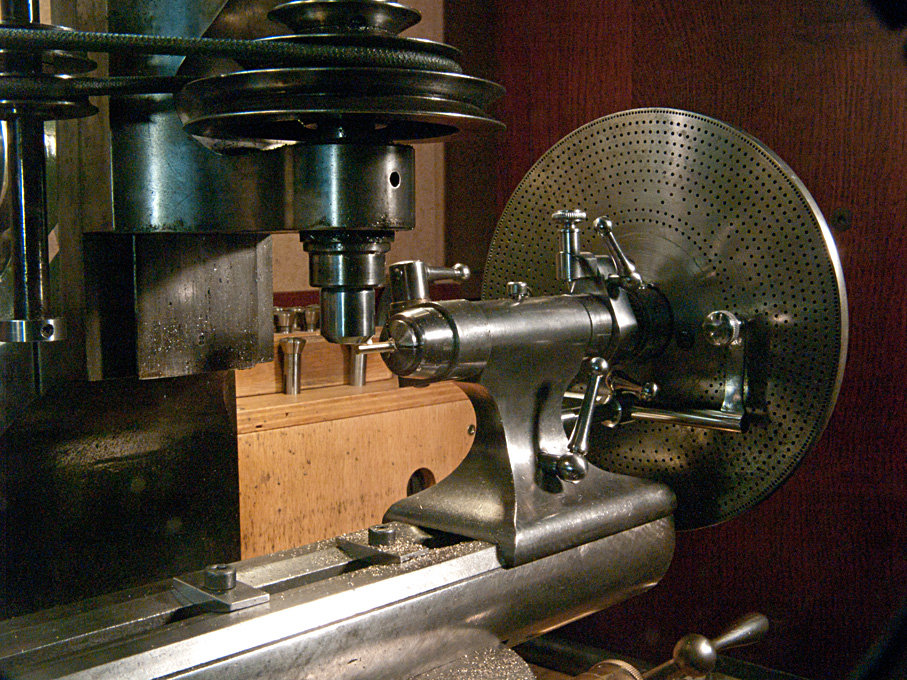
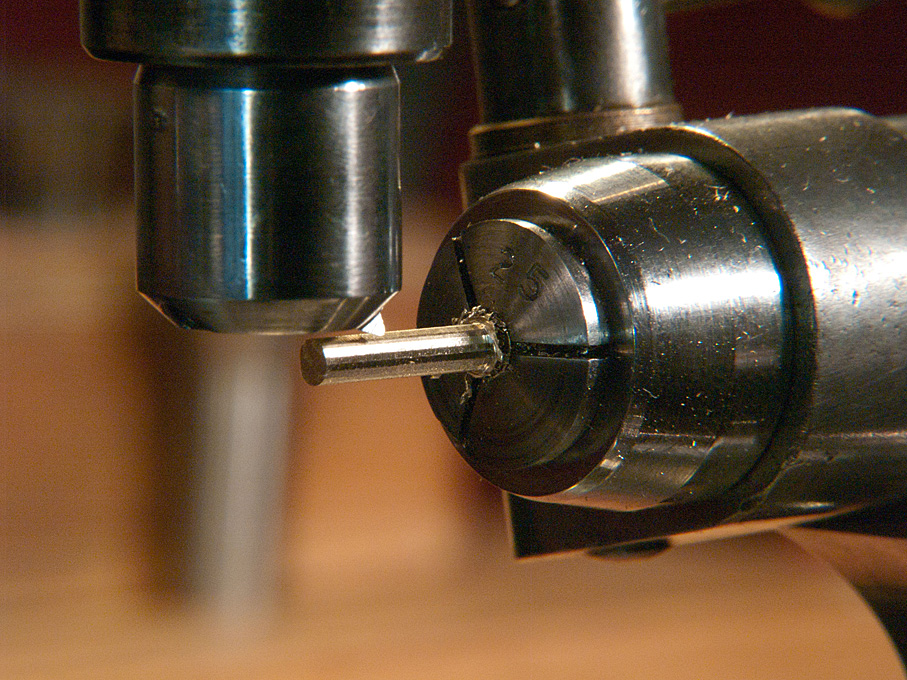
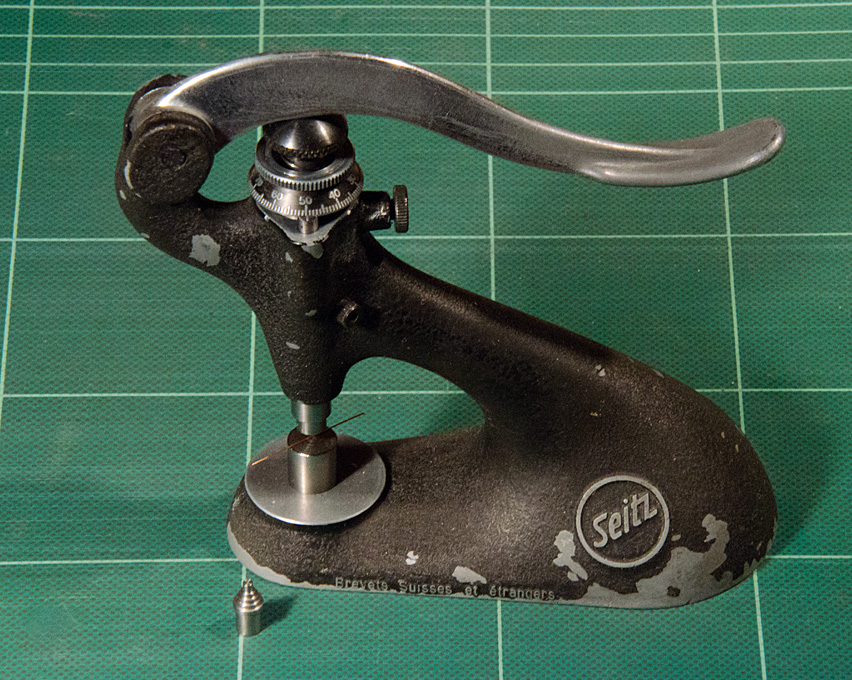
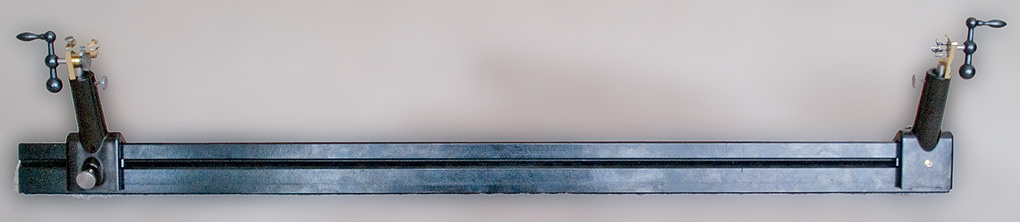
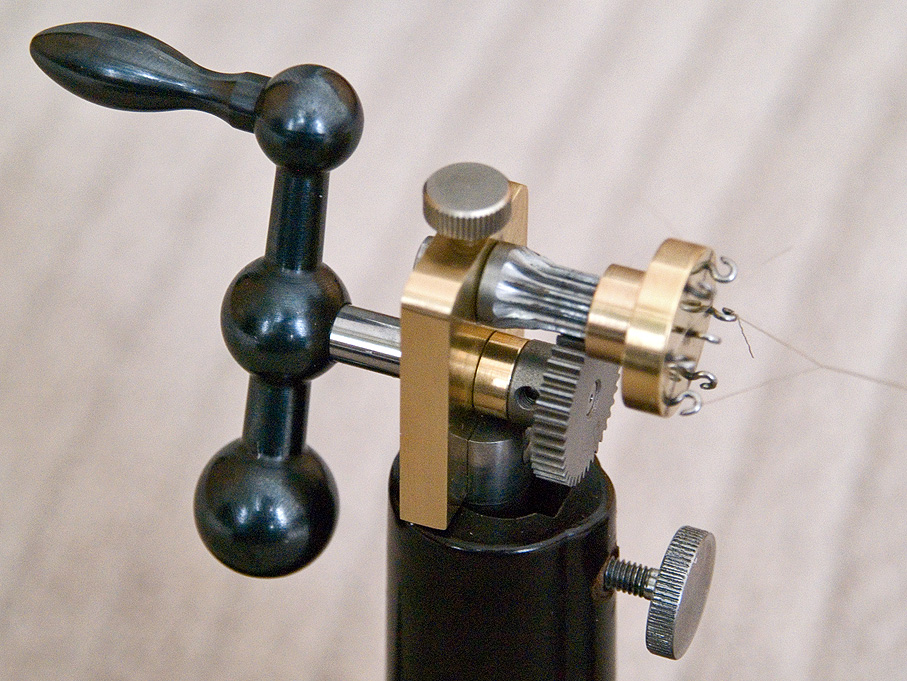
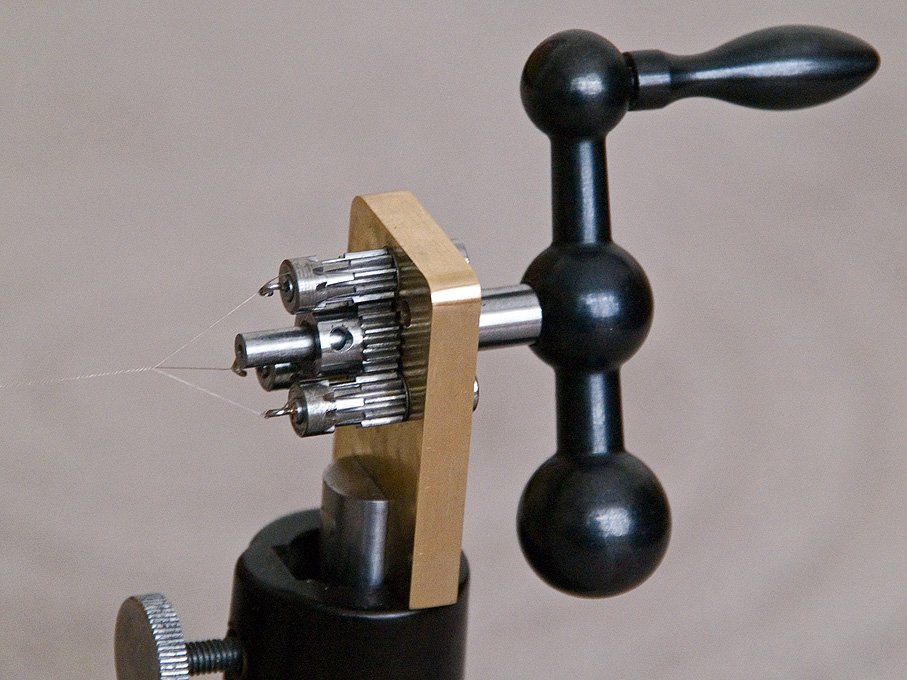
A major challenge were the various belaying and thole pins. On the prototype their maximum diameter is just under 40 mm, the cylindrical sections generally being around 20 mm. So, in the 1/90 scale this means they are 0.2 to 0.4 mm in diameter, with a length of 3 to 4 mm. There are five different types and the literature (VAN BEYLEN, 1995; DORLEIJN, 2001) gives the typical dimensions and shapes for each them. Turning them from the available brass was impossibe, so that 1 mm steel wire was used as starting material. Even then turning them flying, i.e. supported only in a collet in the headstock proved impossible. This lead to the design and manufacturing of a tailstock-held micro-steady. The spherical parts on the pins where shaped free-hand using files and strips of abrasive paper.

Belaying pin
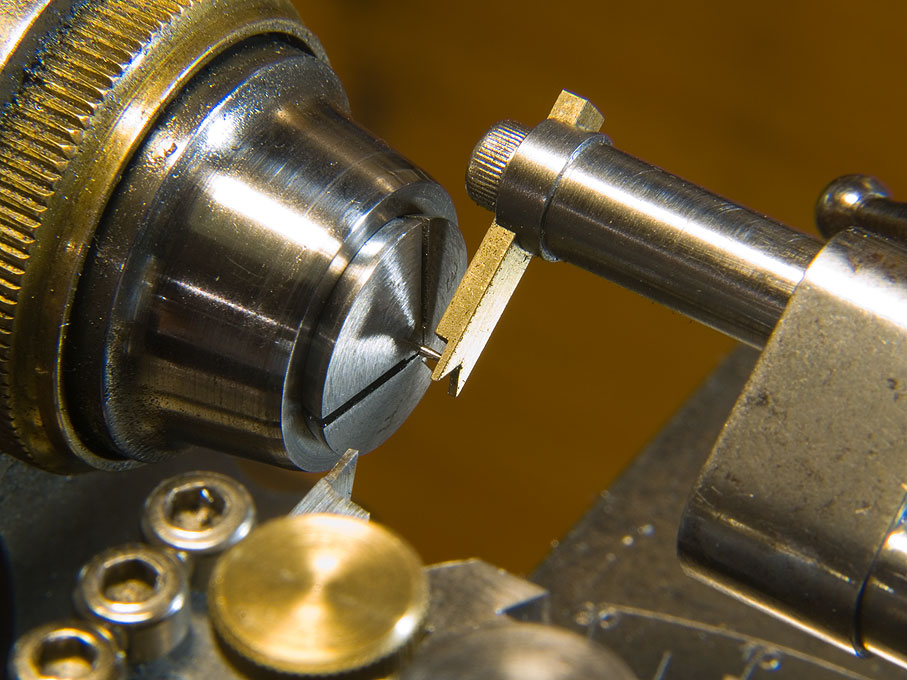
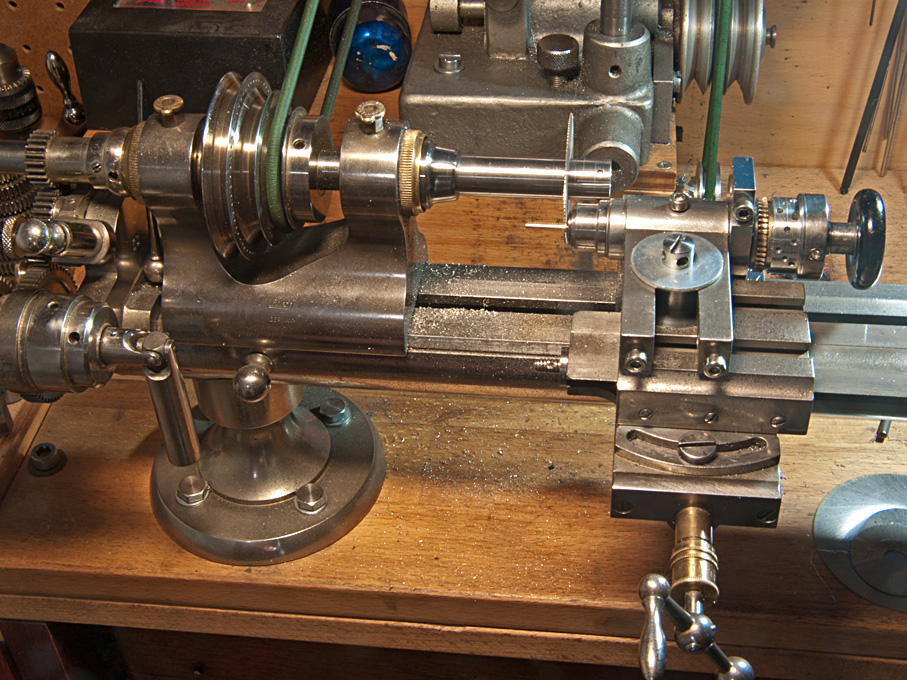
Specially made micro fixed-steady for turning small slender items on the watchmakers lathe.
wefalck
The mast is held in its tabernacle by a latch hinging on eyebolts.
Mast tabernacle
There is a complex piece of ironwork that guides and holds down the running bowsprit (which will not be shown on the model, as it was normally left home during the winter season, when a reduced rig was used). The ring was turned from a piece of brass rod, while stay was fashioned from a piece of steel rod on both the lathe and the mill, as it has partially a square section. In fact, various parts of the ironwork do have square sections, inter alia to prevent them from turning, or because they have made from square bar, hammered to a round cross-section where needed.
Bowsprit guide
The leeboards are held by sort of square rings that slip over the leeboard-bollards. These rings were made from brass strips soldered together and filed to shape. The leeboard pivots on a bolt that is held by these rings.
Various ironwork
A major challenge were the various belaying and thole pins. On the prototype their maximum diameter is just under 40 mm, the cylindrical sections generally being around 20 mm. So, in the 1/90 scale this means they are 0.2 to 0.4 mm in diameter, with a length of 3 to 4 mm. There are five different types and the literature (VAN BEYLEN, 1995; DORLEIJN, 2001) gives the typical dimensions and shapes for each them. Turning them from the available brass was impossibe, so that 1 mm steel wire was used as starting material. Even then turning them flying, i.e. supported only in a collet in the headstock proved impossible. This lead to the design and manufacturing of a tailstock-held micro-steady. The spherical parts on the pins where shaped free-hand using files and strips of abrasive paper.
Belaying pin
Specially made micro fixed-steady for turning small slender items on the watchmakers lathe.
wefalck
Eberhard
Former chairman Arbeitskreis historischer Schiffbau e.V. (German Association for Shipbuilding History)
--------------------------------------------------------------------------------------------------------------------------------------------------------------------------------------------


Former chairman Arbeitskreis historischer Schiffbau e.V. (German Association for Shipbuilding History)
--------------------------------------------------------------------------------------------------------------------------------------------------------------------------------------------
-
JIM BAUMANN

- Posts: 5678
- Joined: Mon Jan 10, 2005 5:30 pm
- Location: Nr Southampton England
Re: Zuiderzee-Botter
mighty impressive stuff!--both the modelmaking and the methodology to achieve the result
fine use of fine tools
very good indeed!
Jim Baumann
fine use of fine tools
very good indeed!
Jim Baumann
....I buy them at three times the speed I build 'em.... will I live long enough to empty my stash...?
http://www.modelshipgallery.com/gallery ... index.html
IPMS UK SIG (special interest group) www.finewaterline.com
http://www.modelshipgallery.com/gallery ... index.html
IPMS UK SIG (special interest group) www.finewaterline.com
-
wefalck
- Posts: 2079
- Joined: Wed Sep 28, 2011 12:04 pm
- Location: Paris
- Contact:
Re: Zuiderzee-Botter
Thanks, gentlemen, for your gentle comments.
I am trying to put as much detail into my models as is physically possible. Obviously, there are limitations due to available material dimensions, such as wire diameters, or the practicabilities of machining. Having ammassed a lot of watchmaking machinery pushed these limits, but it is still difficult to, say, turn long items below 0.3 mm diameter, or to drill quantities of holes below 0.2 mm. One offs are possible, but not series of such operations.
*****
I have been thinking very hard on ways to make really convincing rigging blocks of late 19th century model. Some of the blocks would have to be as small as 1.6 mm long, while the typical block would be just under 2 mm long. Most of the blocks would have to have external ironwork. The ropes for the running rigging typically would have a diameter of somewhere between 0.15 mm and 0.25 mm in 1/90 scale, depending on the particular rope. This would mean that quite a large number of holes of such diameters would have to drilled to a depth of around 1 mm, which is a bit of a challenge. I did consider 3D-printing, but from what I know about it, it may be pushing the technique to its limits - and I need to first improve my very basic CAD and 3D-computer modelling skills.
I wanted to avoid drilling all those small holes by cutting slots into the material and inserting real sheaves turned from brass. The slots at the bottom would be filled in afterward. The outside shape of the block was to be milled in the dividing head from round stock. A table was prepared that calculated the exact distance of the cutter from the centre-line for each pass, so that eventually the oval shape would emerge. This raw part then was transferred to the lathe for cutting the slots.
Set-up for shape-milling the blocks in a dividing head on the milling machine
Shape-milling of blocks with a fly-cutter
The set-up for slotting on the lathe
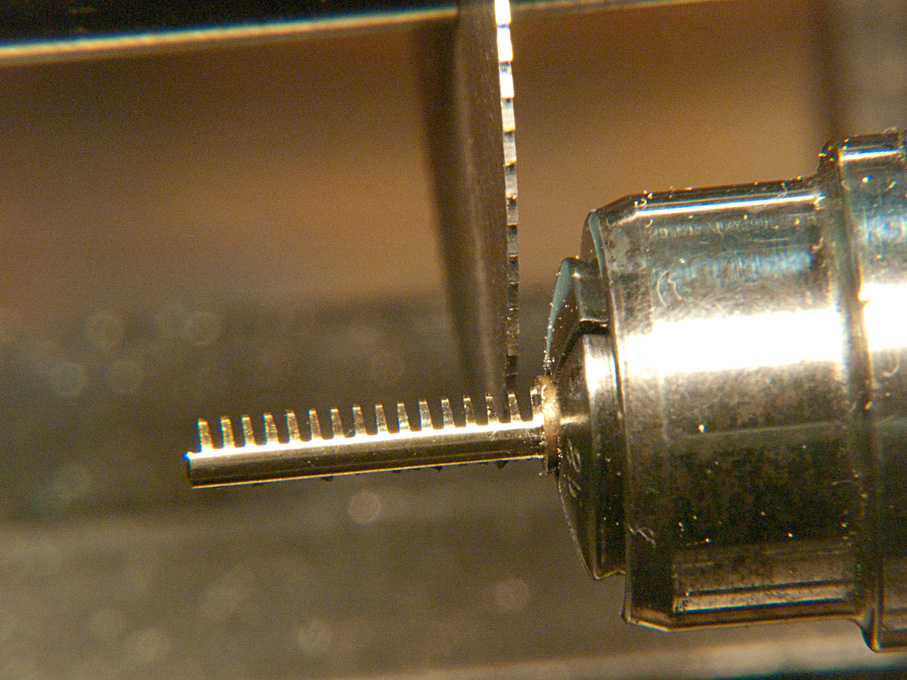
Slotting the blocks on the lathe
While perhaps a good idea from a theoretical point of view, the slotted material proved to be too flimsy for further manipulation and I abandoned this approach.
Therefore, a different method was devised, for which the material was changed from brass to Plexiglas. The outside shape was cut as before, but instead of using a flycutter, a dental burr was used, which due to its smaller diameter exerts less force on the part. Then the holes were drilled at pre-calculated positions. The cross-section of the future blocks were positioned in the round Plexiglas stock in a way that the axes of the sheave would coincide with the rotational axis of the dividing head. This arrangement allowed the sheave to be milled out of the solid. The holes then were drilled through with a miniature drill.
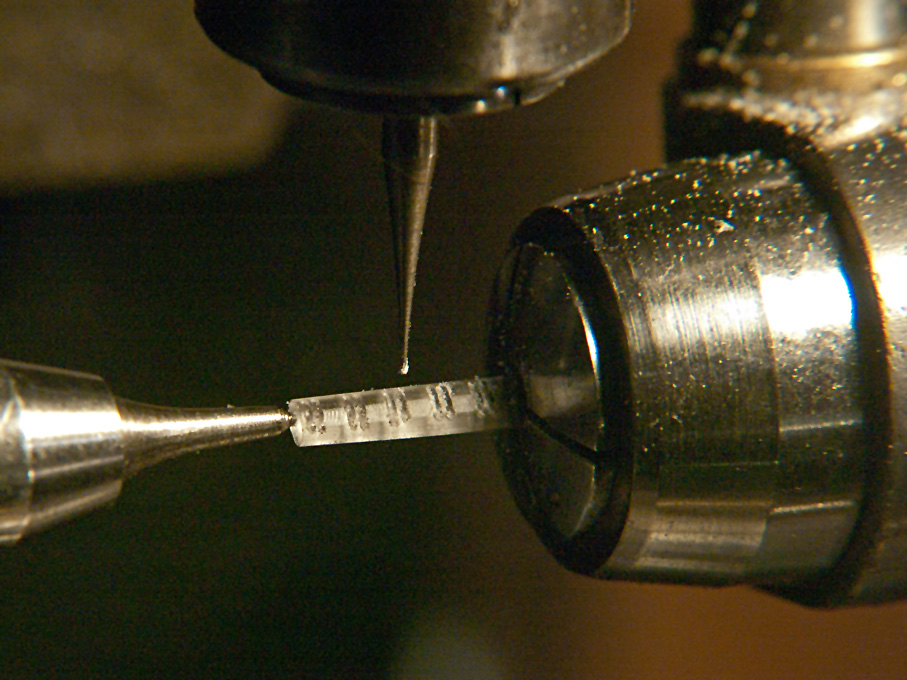
Milling of the 'sheaves' into the solid stock
Many shipmodellers just drill their blocks and perhaps, if they have a thin enough tool, attempt to file the edges of the hole round to give an indication of the sheave. However, this never looks quite right, with the ropes sort of sticking out sideways from the hole, rather than running around the sheave.
These blocks then were cut off from the stock on the lathe. It should be noted that the stock was turned down at the end, so that it could be inserted into the collets against a shoulder, ensuring repeatable positioning. The latter was needed, as the dividing head on the lathe and the one on the mill use different types of collets.
The botter has a variety of rather special blocks that also needed to be made, such as the sheepshead-block for the foresail. They were produced the technique described above, but in some instances were 'eyeballed' from the stock in the dividing head. One violin-block was also built up from hard paper with real brass sheaves and filed to shape by hand.
The blocks were completed with 'ironwork' from copper wire. On the prototype this ironwork is forged from different sizes of bars. The blacksmith shapes the cross-sections as needed either flat (around the shell of the blocks) or round/oval for the hooks. This process was repeated up to a point by flattening the round copper wire used. In order to flatten the wire in a controllable and repeatable way another watch-repairing tool was adapted: a so-called jewelling press. This tool has a piston the movement of which is controlled by micrometer stop. In watchrepairing it is used to set bearings, i.e. the �stones� or �rubies� to an exact depth.
I made some anvils and pistons for it that allow to squeeze the copper wire to a preset thickness over a particular length. The thickness is set with the help of a feeler-gauge.
Jewelling tool
A selection of unpainted blocks
The results from all these labours are by no means perfect, but I think better than what I have seen around in this size. Keep in mind that the pictures on the screen are five to ten times enlarged compared to the real thing.
I am not certain, however, whether I would go down the same route again. It would be useful to be able to solder together the straps, which is out of question for blocks made from Plexiglas. Using hard paper/Pertinax would be an option, but drilling this material is not so easy, considering the small sizes of drills required. Perhaps one should use boxwood. In both cases round rods would have to produced first from the available stock. Or at least one would need to turn-on a round end, so that the stock can be taken into a collet � square collets for watchmaking lathes don�t exist ! (this is another of my future projects, to make a set of square-holed collets.
wefalck
I am trying to put as much detail into my models as is physically possible. Obviously, there are limitations due to available material dimensions, such as wire diameters, or the practicabilities of machining. Having ammassed a lot of watchmaking machinery pushed these limits, but it is still difficult to, say, turn long items below 0.3 mm diameter, or to drill quantities of holes below 0.2 mm. One offs are possible, but not series of such operations.
*****
I have been thinking very hard on ways to make really convincing rigging blocks of late 19th century model. Some of the blocks would have to be as small as 1.6 mm long, while the typical block would be just under 2 mm long. Most of the blocks would have to have external ironwork. The ropes for the running rigging typically would have a diameter of somewhere between 0.15 mm and 0.25 mm in 1/90 scale, depending on the particular rope. This would mean that quite a large number of holes of such diameters would have to drilled to a depth of around 1 mm, which is a bit of a challenge. I did consider 3D-printing, but from what I know about it, it may be pushing the technique to its limits - and I need to first improve my very basic CAD and 3D-computer modelling skills.
I wanted to avoid drilling all those small holes by cutting slots into the material and inserting real sheaves turned from brass. The slots at the bottom would be filled in afterward. The outside shape of the block was to be milled in the dividing head from round stock. A table was prepared that calculated the exact distance of the cutter from the centre-line for each pass, so that eventually the oval shape would emerge. This raw part then was transferred to the lathe for cutting the slots.
Set-up for shape-milling the blocks in a dividing head on the milling machine
Shape-milling of blocks with a fly-cutter
The set-up for slotting on the lathe
Slotting the blocks on the lathe
While perhaps a good idea from a theoretical point of view, the slotted material proved to be too flimsy for further manipulation and I abandoned this approach.
Therefore, a different method was devised, for which the material was changed from brass to Plexiglas. The outside shape was cut as before, but instead of using a flycutter, a dental burr was used, which due to its smaller diameter exerts less force on the part. Then the holes were drilled at pre-calculated positions. The cross-section of the future blocks were positioned in the round Plexiglas stock in a way that the axes of the sheave would coincide with the rotational axis of the dividing head. This arrangement allowed the sheave to be milled out of the solid. The holes then were drilled through with a miniature drill.
Milling of the 'sheaves' into the solid stock
Many shipmodellers just drill their blocks and perhaps, if they have a thin enough tool, attempt to file the edges of the hole round to give an indication of the sheave. However, this never looks quite right, with the ropes sort of sticking out sideways from the hole, rather than running around the sheave.
These blocks then were cut off from the stock on the lathe. It should be noted that the stock was turned down at the end, so that it could be inserted into the collets against a shoulder, ensuring repeatable positioning. The latter was needed, as the dividing head on the lathe and the one on the mill use different types of collets.
The botter has a variety of rather special blocks that also needed to be made, such as the sheepshead-block for the foresail. They were produced the technique described above, but in some instances were 'eyeballed' from the stock in the dividing head. One violin-block was also built up from hard paper with real brass sheaves and filed to shape by hand.
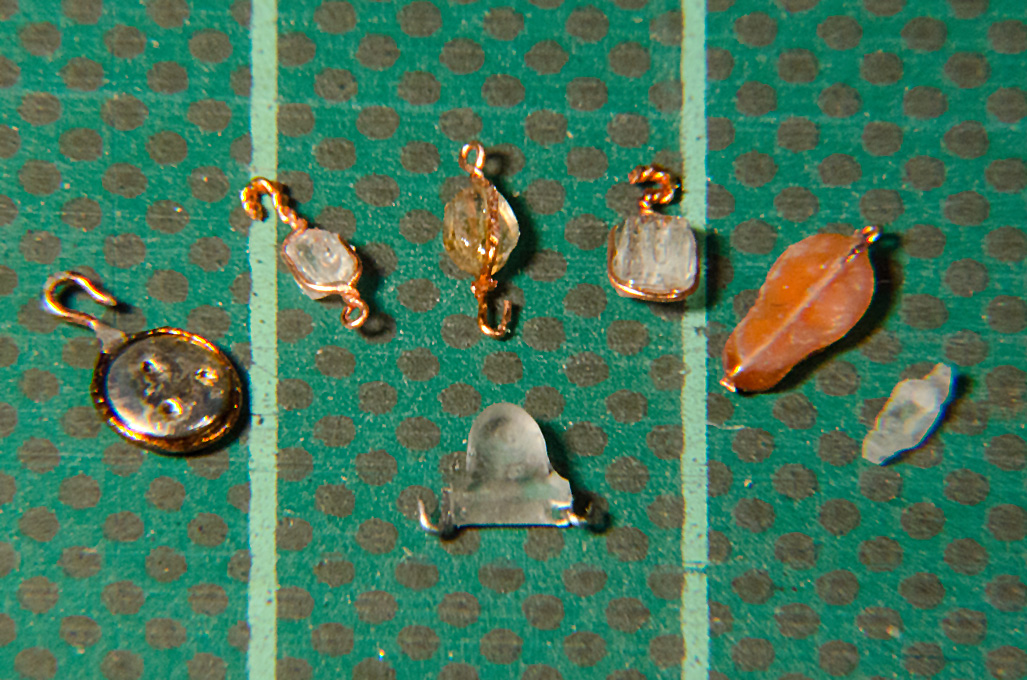
The blocks were completed with 'ironwork' from copper wire. On the prototype this ironwork is forged from different sizes of bars. The blacksmith shapes the cross-sections as needed either flat (around the shell of the blocks) or round/oval for the hooks. This process was repeated up to a point by flattening the round copper wire used. In order to flatten the wire in a controllable and repeatable way another watch-repairing tool was adapted: a so-called jewelling press. This tool has a piston the movement of which is controlled by micrometer stop. In watchrepairing it is used to set bearings, i.e. the �stones� or �rubies� to an exact depth.
I made some anvils and pistons for it that allow to squeeze the copper wire to a preset thickness over a particular length. The thickness is set with the help of a feeler-gauge.
Jewelling tool
A selection of unpainted blocks
The results from all these labours are by no means perfect, but I think better than what I have seen around in this size. Keep in mind that the pictures on the screen are five to ten times enlarged compared to the real thing.
I am not certain, however, whether I would go down the same route again. It would be useful to be able to solder together the straps, which is out of question for blocks made from Plexiglas. Using hard paper/Pertinax would be an option, but drilling this material is not so easy, considering the small sizes of drills required. Perhaps one should use boxwood. In both cases round rods would have to produced first from the available stock. Or at least one would need to turn-on a round end, so that the stock can be taken into a collet � square collets for watchmaking lathes don�t exist ! (this is another of my future projects, to make a set of square-holed collets.
wefalck
Eberhard
Former chairman Arbeitskreis historischer Schiffbau e.V. (German Association for Shipbuilding History)
--------------------------------------------------------------------------------------------------------------------------------------------------------------------------------------------
Former chairman Arbeitskreis historischer Schiffbau e.V. (German Association for Shipbuilding History)
--------------------------------------------------------------------------------------------------------------------------------------------------------------------------------------------
-
Rob 2

- Posts: 157
- Joined: Sun Apr 11, 2010 1:22 pm
Re: Zuiderzee-Botter
What skill and what a workshop.
I'm green with envy on both counts.
Rob.
I'm green with envy on both counts.
Rob.
-
wefalck
- Posts: 2079
- Joined: Wed Sep 28, 2011 12:04 pm
- Location: Paris
- Contact:
Re: Zuiderzee-Botter
I think I mentioned before that these antique watchmaking/-repairing machines are a hobby of its own that developed since I first bought a watchmakers lathe some 25 year ago. I have been collecting and restoring them since and make my own tools and attachments for them too. This accounts for me being rather well equipped now. But I remember those days, when I was full of envy myself ...
****
With many parts of the boat actually completed, I turned my attention to the sails. I did this before painting the model, as various fitting and shaping actions will be required that may damage the paintwork.
The plan is to show the sails in a sort of semi-set stage, as they would be when the boat is in harbour in order to allow them to dry. This going to be a much bigger challenge to represent convincingly than fully set or furled sails. As the boat will be shown in its winter rig, there will be only two sails.
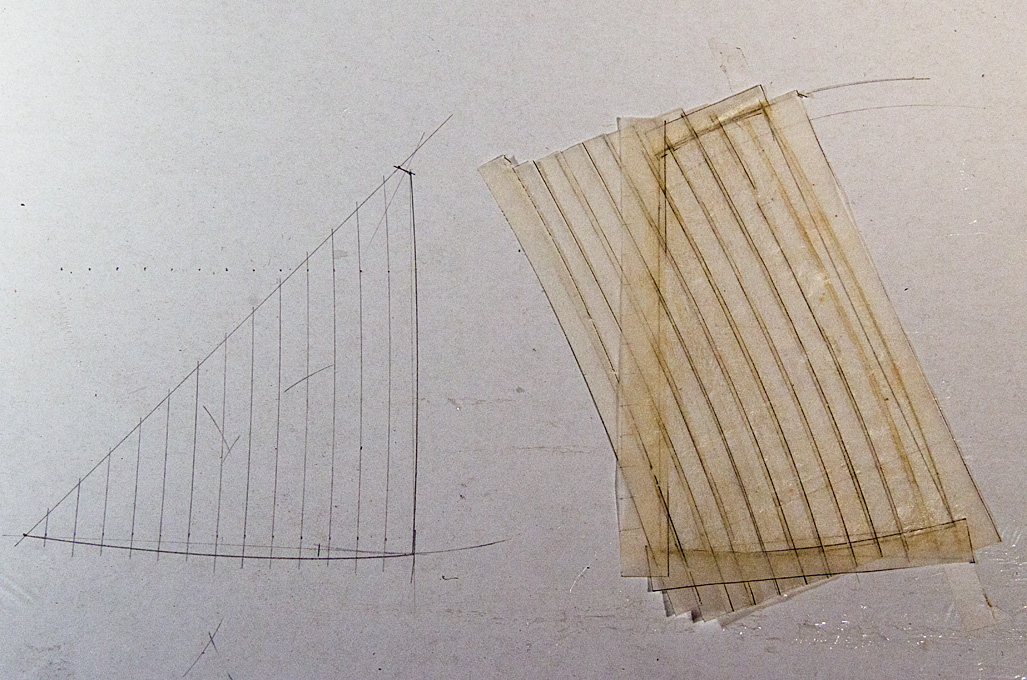
The raw material is a very thin tissue paper that I found in my stock. The first step was to draw a sail plan 'as built', i.e. with the actual dimensions of the mast, boom and gaff.

Sail-plan �as built�
Sail-plan �as built� (detail)
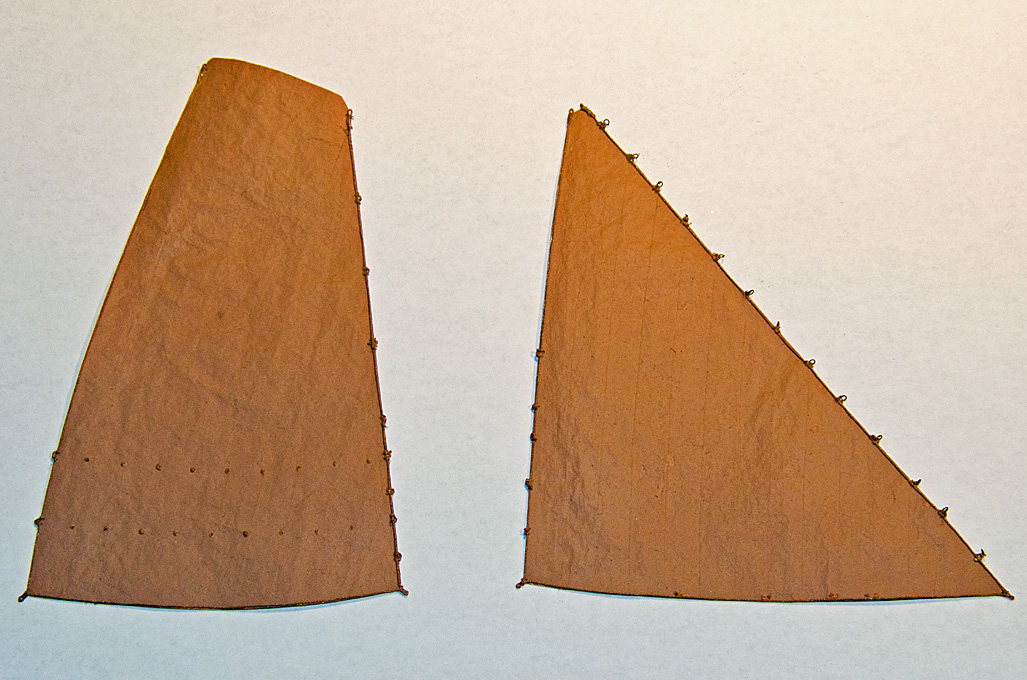
The shape of each panel of sail-cloth was pencilled in also with the help of a french curve. The drawing then was backed with a piece of stiff cardboard and covered in clingfilm. Based on this pattern the individual sail-'cloths' were cut from the tissue paper with the addition of 1 mm for the seam. This is rather wide at this scale, but inconsequential as the sail will not be translucent, being tanned and dressed on the prototype, i.e. soaked in a broth from bark and smeared with a concoction of tallow, oil and ochre. This treatment prevents the formation of mildew and allows to furl the sails when wet.
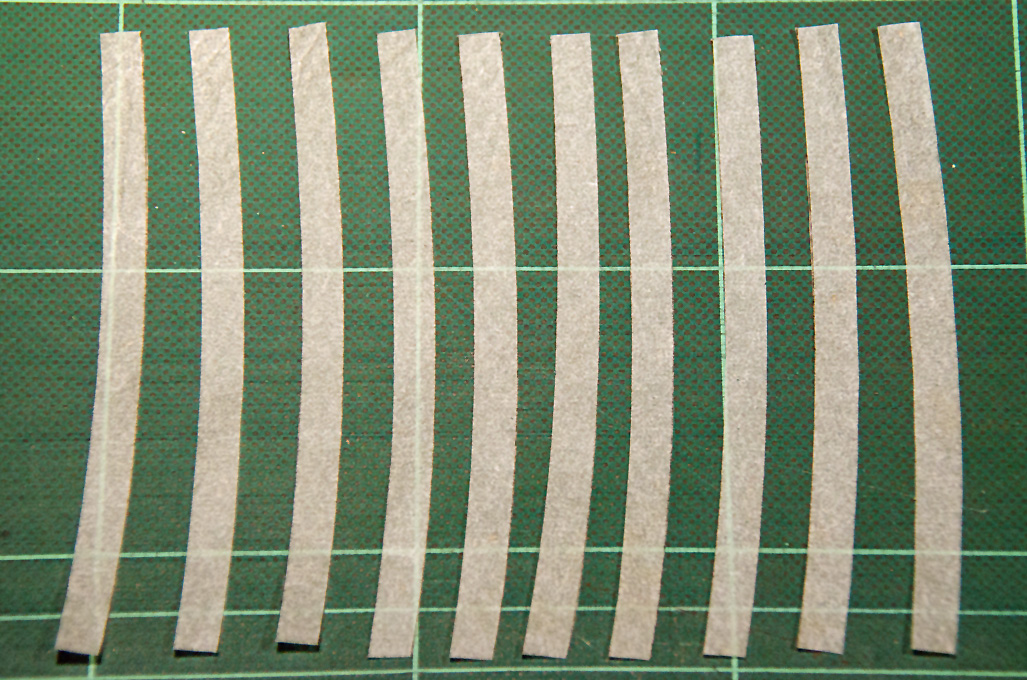
The �cloths� of the mainsail.
Using the drawing as a template, panels were stuck together using wood-filler (CLOU Schnellschleifgrundierung) as glue. The tissue paper soaks up the filler, turning it into a sort of compound material. I prefer wood-filler over diluted PVA-glue because it does not swell the glue and the joints can be loosened and re-adjusted by applying a drop of thinner. After completing the basic sails, outside margins and doublings were added in the same way based on the detail drawings in VAN BEYLEN, (1995) and DORLEIJN (2001).
Glueing together the sail cloths
wefalck
****
With many parts of the boat actually completed, I turned my attention to the sails. I did this before painting the model, as various fitting and shaping actions will be required that may damage the paintwork.
The plan is to show the sails in a sort of semi-set stage, as they would be when the boat is in harbour in order to allow them to dry. This going to be a much bigger challenge to represent convincingly than fully set or furled sails. As the boat will be shown in its winter rig, there will be only two sails.
The raw material is a very thin tissue paper that I found in my stock. The first step was to draw a sail plan 'as built', i.e. with the actual dimensions of the mast, boom and gaff.
Sail-plan �as built�
Sail-plan �as built� (detail)
The shape of each panel of sail-cloth was pencilled in also with the help of a french curve. The drawing then was backed with a piece of stiff cardboard and covered in clingfilm. Based on this pattern the individual sail-'cloths' were cut from the tissue paper with the addition of 1 mm for the seam. This is rather wide at this scale, but inconsequential as the sail will not be translucent, being tanned and dressed on the prototype, i.e. soaked in a broth from bark and smeared with a concoction of tallow, oil and ochre. This treatment prevents the formation of mildew and allows to furl the sails when wet.
The �cloths� of the mainsail.
Using the drawing as a template, panels were stuck together using wood-filler (CLOU Schnellschleifgrundierung) as glue. The tissue paper soaks up the filler, turning it into a sort of compound material. I prefer wood-filler over diluted PVA-glue because it does not swell the glue and the joints can be loosened and re-adjusted by applying a drop of thinner. After completing the basic sails, outside margins and doublings were added in the same way based on the detail drawings in VAN BEYLEN, (1995) and DORLEIJN (2001).
Glueing together the sail cloths
wefalck
Last edited by wefalck on Sat Mar 13, 2021 2:46 pm, edited 1 time in total.
Eberhard
Former chairman Arbeitskreis historischer Schiffbau e.V. (German Association for Shipbuilding History)
--------------------------------------------------------------------------------------------------------------------------------------------------------------------------------------------
Former chairman Arbeitskreis historischer Schiffbau e.V. (German Association for Shipbuilding History)
--------------------------------------------------------------------------------------------------------------------------------------------------------------------------------------------
-
sallies89
- Posts: 14
- Joined: Tue Mar 26, 2013 8:58 pm
Re: Zuiderzee-Botter
Wonderful work. Can you please post a picture of the entire model so far. I would love to get a look at it from a larger perspective.
-
wefalck
- Posts: 2079
- Joined: Wed Sep 28, 2011 12:04 pm
- Location: Paris
- Contact:
Re: Zuiderzee-Botter
Patience ... everything is in bits and pieces 
wefalck
wefalck
Eberhard
Former chairman Arbeitskreis historischer Schiffbau e.V. (German Association for Shipbuilding History)
--------------------------------------------------------------------------------------------------------------------------------------------------------------------------------------------
Former chairman Arbeitskreis historischer Schiffbau e.V. (German Association for Shipbuilding History)
--------------------------------------------------------------------------------------------------------------------------------------------------------------------------------------------
-
wefalck
- Posts: 2079
- Joined: Wed Sep 28, 2011 12:04 pm
- Location: Paris
- Contact:
Re: Zuiderzee-Botter
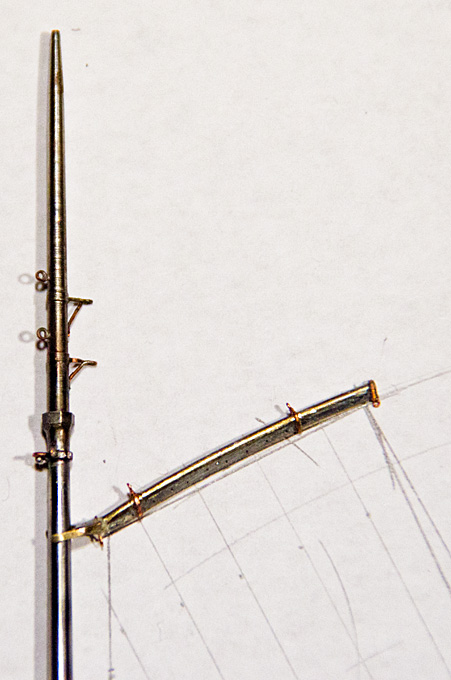
The next thing to go on was the bolt-rope. The rope was made on the miniature rope-walk (http://www.maritima-et-mechanika.org/ma ... ewalk.html)from 8/0 size tan fly-tying yarn (UNI-Thread).
1 m-rope walk built on the basis of a laboratory optical bench I inherited from my father
According to the authors cited above, it was left to the individual sailmaker whether the bolt-rope was sewn to the port or starboard side of the sail. I attached all doublings to the port side and decided on the starboard side for the bolt-rope. Again it was glued on using the wood-filler.
Applying the bolt rope
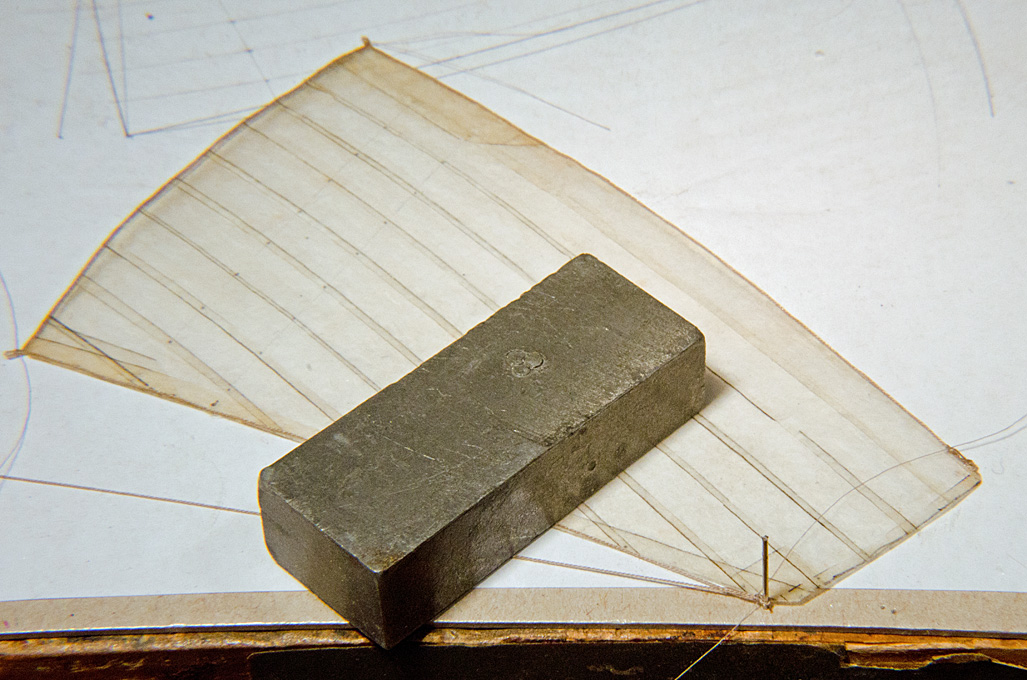
On the prototype the bolt-rope does not continue all-around the sails, but rather ends at the respective head in spliced eyes. The mainsail is attached to corresponding eyebolts in the gaff with hooks or shackles in these eyes. Owing to the springiness of the fly-tying yarn, I found it impossible to recreate real eyesplices. I took some artisanal license and bound the eyes, pretending they were served eyesplices. The eyes at the other corners of the sails were fashioned in a similar way. To increase the stability of the sail, the corners of the bolt-rope were 'sewn' to the tissue paper using 14/0 size fly-tying yarn (Sheer).
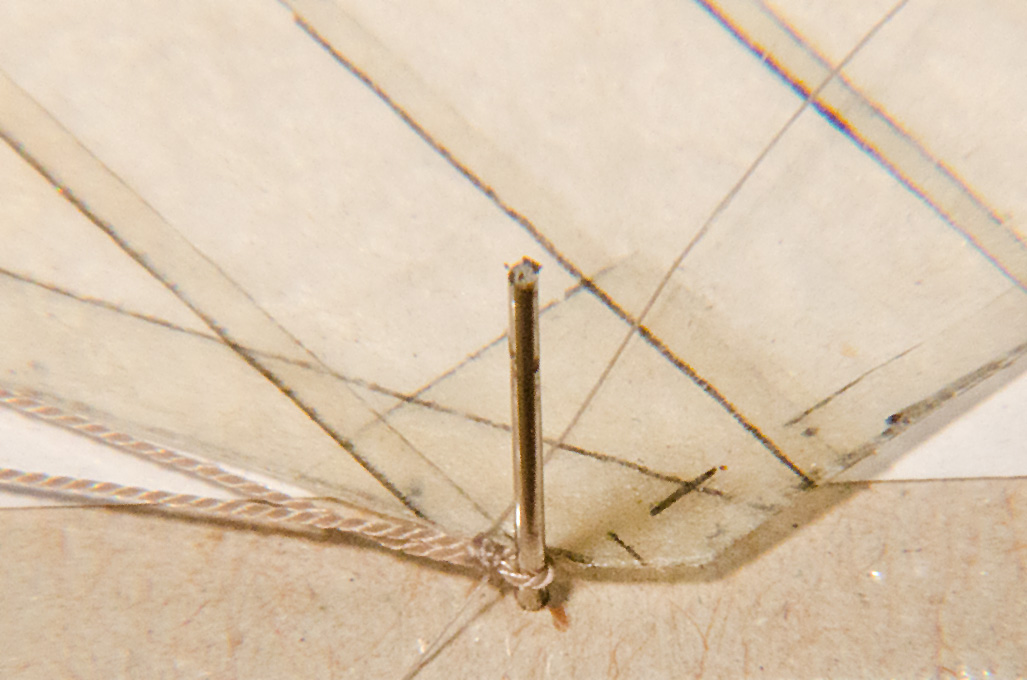
Fake eyesplice - the 'pole' is a common clothes pin
wefalck
1 m-rope walk built on the basis of a laboratory optical bench I inherited from my father
According to the authors cited above, it was left to the individual sailmaker whether the bolt-rope was sewn to the port or starboard side of the sail. I attached all doublings to the port side and decided on the starboard side for the bolt-rope. Again it was glued on using the wood-filler.
Applying the bolt rope
On the prototype the bolt-rope does not continue all-around the sails, but rather ends at the respective head in spliced eyes. The mainsail is attached to corresponding eyebolts in the gaff with hooks or shackles in these eyes. Owing to the springiness of the fly-tying yarn, I found it impossible to recreate real eyesplices. I took some artisanal license and bound the eyes, pretending they were served eyesplices. The eyes at the other corners of the sails were fashioned in a similar way. To increase the stability of the sail, the corners of the bolt-rope were 'sewn' to the tissue paper using 14/0 size fly-tying yarn (Sheer).
Fake eyesplice - the 'pole' is a common clothes pin
wefalck
Last edited by wefalck on Sat Mar 13, 2021 1:05 pm, edited 1 time in total.
Eberhard
Former chairman Arbeitskreis historischer Schiffbau e.V. (German Association for Shipbuilding History)
--------------------------------------------------------------------------------------------------------------------------------------------------------------------------------------------
Former chairman Arbeitskreis historischer Schiffbau e.V. (German Association for Shipbuilding History)
--------------------------------------------------------------------------------------------------------------------------------------------------------------------------------------------
-
unhuzpt
- Posts: 33
- Joined: Sun May 12, 2013 12:27 pm
- Location: Portugal
Re: Zuiderzee-Botter
Fastastic!
-
wefalck
- Posts: 2079
- Joined: Wed Sep 28, 2011 12:04 pm
- Location: Paris
- Contact:
Re: Zuiderzee-Botter
Before making off for a ten-day scientific mission to the mountains of Kyrgyzstan, here a little update:
The sails were further completed by adding cringles and eyelets. For the cringles the sail was punched with a needle to simulate the eyelets. A piece of 8/0 yarn was threaded through, twisted with itself and secured with a blob of lacquer. The free ends were threaded cross-wise through the second eyelet and secured with knots. The cringle was secured with a bit of lacquer. For eyelets in the sail itself blobs of acrylic gel were set on both sides and once dry punched with a needle.
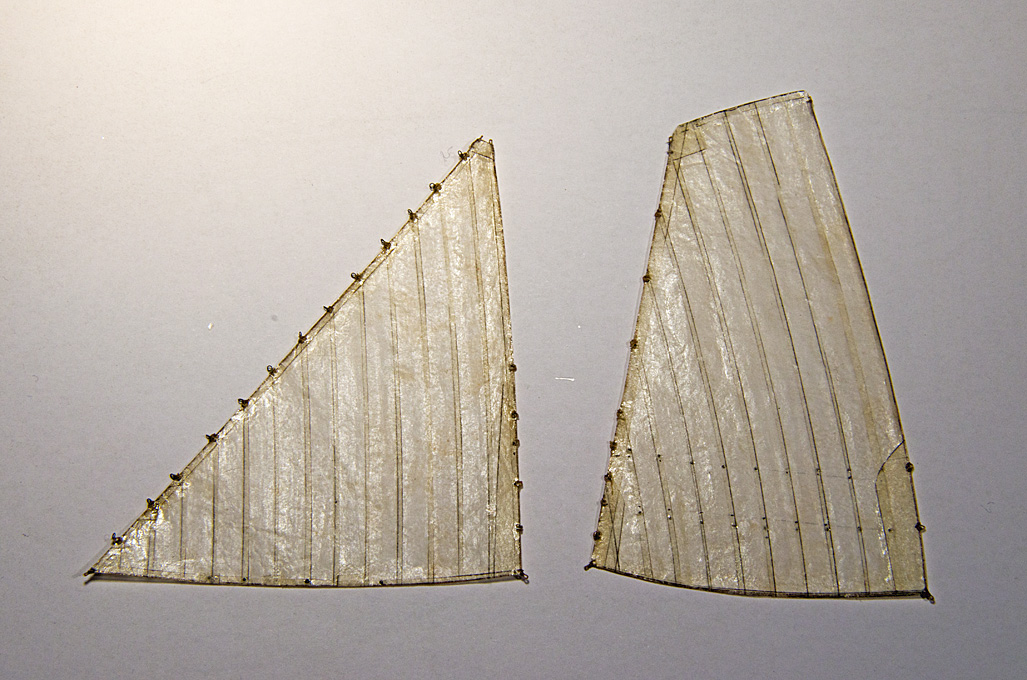
Sails ready to be painted
The foresail runs on small iron hoops along the forestay. These were reproduced by small rings of copper wire that were sewn to the cringles using 16/0 size yarn (Veevus).
(http://veevus.dk).
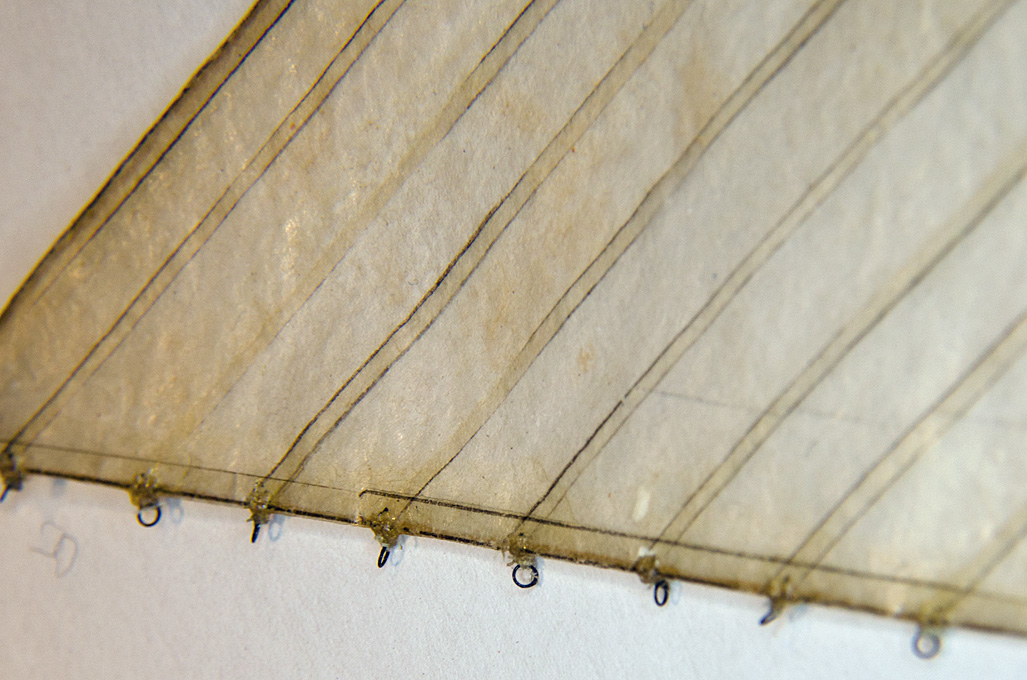
Hoops (0.7 mm �) of the foresail
There are various eyelets in the sail, e.g. for reefing points. These were immitated by a drop of acrylic gel medium glue on both sides of the sail that later was pierced with a needle.
The painted sails
The sails then were checked for any joints having come loose and more wood-filler was applied if needed. Now the sails were ready for painting. The original sails were tanned. Hence, a terracotta colour ('terre' by Prince August Air, http://www.prince-august.net) was chosen as the base colour that was applied with an airbrush. Once on the model some weathering and shading will add more plasticity. The eyelets etc. were �metallised� by turning a soft lead pencil in them.
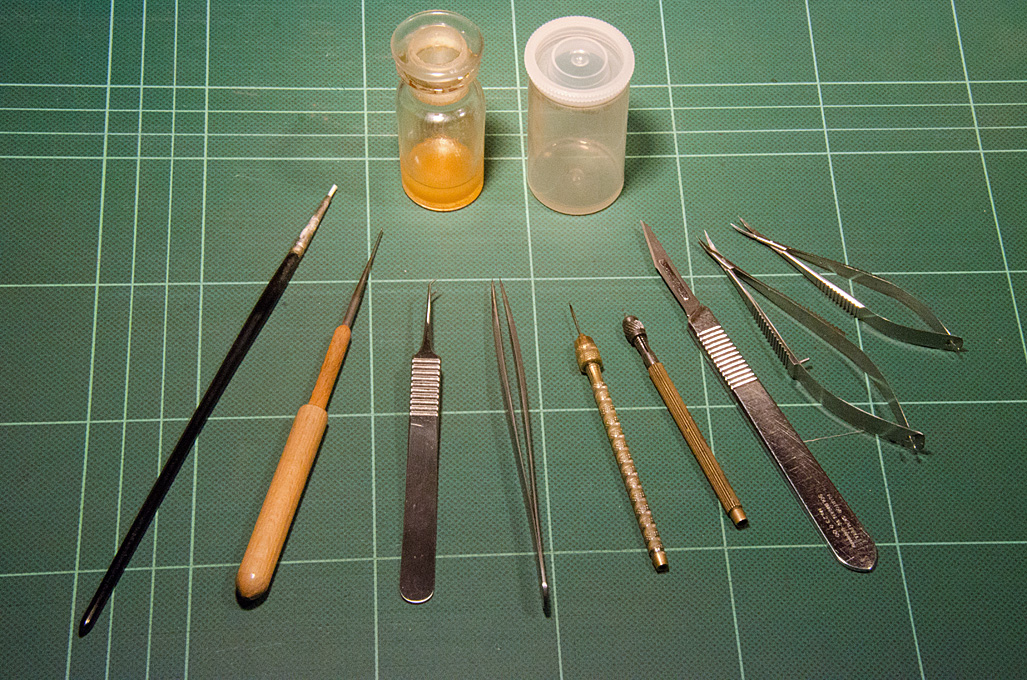
�Sailmaking� tools
wefalck
The sails were further completed by adding cringles and eyelets. For the cringles the sail was punched with a needle to simulate the eyelets. A piece of 8/0 yarn was threaded through, twisted with itself and secured with a blob of lacquer. The free ends were threaded cross-wise through the second eyelet and secured with knots. The cringle was secured with a bit of lacquer. For eyelets in the sail itself blobs of acrylic gel were set on both sides and once dry punched with a needle.
Sails ready to be painted
The foresail runs on small iron hoops along the forestay. These were reproduced by small rings of copper wire that were sewn to the cringles using 16/0 size yarn (Veevus).
(http://veevus.dk).
Hoops (0.7 mm �) of the foresail
There are various eyelets in the sail, e.g. for reefing points. These were immitated by a drop of acrylic gel medium glue on both sides of the sail that later was pierced with a needle.
The painted sails
The sails then were checked for any joints having come loose and more wood-filler was applied if needed. Now the sails were ready for painting. The original sails were tanned. Hence, a terracotta colour ('terre' by Prince August Air, http://www.prince-august.net) was chosen as the base colour that was applied with an airbrush. Once on the model some weathering and shading will add more plasticity. The eyelets etc. were �metallised� by turning a soft lead pencil in them.
�Sailmaking� tools
wefalck
Last edited by wefalck on Sat Mar 13, 2021 1:05 pm, edited 1 time in total.
Eberhard
Former chairman Arbeitskreis historischer Schiffbau e.V. (German Association for Shipbuilding History)
--------------------------------------------------------------------------------------------------------------------------------------------------------------------------------------------
Former chairman Arbeitskreis historischer Schiffbau e.V. (German Association for Shipbuilding History)
--------------------------------------------------------------------------------------------------------------------------------------------------------------------------------------------
-
wefalck
- Posts: 2079
- Joined: Wed Sep 28, 2011 12:04 pm
- Location: Paris
- Contact:
Re: Zuiderzee-Botter
As I am off to Central Asia only on Sunday, here another small update:
The building now has progressed far enough to be able to apply a base-coat of paint. After some preliminary trials I decided on a light terracotta as a base-coat for the hull, while the spars were painted in �bois� (i.e. wood, Prince August Air). On this oak-tinted varnish will be applied to give the �wood�, that in the original was painted with tar and harpeus (a mixture of wood-tar and lineseed oil), some depth. The different base-coat colours where chosen to differentiate between the different woods, i.e. oak for the hull and pine for the spars.
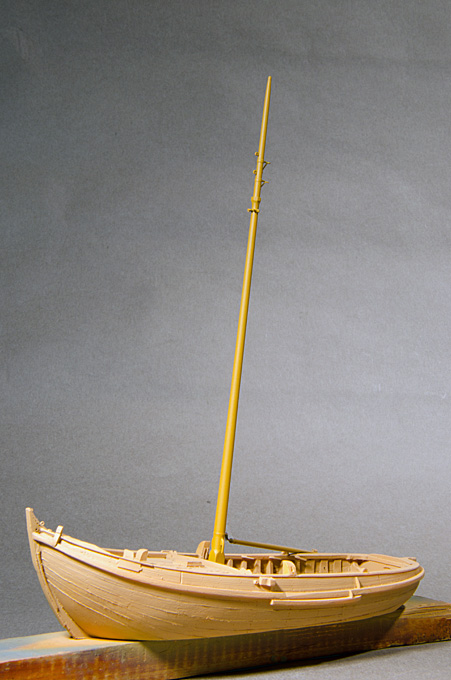
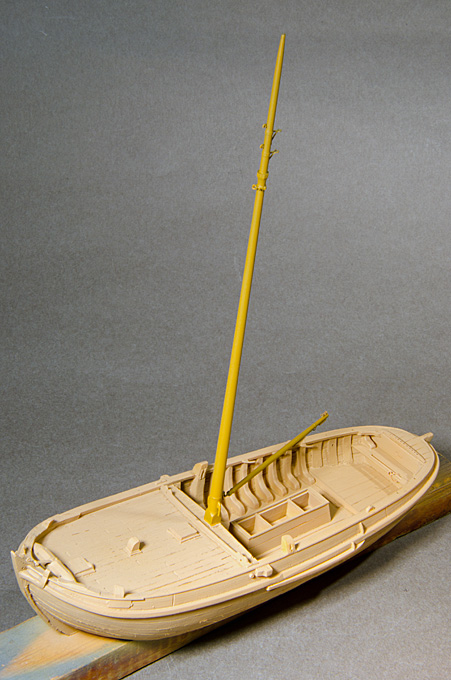
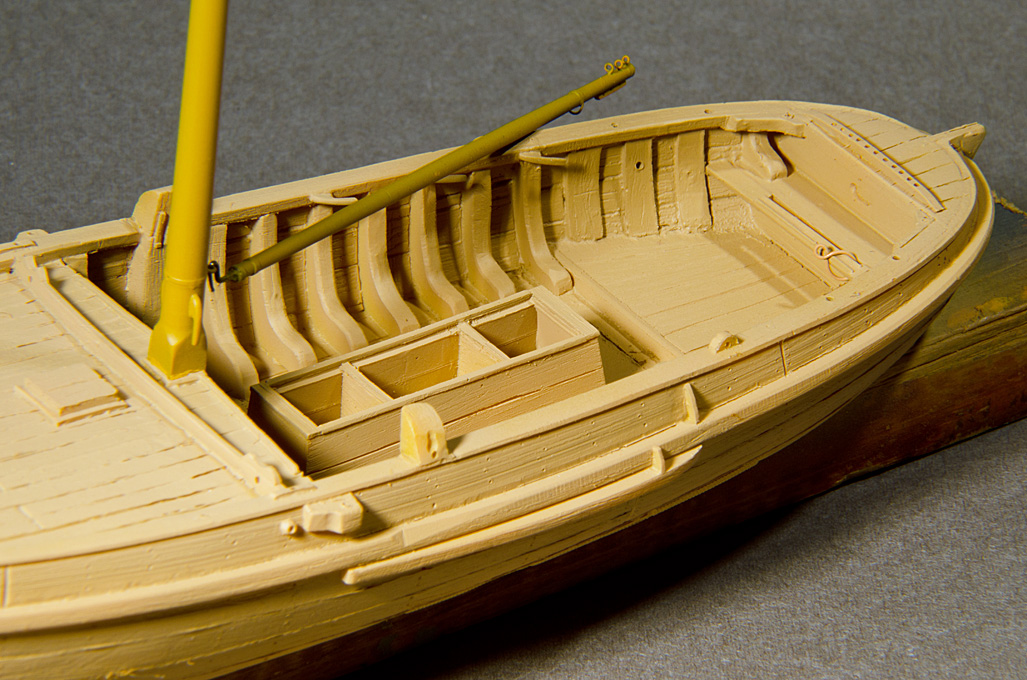

The matte base-coat makes visible the �rustique� style of modelling by Artitec and also any imperfections in building. Photographic images even further enhance any imperfections that may be not so obvious to the naked eye. There was a need to work over one or the other part.
wefalck
The building now has progressed far enough to be able to apply a base-coat of paint. After some preliminary trials I decided on a light terracotta as a base-coat for the hull, while the spars were painted in �bois� (i.e. wood, Prince August Air). On this oak-tinted varnish will be applied to give the �wood�, that in the original was painted with tar and harpeus (a mixture of wood-tar and lineseed oil), some depth. The different base-coat colours where chosen to differentiate between the different woods, i.e. oak for the hull and pine for the spars.
The matte base-coat makes visible the �rustique� style of modelling by Artitec and also any imperfections in building. Photographic images even further enhance any imperfections that may be not so obvious to the naked eye. There was a need to work over one or the other part.
wefalck
Last edited by wefalck on Sat Mar 13, 2021 1:07 pm, edited 1 time in total.
Eberhard
Former chairman Arbeitskreis historischer Schiffbau e.V. (German Association for Shipbuilding History)
--------------------------------------------------------------------------------------------------------------------------------------------------------------------------------------------
Former chairman Arbeitskreis historischer Schiffbau e.V. (German Association for Shipbuilding History)
--------------------------------------------------------------------------------------------------------------------------------------------------------------------------------------------
-
wefalck
- Posts: 2079
- Joined: Wed Sep 28, 2011 12:04 pm
- Location: Paris
- Contact:
Re: Zuiderzee-Botter
Just back from Central Asia, but travelling again in Europe again ... as usual the work has been frequently interrupted by travels and other activities, e.g. working up the pictures taken during my travels.
The actual painting is a rather complex procedure and I have not documented all intermediary steps.
The first step after the base-coat was to apply a coat of nitrocellulose-based wood varnish in oak. The idea was to simulate to some extend the surface treatment of the real wood, though with somewhat different materials, in order to create �depth� of the wood surface. I used this method successfully in the past on small parts. Here, however, the problem arose that a second coat or touching up would dissolve the first coat. On the next model I will apply the varnish by airbrush or use an acrylic varnish.
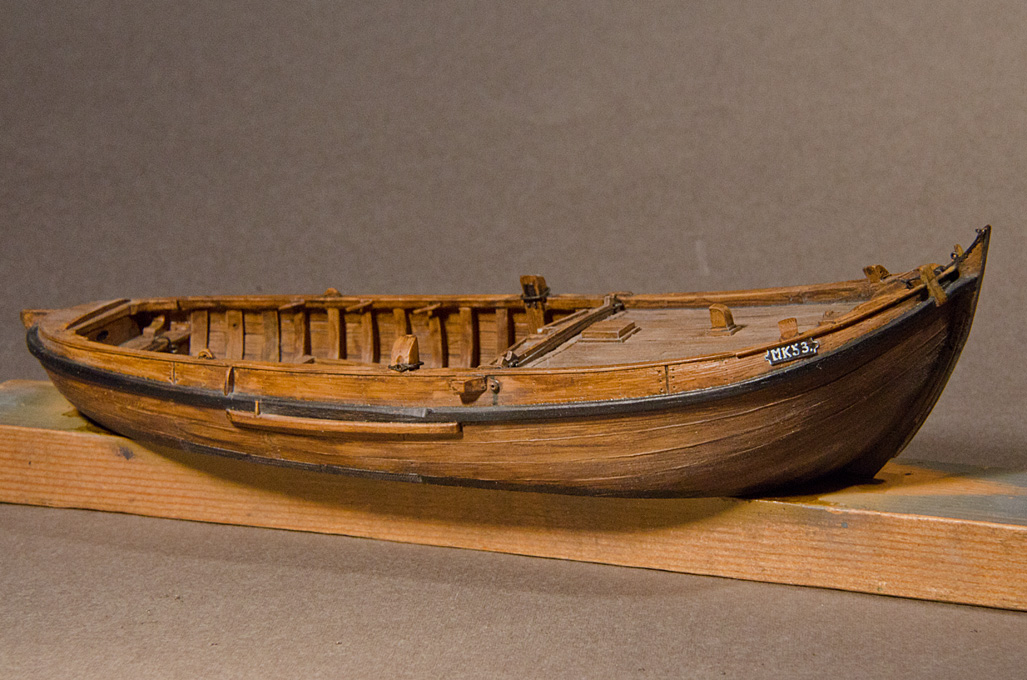
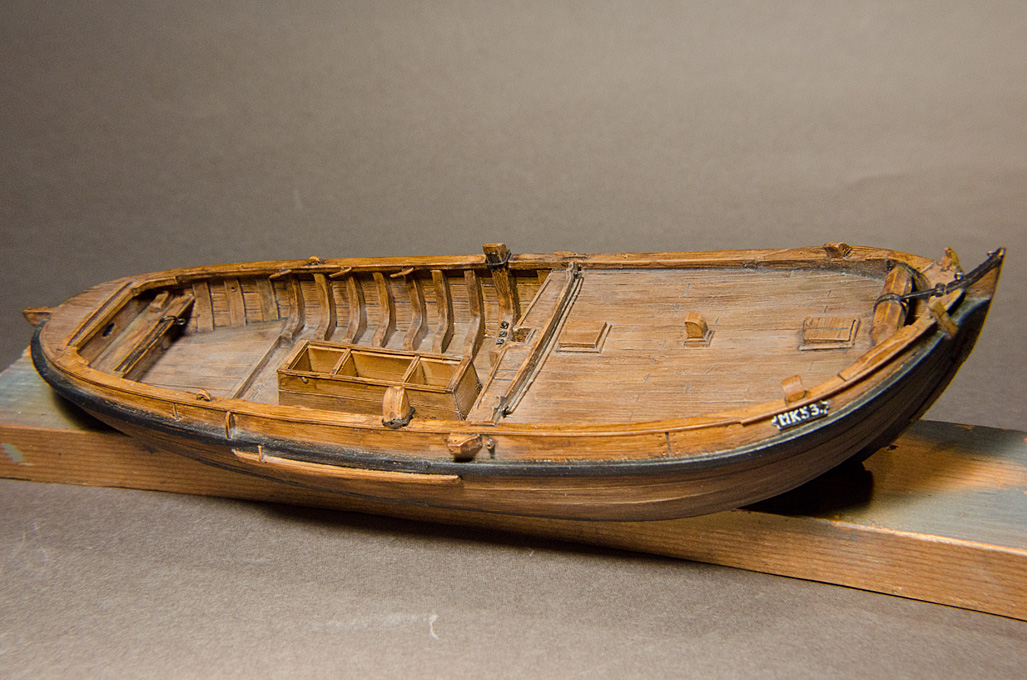
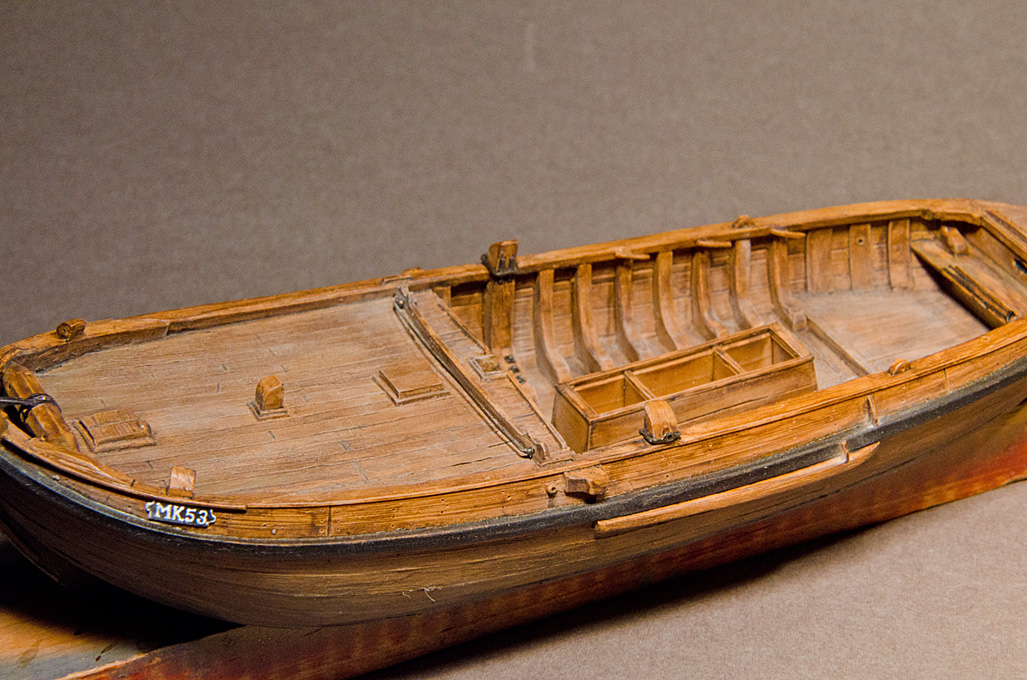
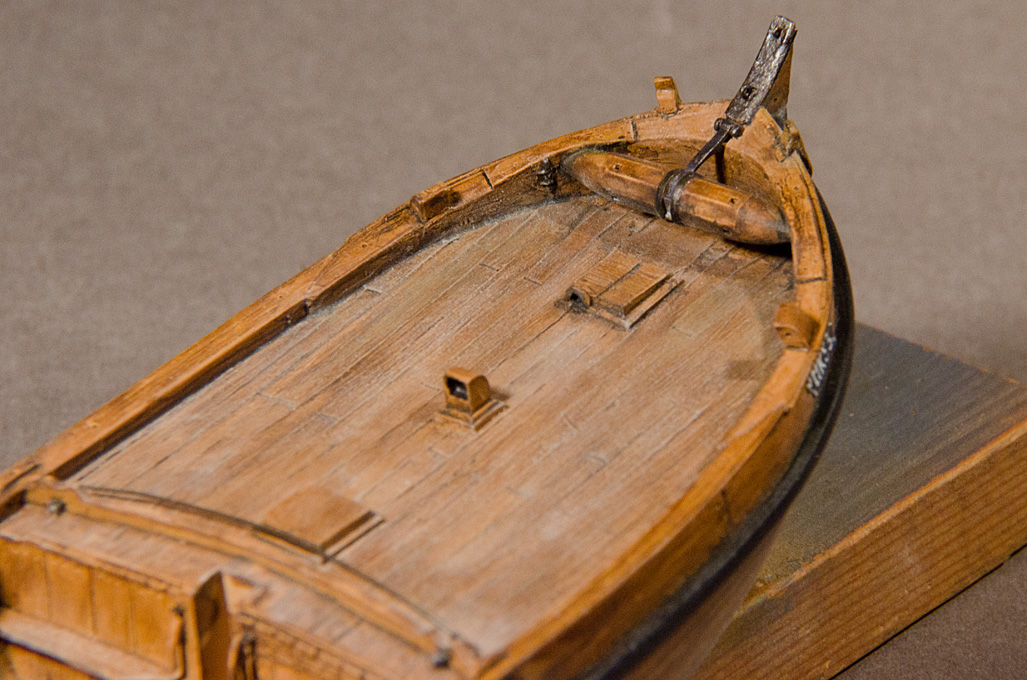
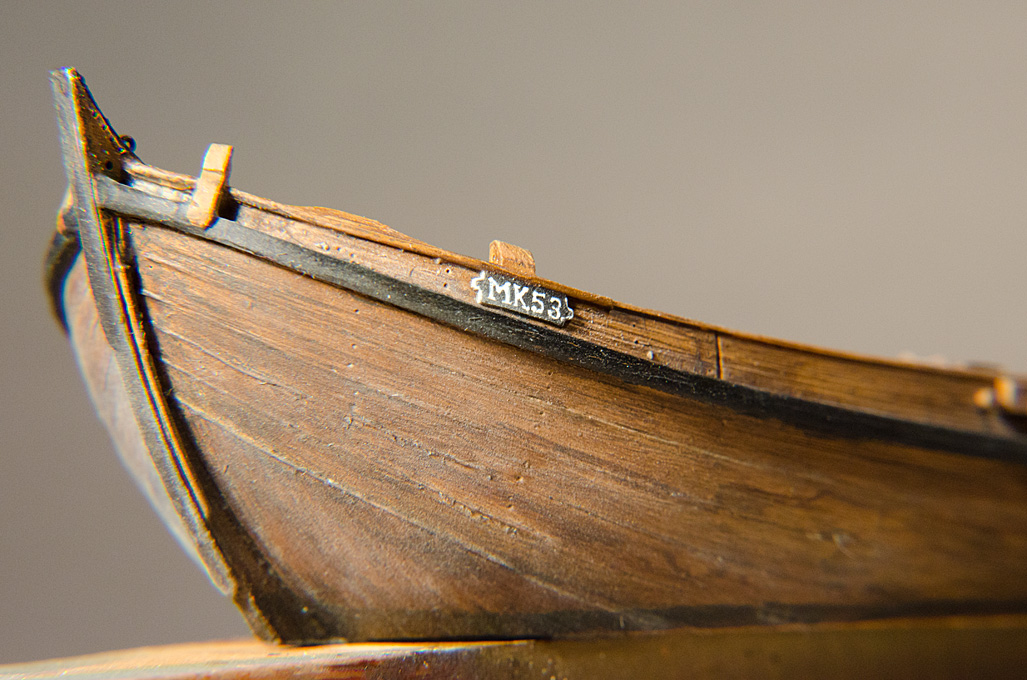
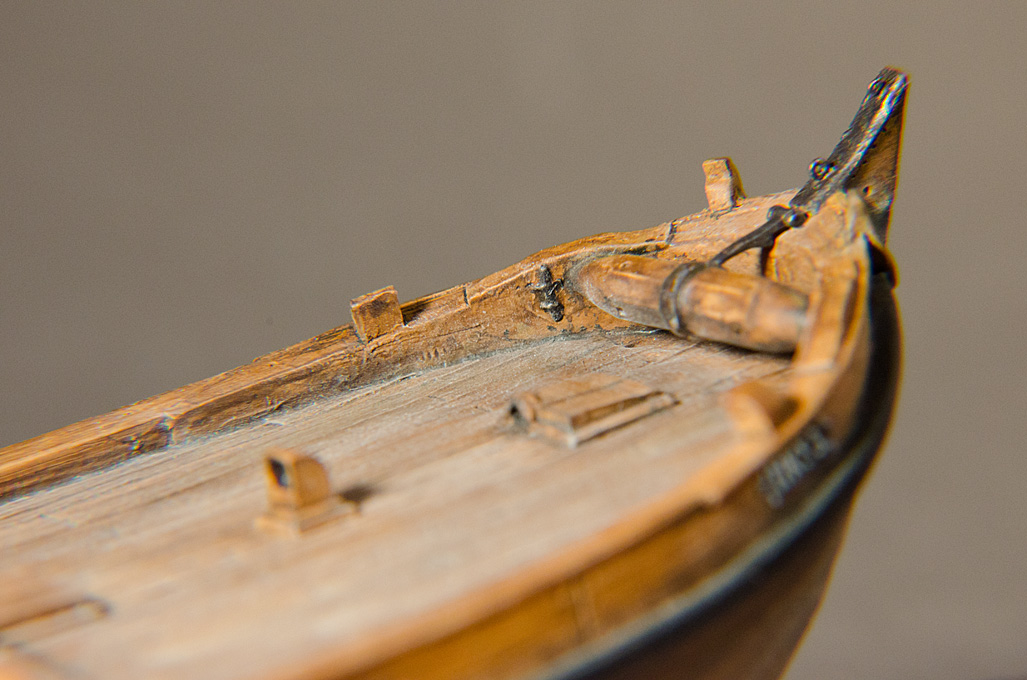
The varnish was cautiously matted with steelwool and a glas-eraser pen. Then the wale and the registration board were painted in black acrylic. The registration number was painted freehand in white acrylic. The next step then was a juidicious weathering/washing in burnt umber acrylic to simulate the surface treatment with Stockholm tar. In order to simulate the coal-tarred underwater body burnt umber was applied in more covering layers.
Individual parts, such as the spars, the leeboards, the rudder etc. were treated in a similar way. In oder to achieve a uniform degree of matt-ness, everything was coated lightly with the airbrush in Winsor&Newton matte acrylic varnish.
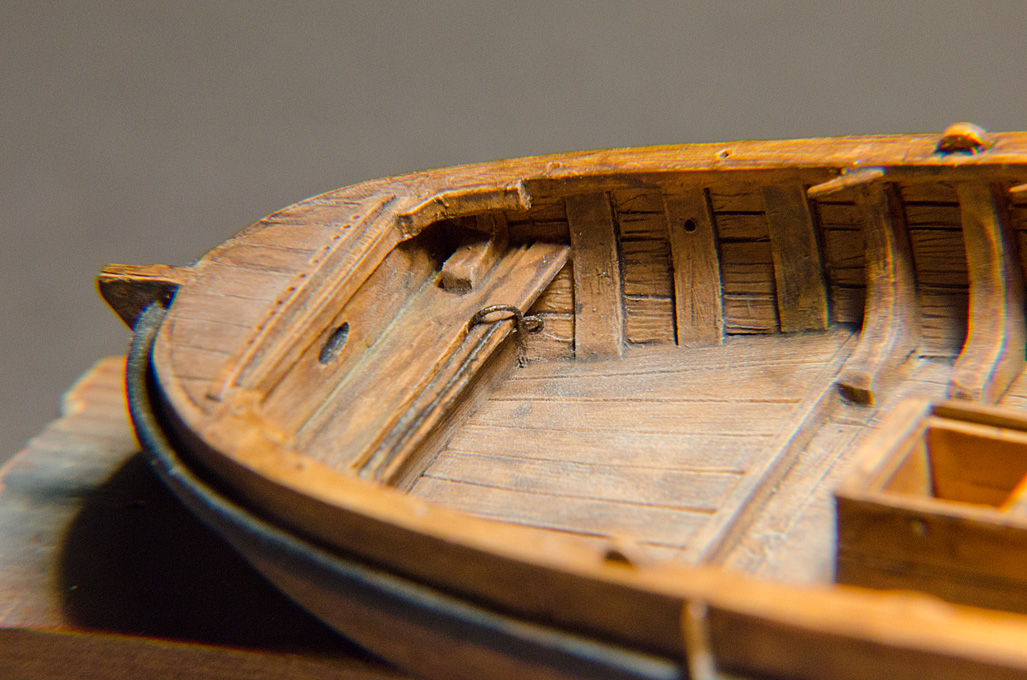
White, beige and black pastels were applied with a brush and Q-tips to simulate grime and salt. The quarter deck and floorboards also attain in this way a nice greyish worn appearance.
The various �ironwork� received a base-coat in black acrylic with the airbrush. Then a mixture of �metallic rust� (Prince-August Air/Vallejo) and burnt umber was then applied with a brush. The parts thus receive a certain patina � in real life they were painted black, painted in lineseed-oil or left bright. On places were the ironwork would have been bright from use a soft pencil (6B) was rubbed, which results in a subtle metallic sheen.
wefalck
The actual painting is a rather complex procedure and I have not documented all intermediary steps.
The first step after the base-coat was to apply a coat of nitrocellulose-based wood varnish in oak. The idea was to simulate to some extend the surface treatment of the real wood, though with somewhat different materials, in order to create �depth� of the wood surface. I used this method successfully in the past on small parts. Here, however, the problem arose that a second coat or touching up would dissolve the first coat. On the next model I will apply the varnish by airbrush or use an acrylic varnish.
The varnish was cautiously matted with steelwool and a glas-eraser pen. Then the wale and the registration board were painted in black acrylic. The registration number was painted freehand in white acrylic. The next step then was a juidicious weathering/washing in burnt umber acrylic to simulate the surface treatment with Stockholm tar. In order to simulate the coal-tarred underwater body burnt umber was applied in more covering layers.
Individual parts, such as the spars, the leeboards, the rudder etc. were treated in a similar way. In oder to achieve a uniform degree of matt-ness, everything was coated lightly with the airbrush in Winsor&Newton matte acrylic varnish.
White, beige and black pastels were applied with a brush and Q-tips to simulate grime and salt. The quarter deck and floorboards also attain in this way a nice greyish worn appearance.
The various �ironwork� received a base-coat in black acrylic with the airbrush. Then a mixture of �metallic rust� (Prince-August Air/Vallejo) and burnt umber was then applied with a brush. The parts thus receive a certain patina � in real life they were painted black, painted in lineseed-oil or left bright. On places were the ironwork would have been bright from use a soft pencil (6B) was rubbed, which results in a subtle metallic sheen.
wefalck
Last edited by wefalck on Sat Mar 13, 2021 1:08 pm, edited 1 time in total.
Eberhard
Former chairman Arbeitskreis historischer Schiffbau e.V. (German Association for Shipbuilding History)
--------------------------------------------------------------------------------------------------------------------------------------------------------------------------------------------
Former chairman Arbeitskreis historischer Schiffbau e.V. (German Association for Shipbuilding History)
--------------------------------------------------------------------------------------------------------------------------------------------------------------------------------------------
-
JIM BAUMANN
- Posts: 5678
- Joined: Mon Jan 10, 2005 5:30 pm
- Location: Nr Southampton England
Re: Zuiderzee-Botter
Looking very rustic!
I was very impressed with the sails-- lovely texture to the cloths!
JB
I was very impressed with the sails-- lovely texture to the cloths!
JB
....I buy them at three times the speed I build 'em.... will I live long enough to empty my stash...?
http://www.modelshipgallery.com/gallery ... index.html
IPMS UK SIG (special interest group) www.finewaterline.com
http://www.modelshipgallery.com/gallery ... index.html
IPMS UK SIG (special interest group) www.finewaterline.com
-
wefalck
- Posts: 2079
- Joined: Wed Sep 28, 2011 12:04 pm
- Location: Paris
- Contact:
Re: Zuiderzee-Botter
Yes, actually a bit too rustic for my taste some of the Artitec kits. On the other hand, the photographs enhance this compared to what it looks like in real life.
I am quite pleased with how the sails turned out, but the challenge to shape them into a half-set, drying state is still to come. I hope it will work.
wefalck
I am quite pleased with how the sails turned out, but the challenge to shape them into a half-set, drying state is still to come. I hope it will work.
wefalck
Eberhard
Former chairman Arbeitskreis historischer Schiffbau e.V. (German Association for Shipbuilding History)
--------------------------------------------------------------------------------------------------------------------------------------------------------------------------------------------
Former chairman Arbeitskreis historischer Schiffbau e.V. (German Association for Shipbuilding History)
--------------------------------------------------------------------------------------------------------------------------------------------------------------------------------------------
-
wefalck
- Posts: 2079
- Joined: Wed Sep 28, 2011 12:04 pm
- Location: Paris
- Contact:
Re: Zuiderzee-Botter
As noted at the beginning, the model will be presented in scenic setting. The �story-board� for this reads like this: a botter from Marken (around the late 1800s) got caught out by ice and made it only into the port of Volendam, where it is locked up now by a solid sheet of ice. It is Saturday afternoon. The crew keeps themselves occupied with some maintenance work, while some Volendammer folk enjoy the cold, but bright winter weather during a walk on the dyke or on the ice. This story was inspired by a winterly visit to the Zuiderzeemuseum in Enkhuizen followed by a drive along the dyke down to Volendam. The Ijsselmeer (then Zuiderzee) was covered in pack- and pancake-ice.
I don�t the traditional costume of the women of Marken aesthetically not so pleasing � they had their neck shaved, while long temple-locks dangled from underneath their coifs or caps. The costume of the Volendamm women- and men-folk on the other hand is what we consider �the� traditional Dutch costume. Volendam actually is rather atypical, as it is a catholic �island� in largely protestant surroundings. However, the pictoresque setting and people as well as increasingly easy accessebility resulted in many painters coming here, so that the Volendam images became icons of the Low Lands. Later, the Dutch tourist board and other marketing organisations perpetrated these images. The above story allows me to show the Marker botter (Volendam mainly used a slightly different variant of it, the kwak, and the Artitec prototype was a Marker botter) in a Volendam setting. The winter setting allows me also Breughel citations of winter pleasures, albeit in a more modern environment.
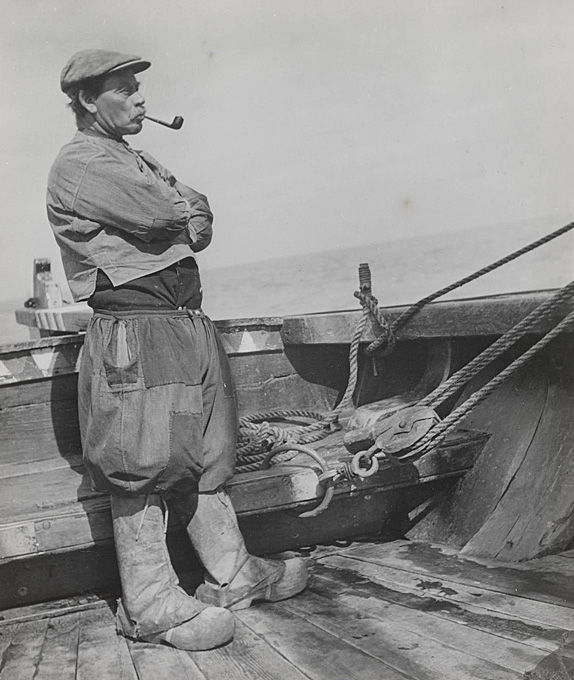
Marker master-fisherman (� http://www.geheugenvannederland.nl)
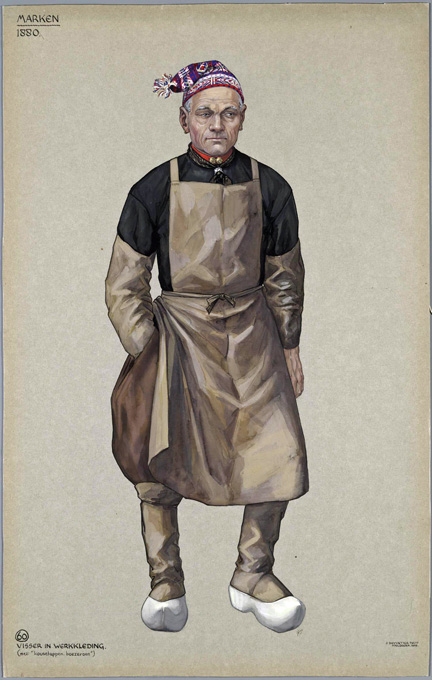
Marker mate (� http://www.geheugenvannederland.nl)
In between the work on the botter model, I turned my attention to the botter skipper and his mate. To this end I obtained second hand a set of Preiser-figurines (http://www-preiserfiguren.de) �Various Occupations� in 1/87 scale, from which I selected two suitable personages. These were carved and sculpted so represent Marker fishermen in their traditional work-a-day outfit. This outfit consist of woolen or linen culots, worn with long dark-blue stockings. The upper body is covered by dark, woolen shirt with a low upright collar or a turtle-neck sweater. Over this in the winter a short, spencer-type or a pea-jacket was worn in the winter seaason. The fishermen appear to have been a hardy species so that one doesn�t see jackets too often on winter-photographs. But they also had woolen underwear. The feet were protected by the iconic wooden clogs. The shape of the clogs varied from village to village. When working the net or doing other wet work, the lower leg were protected by gaiters that reached over the clogs. The characteristic male headgear in Marken was either a black, round (often rather battered) felt-hat or small black k�pi with a narrow shade.
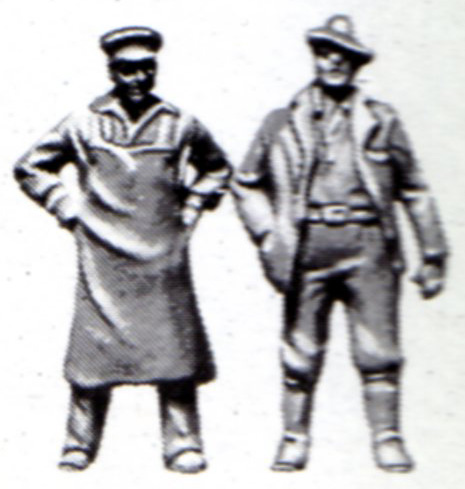
Scan from the Preiser box
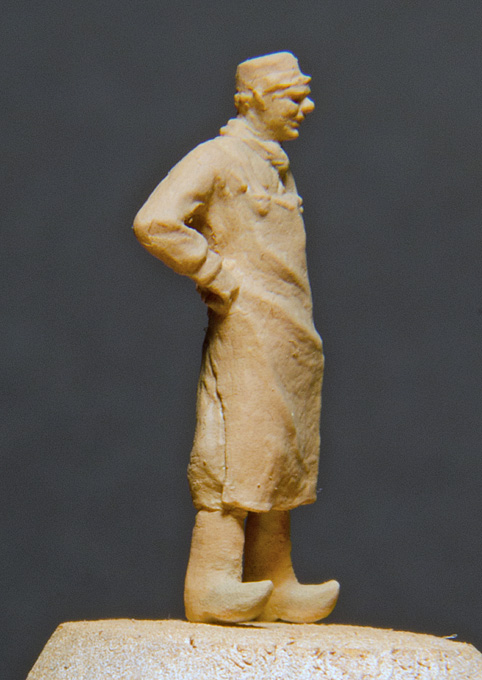
The Preiser country-gentleman or whatever the figure in long boots is mutated into the skipper with the aid of a scalpel and putty. By the same method, an apron-clad drayman with a peaked cap mutated into a fisherman�s mate. The culots were sculpted using putty, while other features, such as shirt collars fell victim to the scalpel. The clogs also were sculpted in putty.
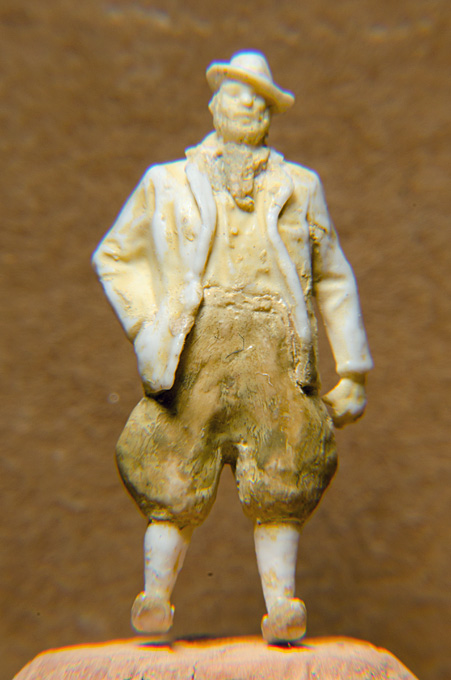
Fisherman ready to painted
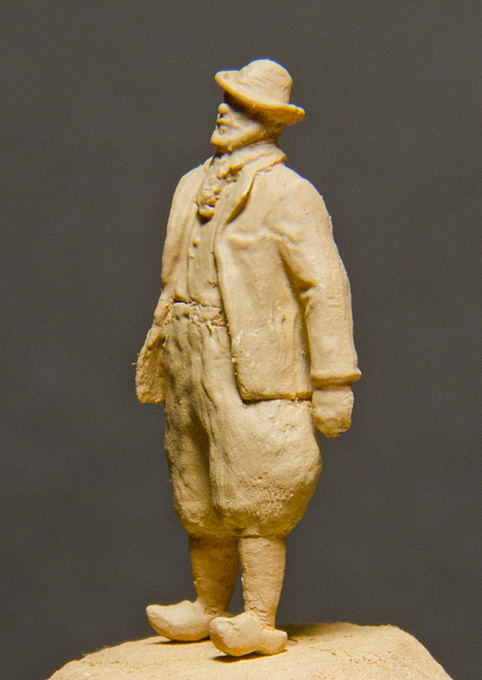
Fisherman after receiving a base-coat
I haven�t done any figure-modelling for years so my arsenal of materials was a bit limited: I just had a 40 year-old tube of Britfix �customising body putty�, which to my surprise still was useable. A 20 year-old pack of Milliput �grey� was not quite so fit anymore. The base-coat in terracotta acrylic paint shows up all the places that need to be worked over again. However, remember this is 1/90 scale and the figures are just about 2 cm high and hence appear on the computer several times enlarged.
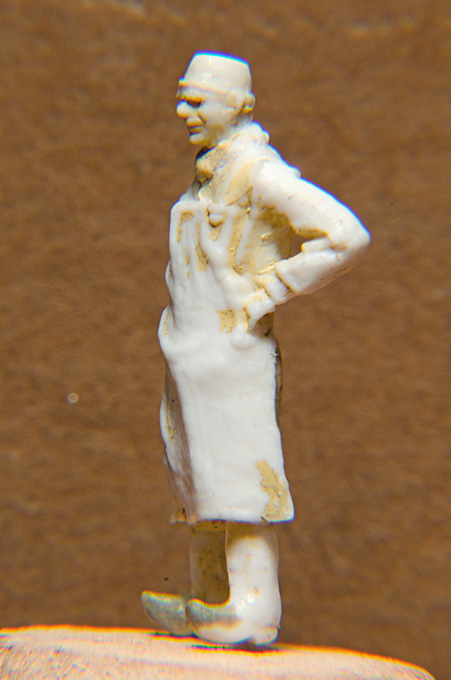
Fisherman�s mate ready to painted
Fisherman�s mater after receiving a base-coat
To be continued with the actual paint-job.
wefalck
I don�t the traditional costume of the women of Marken aesthetically not so pleasing � they had their neck shaved, while long temple-locks dangled from underneath their coifs or caps. The costume of the Volendamm women- and men-folk on the other hand is what we consider �the� traditional Dutch costume. Volendam actually is rather atypical, as it is a catholic �island� in largely protestant surroundings. However, the pictoresque setting and people as well as increasingly easy accessebility resulted in many painters coming here, so that the Volendam images became icons of the Low Lands. Later, the Dutch tourist board and other marketing organisations perpetrated these images. The above story allows me to show the Marker botter (Volendam mainly used a slightly different variant of it, the kwak, and the Artitec prototype was a Marker botter) in a Volendam setting. The winter setting allows me also Breughel citations of winter pleasures, albeit in a more modern environment.
Marker master-fisherman (� http://www.geheugenvannederland.nl)
Marker mate (� http://www.geheugenvannederland.nl)
In between the work on the botter model, I turned my attention to the botter skipper and his mate. To this end I obtained second hand a set of Preiser-figurines (http://www-preiserfiguren.de) �Various Occupations� in 1/87 scale, from which I selected two suitable personages. These were carved and sculpted so represent Marker fishermen in their traditional work-a-day outfit. This outfit consist of woolen or linen culots, worn with long dark-blue stockings. The upper body is covered by dark, woolen shirt with a low upright collar or a turtle-neck sweater. Over this in the winter a short, spencer-type or a pea-jacket was worn in the winter seaason. The fishermen appear to have been a hardy species so that one doesn�t see jackets too often on winter-photographs. But they also had woolen underwear. The feet were protected by the iconic wooden clogs. The shape of the clogs varied from village to village. When working the net or doing other wet work, the lower leg were protected by gaiters that reached over the clogs. The characteristic male headgear in Marken was either a black, round (often rather battered) felt-hat or small black k�pi with a narrow shade.
Scan from the Preiser box
The Preiser country-gentleman or whatever the figure in long boots is mutated into the skipper with the aid of a scalpel and putty. By the same method, an apron-clad drayman with a peaked cap mutated into a fisherman�s mate. The culots were sculpted using putty, while other features, such as shirt collars fell victim to the scalpel. The clogs also were sculpted in putty.
Fisherman ready to painted
Fisherman after receiving a base-coat
I haven�t done any figure-modelling for years so my arsenal of materials was a bit limited: I just had a 40 year-old tube of Britfix �customising body putty�, which to my surprise still was useable. A 20 year-old pack of Milliput �grey� was not quite so fit anymore. The base-coat in terracotta acrylic paint shows up all the places that need to be worked over again. However, remember this is 1/90 scale and the figures are just about 2 cm high and hence appear on the computer several times enlarged.
Fisherman�s mate ready to painted
Fisherman�s mater after receiving a base-coat
To be continued with the actual paint-job.
wefalck
Eberhard
Former chairman Arbeitskreis historischer Schiffbau e.V. (German Association for Shipbuilding History)
--------------------------------------------------------------------------------------------------------------------------------------------------------------------------------------------
Former chairman Arbeitskreis historischer Schiffbau e.V. (German Association for Shipbuilding History)
--------------------------------------------------------------------------------------------------------------------------------------------------------------------------------------------
-
Neptune

- Posts: 2453
- Joined: Sun Mar 13, 2005 11:51 am
- Location: Belgium
Re: Zuiderzee-Botter
Apart from the awesome equipment this is a remarkable build! Love that paint job, I'm pretty sure from even a short distance that looks like real wood! Very sharp build as well! 
The merchant shipyard
-
wefalck
- Posts: 2079
- Joined: Wed Sep 28, 2011 12:04 pm
- Location: Paris
- Contact:
Re: Zuiderzee-Botter
Thanks for the kind words ...
*****
The actual painting proceeded with Schminke-, Vallejo- und Prince August-Airbrush paints, but of course using very fine (10/0 and 5/0) brushes.

The painted skipper
But I had to fight with the brushes. The art materials department in the famous Bazaar de Hotel de Ville (BHV, http://www.bhv.fr) which has the best DIY department in Paris wasn�t the same anymore after a recent revamp. It turned out to be very difficult to find such fine brushes in Paris, but I needed to replace some worn out ones. Eventually I ordered some via ebay in Germany. Their rather fat three-sided handles looked as if they would be very comfortable, but their turned out to be really �rat-tails�. I gather you get what you pay for. Also: one should really try the point in the shop, which is obviously not possible when ordering through mail. Since then, I had the opportunity to visit another art shop in Paris and in Valencia, and got some very fine 'spotting' brushes, which should make better work with the remaining figures.

The back of the painted skipper
The painting technique was largely the same as for bigger figurines. However, at the 1/90 scale one needs to simplify, particularly when painting the faces. Thus, the eyes were indicated only by the shadows beneath the eyebrows. This I learned from Canaletto, who was able to render a very lifely population in his Venice pictures with just a few strokes of his brush. The effect is calculated form normal reading distance � on your computer screen the 18 mm high figures appear several times magnified. Painting the faces in acrylics was an experiment. The open time of these paints is just too short for painting soft transitions and I will return to artist�s oils for this.
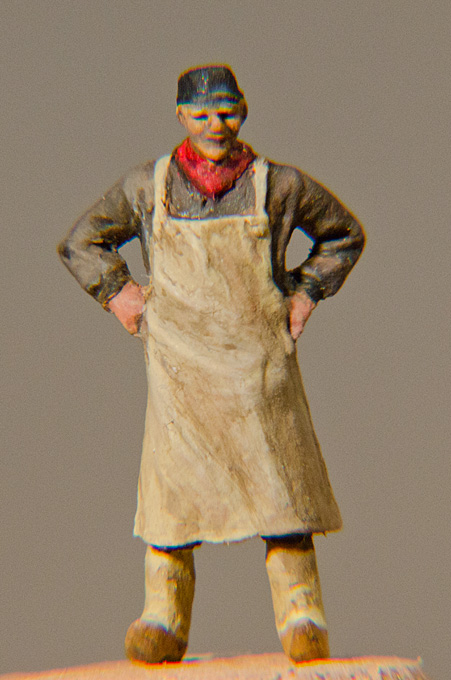
The painted mate.
Photographs show you the coarseness of your work glaringly. Observed from normal reading distance, I believe, the figures look quite convincing.
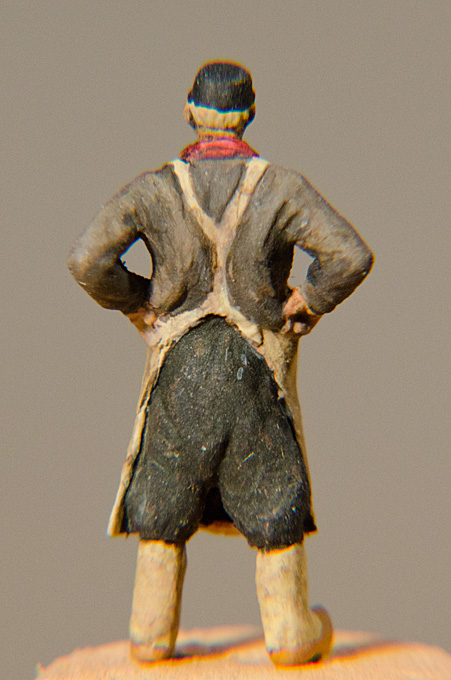
The painted mate from the back.
The scenic setting will be eventually populated by a boy belonging to the botter, a Volendam couple enjoying a walk on the dike and another couple, where he is pushing her in a sledge on the ice.
wefalck
*****
The actual painting proceeded with Schminke-, Vallejo- und Prince August-Airbrush paints, but of course using very fine (10/0 and 5/0) brushes.
The painted skipper
But I had to fight with the brushes. The art materials department in the famous Bazaar de Hotel de Ville (BHV, http://www.bhv.fr) which has the best DIY department in Paris wasn�t the same anymore after a recent revamp. It turned out to be very difficult to find such fine brushes in Paris, but I needed to replace some worn out ones. Eventually I ordered some via ebay in Germany. Their rather fat three-sided handles looked as if they would be very comfortable, but their turned out to be really �rat-tails�. I gather you get what you pay for. Also: one should really try the point in the shop, which is obviously not possible when ordering through mail. Since then, I had the opportunity to visit another art shop in Paris and in Valencia, and got some very fine 'spotting' brushes, which should make better work with the remaining figures.
The back of the painted skipper
The painting technique was largely the same as for bigger figurines. However, at the 1/90 scale one needs to simplify, particularly when painting the faces. Thus, the eyes were indicated only by the shadows beneath the eyebrows. This I learned from Canaletto, who was able to render a very lifely population in his Venice pictures with just a few strokes of his brush. The effect is calculated form normal reading distance � on your computer screen the 18 mm high figures appear several times magnified. Painting the faces in acrylics was an experiment. The open time of these paints is just too short for painting soft transitions and I will return to artist�s oils for this.
The painted mate.
Photographs show you the coarseness of your work glaringly. Observed from normal reading distance, I believe, the figures look quite convincing.
The painted mate from the back.
The scenic setting will be eventually populated by a boy belonging to the botter, a Volendam couple enjoying a walk on the dike and another couple, where he is pushing her in a sledge on the ice.
wefalck
Last edited by wefalck on Wed Jul 03, 2013 10:38 am, edited 1 time in total.
Eberhard
Former chairman Arbeitskreis historischer Schiffbau e.V. (German Association for Shipbuilding History)
--------------------------------------------------------------------------------------------------------------------------------------------------------------------------------------------
Former chairman Arbeitskreis historischer Schiffbau e.V. (German Association for Shipbuilding History)
--------------------------------------------------------------------------------------------------------------------------------------------------------------------------------------------
-
dafi

- Posts: 996
- Joined: Mon Mar 12, 2012 11:13 am
- Location: Ludwigsburg/Germany
- Contact:
Re: Zuiderzee-Botter
Breathtaking as always!
... he got the looks, he got the soul
Daniel
... he got the looks, he got the soul
Daniel
To Victory and beyond ...
viewtopic.php?f=59&t=99050&start=60
See also our german forum for the age of Sail and History:
http://www.segelschiffsmodellbau.com
viewtopic.php?f=59&t=99050&start=60
See also our german forum for the age of Sail and History:
http://www.segelschiffsmodellbau.com
-
wefalck
- Posts: 2079
- Joined: Wed Sep 28, 2011 12:04 pm
- Location: Paris
- Contact:
Re: Zuiderzee-Botter
Yes, putting some soul into the builds is not so easy ...
*******
The building has now reached a stage where I need to think seriously about protection against dust and mechanical damage, which is not so easy once the mast has been erected. Therefore, I started with the building of the scenic display, around which a display case will be fitted. The basis is a piece of blockboard
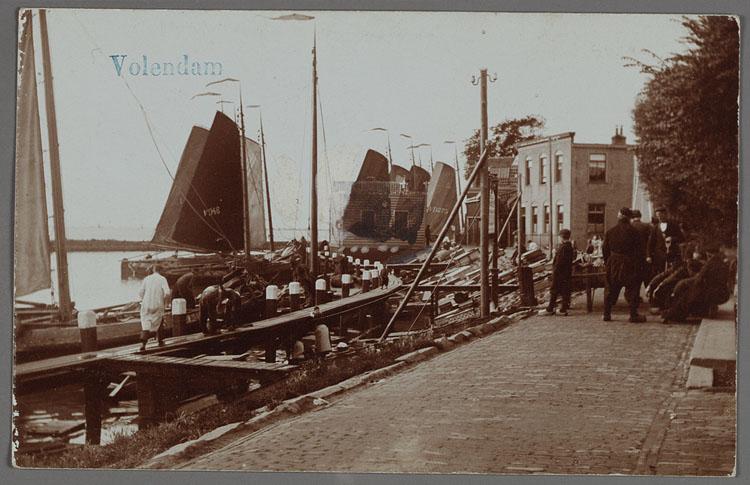
Harbour and dyke in Volendam (http://www.geheugenvannederland.nl)
The �story board� for the scenic display assumes that the Marker botter is moored at a jetty in front of the dyke behind which Voldendam hides from the Zuiderzee. The botter is ice-locked in Voldendam. The dyke runs obliquely through the scene and was given a frame from pinewood cut-offs and filled with balsawood.

Baseboard and core of the dyke
The frozen Zuiderzee consists initially of a sheet of 2 mm Plexiglas. A screw piercing baseboard and Plexiglas will eventually fix the model in place.
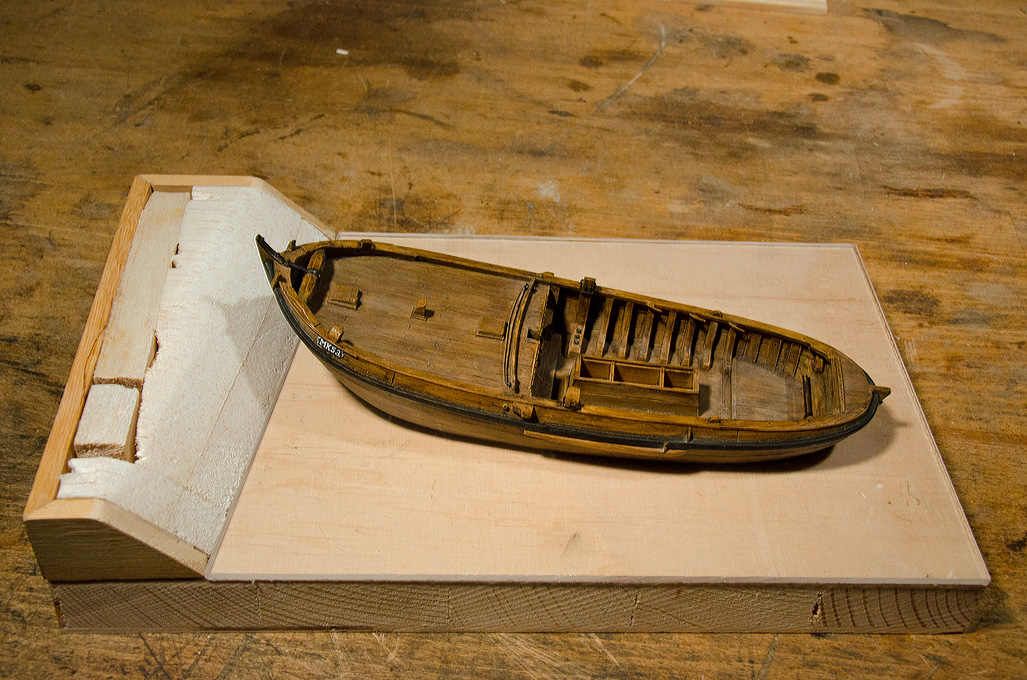
Trying out the model in place
All wood parts were dyed in mahagony and varnished as will be the other wooden parts of the display case.
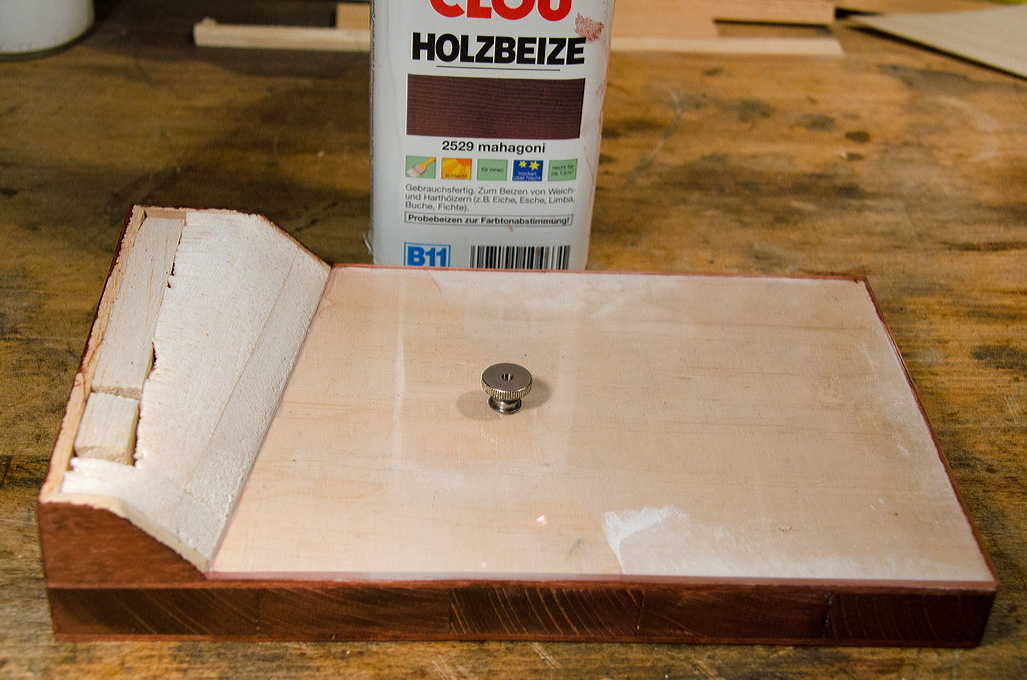
Baseboard dyed and varnished
Once the varnish is dry, this report will continue.
wefalck
*******
The building has now reached a stage where I need to think seriously about protection against dust and mechanical damage, which is not so easy once the mast has been erected. Therefore, I started with the building of the scenic display, around which a display case will be fitted. The basis is a piece of blockboard
Harbour and dyke in Volendam (http://www.geheugenvannederland.nl)
The �story board� for the scenic display assumes that the Marker botter is moored at a jetty in front of the dyke behind which Voldendam hides from the Zuiderzee. The botter is ice-locked in Voldendam. The dyke runs obliquely through the scene and was given a frame from pinewood cut-offs and filled with balsawood.
Baseboard and core of the dyke
The frozen Zuiderzee consists initially of a sheet of 2 mm Plexiglas. A screw piercing baseboard and Plexiglas will eventually fix the model in place.
Trying out the model in place
All wood parts were dyed in mahagony and varnished as will be the other wooden parts of the display case.
Baseboard dyed and varnished
Once the varnish is dry, this report will continue.
wefalck
Last edited by wefalck on Sat Mar 13, 2021 1:09 pm, edited 1 time in total.
Eberhard
Former chairman Arbeitskreis historischer Schiffbau e.V. (German Association for Shipbuilding History)
--------------------------------------------------------------------------------------------------------------------------------------------------------------------------------------------
Former chairman Arbeitskreis historischer Schiffbau e.V. (German Association for Shipbuilding History)
--------------------------------------------------------------------------------------------------------------------------------------------------------------------------------------------