perfection...
Superb!
May I ask how did you manage to create conical masts? It is just dremel and sand paper?
1/700 Amagi diorama
Moderators: MartinJQuinn, JIM BAUMANN, Jon, Dan K
-
blacman

- Posts: 552
- Joined: Tue Aug 18, 2009 11:02 am
- Location: Poland, Wroclaw
Re: 1/700 Amagi diorama
...in my shipyard...

-
marijn van gils
- Posts: 2686
- Joined: Tue Feb 06, 2007 10:24 am
- Location: Belgium
Re: 1/700 Amagi diorama
Thanks guys!

The problem with the Dremel is that anything longer than 1cm or so starts to twist and tremble, making it impossible to get nice and regular, or even any, results.
Jim Baumann told me this little trick in Telford last year: stabilize the wire in a small groove in the workbench.
My workbench is in the living room and I want to keep it in one piece, so I made the groove in a piece of MDF. I simply used a saw, guided by a metal ruler:
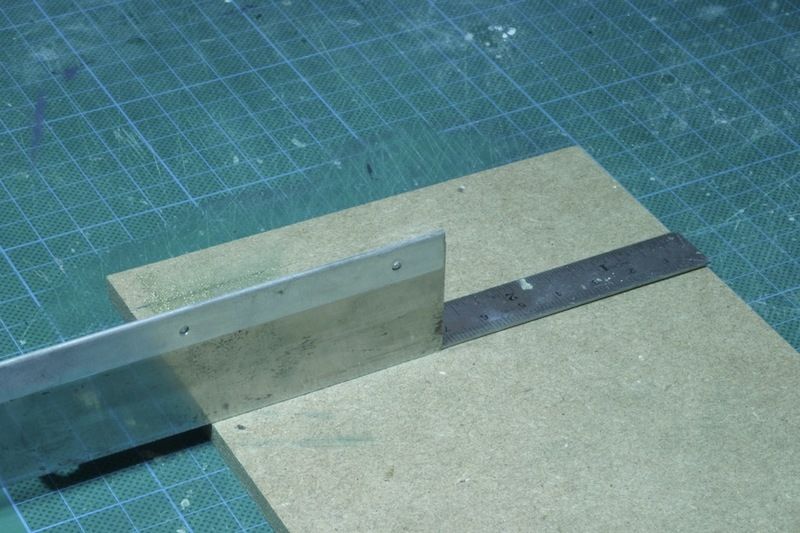
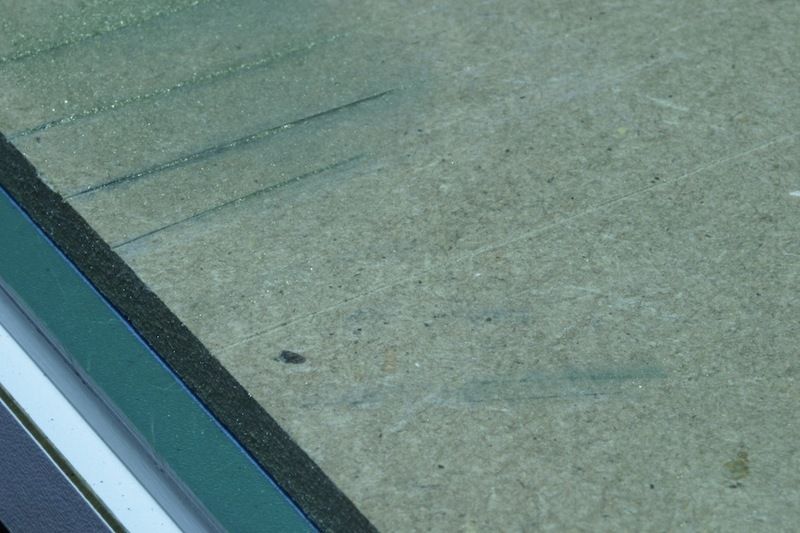
The groove is very simple and shallow, just enough for the brass wire to get caught in.
Behind the fresh groove, you see some used ones. The metal wire does erode the grooves when spinning, so I had to make several new ones. The upside to the MDF is that the brass wire doesn't heat up too much while spinning in it.
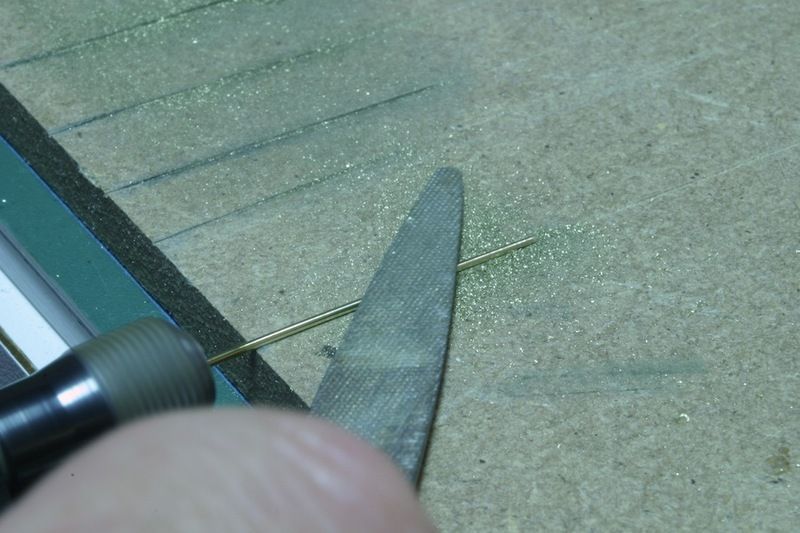
So then I spin the wire in the Dremel, lay it down gently in the groove, and press a file down on it (sandpaper glued to a thick piece of plastic sheet works well also):
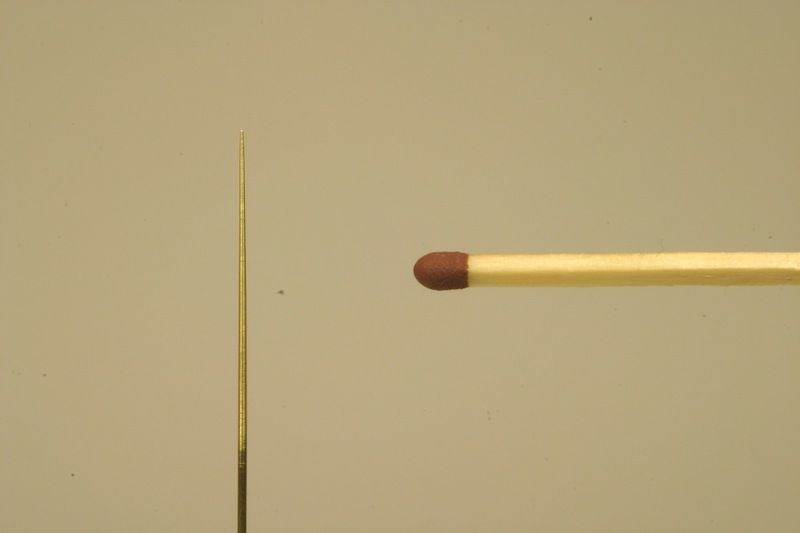
By moving the file up and down, and regularly checking the wire, this kind of results can be achieved:
After adding some PE and tubing details:
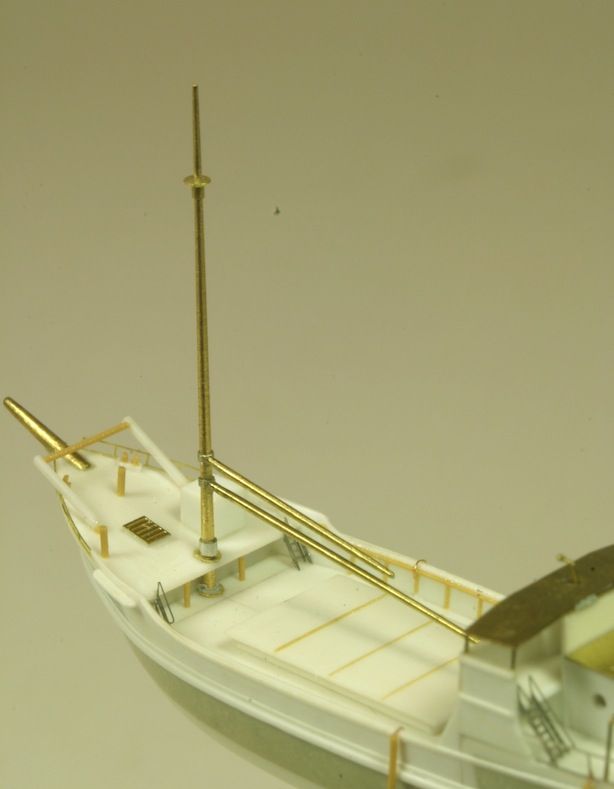
The booms are also tapered this way, but to a lesser degree. I also added a small taper to them towards the mast by first turning the main taper, cutting the wire to length, turning it around in the Dremel and turning again.
I was surprised how well this technique worked, and how easy it was to get really nice results.
Just be careful with yours eyes; the wire can break at the fitting of the Dremel and get launched in the air at high speed.
Cheers!
Marijn
Dang! I was going for arrogance and abusiveness�LE BOSCO wrote:three qualifier for your thread Marjin ,inventiveness, dexterity, friendliness
Almost!blacman wrote:May I ask how did you manage to create conical masts? It is just dremel and sand paper?
The problem with the Dremel is that anything longer than 1cm or so starts to twist and tremble, making it impossible to get nice and regular, or even any, results.
Jim Baumann told me this little trick in Telford last year: stabilize the wire in a small groove in the workbench.
My workbench is in the living room and I want to keep it in one piece, so I made the groove in a piece of MDF. I simply used a saw, guided by a metal ruler:

The groove is very simple and shallow, just enough for the brass wire to get caught in.
Behind the fresh groove, you see some used ones. The metal wire does erode the grooves when spinning, so I had to make several new ones. The upside to the MDF is that the brass wire doesn't heat up too much while spinning in it.

So then I spin the wire in the Dremel, lay it down gently in the groove, and press a file down on it (sandpaper glued to a thick piece of plastic sheet works well also):

By moving the file up and down, and regularly checking the wire, this kind of results can be achieved:

After adding some PE and tubing details:
The booms are also tapered this way, but to a lesser degree. I also added a small taper to them towards the mast by first turning the main taper, cutting the wire to length, turning it around in the Dremel and turning again.
I was surprised how well this technique worked, and how easy it was to get really nice results.
Just be careful with yours eyes; the wire can break at the fitting of the Dremel and get launched in the air at high speed.
Cheers!
Marijn
-
hypno7
- Posts: 374
- Joined: Tue Sep 17, 2013 12:16 pm
Re: 1/700 Amagi diorama
That is a great tip! I have to try it now.
Extremely nice boats. Can't wait to see more updates!
Extremely nice boats. Can't wait to see more updates!
CV-8: viewtopic.php?f=59&t=153851
DD-436: viewtopic.php?f=59&t=157123
CVL-24 viewtopic.php?f=59&t=158455
DD-436: viewtopic.php?f=59&t=157123
CVL-24 viewtopic.php?f=59&t=158455
-
Kometa

- Posts: 368
- Joined: Sun Jul 11, 2010 6:52 am
- Location: Galicia (Spain)
Re: 1/700 Amagi diorama
Excelent idea and excelent job.
On workbench:
Uss Fletcher DDG-992 1/350
Uss Lexington 1/700
Russian SSBN Borei Class - K-550 Alexander Nevskiy
and more, more, more
My Galery:
http://www.modelshipgallery.com/gallery ... index.html
Instagram: Tamboshipsmodels
Uss Fletcher DDG-992 1/350
Uss Lexington 1/700
Russian SSBN Borei Class - K-550 Alexander Nevskiy
and more, more, more
My Galery:
http://www.modelshipgallery.com/gallery ... index.html
Instagram: Tamboshipsmodels
-
Goodwood

- Posts: 1257
- Joined: Mon Nov 11, 2013 11:01 pm
- Location: Detroit area
Re: 1/700 Amagi diorama
It really does bugger the mind what you can do in that scale, Marjin. I imagine that your 1/350 figures would have brass on their collars!
Sean Nash, ACG (aircraft camo gestapo)
On the ways:
1/200 Trumpeter HMS Nelson
1/700 Tamiya USS Yorktown CV-5
In the stash:
1/35 Italiari PT-109
1/35 Tamiya "Pibber" Patrol Boat
1/350 Trumpeter USS Yorktown CV-10
On the ways:
1/200 Trumpeter HMS Nelson
1/700 Tamiya USS Yorktown CV-5
In the stash:
1/35 Italiari PT-109
1/35 Tamiya "Pibber" Patrol Boat
1/350 Trumpeter USS Yorktown CV-10
-
Devin

- Posts: 2495
- Joined: Mon Jan 10, 2005 10:46 am
- Location: Hoboken, NJ
- Contact:
Re: 1/700 Amagi diorama
Great tip on the MDF as a turning support. I hadn't been able to figure out a way to do that in the past, but I'll be giving this a go.
We like our history sanitized and theme-parked and self-congratulatory, not bloody and angry and unflattering. - Jonathan Yardley
-
blacman
- Posts: 552
- Joined: Tue Aug 18, 2009 11:02 am
- Location: Poland, Wroclaw
-
Quincy

- Posts: 2217
- Joined: Fri Apr 08, 2005 9:41 am
- Location: Monson, MA.
Re: 1/700 Amagi diorama
Wow! That is an awesome tip! Thank you for sharing.
Bob Pink
Bob Pink
-
marijn van gils
- Posts: 2686
- Joined: Tue Feb 06, 2007 10:24 am
- Location: Belgium
Re: 1/700 Amagi diorama
Many thanks guys!
It was actually Jim who told me this technique. I was really surprised how well it worked, it's really not hard to do.
Cheers,
Marijn
It was actually Jim who told me this technique. I was really surprised how well it worked, it's really not hard to do.
Cheers,
Marijn
-
Strategos Augustus

- Posts: 537
- Joined: Sat Feb 08, 2014 1:58 pm
- Location: New Hampshire , United States
Re: 1/700 Amagi diorama
Martin,
Out of a desire to replicate some of your small craft: what are you forming the hulls of your boats with?
Also, how long does it take you to scratch one of these small craft?
Thank you,
Konstantin
Out of a desire to replicate some of your small craft: what are you forming the hulls of your boats with?
Also, how long does it take you to scratch one of these small craft?
Thank you,
Konstantin

Si hortum in bibliotheca habes, nihil deerit.
- Consul Marcus Tullius Cicero
-
marijn van gils
- Posts: 2686
- Joined: Tue Feb 06, 2007 10:24 am
- Location: Belgium
Re: 1/700 Amagi diorama
Hello Konstantin,
I first made a very basic frame for the ships from plastic sheet:
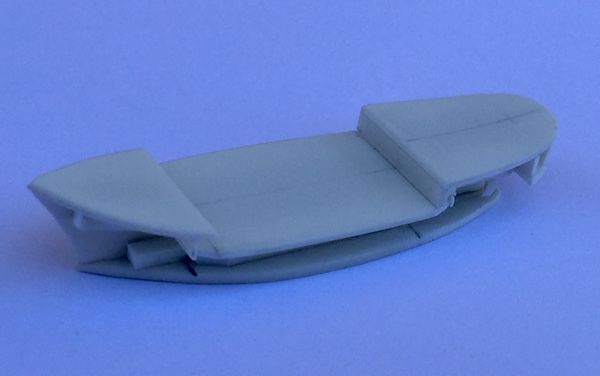
As you see, it is basically a waterline plate, the decks, and a longitudinal section in the centre to put the decks at the correct height. The rest is only framing for the openings at the stern, and re-inforcements.
For the two smaller ships, these frames were even simpler, as they only have one deck level.
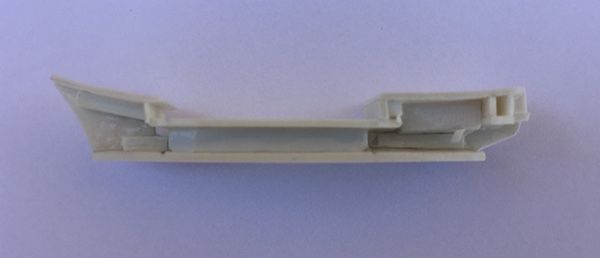
The, I filled the gaps with Magic Sculp:
I prefer Magic Sculp, from my figure sculpting days, but any decent epoxy putty should work fine.
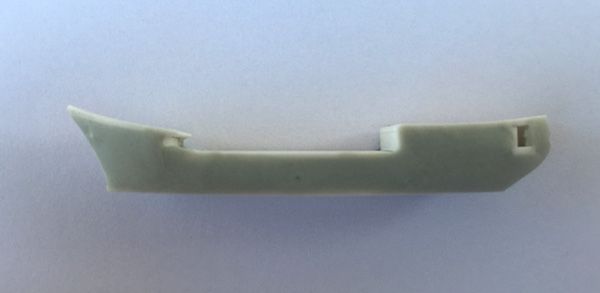
I sanded this smooth. Then I added the bulwarks, and sanded a bit more:
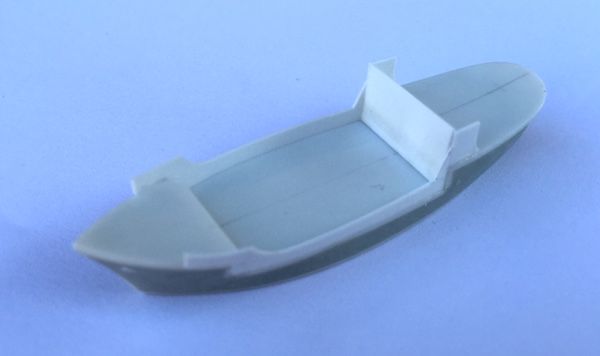
The rest is only a matter of adding details.
With the two smaller ships, the bulwarks go all around but the hull shapes are simpler. Therefore, I simply glued a skin of plastic sheet all around the hull after sanding the Magic Sculp. This was kept oversized, and cut and sanded down after the glue dried to the exact height of the bulwarks. Hence you don't see any Magic Sculp anymore on those two ships, but it is there under that skin.
If you pm me your email, I can send you the photographs I based these ships on.
Cheers!
Marijn
I first made a very basic frame for the ships from plastic sheet:


As you see, it is basically a waterline plate, the decks, and a longitudinal section in the centre to put the decks at the correct height. The rest is only framing for the openings at the stern, and re-inforcements.
For the two smaller ships, these frames were even simpler, as they only have one deck level.
The, I filled the gaps with Magic Sculp:

I prefer Magic Sculp, from my figure sculpting days, but any decent epoxy putty should work fine.
I sanded this smooth. Then I added the bulwarks, and sanded a bit more:

The rest is only a matter of adding details.
With the two smaller ships, the bulwarks go all around but the hull shapes are simpler. Therefore, I simply glued a skin of plastic sheet all around the hull after sanding the Magic Sculp. This was kept oversized, and cut and sanded down after the glue dried to the exact height of the bulwarks. Hence you don't see any Magic Sculp anymore on those two ships, but it is there under that skin.
If you pm me your email, I can send you the photographs I based these ships on.
Cheers!
Marijn
-
JIM BAUMANN

- Posts: 5675
- Joined: Mon Jan 10, 2005 5:30 pm
- Location: Nr Southampton England
Re: 1/700 Amagi diorama
very very nice small craft!-- very fione weok
magic sculpt eh...--a favourite of mine too! )
I am glad that the mast making is working well for you using the grooves...)
for taller and/ or thinner tipped masts--
use stainless steel --
thin stainless welding rod is a good starting point
( I guess welding rod for mild steel would work also !?)
its sands even thinner finer and gives a much stronger springier mast
when lots of rigging is applied
even stretched sprue can distort if the masts are too soft ( and brass is twice as soft a stainless in this application)
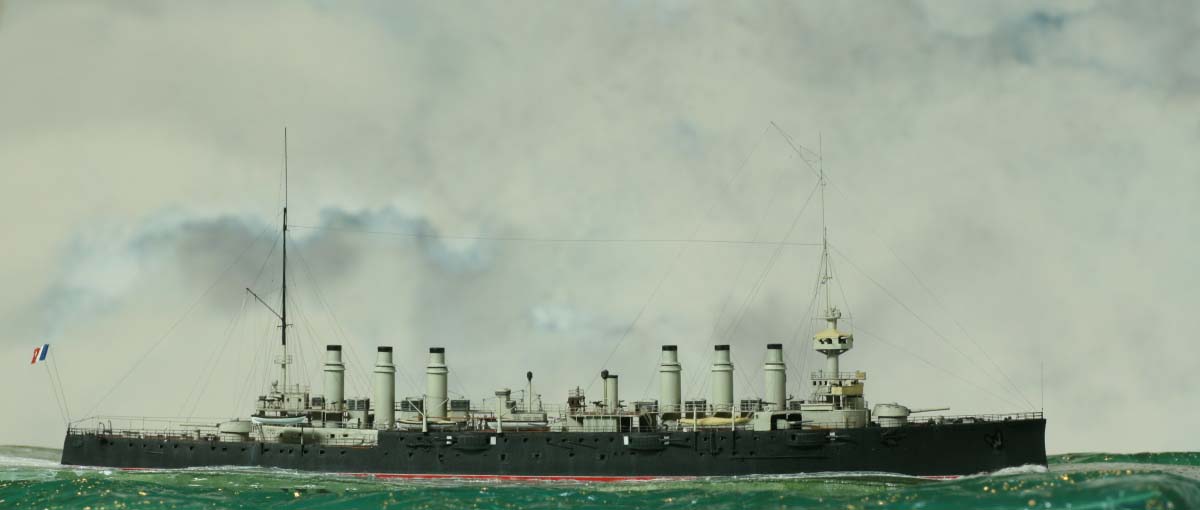
these masts were made of stainless --and are very tall ( for 1/700 anyhow ! ) tall !
( 1/700 french cruiser Jeanne d'Arc )
magic sculpt eh...--a favourite of mine too! )
I am glad that the mast making is working well for you using the grooves...)
for taller and/ or thinner tipped masts--
use stainless steel --
thin stainless welding rod is a good starting point
( I guess welding rod for mild steel would work also !?)
its sands even thinner finer and gives a much stronger springier mast
when lots of rigging is applied
even stretched sprue can distort if the masts are too soft ( and brass is twice as soft a stainless in this application)
these masts were made of stainless --and are very tall ( for 1/700 anyhow ! ) tall !
( 1/700 french cruiser Jeanne d'Arc )
....I buy them at three times the speed I build 'em.... will I live long enough to empty my stash...?
http://www.modelshipgallery.com/gallery ... index.html
IPMS UK SIG (special interest group) www.finewaterline.com
http://www.modelshipgallery.com/gallery ... index.html
IPMS UK SIG (special interest group) www.finewaterline.com
-
marijn van gils
- Posts: 2686
- Joined: Tue Feb 06, 2007 10:24 am
- Location: Belgium
Re: 1/700 Amagi diorama
Many thanks Jim!
I remember you advised me stainless steel indeed, but I didn't happen to have any at home. So I first tried it with brass and was surprised how well it works. But the mast didn't need to be very tall or very pointy...
I will certainly remember steel for the next project, were I will need longer and thinner pieces, and lots of rigging!
Cheers,
Marijn
-
Wolfenstein

- Posts: 12
- Joined: Mon Aug 18, 2014 10:49 am
Re: 1/700 Amagi diorama
Marijn,
your work looks amazing. I especially like how clean your work looks.
What glue are you using for those tiny PEs?
your work looks amazing. I especially like how clean your work looks.
What glue are you using for those tiny PEs?
-
marijn van gils
- Posts: 2686
- Joined: Tue Feb 06, 2007 10:24 am
- Location: Belgium
Re: 1/700 Amagi diorama
Thanks Wolfenstein!
Just superglue. I usually tack the piece in place with a small amount of gel superglue. Then, I usually add as much liquid superglue as possible to the seams to make the bond as strong as possible. For tiny pieces, this is very little of course. I use 0,1mm copper wire as an applicator for the liquid glue, a needle or a toothpick for the gel.
The secret: when I over-use glue, I scrape away the excess carefully with a sharp scalpel.
Cheers,
Marijn
-
LE BOSCO

- Posts: 2261
- Joined: Thu Aug 27, 2009 11:05 am
- Location: Paris France
Re: 1/700 Amagi diorama
Hello Marjin
new progress on your project ? like a junkie
cheers
Nicolas
new progress on your project ? like a junkie
cheers
Nicolas
-
marijn van gils
- Posts: 2686
- Joined: Tue Feb 06, 2007 10:24 am
- Location: Belgium
Re: 1/700 Amagi diorama
Thanks for your interest Nicolas! 
I had a bit of a modelling dip because of a very busy period at work and starting up a new band (80ies covers; a lot of fun! ) (my second hobby/passion is playing bass guitar). Therefore, I only made the glass case. That is a not such a pleasant job though, so I'll be very happy when I don't have to make it at the end of the project anymore!
On monday however, I started with the base, and soon I will be able to add groundwork, so there should be some updates soon I hope.
Cheers,
Marijn
I had a bit of a modelling dip because of a very busy period at work and starting up a new band (80ies covers; a lot of fun!
On monday however, I started with the base, and soon I will be able to add groundwork, so there should be some updates soon I hope.
Cheers,
Marijn
-
Goodwood
- Posts: 1257
- Joined: Mon Nov 11, 2013 11:01 pm
- Location: Detroit area
Re: 1/700 Amagi diorama
Very much looking forward to your next update, Marijn!
I'm especially looking forward to seeing how you go about making a landmass and shallow water in this scale, as opposed to the deep blue sea from your Lexington dio. You gonna make some buildings and such as well?
I'm especially looking forward to seeing how you go about making a landmass and shallow water in this scale, as opposed to the deep blue sea from your Lexington dio. You gonna make some buildings and such as well?
Sean Nash, ACG (aircraft camo gestapo)
On the ways:
1/200 Trumpeter HMS Nelson
1/700 Tamiya USS Yorktown CV-5
In the stash:
1/35 Italiari PT-109
1/35 Tamiya "Pibber" Patrol Boat
1/350 Trumpeter USS Yorktown CV-10
On the ways:
1/200 Trumpeter HMS Nelson
1/700 Tamiya USS Yorktown CV-5
In the stash:
1/35 Italiari PT-109
1/35 Tamiya "Pibber" Patrol Boat
1/350 Trumpeter USS Yorktown CV-10
-
marijn van gils
- Posts: 2686
- Joined: Tue Feb 06, 2007 10:24 am
- Location: Belgium
Re: 1/700 Amagi diorama
Sorry for the late reply Goodwood!
On the island, there will be only the type of structures which are visible on the period photo's. It will not be looking very busy, but hopefully still interesting with one small building, some wood structures (which I think were used to support camouflage netting running to the ship), a piece of railroad track, bomb craters, some piles of barrels and crates, some small junk, � As a focal point, there will be a GMC truck and a jeep, with some American soldiers having a look at the wreck.
Now I just have to get on with it!
Marijn
-
Goodwood
- Posts: 1257
- Joined: Mon Nov 11, 2013 11:01 pm
- Location: Detroit area
Re: 1/700 Amagi diorama
Found this image in a chance Google search, thought it might prove somewhat useful. Seems to be a dead-on bow shot of Amagi in the condition you wish to depict her in.
http://www.fisthistory.org/Ships_files/image066.jpg
http://www.fisthistory.org/Ships_files/image066.jpg
Sean Nash, ACG (aircraft camo gestapo)
On the ways:
1/200 Trumpeter HMS Nelson
1/700 Tamiya USS Yorktown CV-5
In the stash:
1/35 Italiari PT-109
1/35 Tamiya "Pibber" Patrol Boat
1/350 Trumpeter USS Yorktown CV-10
On the ways:
1/200 Trumpeter HMS Nelson
1/700 Tamiya USS Yorktown CV-5
In the stash:
1/35 Italiari PT-109
1/35 Tamiya "Pibber" Patrol Boat
1/350 Trumpeter USS Yorktown CV-10