1/700 Amagi diorama
Moderators: MartinJQuinn, JIM BAUMANN, Jon, Dan K
-
robn1

- Posts: 48
- Joined: Tue Aug 30, 2016 8:11 pm
- Location: Waikato, New Zealand
Re: 1/700 Amagi diorama
Absolutely amazing precision.....
-
JIM BAUMANN

- Posts: 5675
- Joined: Mon Jan 10, 2005 5:30 pm
- Location: Nr Southampton England
Re: 1/700 Amagi diorama
Thats the stuff!
excellent
JB
excellent
JB
....I buy them at three times the speed I build 'em.... will I live long enough to empty my stash...?
http://www.modelshipgallery.com/gallery ... index.html
IPMS UK SIG (special interest group) www.finewaterline.com
http://www.modelshipgallery.com/gallery ... index.html
IPMS UK SIG (special interest group) www.finewaterline.com
-
Aop Aur

- Posts: 972
- Joined: Thu Jul 02, 2015 1:06 am
- Location: Bangkok, Thailand
Re: 1/700 Amagi diorama
That is an amazing piece of stretched sprue assemblies!! Looking forward to more! 
Aop
Aop
On the way:
--1/350 Tamiya DKM Tirpitz Nov 1944
--1/350 scratch-build HMS Lion never built battleship (1938)
And our artworks!
--1/350 Tamiya DKM Tirpitz Nov 1944
--1/350 scratch-build HMS Lion never built battleship (1938)
And our artworks!
-
f14dtomcat
- Posts: 125
- Joined: Wed Mar 11, 2009 11:43 pm
- Location: Singapore
Re: 1/700 Amagi diorama
Mr. Marijn van gils these pictures no matter how close-up and sharp don't do your fine work justice. I saw this model in acrylic case up close in last month's (1-2 October) Scale Model Challenge in Veldhoven, Holland. I hope to see it completed in next year's SMC event which I will be attending again.
Matthew Liew
Singapore
Matthew Liew
Singapore
I like sniffing plastic........ and the instruction sheet.
-
marijn van gils
- Posts: 2686
- Joined: Tue Feb 06, 2007 10:24 am
- Location: Belgium
Re: 1/700 Amagi diorama
Many thanks everyone! Your comments are too nice!
This part was a bit more crazy and time-consuming than I would normally do, but I felt it was worth it because it is in a very visible location. Also, I just felt like trying out how for I could go with stretched sprue�
I first thought of using only the longitudinal beams of the PE part, scavenge a third one of the port side platform, and fill in the rest with other PE elements. But I couldn't find useable PE pieces for that� I guess I could have used stretched spur to fill in the rest, but then I would have to use CA instead of Tamiya extra thin, and would have a mix of flat looking PE and round looking stretched sprue.
As you know only too well, sometimes it is just both better and easier to scratch build everything.
Many thanks f14dtomcat! Normally I'll be there, so I hope to meet you there!
Cheers,
Marijn
This part was a bit more crazy and time-consuming than I would normally do, but I felt it was worth it because it is in a very visible location. Also, I just felt like trying out how for I could go with stretched sprue�
That's correct Dan! The PE part also placed diagonal supports at the bottom (while they only seem to be present on the top of the real thing), and omits the central support beam and perpendicular members.Dan K wrote:Beautiful. The difference between the PE and the photo of the real thing is that the netting that layers over the top of the framework has disappeared, or been removed.
I first thought of using only the longitudinal beams of the PE part, scavenge a third one of the port side platform, and fill in the rest with other PE elements. But I couldn't find useable PE pieces for that� I guess I could have used stretched spur to fill in the rest, but then I would have to use CA instead of Tamiya extra thin, and would have a mix of flat looking PE and round looking stretched sprue.
As you know only too well, sometimes it is just both better and easier to scratch build everything.
Many thanks f14dtomcat! Normally I'll be there, so I hope to meet you there!
Cheers,
Marijn
-
marijn van gils
- Posts: 2686
- Joined: Tue Feb 06, 2007 10:24 am
- Location: Belgium
Re: 1/700 Amagi diorama
Luckily, the collapsible masts were much easier, as the items in the Lionroar set are quite perfect. I just added ladders from a GMM set, and scavenged some parts to make their attachment points at their platforms. I first wanted to add ladders to the top parts of the masts too, but this looked too heavy and out of scale so I left them of.
Most fun was bending them like in the period photo's!


Also this accommodation ladder could be made from stock PE. I used one from the Lionroar 'IJN accommodation ladders' set, which is excellent.


The ladder itself is only attached with Blue-Tack, as it will be much easier to paint separately.
Cheers!
Marijn
-
SilverGhost

- Posts: 421
- Joined: Wed Jul 29, 2015 3:37 am
- Location: Moscow, Russia
- Contact:
Re: 1/700 Amagi diorama
Marijn, Amazing work!!!
-
EJFoeth
- Posts: 2905
- Joined: Wed Jan 21, 2009 1:51 pm
Re: 1/700 Amagi diorama
Nice work on the small platform and that the stretched sprue has not started to deform at the joints. I suppose that might happen to soldered structures too...
What's the thickness of the rods now? Still about a tenth? Plastruct has some nice 0.3mm rod I frequently use but that may already may be too thick. Soldering works wonders though but desoldering is always "very interesting".
What's the thickness of the rods now? Still about a tenth? Plastruct has some nice 0.3mm rod I frequently use but that may already may be too thick. Soldering works wonders though but desoldering is always "very interesting".
-
marijn van gils
- Posts: 2686
- Joined: Tue Feb 06, 2007 10:24 am
- Location: Belgium
Re: 1/700 Amagi diorama
Many thanks guys!
Evert-Jan, I think the ideal way would be to solder the main frame (for strength), and fill in the small parts with stretched sprue (to avoid desoldering previous work, as they often connect directly to other connections). The only disadantage would be that the connection between metal rod and sprue needs to be made with CA glue, which can cause visible build-up.
But unfortunately I never got round to teaching myself to solder (except for fixing broken guitar cables, but that something else... ). I guess I have to do that some day...
I used different thicknesses of sprue: thicker for the main parts, thinner for the small stuff. The thickness range from a bit over 0,15mm to a bit under 0,1mm. Maybe from 0,17 to 0,07 or so?
Since the parts are relatively short and there are many pieces reinforcing each other, the final structure is surprisingly strong for what it is. Still, I don't want to press my finger on it...
I was also afraid for deformation of the plastic, but hoped the quick evaporation of the Tamiya Extra Thin would prevent this. Luckily it turned out that way!
I applied the glue with the point of a thin pointy brush, being careful not to apply too much. It worked like a charm!
Cheers,
Marijn
Evert-Jan, I think the ideal way would be to solder the main frame (for strength), and fill in the small parts with stretched sprue (to avoid desoldering previous work, as they often connect directly to other connections). The only disadantage would be that the connection between metal rod and sprue needs to be made with CA glue, which can cause visible build-up.
But unfortunately I never got round to teaching myself to solder (except for fixing broken guitar cables, but that something else...
I used different thicknesses of sprue: thicker for the main parts, thinner for the small stuff. The thickness range from a bit over 0,15mm to a bit under 0,1mm. Maybe from 0,17 to 0,07 or so?
Since the parts are relatively short and there are many pieces reinforcing each other, the final structure is surprisingly strong for what it is. Still, I don't want to press my finger on it...
I was also afraid for deformation of the plastic, but hoped the quick evaporation of the Tamiya Extra Thin would prevent this. Luckily it turned out that way!
I applied the glue with the point of a thin pointy brush, being careful not to apply too much. It worked like a charm!
Cheers,
Marijn
-
marijn van gils
- Posts: 2686
- Joined: Tue Feb 06, 2007 10:24 am
- Location: Belgium
Re: 1/700 Amagi diorama
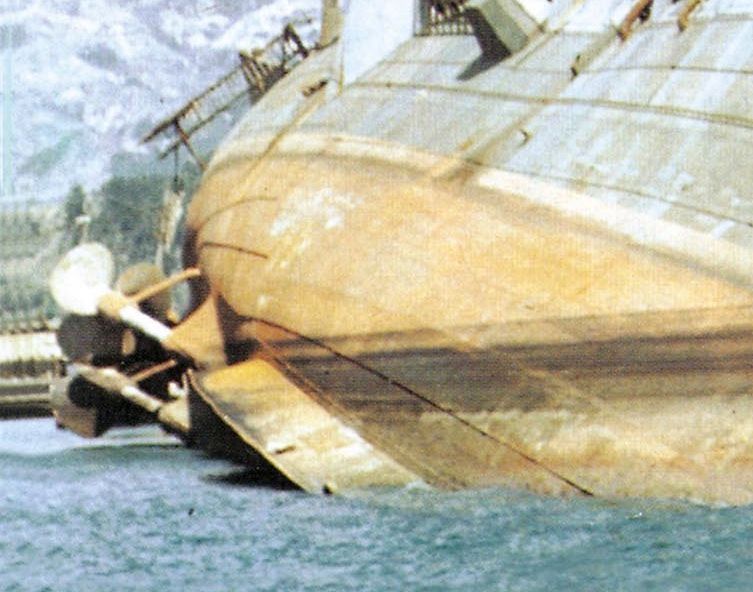
Now the propellers, rudder and bilge keel:
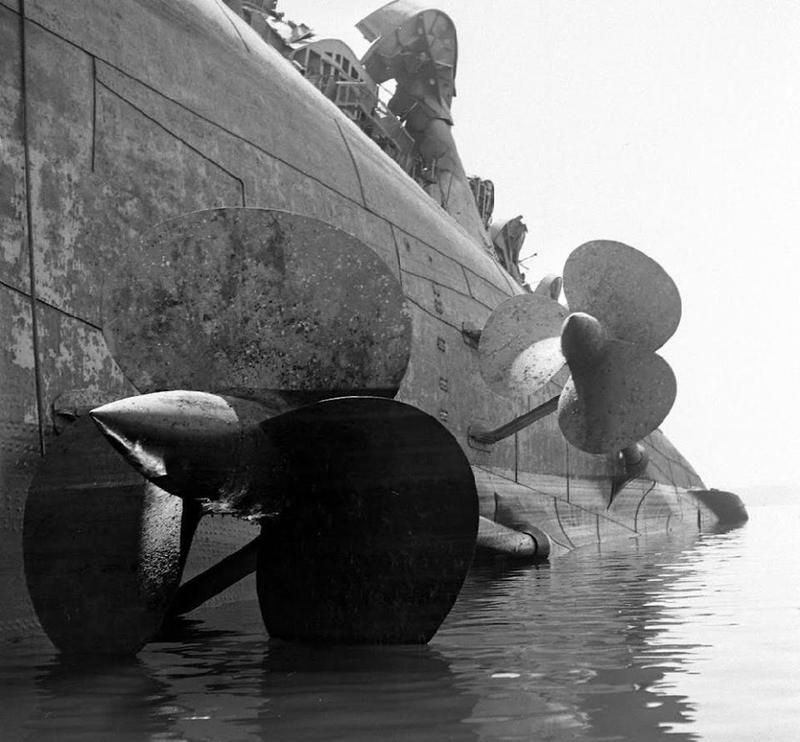
For the propellers, I got double lucky!
The 'bulging' part of the hull from which the shafts emerge, happen to be identical in size to the parts in the Trumpeter Lexington kit, so I could use these instead of having to scratchbuild them. I just had to flare them into the hull with some Magic Sculp.
The blades are also the same size as the ones included in the GMM Lexington PE set. So I cut these from their 'hub-ring' and bent them to shape. Scratchbuilding 6 identical blades from brass or plastic would have been so much more time-consuming...

The hubs are thinner and more elongated than the ones of Lexington however, so these needed to be scratchbuilt. I turned them from brass rod in the way I described here: viewtopic.php?f=59&t=159615&start=40#p665306

Besides 'sharpening' their tips, I also thinned the rod behind them, but left them attached to the brass so I could use the rod as a handle while attaching the blades. One broke (lower one), but luckily far enough from the hub so I could attach it to a piece of brass tubing.
The blades were attached with superglue. Afterwards, white glue was 'painted' on to give extra thickness near the base of each blade, and to provide extra strength.
(One prop from Lexington is visible in the back)

When dry, I could simply snip of the 'handle', leaving about 2mm to insert in the shaft (made from brass rod and tubing, with plastic sheet supports). Since the props are rather delicate, I will leave them separate, and use the 2mm of left-over 'handle' to attach them to brass tube handles, for painting.


The bilge keel was fashioned from plastic sheet, as was the rudder:

Cheers,
Marijn
-
EJFoeth
- Posts: 2905
- Joined: Wed Jan 21, 2009 1:51 pm
Re: 1/700 Amagi diorama
Bossingsmarijn van gils wrote:The 'bulging' part of the hull from which the shafts emerge
Great work, really interesting to follow!
-
marijn van gils
- Posts: 2686
- Joined: Tue Feb 06, 2007 10:24 am
- Location: Belgium
Re: 1/700 Amagi diorama
Thanks Evert-Jan!
We learn something new every day...
Cheers,
Marijn
We learn something new every day...
Cheers,
Marijn
-
MartinJQuinn

- Posts: 8502
- Joined: Tue Jan 11, 2005 1:40 pm
- Location: New Jersey
Re: 1/700 Amagi diorama
Wow. Amazing work. Love your attention to detail.
Martin
"Tomorrow is the most important thing in life. Comes into us at midnight very clean. It's perfect when it arrives and it puts itself in our hands. It hopes we've learned something from yesterday." John Wayne
Ship Model Gallery
"Tomorrow is the most important thing in life. Comes into us at midnight very clean. It's perfect when it arrives and it puts itself in our hands. It hopes we've learned something from yesterday." John Wayne
Ship Model Gallery
-
J. Soca

- Posts: 2161
- Joined: Sun Dec 03, 2006 5:36 pm
- Location: About 50 miles away from the Gulf of Mexico ( traveling W is you do so :)
Re: 1/700 Amagi diorama
I truly tip my hat to you sir!
Jose
Jose
-
DWD

- Posts: 365
- Joined: Sat Oct 27, 2012 12:37 am
- Location: Idaho
Re: 1/700 Amagi diorama
Marijn, your craftsmanship is truly outstanding. I really admire your work. Very inspirational to me to want to do more. I enjoy watching your builds progress. Thanks for posting and showing us how it's done sir.
Doug
Currently building:
Tamiya 1/350 CVN-65 USS Enterprise 2001
viewtopic.php?f=59&t=120496
http://modelshipgallery.com/gallery/use ... index.html
Currently building:
Tamiya 1/350 CVN-65 USS Enterprise 2001
viewtopic.php?f=59&t=120496
http://modelshipgallery.com/gallery/use ... index.html
-
blacman

- Posts: 552
- Joined: Tue Aug 18, 2009 11:02 am
- Location: Poland, Wroclaw
Re: 1/700 Amagi diorama
You are opening new doors for 1/700 scale models. Please keep them open for us...it's great WIP thread. :thumbs_up_1:j
...in my shipyard...

-
zs180

- Posts: 658
- Joined: Sun Oct 12, 2008 3:55 am
- Location: Budapest, Hungary
Re: 1/700 Amagi diorama
This is exquisite craftsmanship. It's a delight to follow this thread.
-
Frank Spahr

- Posts: 448
- Joined: Thu Jun 23, 2005 3:47 pm
Re: 1/700 Amagi diorama
Absolutely amazing!
Properly gobsmacked
Frank
Properly gobsmacked
Frank
AKA "Doc Bear" (a bear of very little brain ...)
VMF'06 - German Gamblers
Veritable Modelling Friends 2006, Germany
VMF'06 - German Gamblers
Veritable Modelling Friends 2006, Germany
-
GewoonWouter

- Posts: 225
- Joined: Sat Mar 26, 2016 2:58 am
- Location: Belgium
Re: 1/700 Amagi diorama
Very very nice additions there again Mr. Wizard!
-
Aur
- Posts: 140
- Joined: Thu Dec 10, 2015 10:36 pm
- Location: Bangkok, Thailand
Re: 1/700 Amagi diorama
I agree with others. And the impossibilities of this scale being made so easy is just stunning! The screws are looking great, and the best ones I've ever seen. One thing you might want to look though; the pitch is greatest near the hub and decreases towards the edge. So maybe you could try bending on a horizontal axis, tangent to the hub instead of 45 degrees. But I don't know if the PE blades will allow such bending, so...just my 2 cents!
Keep us alive with more pics!
Aur
Keep us alive with more pics!
Aur
On the way:
1/350 Tamiya DKM Tirpitz Nov 1944
1/350 scratch-build HMS Lion never built battleship (1938)
Completed build:
1/350 AFV Club Japanese Submarine I-58
And our artworks!
1/350 Tamiya DKM Tirpitz Nov 1944
1/350 scratch-build HMS Lion never built battleship (1938)
Completed build:
1/350 AFV Club Japanese Submarine I-58
And our artworks!