Stunning...
John
1/700 Amagi diorama
Moderators: MartinJQuinn, JIM BAUMANN, Jon, Dan K
-
johndon

- Posts: 1034
- Joined: Mon Jan 10, 2005 3:39 pm
- Location: Newcastle Upon Tyne, England
-
marijn van gils
- Posts: 2707
- Joined: Tue Feb 06, 2007 10:24 am
- Location: Belgium
Re: 1/700 Amagi diorama
Many thanks Daniele and John! 
 It all comes from a place of love!
But maybe I should try a battleship next?
Cheers,
Marijn
EJFoeth wrote:Not completely different; in both cases you show your carriers sunk or sinking. Perhaps you have unresolved issues you need to discuss with a carrier therapist.
 It all comes from a place of love!
 But maybe I should try a battleship next?
Cheers,
Marijn
-
JariL
- Posts: 59
- Joined: Fri Nov 13, 2015 5:40 am
Re: 1/700 Amagi diorama
Perhaps a half battleship that sank not so far from your current project;-)
-
ajkochev

- Posts: 841
- Joined: Fri Jun 08, 2007 3:04 pm
Re: 1/700 Amagi diorama
An absolutely stunning build!  Just awesome!
Just awesome!-
Aop Aur

- Posts: 972
- Joined: Thu Jul 02, 2015 1:06 am
- Location: Bangkok, Thailand
Re: 1/700 Amagi diorama
Cool! Awesome! Excellent!, Brilliant! Amazing! Utterly Stunning!....phew! I'm out of superlatives! Perhaps we need to invent a new word to describe the quality of your work, Marijn! The water colour is spot-on, and actually more beautiful than the reality. Those little boats are a joy to watch! 
Aop
Aop
On the way:
--1/350 Tamiya DKM Tirpitz Nov 1944
--1/350 scratch-build HMS Lion never built battleship (1938)
And our artworks!
--1/350 Tamiya DKM Tirpitz Nov 1944
--1/350 scratch-build HMS Lion never built battleship (1938)
And our artworks!
-
marijn van gils
- Posts: 2707
- Joined: Tue Feb 06, 2007 10:24 am
- Location: Belgium
Re: 1/700 Amagi diorama
Many thanks guys!
Jari, first I want to see your sinking battleship! 
Cheers,
Marijn
Jari, first I want to see your sinking battleship!
Cheers,
Marijn
-
marijn van gils
- Posts: 2707
- Joined: Tue Feb 06, 2007 10:24 am
- Location: Belgium
Re: 1/700 Amagi diorama
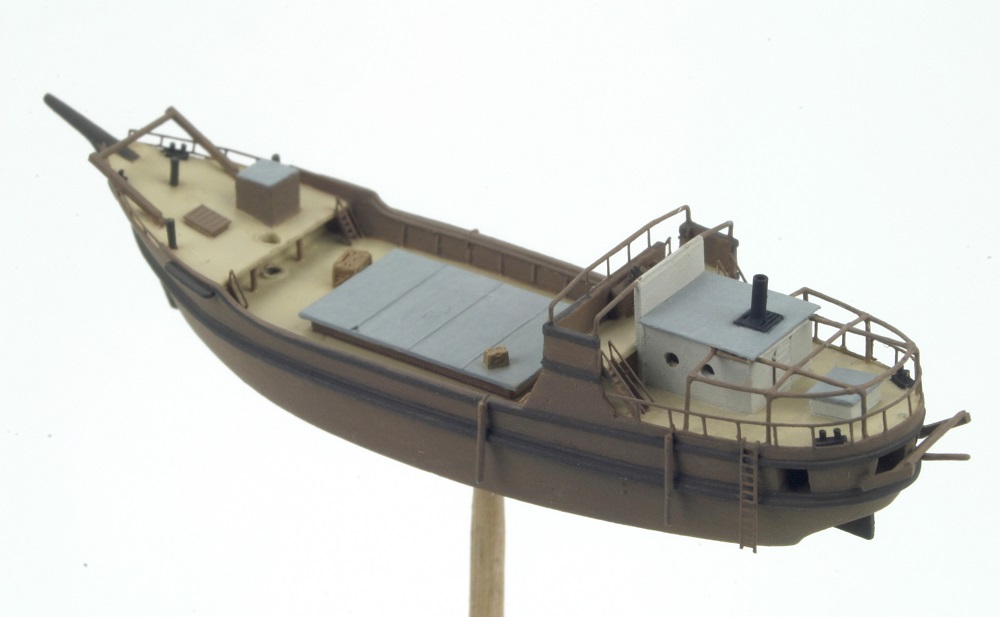
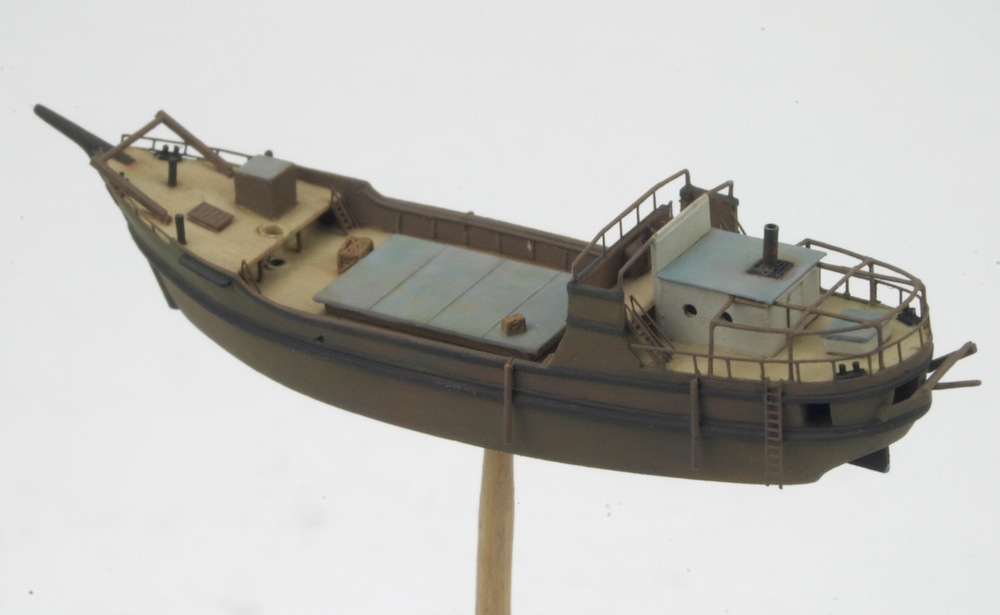
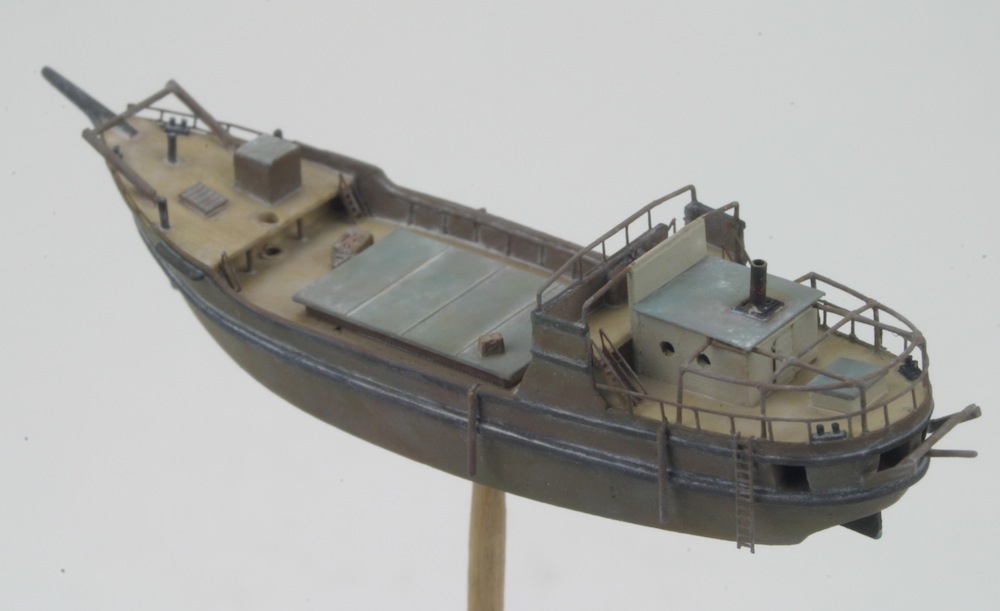
Meanwhile, I finished the wooden sea truck.
Basecoated:
�Colouful� filters:
Filters/washes with dusty colours:
And the last bits. During these last stages, unfortunately I find it hard to pauze the modelling 'momentum' for step-by-step photo's...
- Shadows, simulation of planking, dirt and rust painted.
- Bridge windows glazed with Kristal Klear, figures added, roof of the bridge attached.
- Awning made with woodglue and painted,
- Mast attached and rigged
Of course, I still need to integrate it into the seascape.
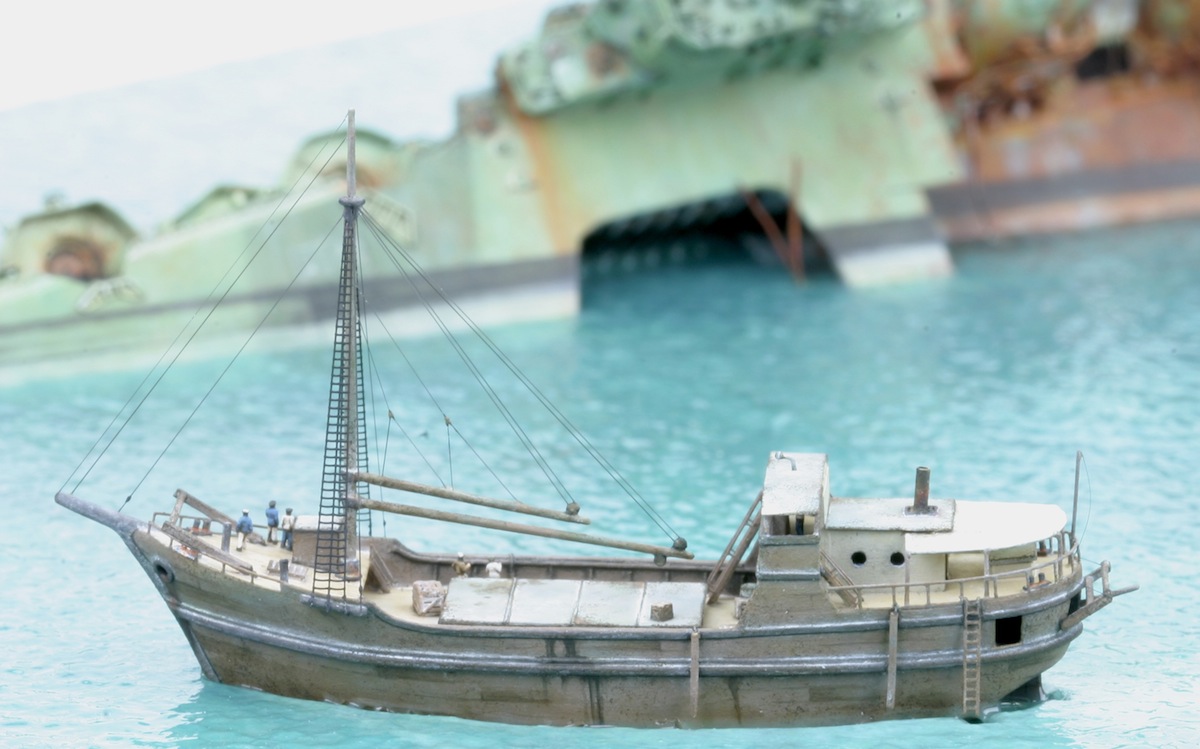
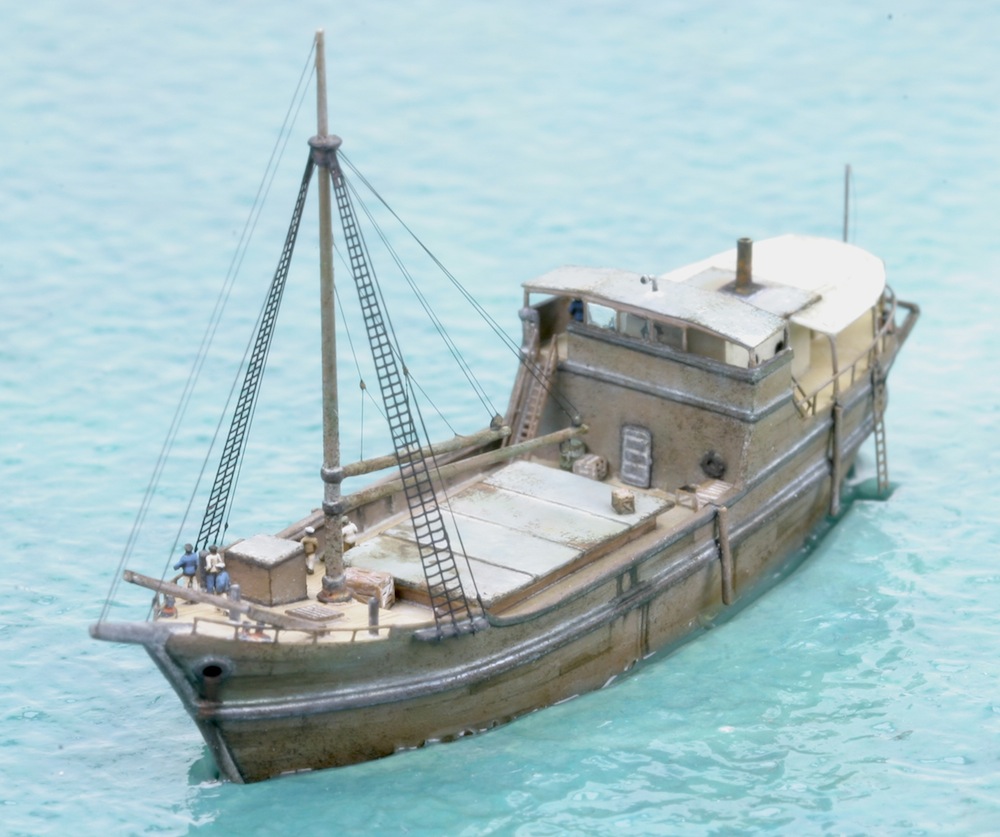
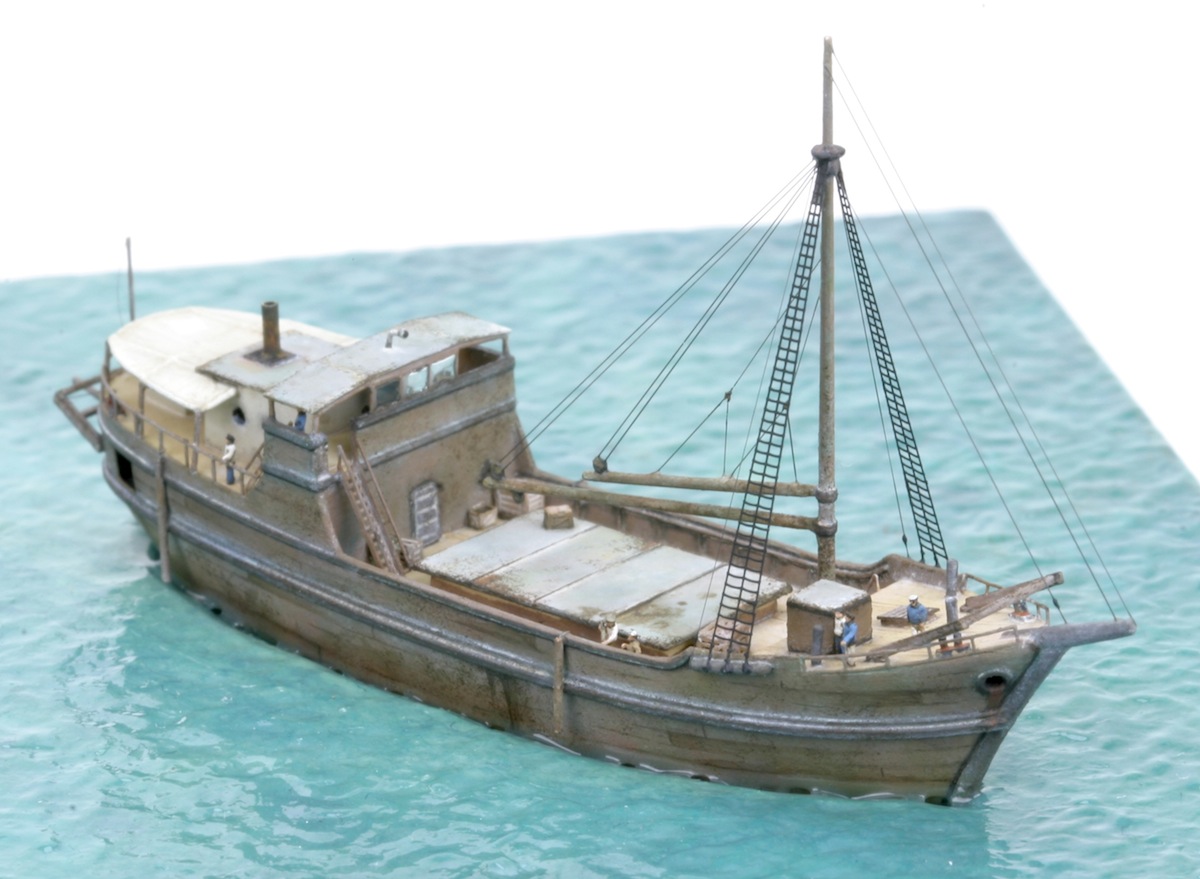
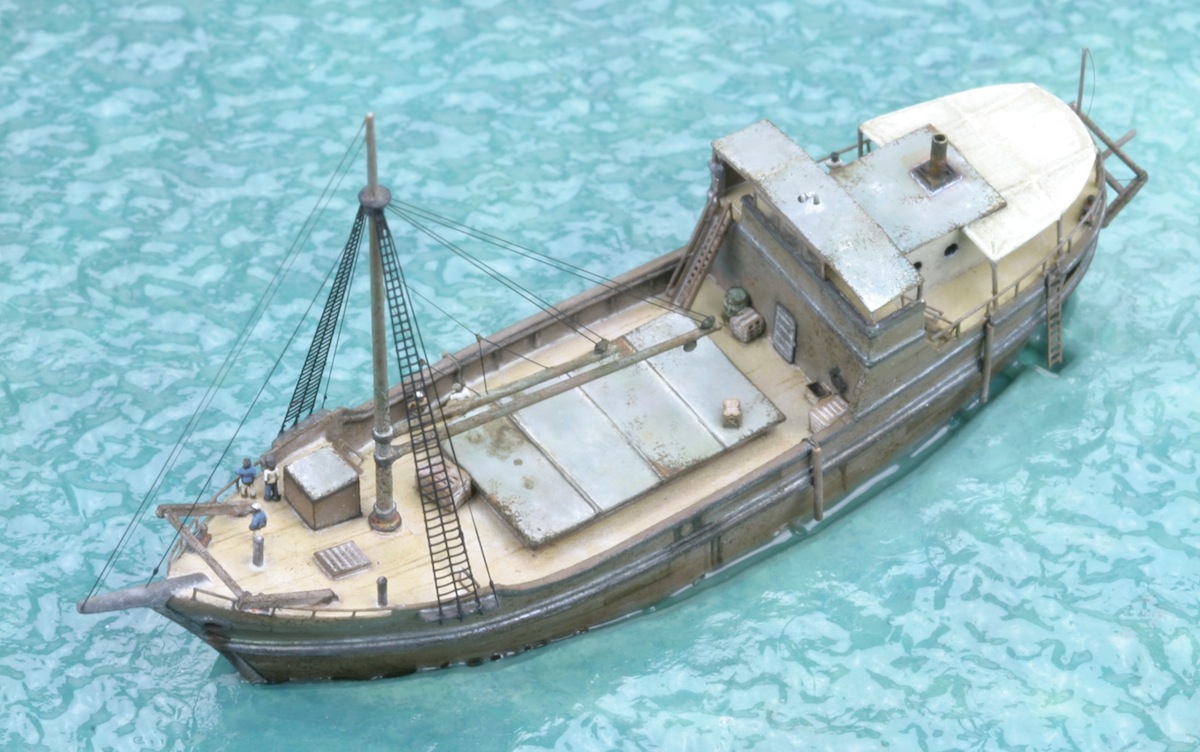
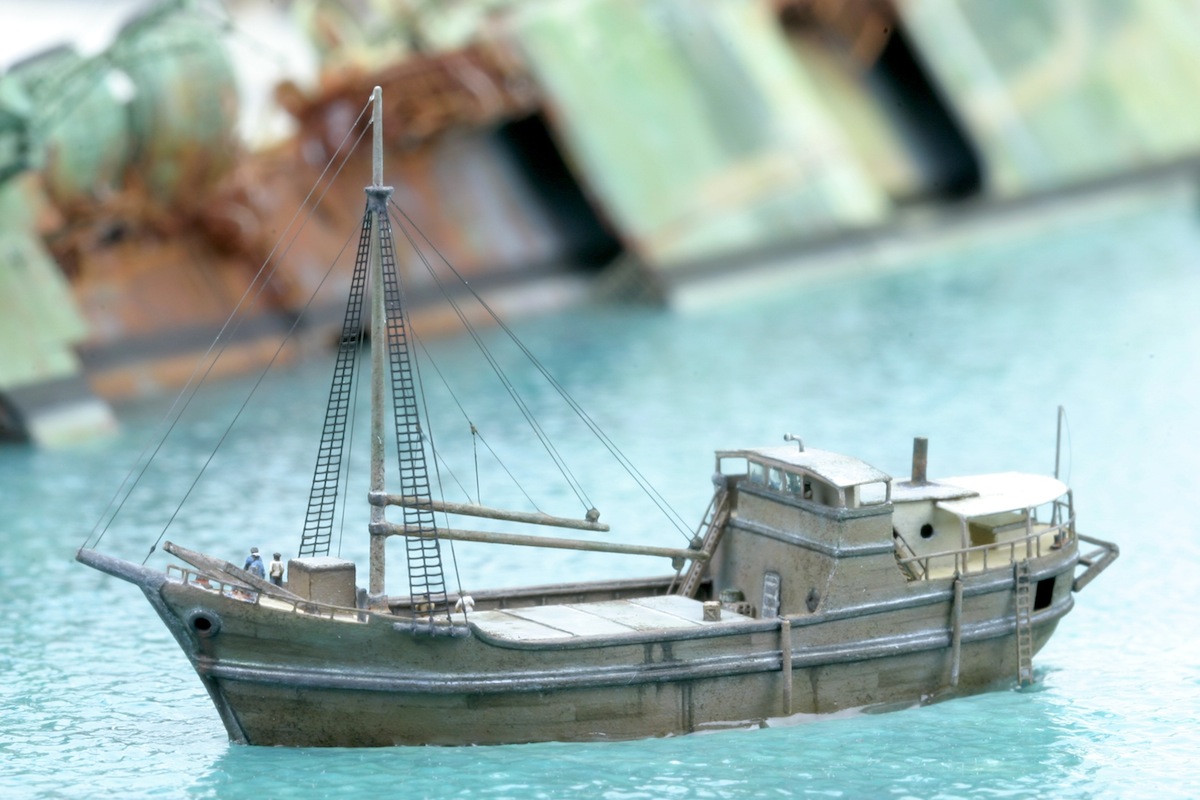
For scale: the entire ship is 6cm long.
Slowly getting there�
Cheers,
Marijn
Basecoated:
�Colouful� filters:
Filters/washes with dusty colours:
And the last bits. During these last stages, unfortunately I find it hard to pauze the modelling 'momentum' for step-by-step photo's...
- Shadows, simulation of planking, dirt and rust painted.
- Bridge windows glazed with Kristal Klear, figures added, roof of the bridge attached.
- Awning made with woodglue and painted,
- Mast attached and rigged
Of course, I still need to integrate it into the seascape.
For scale: the entire ship is 6cm long.
Slowly getting there�
Cheers,
Marijn
-
Silenoz
- Posts: 209
- Joined: Thu Jan 26, 2017 8:30 am
Re: 1/700 Amagi diorama
beautiful work, what more can be said without repeating the same over and over....
still wonder how one does the rigging in this scale...
still wonder how one does the rigging in this scale...
-
EJFoeth
- Posts: 2924
- Joined: Wed Jan 21, 2009 1:51 pm
Re: 1/700 Amagi diorama
Small question on the paint flaking (hatches, bridge roof). I noticed the base color is grey so I assume it's not the hairspray technique, but the scratches are so very fine. Drybrush? Tamponing (dutch: tamponeren?) with a rigid brush? or simply 000 brush action?
The reason I ask is that if it's not hairspray then I do not need to practice that using that technique enamel top coats because this looks just great and to scale for 1:700!
The reason I ask is that if it's not hairspray then I do not need to practice that using that technique enamel top coats because this looks just great and to scale for 1:700!
-
marijn van gils
- Posts: 2707
- Joined: Tue Feb 06, 2007 10:24 am
- Location: Belgium
Re: 1/700 Amagi diorama
Many thanks guys!
The technique I used is tamponing with a rigid brush indeed. Is that the correct Enlish term?
I cut the bristles of a 0 size brush short, and tap it gently with the points of the bristles on the model, building the effect slowly with repeated taps.
I used oil paints (raw umber, both for the dark chips and for the worn wood effect). I first let the oil soak from the paint for a couple of hours (or even a full day) by placing on a piece of cardbord. Then I take some of the pretty thick and relatively 'dry' paint on the brush. I wipe most of it on a paper towel, and check the amount of paint coming of the brush on a piece of paper. Only when happy with the chips coming from the brush, I turn to the model.
It was the first time I really used this technique, but it quickly felt comfortable and I'm happy with the results.
Depending on the colours used, it can be used not only for chipped paint but also for worn surfaces like the wooden hull of this ship.
I would use hairspray technique only for pretty heavy chipping effects. For anything more moderate, I would use this technique, the sponge technique (the same, but usually with acrylics or enamels and a piece of sponge), painting them individually with the tip of a 000 brush, or a combination of these techniques.
Cheers,
Marijn
The technique I used is tamponing with a rigid brush indeed. Is that the correct Enlish term?
I cut the bristles of a 0 size brush short, and tap it gently with the points of the bristles on the model, building the effect slowly with repeated taps.
I used oil paints (raw umber, both for the dark chips and for the worn wood effect). I first let the oil soak from the paint for a couple of hours (or even a full day) by placing on a piece of cardbord. Then I take some of the pretty thick and relatively 'dry' paint on the brush. I wipe most of it on a paper towel, and check the amount of paint coming of the brush on a piece of paper. Only when happy with the chips coming from the brush, I turn to the model.
It was the first time I really used this technique, but it quickly felt comfortable and I'm happy with the results.
Depending on the colours used, it can be used not only for chipped paint but also for worn surfaces like the wooden hull of this ship.
I would use hairspray technique only for pretty heavy chipping effects. For anything more moderate, I would use this technique, the sponge technique (the same, but usually with acrylics or enamels and a piece of sponge), painting them individually with the tip of a 000 brush, or a combination of these techniques.
Cheers,
Marijn
-
EJFoeth
- Posts: 2924
- Joined: Wed Jan 21, 2009 1:51 pm
Re: 1/700 Amagi diorama
Thanks for the explanation. I've been reading up on hairspray and salt chipping techniques and the effect you want is a very small spec size (and that you've achieved on the flight deck of Amagi). One problem (for me that is) is that an acrylic top coat is recommended. I was not entirely sure how chipping with enamels would work out and I only have light chipping planned at the bow and boot topping region... potentially a lot of trial & error that may now be not needed at all... I also noticed the pure black you applied blends in nicely... I just added some black spots and they are so... black! Filters to the rescue
Translation: dabbing? pouncing? brushdarting?
I've been reading up on hairspray and salt chipping techniques and the effect you want is a very small spec size (and that you've achieved on the flight deck of Amagi). One problem (for me that is) is that an acrylic top coat is recommended. I was not entirely sure how chipping with enamels would work out and I only have light chipping planned at the bow and boot topping region... potentially a lot of trial & error that may now be not needed at all... I also noticed the pure black you applied blends in nicely... I just added some black spots and they are so... black! Filters to the rescue Translation: dabbing? pouncing? brushdarting?
-
GewoonWouter

- Posts: 225
- Joined: Sat Mar 26, 2016 2:58 am
- Location: Belgium
Re: 1/700 Amagi diorama
dabbing would be a good alternative for the Dutch tamponing I reckon.
And agree with the fellas above. It really looks very good. So much to see, even if the model itself is only 6 centimetres. Weathering really finishes it of very nicely indeed.
Rigging is still one of the more scary bits for me as well I guess. I always wonder how people get a nice firm bond on such a small surface. I have besides my Yamato a 1/350 U-Boot in the pipeline (Werner De Keersmaekers' amazing work really made me decide to try it) but attaching the rigging is something which gives me headaches (and I never ever have headaches )
)
Anyway, keep up the good work Marijn, you're on a roll it seems ^^
And agree with the fellas above. It really looks very good. So much to see, even if the model itself is only 6 centimetres. Weathering really finishes it of very nicely indeed.
Rigging is still one of the more scary bits for me as well I guess. I always wonder how people get a nice firm bond on such a small surface. I have besides my Yamato a 1/350 U-Boot in the pipeline (Werner De Keersmaekers' amazing work really made me decide to try it) but attaching the rigging is something which gives me headaches (and I never ever have headaches
)Anyway, keep up the good work Marijn, you're on a roll it seems ^^
-
Bill Livingston
- Posts: 730
- Joined: Tue Jun 20, 2006 5:06 pm
- Location: Cambridgeshire
Re: 1/700 Amagi diorama
'Dabbing' is probably the best translation... Its certainly more appropriate than 'tamponing'

Very nice and controllable technique. I'm going to steal that too
Bill Livingston
Cambridge
Cambridge
-
marijn van gils
- Posts: 2707
- Joined: Tue Feb 06, 2007 10:24 am
- Location: Belgium
Re: 1/700 Amagi diorama
Thanks guys!
And please 'steal' away! It's just a technique...
Since the forces are very small, the bond doesn't need to be especially firm. Gell type superglue usually does the trick, sometimes reinforced with a tiny droplet of liquid superglue (and hidden afterwards with some matt varnish). Only for attaching a length of stretched sprue to another piece of rigging, I use Revell glue (like Jim).
For longer rigging in 1/350 scale, I might prefer Ushi's stuff. I have used it a little before, and it glues very easily and strongly with superglue too.
The end of the project is near, so a lot of stuff that took a lot of preparation time is now finally coming together. But that is certainly a lot of fun indeed!
Cheers,
Marijn
And please 'steal' away!
It's just a technique... I rarely use pure black for weathering (only for smoke-effects), but I always 'warm it up' a bit with some raw umber oil paint. So in fact it is a very dark brown I use for shadows, stains etc., but it looks black.EJFoeth wrote:I also noticed the pure black you applied blends in nicely... I just added some black spots and they are so... black! Filters to the rescue
I'm also still a novice at it. I'm use Jim Baumann's stretched sprue techniques, as they are described in detail somewhere on this forum. They work very good indeed!GewoonWouter wrote:Rigging is still one of the more scary bits for me as well I guess. I always wonder how people get a nice firm bond on such a small surface. I have besides my Yamato a 1/350 U-Boot in the pipeline (Werner De Keersmaekers' amazing work really made me decide to try it) but attaching the rigging is something which gives me headaches (and I never ever have headaches
Since the forces are very small, the bond doesn't need to be especially firm. Gell type superglue usually does the trick, sometimes reinforced with a tiny droplet of liquid superglue (and hidden afterwards with some matt varnish). Only for attaching a length of stretched sprue to another piece of rigging, I use Revell glue (like Jim).
For longer rigging in 1/350 scale, I might prefer Ushi's stuff. I have used it a little before, and it glues very easily and strongly with superglue too.
GewoonWouter wrote:you're on a roll it seems ^^
The end of the project is near, so a lot of stuff that took a lot of preparation time is now finally coming together. But that is certainly a lot of fun indeed! Cheers,
Marijn
-
EJFoeth
- Posts: 2924
- Joined: Wed Jan 21, 2009 1:51 pm
Re: 1/700 Amagi diorama
(I meant the funnel and other black parts int he base layer; but perhaps that's not really 100% black either... )marijn van gils wrote:I rarely use pure black for weathering (only for smoke-effects), but I always 'warm it up' a bit with some raw umber oil paint. So in fact it is a very dark brown I use for shadows, stains etc., but it looks black.EJFoeth wrote:I also noticed the pure black you applied blends in nicely... I just added some black spots and they are so... black! Filters to the rescue
-
j.mahieux

- Posts: 149
- Joined: Fri Aug 15, 2008 1:04 am
Re: 1/700 Amagi diorama
Hi Marijn,
Still as beautiful as work, there is one thing that annoys me, it is these struts too straight, too stiff, that do not go with the rest of the dio.
Fantastic work anyway!
As I use google translate, my messages are sometimes fanciful, sorry!
Sincerly,
Jeans
Still as beautiful as work, there is one thing that annoys me, it is these struts too straight, too stiff, that do not go with the rest of the dio.
Fantastic work anyway!
As I use google translate, my messages are sometimes fanciful, sorry!
Sincerly,
Jeans
-
JIM BAUMANN

- Posts: 5689
- Joined: Mon Jan 10, 2005 5:30 pm
- Location: Nr Southampton England
Re: 1/700 Amagi diorama
@Geroon Wouter,
Marjinn is too kind ...
My "step by step" thread of making fine rigging with stretched sprue can be found here:
viewtopic.php?f=4&t=37536
@ Marjinn
good work- - you have mail in your in-box from me
Marjinn is too kind ...
My "step by step" thread of making fine rigging with stretched sprue can be found here:
viewtopic.php?f=4&t=37536
@ Marjinn
good work-
- you have mail in your in-box from me ....I buy them at three times the speed I build 'em.... will I live long enough to empty my stash...?
http://www.modelshipgallery.com/gallery ... index.html
IPMS UK SIG (special interest group) www.finewaterline.com
http://www.modelshipgallery.com/gallery ... index.html
IPMS UK SIG (special interest group) www.finewaterline.com
-
JIM BAUMANN
- Posts: 5689
- Joined: Mon Jan 10, 2005 5:30 pm
- Location: Nr Southampton England
Re: 1/700 Amagi diorama
ahoi Jeans!
--
Still as beautiful as work, there is one thing that annoys me, it is these struts too straight, too stiff, that do not go with the rest of the dio....
Normally I would agree with you that the rigging needs some sag....
BUT...
==> in this instance the spars are hanging on the gaff hoists with no support from underneath;
so the weight of the booms will pull all lines totally tight...
I hope this makes sense
very best wishes
Jim Baumann
--
Still as beautiful as work, there is one thing that annoys me, it is these struts too straight, too stiff, that do not go with the rest of the dio....
Normally I would agree with you that the rigging needs some sag....
BUT...
==> in this instance the spars are hanging on the gaff hoists with no support from underneath;
so the weight of the booms will pull all lines totally tight...
I hope this makes sense
very best wishes
Jim Baumann
....I buy them at three times the speed I build 'em.... will I live long enough to empty my stash...?
http://www.modelshipgallery.com/gallery ... index.html
IPMS UK SIG (special interest group) www.finewaterline.com
http://www.modelshipgallery.com/gallery ... index.html
IPMS UK SIG (special interest group) www.finewaterline.com
-
Joe Simon
- Posts: 825
- Joined: Sat Jan 24, 2009 5:16 pm
- Location: Wisconsin
Re: 1/700 Amagi diorama
Once again words fail me!
-
marijn van gils
- Posts: 2707
- Joined: Tue Feb 06, 2007 10:24 am
- Location: Belgium
Re: 1/700 Amagi diorama
Many thanks Jean, Jim and Joe!
Many thanks for the suggestion Jean! But this time I'll go with Jim...
And thanks for the email Jim! I'll get to work and show the results here!
The basecoat of the funnel and bollards was pure black indeed. The horizontal 'lines' on the hull were dark brown (Humbroll brown bess + black).
Cheers,
Marijn
Many thanks for the suggestion Jean!
But this time I'll go with Jim... And thanks for the email Jim! I'll get to work and show the results here!
Oops, I did misunderstand indeed...EJFoeth wrote:(I meant the funnel and other black parts int he base layer; but perhaps that's not really 100% black either... )
The basecoat of the funnel and bollards was pure black indeed. The horizontal 'lines' on the hull were dark brown (Humbroll brown bess + black).
Cheers,
Marijn