HMS Victory and Le Redoutable at Trafalgar (1/300)

Moderators: BB62vet, MartinJQuinn, JIM BAUMANN, Jon, Dan K

User avatar
JIM BAUMANN
Posts: 5678
Joined: Mon Jan 10, 2005 5:30 pm
Location: Nr Southampton England

Re: HMS Victory and Le Redoutable at Trafalgar (1/300)

Post by JIM BAUMANN »

as ever-- very inspiring work !!

You are surpassing yourself ,-- and ,...everyone else really!
:thumbs_up_1: :thumbs_up_1:

JB
....I buy them at three times the speed I build 'em.... will I live long enough to empty my stash...?
http://www.modelshipgallery.com/gallery ... index.html

IPMS UK SIG (special interest group) www.finewaterline.com
Dan K
Posts: 9037
Joined: Tue Jan 11, 2005 10:56 am
Location: New York City

Re: HMS Victory and Le Redoutable at Trafalgar (1/300)

Post by Dan K »

Outstanding work, as always.
User avatar
Willie
Posts: 690
Joined: Sat Apr 29, 2006 7:36 am
Location: Vigo, Spain

Re: HMS Victory and Le Redoutable at Trafalgar (1/300)

Post by Willie »

Howdy Marijn and all,

Amazing, to say the least, or superb, to put it very mildly.

As always, fantastic job. please keep them coming.

Willie.
Amen dico tibi, hodie mecum eris in paradiso (Lk 23,43).
JariL
Posts: 59
Joined: Fri Nov 13, 2015 5:40 am

Re: HMS Victory and Le Redoutable at Trafalgar (1/300)

Post by JariL »

Hi Marijn,

At some point there was some discussion about the damage caused by cannon balls. The attached linked is to a video showing the impact of 17th century ship cannon ball on a wooden mock up of a ship side. Lots of wood splinter flying around from the inside, neat hole seen from the outside.

https://www.youtube.com/watch?v=EpNS0JpnUNY

An other one:
https://www.youtube.com/watch?v=WSXaCkQ9sF8

An of course there was all the stuff falling down from the rigging and masts.

Regards,

Jari
marijn van gils
Posts: 2686
Joined: Tue Feb 06, 2007 10:24 am
Location: Belgium

Re: HMS Victory and Le Redoutable at Trafalgar (1/300)

Post by marijn van gils »

Many thanks everyone! That is very high praise, coming from you gentlemen! :smallsmile: :smallsmile: :smallsmile:

Thanks Jari! That is the general pattern indeed, as expected.
But if I don't exaggerate a little on the entrance holes, they will be almost invisible as they are only 0,4mm diameter in 1/300...
Luckily the video's do show some splintering on the entrance side too, especially the first video. ;)


Now a little update: blocks!
I made blocks of different types and sizes, and prepared for having them copied in resin. To keep resin casting manageable, I didn�t just make one block of each type, but I made more blocks of the sizes I will need more of.

Image

I made the blocks in a similar way to how modellers of wooden ship modellers make their blocks, but adapted to styrene, to the small scale, and to the needs of resin casting.

They start as a strip of styrene, with the correct width and thickness for the block. This is taped to a work surface with double-sided tape. Two pieces of styrene are taped alongside to stabilize it:
Image

Image

Now, grooves are scribed�
Image

�and cleaned up with some sandpaper and steel wool:
Image

On two opposing sides, the grooves will represent the openings for the sheeves (through which the moving rope passes on the real thing). On the other two sides, the grooves will serve to hold the strop in place (the rope with which the block was attached to a spar, mast, etc.).

Bigger is easier to photograph, so this is the biggest and most complex block: a 2,2mm treble-sheaved and double-stropped block. Hence there are 2 grooves on one side and 3 on the other.

Now I drill a hole in the end, while the drill is easy to center:
Image

Next, the end is rounded:
Image

And the strop grooves are continued around the end (simple V-cuts with a scalpel):
Image

Now, brass wire is glued in the hole (here: 0,3mm):
Image

And the block is cut from its styrene strip:
Image

Up until this point, the styrene strip provided a convenient handle. For the remaining steps, the brass wire will serve as a handle, and in the end the wire will serve to attach the block firmly to its casting block.

If I am making more of the same type of block, I make them all from the same grooved strip: drill a hole, round the edges, glue brass wire, cut another block, and so on�

Now, the cut end is round too, and the strop grooves continued around that side too:
Image

The strop is added from twisted copper wire. At first, the wire is kept too long for easy handling.
Image

Next, it is cut to size and glued to the bottom of the block.
Image

The block is now finished. I don�t drill holes for the ropes in the sheave grooves, as I won�t rig any rope through them. Instead, I will glue wire or sprue rigging to both sides, into the grooves.

For the resin to enter the mould more easily, the wire is �thickened� by gluing a section of brass tubing around it:
Image

The brass wire is finally cut short, and glued into a styrene casting block:
Image

A set of double and triple jeer blocks ready for casting:
Image

After casting, the resin items can be cut at the bottom, a hole drilled where they were attached to the casting block, and twisted copper wire glued in to serve as the rest of the strop.

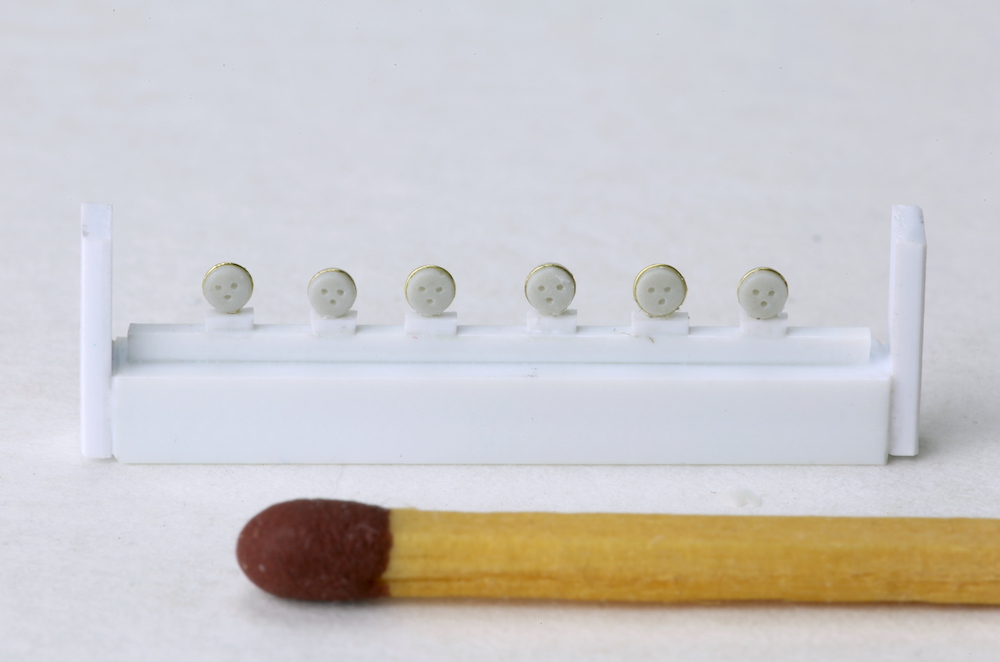
All the other blocks are simpler: single and double blocks with a single strop. These are the biggest ones I made:
Image

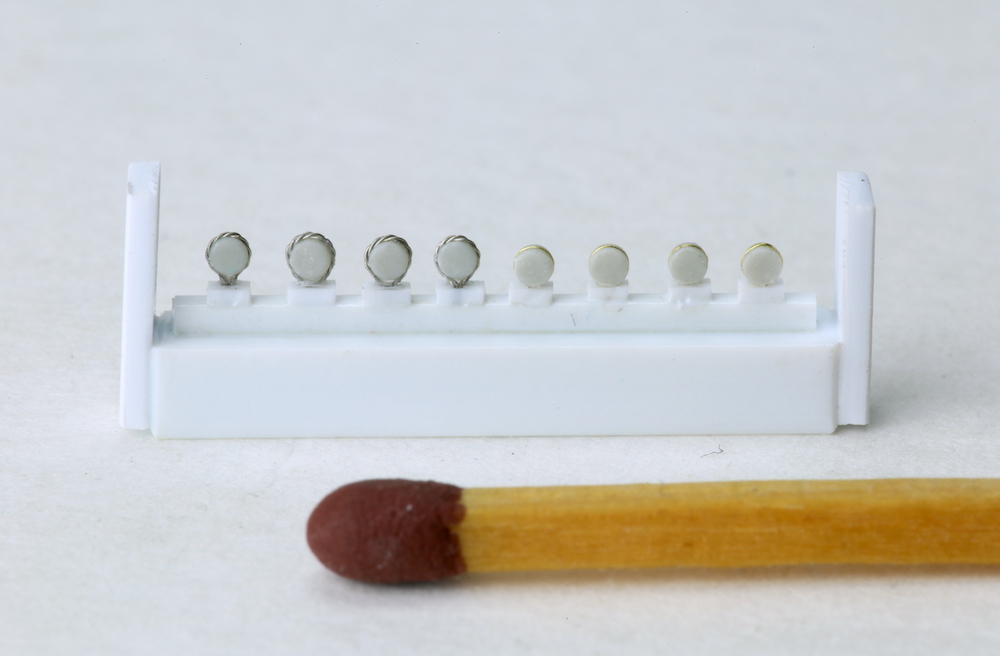
And these are the smallest ones I did with a strop. They are about 1,2mm long.
I made a small series of blocks from each type, instead of only one, to make casting more efficient.
Image

I also made 1mm long blocks. But I found them too small to add the strop. I will simply paint the strop on the blocks instead.
Image

They do have sheave grooves however. I also drilled a little hole in the top (barely visible in the photo). This way, after casting I can easily drill that hole a little deeper when the blocks are still attached to the resin �sprue�, glue a length of wire in it, and then cut it from the sprue.
Image

The 1mm blocks are about 10-11 inch blocks in reality. I will still need some smaller blocks, but I will simply mimic those with blobs of white glue.

I also made 3 sizes of hearts:
Image

First, tried turning one on the lathe, and then �deforming� it into a semi-triangular shape by forcing a filed pieces of brass into it. This was only partly successful, and I ended up adjusting a lot by carving with a scalpel.
Image

So I made the 2 others by carving them completely from the end of a strip of styrene:
Image

While the lathe was out, I also made something I had forgotten earlier: the British fire buckets. At 0,8mm diameter, they are pretty tiny in 1/300�
Image

All the best,

Marijn
User avatar
Iceman 29
Posts: 1945
Joined: Tue Sep 29, 2020 4:35 pm
Location: Bretagne, France

Re: HMS Victory and Le Redoutable at Trafalgar (1/300)

Post by Iceman 29 »

Only good ideas! :thumbs_up_1:
Pascal

�Battleship Bretagne 3D: https://vu.fr/FvCY
�SS Delphine 3D: https://vu.fr/NeuO
�SS Nomadic 3D: https://vu.fr/tAyL
�USS Nokomis 3D: https://vu.fr/kntC
�USS Pamanset 3D: https://vu.fr/jXGQ
User avatar
dafi
Posts: 996
Joined: Mon Mar 12, 2012 11:13 am
Location: Ludwigsburg/Germany
Contact:

Re: HMS Victory and Le Redoutable at Trafalgar (1/300)

Post by dafi »

:-) :-) :-)

Wonderful!

XXXDAn
To Victory and beyond ...
viewtopic.php?f=59&t=99050&start=60

See also our german forum for the age of Sail and History:
http://www.segelschiffsmodellbau.com
User avatar
wefalck
Posts: 2079
Joined: Wed Sep 28, 2011 12:04 pm
Location: Paris
Contact:

Re: HMS Victory and Le Redoutable at Trafalgar (1/300)

Post by wefalck »

I continue to be impressed by your styrene carving-capabilities :thumbs_up_1:
Eberhard

Former chairman Arbeitskreis historischer Schiffbau e.V. (German Association for Shipbuilding History)

--------------------------------------------------------------------------------------------------------------------------------------------------------------------------------------------

Image Image Image Image
ModelMonkey
Model Monkey
Model Monkey
Posts: 4096
Joined: Sat Aug 20, 2005 9:27 pm
Location: USA
Contact:

Re: HMS Victory and Le Redoutable at Trafalgar (1/300)

Post by ModelMonkey »

:shock:

Image
Have fun, Monkey around. TM

-Steve L.

Complete catalog: - https://www.model-monkey.com/
Follow Model Monkey™ on Facebook: - https://www.facebook.com/modelmonkeybookandhobby
EJFoeth
Posts: 2907
Joined: Wed Jan 21, 2009 1:51 pm

Re: HMS Victory and Le Redoutable at Trafalgar (1/300)

Post by EJFoeth »

oooh, that's a severe case of modellers block :thumbs_up_1:
marijn van gils
Posts: 2686
Joined: Tue Feb 06, 2007 10:24 am
Location: Belgium

Re: HMS Victory and Le Redoutable at Trafalgar (1/300)

Post by marijn van gils »

Many thanks everyone! :smallsmile: :smallsmile: :smallsmile:
wefalck wrote:I continue to be impressed by your styrene carving-capabilities :thumbs_up_1:
Thanks! For items this small of course it requires some finesse, but besides that it is mostly a matter of systematically breaking it down into simple shapes and work from there. For the hearts:
- sand the circumference to shape
- cut the groove around it
- round the edges
- drill a hole in the centre
- shape the hole more like a 'soft triangle'
- round the edges of the hole
ModelMonkey wrote:Image
Hahaha! :big_grin: :big_grin: :big_grin:

But it may be true... Until now, age 43, I have always modelled without any magnification. But only some months ago, I did start to perceive some degradation of my vision, and I have just bought an optivisor and used it for making these blocks. Nothing lasts forever... :big_grin:
User avatar
Martocticvs
Posts: 239
Joined: Tue Jan 26, 2016 7:59 am
Contact:

Re: HMS Victory and Le Redoutable at Trafalgar (1/300)

Post by Martocticvs »

Fantastic work, and yes - don't strain your eyes!
marijn van gils
Posts: 2686
Joined: Tue Feb 06, 2007 10:24 am
Location: Belgium

Re: HMS Victory and Le Redoutable at Trafalgar (1/300)

Post by marijn van gils »

Thanks Martocticvs! :smallsmile:
Indeed, it is much more comfortable working with an optivisor nowadays. :thumbs_up_1:


One type of �block� was missing from my last post: the deadeyes!

I turned them on the lathe from hardened Magic Sculp. In this material, it is easy to drill holes by hand afterwards, contrary to brass. Also, cleaning up the parted surface is much easier.
I could have turned them in styrene too. But Magic Sculp has the advantage of being much stiffer, while styrene at small diameters bends a lot in the lathe.

So I rolled a number of Magic Sculp �sausages� and let them harden:
Image

Next, I mounted them in the lathe and turned the deadeyes:
Image

After parting them of, cleaning up the parted (�back�) surface only need a quick cut and scrape with a scalpel. Next, I carefully drilled 3 holes in each, glued twisted copper wire around them, and mounted them on a styrene casting block:
Image

The chain deadeyes didn�t get twisted copper wire, but a single strand of wire:
Image

I only drilled holes in the biggest deadeyes. These are 1,5mm diameter, and are only for Victory�s fore and main lower masts. All other deadeyes are too small for drilling holes, and especially for rigging lanyards through those later on. So I kept them solid, and I will simply glue short lengths of �lanyards� on their front and rear surfaces (like Philip Reed describes in this book: https://www.amazon.com/Period-Ship-Mode ... 1591146755 )

Image
Image

These smaller deadeyes (1,2mm diameter) are for Victory�s mizzen mast and Redoutable�s fore and main mast.
For her mizzen, and for all topmasts and bowsprits, I will need even smaller deadeyes. But these are too small for adding the �rope� or �chain� around them. I will make them from simple small punched discs of plastic sheet, glued to both sides of their shrouds, with lanyards glued on top of them.

Finally, a group photo with the other blocks:
Image
User avatar
wefalck
Posts: 2079
Joined: Wed Sep 28, 2011 12:04 pm
Location: Paris
Contact:

Re: HMS Victory and Le Redoutable at Trafalgar (1/300)

Post by wefalck »

Marijn, such small parts I would turn from Plexiglass (acrylic glass), wich is much stiffer than styrene and does not smear, but cuts cleanly. It is available in rods down to 1 mm diameter.

Another option for a stiff, but easy to machine material would be bakelite paper, available in electronic supply shops. Unfortunately, this is only available in sheets. One would need to cut square strips on a circular saw and chuck them into the lathe in a 4-jaw-chuck.

I am thinking about my next project, which would need to have dead-eyes in the 1 to 1.5 mm range with 0.1 mm lanyards. While in theory (and actually also in practice) I can drill 0.15 mm to take these lanyards, it is still a challenge to do this multiple times :big_grin: . I had been thinking of using a method similar to that used by McCaffery (which is similar to Reed's). He uses three layers of punched-out paper discs to build up the dead-eye and then glues to the twisted-wire lanyards to them, building up the volume of the dead-eye with glue. I would rather substitute the paper with a dead-eye turned from Plexiglass. By using a suitably strong glue, one could build up the whole dead-eyes/lanyard assembly away from the model as a self-contained unit - similar to, but a bit more sophisticated compared to what is often contained in plastic sailing-ship kits.
Eberhard

Former chairman Arbeitskreis historischer Schiffbau e.V. (German Association for Shipbuilding History)

--------------------------------------------------------------------------------------------------------------------------------------------------------------------------------------------

Image Image Image Image
EJFoeth
Posts: 2907
Joined: Wed Jan 21, 2009 1:51 pm

Re: HMS Victory and Le Redoutable at Trafalgar (1/300)

Post by EJFoeth »

wefalck wrote:I am thinking about my next project, which would need to have dead-eyes in the 1 to 1.5 mm range with 0.1 mm lanyards. While in theory (and actually also in practice) I can drill 0.15 mm to take these lanyards, it is still a challenge to do this multiple times :big_grin: .
Untitled.png
It is actually exceedingly easy with a drill press, a divider, and a small jig to hold the deadeye. Tape it in place, and, drill away with reckless abandon. :thumbs_up_1: But you can also make a jig by hand and process one after the other.... two styrene plates, one with a small hole to hold the disc, drill three holes in the bottom plate (start over if not done nicely), insert disc, tape, turn over, drill!

(And nice work on the blocks, saw them some time ago :smallsmile: )
User avatar
wefalck
Posts: 2079
Joined: Wed Sep 28, 2011 12:04 pm
Location: Paris
Contact:

Re: HMS Victory and Le Redoutable at Trafalgar (1/300)

Post by wefalck »

" ... and, drill away with reckless abandon." - Well, when using drills below 0.2 mm diameter, I have to always hold my breath, even on my precision equipment :whistle:
Eberhard

Former chairman Arbeitskreis historischer Schiffbau e.V. (German Association for Shipbuilding History)

--------------------------------------------------------------------------------------------------------------------------------------------------------------------------------------------

Image Image Image Image
EJFoeth
Posts: 2907
Joined: Wed Jan 21, 2009 1:51 pm

Re: HMS Victory and Le Redoutable at Trafalgar (1/300)

Post by EJFoeth »

I treat my packs of drills as I do my tins of paint; they go empty when you use them... :dead:
User avatar
MartinJQuinn
Posts: 8512
Joined: Tue Jan 11, 2005 1:40 pm
Location: New Jersey

Re: HMS Victory and Le Redoutable at Trafalgar (1/300)

Post by MartinJQuinn »

I'm out of superlatives. Really great work.
Martin

"Tomorrow is the most important thing in life. Comes into us at midnight very clean. It's perfect when it arrives and it puts itself in our hands. It hopes we've learned something from yesterday." John Wayne

Ship Model Gallery
marijn van gils
Posts: 2686
Joined: Tue Feb 06, 2007 10:24 am
Location: Belgium

Re: HMS Victory and Le Redoutable at Trafalgar (1/300)

Post by marijn van gils »

Many thanks Martin, Evert-Jan and Eberhard! :smallsmile: :smallsmile: :smallsmile:


Indeed, plexiglass would be a good option too! I did get me some 3mm rod (one option for making the ship lamps), so I could try it out one time...

A drill press would be very handy indeed for this kind of drilling! It is on my shopping list... Or better, a small milling machine that can double as a drill press. Especially for drilling in metal (masts and yards!) it would be a great asset.
Any suggestions?

Now I had to drill everything by hand, which is of course less precise. And even when working very carefully, drill breakage occurs frequently too. ;)

For the smaller deadeyes (1mm and smaller) I think I will use the method of Philip Reed, but substitute paper discs for plastic discs. This way, I can add the deadeyes after making the shrouds/ratlines assemblies on a frame, and the shroud is firmly glued between the two 'halves' of the deadeye. It just seems easier and stronger than drilling a hole into such a small deadeye, and then attaching it with its shroud to a frame precisely for adding the ratlines. I will already have to do that with the bigger deadeyes... So it will be good to try some different techniques! :)
User avatar
wefalck
Posts: 2079
Joined: Wed Sep 28, 2011 12:04 pm
Location: Paris
Contact:

Re: HMS Victory and Le Redoutable at Trafalgar (1/300)

Post by wefalck »

Marijn, it is not so easy to make any recommendations for a milling machine. First of all, I am not unbiased, having a definite preference for the antique machinery, and secondly it depends on really what you expect it do and also on, of course, what your budget is.

Perhaps I would go for one of those, because for those tiny drills, one needs little spindle/collet run-out and a sensitive screw-feed:

Image

They used to be available from different importers, such GG-tools ([url]https://www.gg-tools.com)[/url], but I did not see there currently any offer.

Another option could be PROXXON's MF70: https://www.proxxon.com/en/micromot/27110.php, but for drilling tiny holes, the position of the down-feed hand-wheel is rather inconvenient.

All the other machines currently on the market don't seem to be precise enough or their feed-screws are not sensitive enough.
Eberhard

Former chairman Arbeitskreis historischer Schiffbau e.V. (German Association for Shipbuilding History)

--------------------------------------------------------------------------------------------------------------------------------------------------------------------------------------------

Image Image Image Image
Post Reply

Return to “Works in Progress”