Yet another intellectual and manual challenge. Solving these problems are one of the great satisfactions of model building. There is almost always some way of overcoming the conundrum at hand. Your work is very crisp and delicate, always a quality to aspire for.
Best regards: Tom
1:160 S.M.S. WESPE Armoured Gunboat (1876)
Moderators: MartinJQuinn, JIM BAUMANN, HMAS, Tiny69, Dave Wooley
-
Fliger747
- Posts: 5068
- Joined: Wed Jan 02, 2013 1:15 am
-
wefalck

- Posts: 2079
- Joined: Wed Sep 28, 2011 12:04 pm
- Location: Paris
- Contact:
Re: 1:160 S.M.S. WESPE Armoured Gunboat (1876)
Thanks, gentlemen, for the encouragement - much needed 
*******************
Planking the Gig
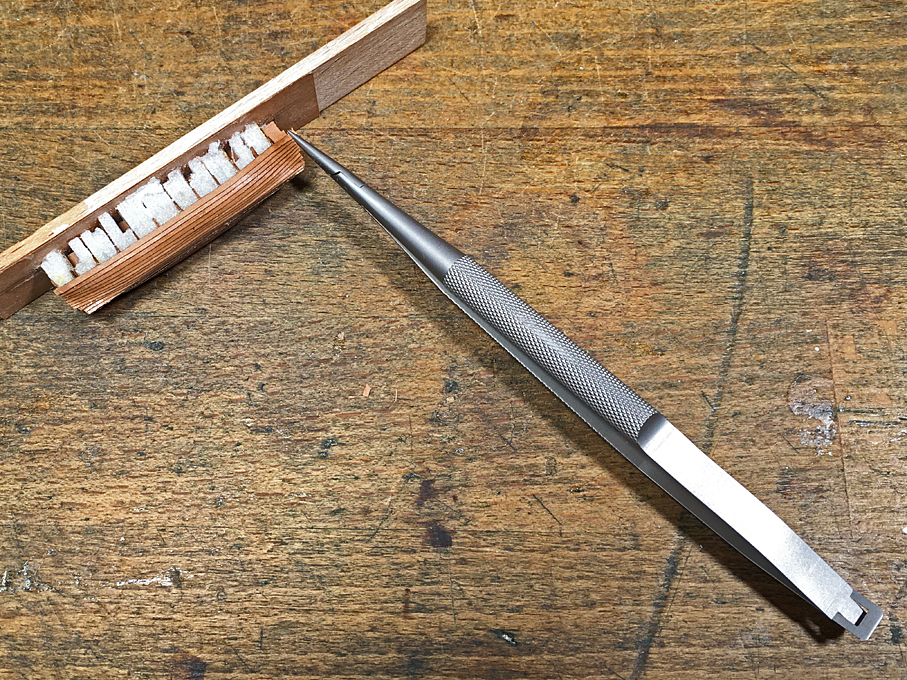
Just a little update on my efforts to plank the gig. The framework was fixed to a piece of wood to keep in shape and for ease of handling.
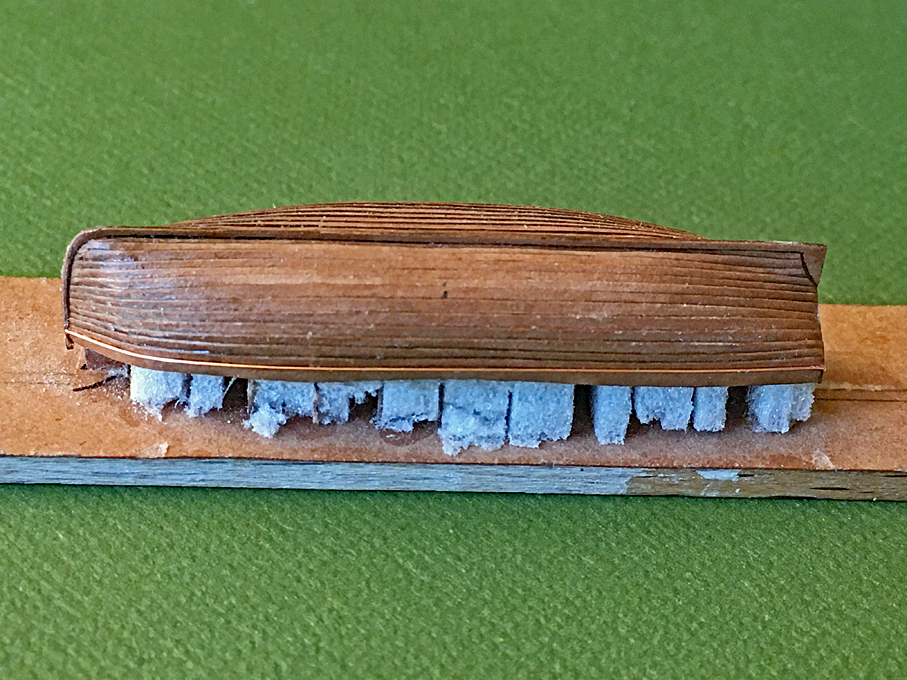
The �planks� were laser-cut from Canson-paper as indicated earlier. Unfortunately, I do not have a software (yet) to develop a planking layout, so the planks were tapered, but straight and all of the same size. However, when wetted with varnish, the paper, unlike wood, can be relatively easily bent and shaped across the wide side of the plank.
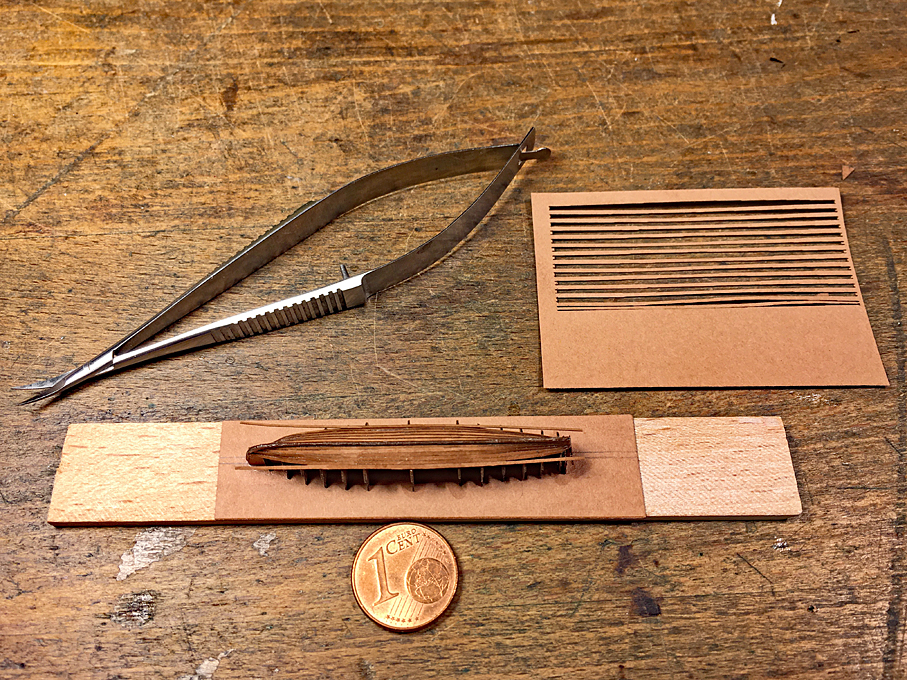
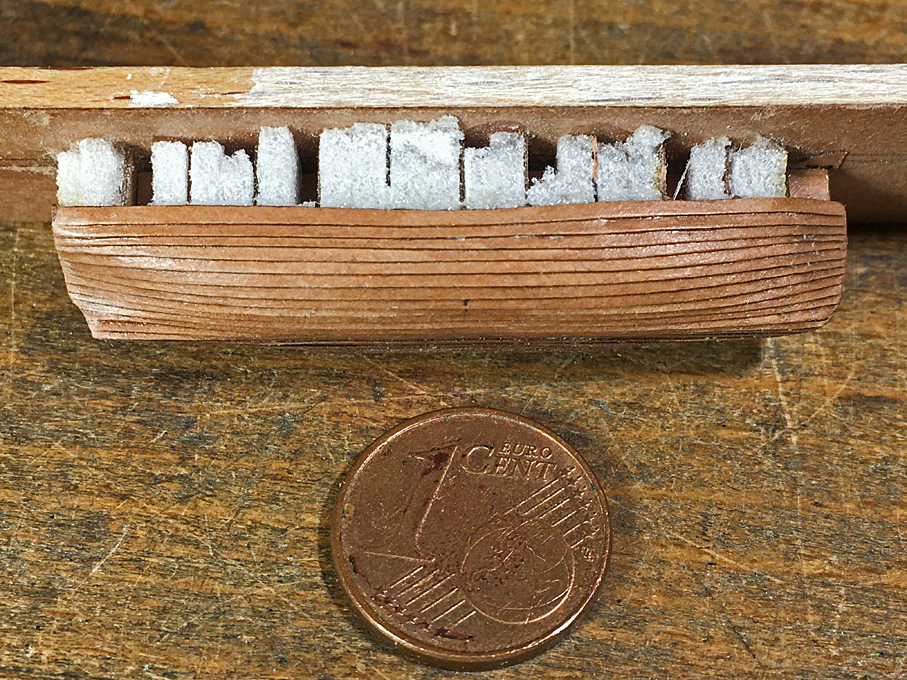
Planking in progress
When laser-cutting the planks, I ran into a small glitch, that is the outside of the planks have such a shallow curve, that the �stepping� due to the 0.1 mm resolution of the cutter becomes quite pronounced. I hope I can remove this later by sanding.
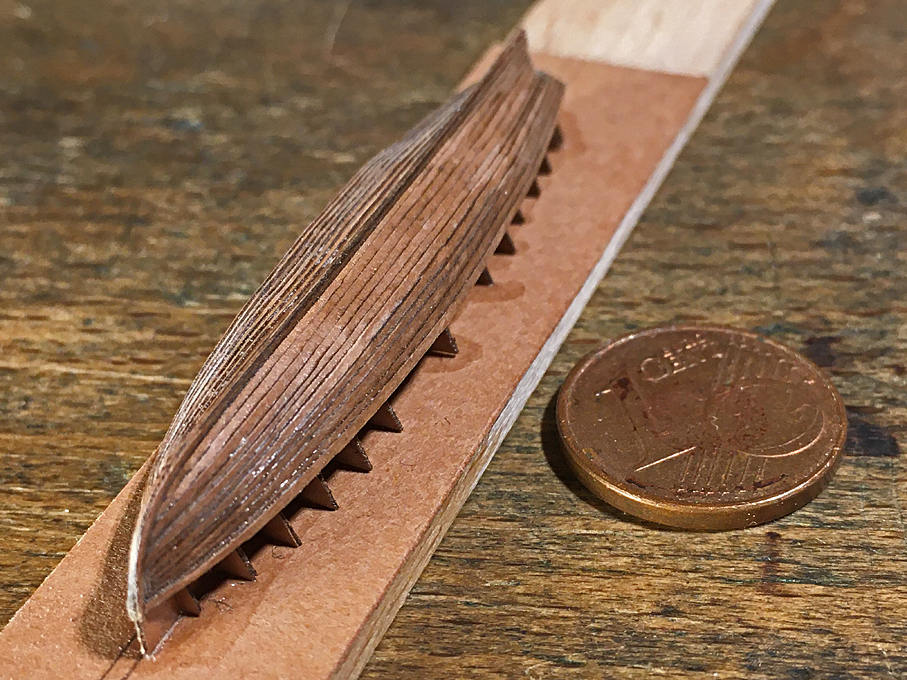
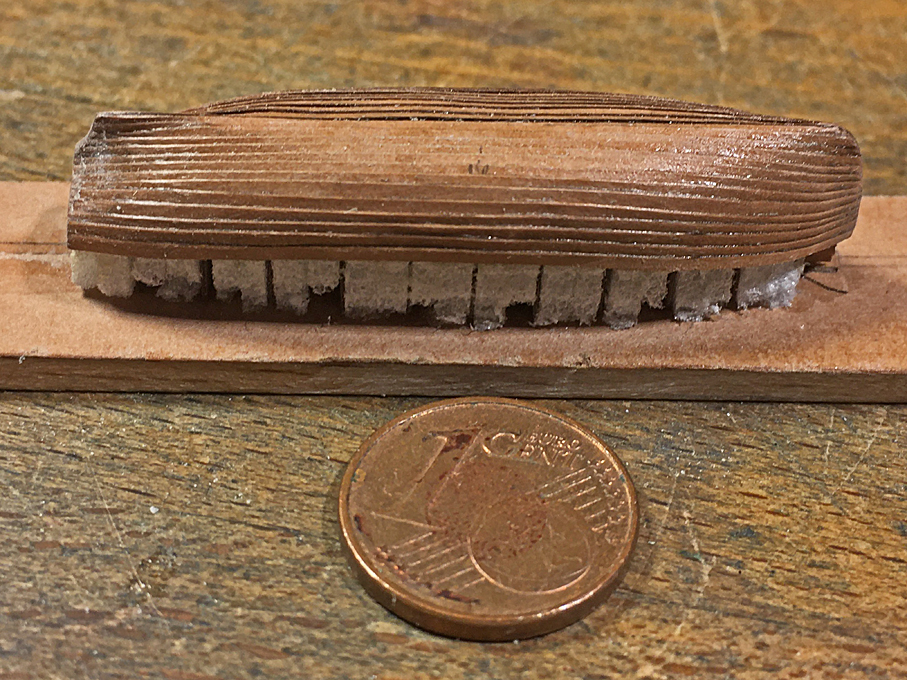
When fitting the planks, I found the best way was to fix them in the middle first and then work towards the ends. This is not ideal at the bows, where the plank has to run against the rabbet. Paper as such cannot be sanded for a close fit. I cut them as best as I could with my micro-scissors. When soaked in varnish, the paper can be moulded and squeezed, so that I did not need to thin the overlapping part of the lower plank, which would have been quite impossible in paper.
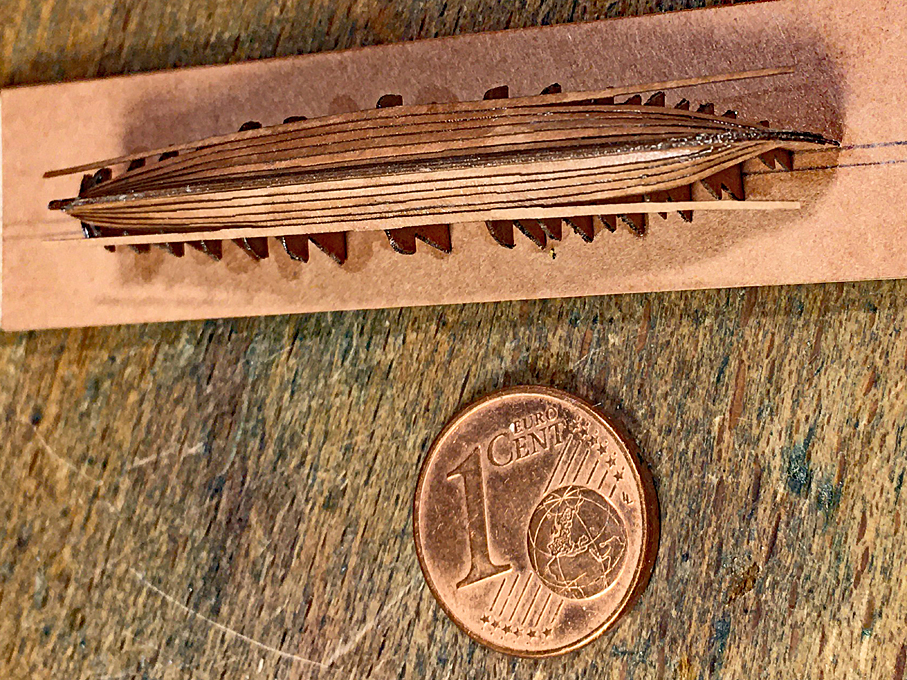
Planking progresses from the middle to the ends
Finally, the hull will probably require some touching up here and there with putty. Let�s see how it looks in the end with some paint on.
To be continued ....
*******************
Planking the Gig
Just a little update on my efforts to plank the gig. The framework was fixed to a piece of wood to keep in shape and for ease of handling.
The �planks� were laser-cut from Canson-paper as indicated earlier. Unfortunately, I do not have a software (yet) to develop a planking layout, so the planks were tapered, but straight and all of the same size. However, when wetted with varnish, the paper, unlike wood, can be relatively easily bent and shaped across the wide side of the plank.
Planking in progress
When laser-cutting the planks, I ran into a small glitch, that is the outside of the planks have such a shallow curve, that the �stepping� due to the 0.1 mm resolution of the cutter becomes quite pronounced. I hope I can remove this later by sanding.
When fitting the planks, I found the best way was to fix them in the middle first and then work towards the ends. This is not ideal at the bows, where the plank has to run against the rabbet. Paper as such cannot be sanded for a close fit. I cut them as best as I could with my micro-scissors. When soaked in varnish, the paper can be moulded and squeezed, so that I did not need to thin the overlapping part of the lower plank, which would have been quite impossible in paper.
Planking progresses from the middle to the ends
Finally, the hull will probably require some touching up here and there with putty. Let�s see how it looks in the end with some paint on.
To be continued ....
Eberhard
Former chairman Arbeitskreis historischer Schiffbau e.V. (German Association for Shipbuilding History)
--------------------------------------------------------------------------------------------------------------------------------------------------------------------------------------------


Former chairman Arbeitskreis historischer Schiffbau e.V. (German Association for Shipbuilding History)
--------------------------------------------------------------------------------------------------------------------------------------------------------------------------------------------
-
Fliger747
- Posts: 5068
- Joined: Wed Jan 02, 2013 1:15 am
Re: 1:160 S.M.S. WESPE Armoured Gunboat (1876)
Very interesting portion of the project. I hadn't heard of Canson Paper but a brief research seems to indicate a range of artists papers similar to the Strathmore papers that I began to use in building model ships some 60 years ago. As the models that I have built and still retain over these many years have not deteriorated, it appears to be an archival material. I have not used varnish to affect the working properties, though I have applied CA, which allows surface sanding.
A clever way to proceed with your ships boat. Use of a laser cutter has many possibilities which might be useful in addition to the 3D techniques I am using. I remember somewhere in the forums that a gentleman built a DE in 1:48 scale making extensive use of laser cutting of styrene for his construction.
Again, a clever approach, which is a lot of what we attempt to do.
Cheers: Tom
-
wefalck
- Posts: 2079
- Joined: Wed Sep 28, 2011 12:04 pm
- Location: Paris
- Contact:
Re: 1:160 S.M.S. WESPE Armoured Gunboat (1876)
Tom, Canson is perhaps one of the oldest paper manufacturers still in existence, tracing their origins back to the 16th century. In fact, it was founded by a certain Montgolfier, whose great-great-somthing-grandsons were the Montgolfier brothers of hot-air balloon fame.
The paper I am using is a heavily rolled, very smooth paper of 120 g/m2.
I am always battling with CA and avoid it, if I can. The use of varnish has some advantages, but the bond may be less strong. The main advantage is that you have plenty of time to adjust the parts, though it is drying very fast. You can also loosen the bond again with some drops of acetone to make adjustments. And it keeps for years without trouble. I also use it extensively when rigging.
The varnish I am using goes by the name of zapon-varnish. It's main use is for protecting metals, such as silver or brass, from tarnishing and on these forms a practically invisible layer. It contains fast-drying solvents. Shellac dissolved in alcohol would be an alternative, but shellac is more brittle and dries slower.
Eberhard
Former chairman Arbeitskreis historischer Schiffbau e.V. (German Association for Shipbuilding History)
--------------------------------------------------------------------------------------------------------------------------------------------------------------------------------------------
Former chairman Arbeitskreis historischer Schiffbau e.V. (German Association for Shipbuilding History)
--------------------------------------------------------------------------------------------------------------------------------------------------------------------------------------------
-
Fliger747
- Posts: 5068
- Joined: Wed Jan 02, 2013 1:15 am
Re: 1:160 S.M.S. WESPE Armoured Gunboat (1876)
Thank you for the working information. When I looked at it on the net I see that a large US Art Supplier, Dick Blick carries their materials. Strathmore was a popular construction materials for Model Railroaders back in the 60's, I used it to construct numerous buildings and some railroad cars. It was excellent in taking paint and weathering for wooden weathered structures. The paper I use is also about 120g/m. I have used thinner paper to clad wood for a surface that will simulate metal. I did some curved vents this way for the APA. I might need to experiment with combining with some materials such as varnish, tung oil or shellac.
Thank you again! Tom
Thank you again! Tom
Last edited by Fliger747 on Tue Jun 07, 2022 1:26 am, edited 1 time in total.
-
Iceman 29

- Posts: 1945
- Joined: Tue Sep 29, 2020 4:35 pm
- Location: Bretagne, France
Re: 1:160 S.M.S. WESPE Armoured Gunboat (1876)
Nice & meticulous job wefalck! 
Pascal
�Battleship Bretagne 3D: https://vu.fr/FvCY
�SS Delphine 3D: https://vu.fr/NeuO
�SS Nomadic 3D: https://vu.fr/tAyL
�USS Nokomis 3D: https://vu.fr/kntC
�USS Pamanset 3D: https://vu.fr/jXGQ
�Battleship Bretagne 3D: https://vu.fr/FvCY
�SS Delphine 3D: https://vu.fr/NeuO
�SS Nomadic 3D: https://vu.fr/tAyL
�USS Nokomis 3D: https://vu.fr/kntC
�USS Pamanset 3D: https://vu.fr/jXGQ
-
Fliger747
- Posts: 5068
- Joined: Wed Jan 02, 2013 1:15 am
Re: 1:160 S.M.S. WESPE Armoured Gunboat (1876)
I was incorrect on the paper weight I had been using it was 250 g/m. I presume the lighter papers are available locally. The use of a laser cutter is interesting, but already I have a lathe, sanders, jig saws, Stencil cutter, 3D printer etc, so perhaps there should be limit here? At least personally. Thank you for expanding our ideas of what is possible.
Cheers: Tom
Cheers: Tom
-
wefalck
- Posts: 2079
- Joined: Wed Sep 28, 2011 12:04 pm
- Location: Paris
- Contact:
Re: 1:160 S.M.S. WESPE Armoured Gunboat (1876)
No can never have enough tools and machines
**********************************************************
Work on the Gig continued
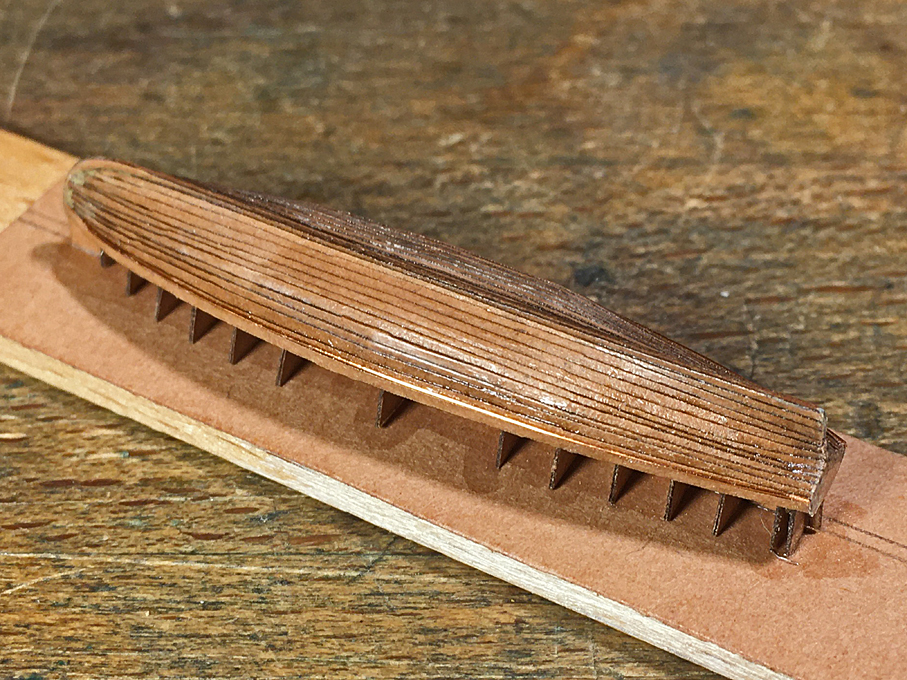
The planking progressed reasonably well, but I actually needed to more strakes per side to be able to go up to the sheer-line. Not good for strake counters � I attribute this to the wider overlap needed than expected. This was particularly the case, where there is a significant angle between planks, e.g. at the turn of the bilge. For the other boats, I will have to cut the planks a bit wider.

Planking completed
A few conclusions from this exercise for the other boats:
- Cut the planks tapered only on one side, as they can edge-bend, when soaked in varnish
- Cut the planks for 30 to 40% overlap not 20% as done in this example; this gives more flexibility to adjust the planks
- Do not try to imitate full-scale practice by running the planks into a rabbet on the stem, rather attach the outer stem and keel-piece after the planking is complete and has been trimmed down to the rabbet line.
Planking completed
The planking now was cleaned up and the excess at the transom trimmed back. I tried to sand the jaggy edges a bit, but that did not work very well on the paper. However, in the varnished state it is not very visible. One has to see, when it is painted.
The hull was lightly rubbed down with fine steel wool to smooth the surface. Then some spots, where touched up with some putty.
Rubbing strake from 0.2 mm copper-wire installed
According to the prototype cross-section, there was a rubbing strake added to the top-strake. It was �faked� by attaching a 0.2. copper-wire below the last strake.
Now the boat was ready to be cut from the base. The bulkheads were cut down and the keel-piece trimmed to a line that would be followed by the tarpaulin cover.
There is a hoisting chain fore and aft to which the falls of the boat-davits will be hooked, As only the rop ring will be protruding from the boat-cover, this chain was simulated by a drilled together piece of tinned 0.2 mm coper-wire. It was hooked into a bulkhead and glued down with varnish.
Boat cut free from the building base
Most modellers seem to show the boats open, but most historical photographs show them covered. The design of the cover seems to vary a bit and I could not find information about this. Some photographs show the cover going down over half of the sides of the boat, with ropes apparently zig-zagging down to the keel and back up on the other side. Others seem to show a line going through a hollow seam to pull it tight around the boat. I opted for the latter to show more of the planking and the (later) paintwork.
Gig with simulated cover
I was debating with myself, whether I should first paint the hull and then add the cover, or the other way around. I opted for the second, as messing around with varnish, could damage the paintwork, even though it made it more difficult to hold the boat during (spray-)painting.
Basis for the cover was a piece of ironed-flat toilet-paper that was draped over the hull and then soaked in varnish resp. sanding filler. It was smoothed down over the edges and down to the rubbing strake. Once dry the paper was cut back to the rubbing-strake with a new scalpel-blade.
Underside of the gig showing planking
I almost forgot the rudder, that seems to have been kept shipped, when the boats were suspended in the davits. It was drawn on the basis of BRIX (1883) and laser-cut to be laminated from two layers. The pintels turned out to be far too small to reproduced, but the respective bands were simulated by flattened, tinned copper-wire.
Gig with rudder shipped
The gig is now ready to be painted.
To be continued ....
**********************************************************
Work on the Gig continued
The planking progressed reasonably well, but I actually needed to more strakes per side to be able to go up to the sheer-line. Not good for strake counters � I attribute this to the wider overlap needed than expected. This was particularly the case, where there is a significant angle between planks, e.g. at the turn of the bilge. For the other boats, I will have to cut the planks a bit wider.
Planking completed
A few conclusions from this exercise for the other boats:
- Cut the planks tapered only on one side, as they can edge-bend, when soaked in varnish
- Cut the planks for 30 to 40% overlap not 20% as done in this example; this gives more flexibility to adjust the planks
- Do not try to imitate full-scale practice by running the planks into a rabbet on the stem, rather attach the outer stem and keel-piece after the planking is complete and has been trimmed down to the rabbet line.
Planking completed
The planking now was cleaned up and the excess at the transom trimmed back. I tried to sand the jaggy edges a bit, but that did not work very well on the paper. However, in the varnished state it is not very visible. One has to see, when it is painted.
The hull was lightly rubbed down with fine steel wool to smooth the surface. Then some spots, where touched up with some putty.
Rubbing strake from 0.2 mm copper-wire installed
According to the prototype cross-section, there was a rubbing strake added to the top-strake. It was �faked� by attaching a 0.2. copper-wire below the last strake.
Now the boat was ready to be cut from the base. The bulkheads were cut down and the keel-piece trimmed to a line that would be followed by the tarpaulin cover.
There is a hoisting chain fore and aft to which the falls of the boat-davits will be hooked, As only the rop ring will be protruding from the boat-cover, this chain was simulated by a drilled together piece of tinned 0.2 mm coper-wire. It was hooked into a bulkhead and glued down with varnish.
Boat cut free from the building base
Most modellers seem to show the boats open, but most historical photographs show them covered. The design of the cover seems to vary a bit and I could not find information about this. Some photographs show the cover going down over half of the sides of the boat, with ropes apparently zig-zagging down to the keel and back up on the other side. Others seem to show a line going through a hollow seam to pull it tight around the boat. I opted for the latter to show more of the planking and the (later) paintwork.
Gig with simulated cover
I was debating with myself, whether I should first paint the hull and then add the cover, or the other way around. I opted for the second, as messing around with varnish, could damage the paintwork, even though it made it more difficult to hold the boat during (spray-)painting.
Basis for the cover was a piece of ironed-flat toilet-paper that was draped over the hull and then soaked in varnish resp. sanding filler. It was smoothed down over the edges and down to the rubbing strake. Once dry the paper was cut back to the rubbing-strake with a new scalpel-blade.
Underside of the gig showing planking
I almost forgot the rudder, that seems to have been kept shipped, when the boats were suspended in the davits. It was drawn on the basis of BRIX (1883) and laser-cut to be laminated from two layers. The pintels turned out to be far too small to reproduced, but the respective bands were simulated by flattened, tinned copper-wire.
Gig with rudder shipped
The gig is now ready to be painted.
To be continued ....
Eberhard
Former chairman Arbeitskreis historischer Schiffbau e.V. (German Association for Shipbuilding History)
--------------------------------------------------------------------------------------------------------------------------------------------------------------------------------------------
Former chairman Arbeitskreis historischer Schiffbau e.V. (German Association for Shipbuilding History)
--------------------------------------------------------------------------------------------------------------------------------------------------------------------------------------------
-
Iceman 29
- Posts: 1945
- Joined: Tue Sep 29, 2020 4:35 pm
- Location: Bretagne, France
Re: 1:160 S.M.S. WESPE Armoured Gunboat (1876)
Not easy to realize at this size.
Sometimes the rudder is stored in the boat, when it is removable.
You did well!
Sometimes the rudder is stored in the boat, when it is removable.
You did well!
Pascal
�Battleship Bretagne 3D: https://vu.fr/FvCY
�SS Delphine 3D: https://vu.fr/NeuO
�SS Nomadic 3D: https://vu.fr/tAyL
�USS Nokomis 3D: https://vu.fr/kntC
�USS Pamanset 3D: https://vu.fr/jXGQ
�Battleship Bretagne 3D: https://vu.fr/FvCY
�SS Delphine 3D: https://vu.fr/NeuO
�SS Nomadic 3D: https://vu.fr/tAyL
�USS Nokomis 3D: https://vu.fr/kntC
�USS Pamanset 3D: https://vu.fr/jXGQ
-
wefalck
- Posts: 2079
- Joined: Wed Sep 28, 2011 12:04 pm
- Location: Paris
- Contact:
Re: 1:160 S.M.S. WESPE Armoured Gunboat (1876)
Thanks, ...
It seems to have been the official rule to have them shipped.
It seems to have been the official rule to have them shipped.
Eberhard
Former chairman Arbeitskreis historischer Schiffbau e.V. (German Association for Shipbuilding History)
--------------------------------------------------------------------------------------------------------------------------------------------------------------------------------------------
Former chairman Arbeitskreis historischer Schiffbau e.V. (German Association for Shipbuilding History)
--------------------------------------------------------------------------------------------------------------------------------------------------------------------------------------------
-
Fliger747
- Posts: 5068
- Joined: Wed Jan 02, 2013 1:15 am
Re: 1:160 S.M.S. WESPE Armoured Gunboat (1876)
Using your technique, a Viking Long Ship would be an interesting project! A considerable accomplishment, up there with Song carving 1:200 working anchor chain from wood!
Best regards: Tom
Best regards: Tom
-
marijn van gils
- Posts: 2686
- Joined: Tue Feb 06, 2007 10:24 am
- Location: Belgium
Re: 1:160 S.M.S. WESPE Armoured Gunboat (1876)
That turned out great!
Thanks for sharing!
It only seems a pity to cover the interior planking...
You could have clad a solid hull with planks too... But while that may be easier, maybe it would actually be slower, because you would have to sculpt or carve the solid hull?
But anyway, the cover does look good too (and indeed often more realistic)
-
wefalck
- Posts: 2079
- Joined: Wed Sep 28, 2011 12:04 pm
- Location: Paris
- Contact:
Re: 1:160 S.M.S. WESPE Armoured Gunboat (1876)
While I did a clinckered boat on a carved hull, I shied away from this route here, because of the small size of the hull. It seemed easier and more to laser-cut the bulkheads. On the also covered cutters I my fill in the space between the bulkhead to further reduce the risk of 'canning', which happened a bit on one side of gig and now, that first coat of paint is on, became noticeable.
I opted for the covered boat simply because I did not want to spend months kitting them to the required level with all the internal structural elements, such as frames, floor-boards, benches and stern-sheets, as well as oar, fenders, boat-anchor, water-barrel, compass etc. Only the 'Jolle' will receive this treatment and I will have to decide how to build this one.
I opted for the covered boat simply because I did not want to spend months kitting them to the required level with all the internal structural elements, such as frames, floor-boards, benches and stern-sheets, as well as oar, fenders, boat-anchor, water-barrel, compass etc. Only the 'Jolle' will receive this treatment and I will have to decide how to build this one.
Eberhard
Former chairman Arbeitskreis historischer Schiffbau e.V. (German Association for Shipbuilding History)
--------------------------------------------------------------------------------------------------------------------------------------------------------------------------------------------
Former chairman Arbeitskreis historischer Schiffbau e.V. (German Association for Shipbuilding History)
--------------------------------------------------------------------------------------------------------------------------------------------------------------------------------------------
-
Fliger747
- Posts: 5068
- Joined: Wed Jan 02, 2013 1:15 am
Re: 1:160 S.M.S. WESPE Armoured Gunboat (1876)
The hand carved 26 ft MWB's I originally did for Alaska (1;192), one had a canvass cowl which I also used tissue paper over wire hoops. The tissue I used was not toilet paper but the type of tissue historically used by model airplane builders, which shrinks to fit when misted with water. In this case I obtained this material from the tissue typically accompanying new shoes. Your effort came out quite nicely. My DMS project should have a 3" 50 practice loader positioned right behind the #3 stack, the only photo I have seen of this device has it covered by a fitted tarp. I wonder what could be done in your way of dong these things with such an item. My 3D design program isn't really capable of designing something this free flowing. On Alaska I formed the main battery bloomers from modeling clay, sealed with CA, a possible route. This has so far held up well with no issues for maybe the best of a decade.
I enjoy your sharing the various techniques you have developed for your creation, they are very clever and successful!
Cheers: Tom
I enjoy your sharing the various techniques you have developed for your creation, they are very clever and successful!
Cheers: Tom
-
wefalck
- Posts: 2079
- Joined: Wed Sep 28, 2011 12:04 pm
- Location: Paris
- Contact:
Re: 1:160 S.M.S. WESPE Armoured Gunboat (1876)
Yes, sculpting the boat-cover in some two-component modelling 'clay' was also under consideration. However, I liked the thin edges of the paper.
***************************
Painting the Gig
The boat was given a few thin coats of white acrylics (Vallejo) all over with the airbrush - the results of which was quite sobering: all the imperfections that were not quite visible in the �raw� state now began to stick out. The jagged edges from the laser cutting that seemed to disappear under the varnish are no rather visible.
Also, using toilet-paper as the basis for the boat-cover was not a good choice. I used it in military-modelling in my youth to simulate tarpaulins, but perhaps then my standards were lower. I choose it, because I wanted something that looks limp and more casually draped, as can be seen on many photographs of the time. However, it turned out to be fuzzy on the surface and the edges in spite of being soaked in sanding filler. On the next boats I will try some Japanese silk-paper that I bought some time ago. I hope when it is wetted it will drape well.
The completed gig on an ordinary port-wine cork
I then brush-painted the boat-cover in thick white acrylic with tiny drop of Vallejo 71.288 (Portland Stone) mixed to it. This gives a very light off-white colour. I don�t actually know, whether these boat covers were oiled or painted canvass.
According to the painting regulations for boats, the top two strakes where to be painted black. Due to the cover not much of them is visible, but I managed to tatter on a bit of black here in there.
The completed gig on an ordinary port-wine cork
I will now turn my attention to the other boats, considering the experience with this one. If they turn out better, I might try a gig 2.0.
To be continued ....
Eberhard
Former chairman Arbeitskreis historischer Schiffbau e.V. (German Association for Shipbuilding History)
--------------------------------------------------------------------------------------------------------------------------------------------------------------------------------------------
Former chairman Arbeitskreis historischer Schiffbau e.V. (German Association for Shipbuilding History)
--------------------------------------------------------------------------------------------------------------------------------------------------------------------------------------------
-
Fliger747
- Posts: 5068
- Joined: Wed Jan 02, 2013 1:15 am
Re: 1:160 S.M.S. WESPE Armoured Gunboat (1876)
When you are experimenting on the edge of the known modeling world, a few efforts are likely to fall over the precipice.
Keep up the good work, inspiring as always!
Cheers: Tom
Keep up the good work, inspiring as always!
Cheers: Tom
-
wefalck
- Posts: 2079
- Joined: Wed Sep 28, 2011 12:04 pm
- Location: Paris
- Contact:
Re: 1:160 S.M.S. WESPE Armoured Gunboat (1876)
I'll do my very best best ...
On with
The Cutters
As noted above, I will be following a somewhat different construction for the cutters. I will not create a rabbet by gluing doublings onto the keel-piece, but will attach the outer stem and keel, once the planking is complete. Hopefully, this will allow a cleaner run of the planks into the stem. Also, all the planks will be cut with a straight line on one edge.
Template for laser-cutting the keel-pieces and the stem-keel-combinations
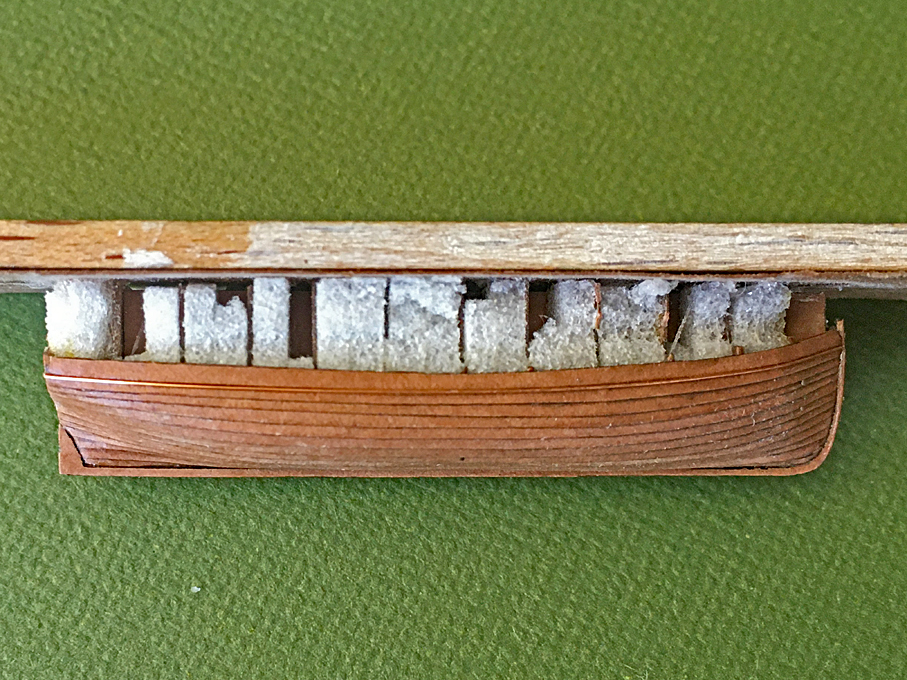
I also decided to fill in the space between the bulkheads to avoid the (minor) cave-in that occurred in some places of the gig. The material should be softer than the bulkheads and I choose a hard foam going by the name Rohacell, which is essentially foamed-up Plexiglas and of which I have still many off-cuts from a project some 35 years ago.
Three strakes on
However, nearly half-way now through the planking I have my doubts, whether there were any advantages in doing that. It turned out to be difficult to sand down the foam (which in itself sands very well with diamond abrasives or just sanding paper) to the bulkheads without damaging them and therefore alter the shape. If the infill actually is low, it become actually counterproductive, as the planks will follow this shape, rather than +/- the tangent between the bulkheads.

Three strakes on
The bow-section is not so easy to get right, as it is quite full and there is a tendency for the planking to rise too high, when it comes off the bottom with little dead-rise.
Again, I did not mark out the division of the strakes, but eye-balled it. It would be quite difficult to do with sufficient precision at this size. Not sure how it will turn out.

Planking half-way up
To be continued ....
On with
The Cutters
As noted above, I will be following a somewhat different construction for the cutters. I will not create a rabbet by gluing doublings onto the keel-piece, but will attach the outer stem and keel, once the planking is complete. Hopefully, this will allow a cleaner run of the planks into the stem. Also, all the planks will be cut with a straight line on one edge.
Template for laser-cutting the keel-pieces and the stem-keel-combinations
I also decided to fill in the space between the bulkheads to avoid the (minor) cave-in that occurred in some places of the gig. The material should be softer than the bulkheads and I choose a hard foam going by the name Rohacell, which is essentially foamed-up Plexiglas and of which I have still many off-cuts from a project some 35 years ago.
Three strakes on
However, nearly half-way now through the planking I have my doubts, whether there were any advantages in doing that. It turned out to be difficult to sand down the foam (which in itself sands very well with diamond abrasives or just sanding paper) to the bulkheads without damaging them and therefore alter the shape. If the infill actually is low, it become actually counterproductive, as the planks will follow this shape, rather than +/- the tangent between the bulkheads.
Three strakes on
The bow-section is not so easy to get right, as it is quite full and there is a tendency for the planking to rise too high, when it comes off the bottom with little dead-rise.
Again, I did not mark out the division of the strakes, but eye-balled it. It would be quite difficult to do with sufficient precision at this size. Not sure how it will turn out.
Planking half-way up
To be continued ....
Eberhard
Former chairman Arbeitskreis historischer Schiffbau e.V. (German Association for Shipbuilding History)
--------------------------------------------------------------------------------------------------------------------------------------------------------------------------------------------
Former chairman Arbeitskreis historischer Schiffbau e.V. (German Association for Shipbuilding History)
--------------------------------------------------------------------------------------------------------------------------------------------------------------------------------------------
-
Fliger747
- Posts: 5068
- Joined: Wed Jan 02, 2013 1:15 am
Re: 1:160 S.M.S. WESPE Armoured Gunboat (1876)
Thank you for sharing what works and doesn't work. The developmental and thought process are valuable education for the rest of us!
Cheers: Tom
Cheers: Tom
-
wefalck
- Posts: 2079
- Joined: Wed Sep 28, 2011 12:04 pm
- Location: Paris
- Contact:
Re: 1:160 S.M.S. WESPE Armoured Gunboat (1876)
Thanks, Tom. I do this writing up also for my own benefit, so that I have a record of methods that worked for future reference.
Eberhard
Former chairman Arbeitskreis historischer Schiffbau e.V. (German Association for Shipbuilding History)
--------------------------------------------------------------------------------------------------------------------------------------------------------------------------------------------
Former chairman Arbeitskreis historischer Schiffbau e.V. (German Association for Shipbuilding History)
--------------------------------------------------------------------------------------------------------------------------------------------------------------------------------------------
-
wefalck
- Posts: 2079
- Joined: Wed Sep 28, 2011 12:04 pm
- Location: Paris
- Contact:
Re: 1:160 S.M.S. WESPE Armoured Gunboat (1876)
Work on the cutter stalled for a good two weeks due to an unexpected event: we went down to Spain to spend a week there and � in spite of all the precautions and safety-measures we took for the past two-and-a-half years and having been vaccinated three times, on the flight the virus caught up with me and my wife. Flu-symptoms with throat-ache, a light fever and general fatigue. We had to extend our stay by a week, until we tested negative. Still rather tired and bothered by a cough � at least we can relax a bit more for the next half year or so until the immunity declines again�
**********************************************************************
Planking of the cutter continued �
This work continued as before, eye-balling the run and spacing. I am not sure that I got the spacing at the bows quite right, as the planking is sweeping more up at the bows, than expected. As noted above, the forward section was more difficult than the rear section.
Clamping the planks tight at the bows
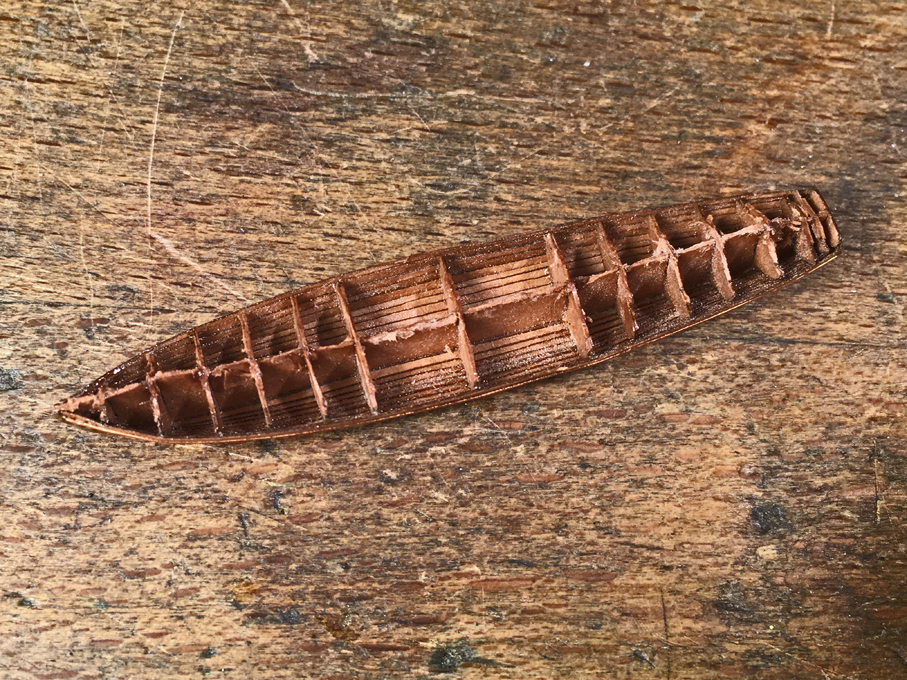
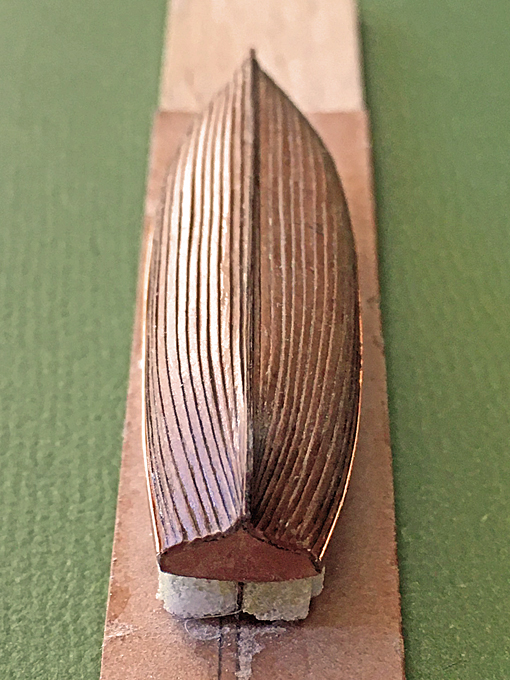
Once the planking was complete, the stem- and stern-post (or rather the deadwood) areas were cleaned up and sanded to match the stem- and keel-pieces. The planks were also sanded flush to the transom.
Planking complete and cleaned up
Planking complete and cleaned up
The stem-keel-piece was laminated from three layers of laser-cut Canson-paper and lacquered into place on the boat. The outside contur was then cleaned up using a diamond nail-file. These files are very useful for the purpose. However, after a few strokes the freshly exposed paper has to be consolidated again with varnish to prevent it from fraying.
Like the gig, the cutter had a rubbing strake running along the lower edge of the top strake. This was simulated again using a 0.2 mm copper-wire lacquered into place.
Due to the charring from the laser-cutting process, it is difficult to see, whether there are any gaps between the stem-keel-piece and the boat as such. I probably will apply a thin coat of paint to be better able to see any imperfections, that then will be filled with putty.
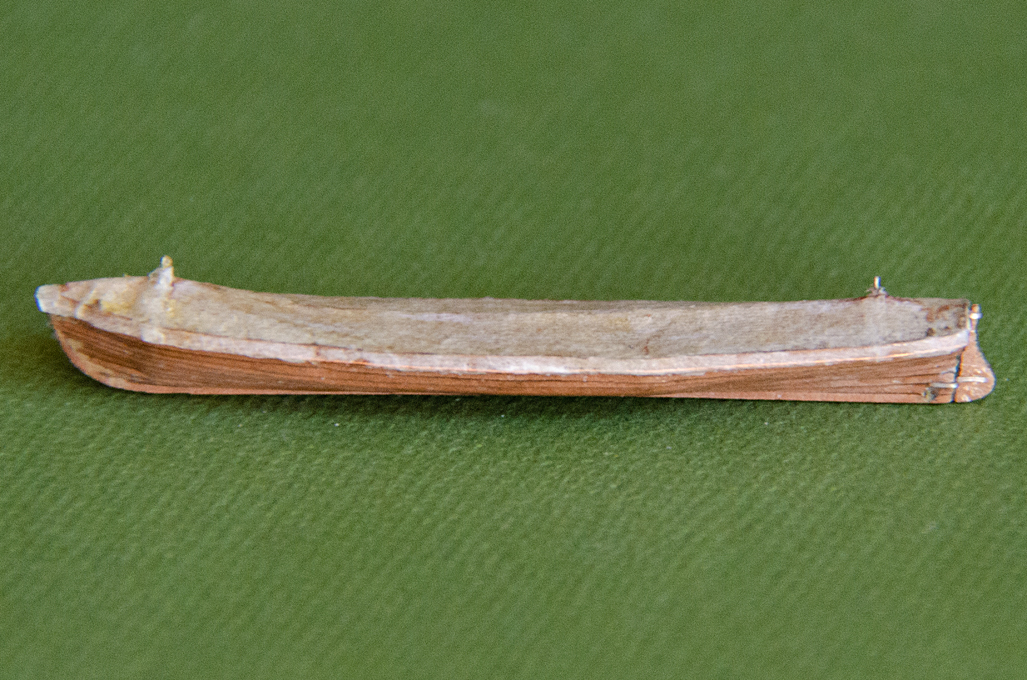
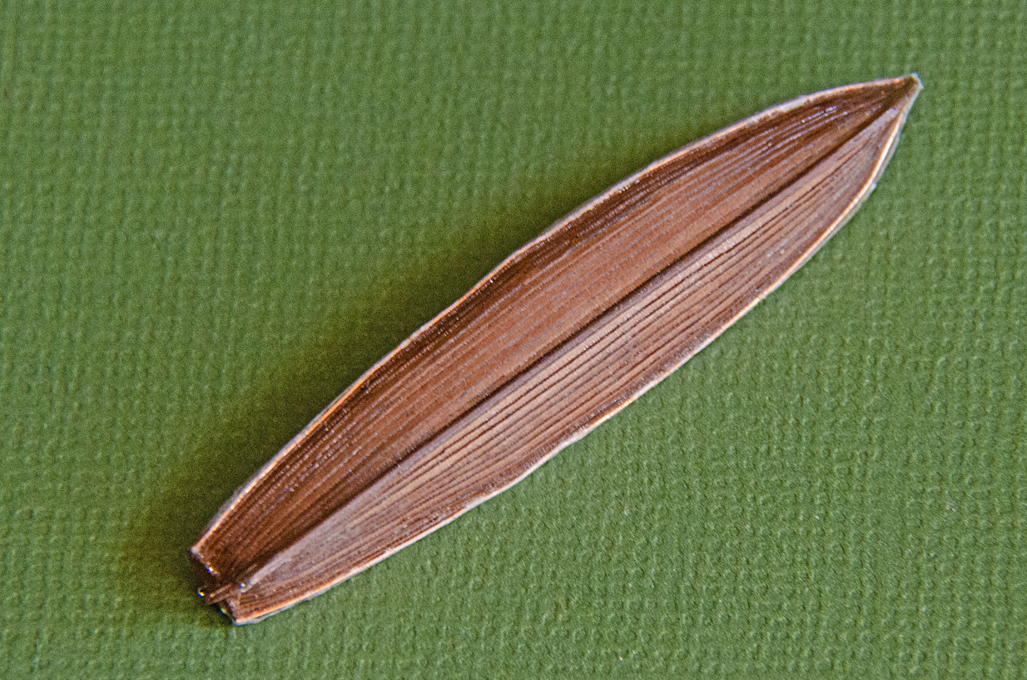
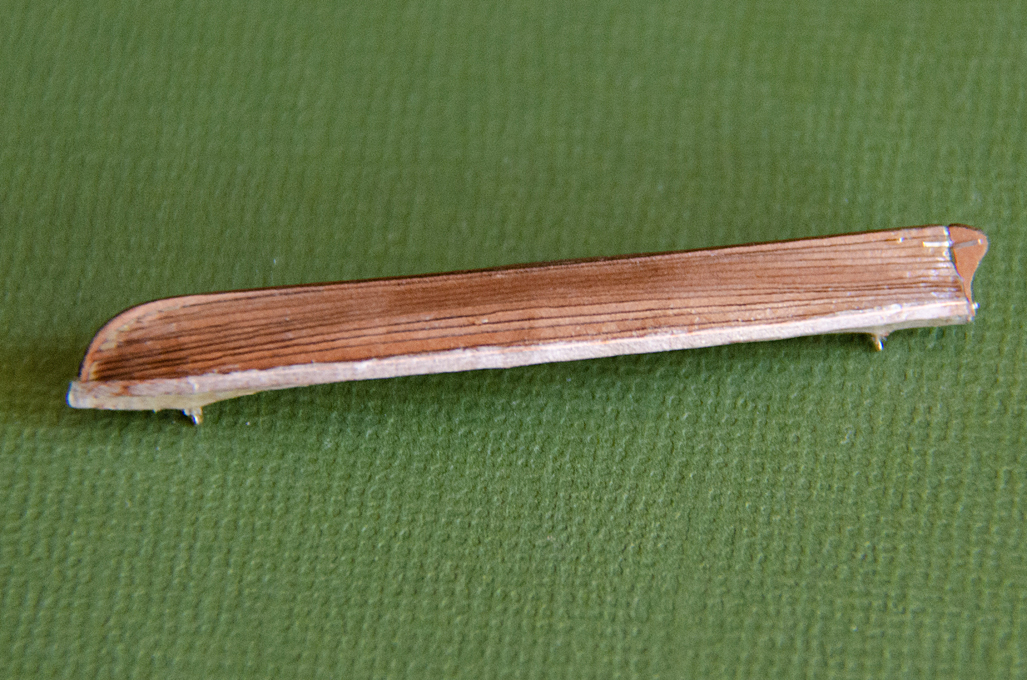
The completed cutter
The completed cutter
The completed cutter
Overall, I a reasonably pleased how the cutter turned out so far and the strategy to attach stem-post and keel after planking is complete has paid off.
To be continued ....
**********************************************************************
Planking of the cutter continued �
This work continued as before, eye-balling the run and spacing. I am not sure that I got the spacing at the bows quite right, as the planking is sweeping more up at the bows, than expected. As noted above, the forward section was more difficult than the rear section.
Clamping the planks tight at the bows
Once the planking was complete, the stem- and stern-post (or rather the deadwood) areas were cleaned up and sanded to match the stem- and keel-pieces. The planks were also sanded flush to the transom.
Planking complete and cleaned up
Planking complete and cleaned up
The stem-keel-piece was laminated from three layers of laser-cut Canson-paper and lacquered into place on the boat. The outside contur was then cleaned up using a diamond nail-file. These files are very useful for the purpose. However, after a few strokes the freshly exposed paper has to be consolidated again with varnish to prevent it from fraying.
Like the gig, the cutter had a rubbing strake running along the lower edge of the top strake. This was simulated again using a 0.2 mm copper-wire lacquered into place.
Due to the charring from the laser-cutting process, it is difficult to see, whether there are any gaps between the stem-keel-piece and the boat as such. I probably will apply a thin coat of paint to be better able to see any imperfections, that then will be filled with putty.
The completed cutter
The completed cutter
The completed cutter
Overall, I a reasonably pleased how the cutter turned out so far and the strategy to attach stem-post and keel after planking is complete has paid off.
To be continued ....
Eberhard
Former chairman Arbeitskreis historischer Schiffbau e.V. (German Association for Shipbuilding History)
--------------------------------------------------------------------------------------------------------------------------------------------------------------------------------------------
Former chairman Arbeitskreis historischer Schiffbau e.V. (German Association for Shipbuilding History)
--------------------------------------------------------------------------------------------------------------------------------------------------------------------------------------------