Very nice shrouds. Did you ever consider buildng a warship with cage masts?
I hope to see your work in real life in a few weeks, just ordered my SMC tickets.
HMS Victory and Le Redoutable at Trafalgar (1/300)
Moderators: BB62vet, MartinJQuinn, JIM BAUMANN, Jon, Dan K
-
Pieter
- Posts: 1602
- Joined: Sat Sep 17, 2005 9:19 am
-
marijn van gils
- Posts: 2686
- Joined: Tue Feb 06, 2007 10:24 am
- Location: Belgium
Re: HMS Victory and Le Redoutable at Trafalgar (1/300)
Thank you Joe and Pieter! 
But now that there are 3D-printed options available, I would probably use those. I'm lazy too!

That would be a challenge indeed to scratchbuild! I remember John Leyland used to do that already decades ago in 1/700.Pieter wrote:Did you ever consider building a warship with cage masts?
But now that there are 3D-printed options available, I would probably use those. I'm lazy too!
Great! I'm looking forward to seeing you again!Pieter wrote:I hope to see your work in real life in a few weeks, just ordered my SMC tickets.
-
marijn van gils
- Posts: 2686
- Joined: Tue Feb 06, 2007 10:24 am
- Location: Belgium
Re: HMS Victory and Le Redoutable at Trafalgar (1/300)
Hello everyone,
I finally got round to adding footropes to the mizzen crossjack yard (thanks again for pointing it out Jim!). This was fiddly enough with the other ropes already in place, so I wanted to do it before the other masts would get in the way.

I also added some more details on the fore and main masts:
- Blocks under the tops, and the sections of ropes in between them. The other sections of the bunt- and leachlines etc. will be added later, but is easiest to have these pieces already in place now.
- Collars with blocks or thimbles for topmast (preventer)stays of the mast behind.
- The section of the lower yards trusses that sits around the mast.

With that completed, both masts are ready for installation:

But at first, only the mainmast is glued in place! I will explain why later…


After installing the lower yard truss pendants, and the remains of the mizzen stay and preventer stay, I added the lower shrouds and ratlines:


These were basically made in the same way as the topmast shrouds and ratlines.
But for the deadeyes, I used castings of more detailed masters I had made a long time ago (viewtopic.php?p=966513#p966513):

Masters for the shroud deadeyes (upper):

Masters for the chain deadeyes (lower):
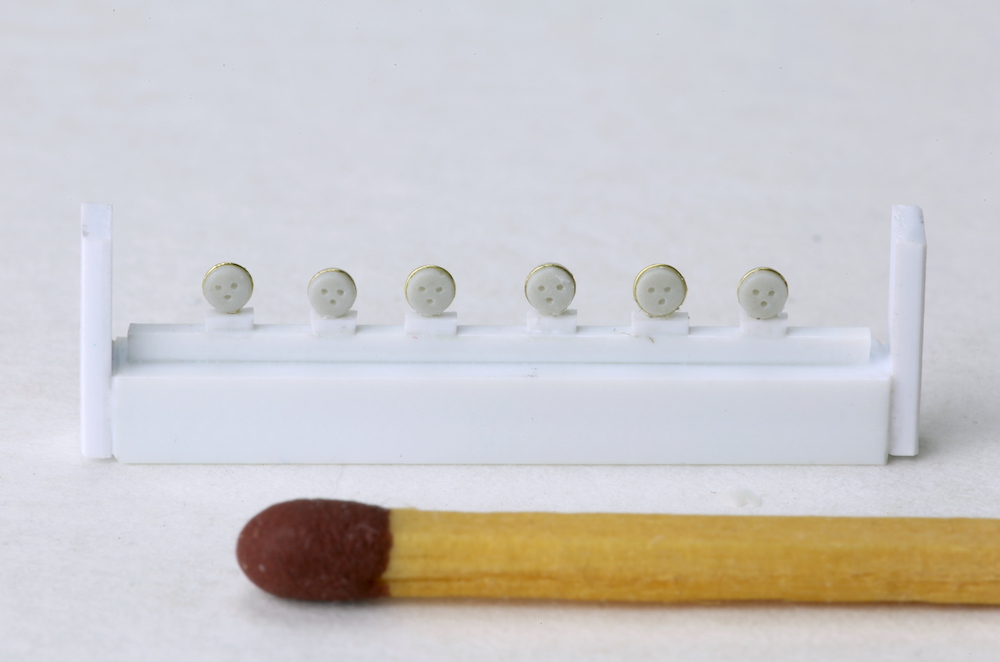
As you can see, I had made holes for the lanyards in the deadeyes. I had also drilled these out on all the castings. And I succeeded in weaving lanyards through these like the real thing!
But in this scale, the result was simply looking too messy. So, I turned back to the same technique I used on the smaller topmast deadeyes: simply glue small sections of lanyard on them… Much cleaner result!
It now looks like this:

With the shrouds in place, the main and main preventer stays could follow.
Like those deadeyes, I had made masters for the hearts too (viewtopic.php?p=966067#p966067):

So I wrapped and glued twisted copper wire around their resin castings, and shaped the upper end into collars, constantly test-fitting around the lower mast top. Then they were painted.

And fitted in place:

I had to do this twice. The first time, I had woven one-piece lanyards through the hearts, but this tightened the stays too much and left them without any sag (which is so visible on the real ship). So I had to go all Dafi on the lanyard and redo it…
The reason the stays needed to be fitted after the shrouds, is because their collars wrap around the top ends of the shrouds.
I build up mouses for the stays with layers of Gesso, before touching up the paintwork.

The second version of the lanyards are not in one piece, nor woven between the hearts. Instead, they are in fact a bunch of separate short pieces, each glued in between the hearts. I’ll try to illustrate this better with the fore stays…

Whatever the method, the lashing in between the hearts would have been more difficult to do with the foremast in place. That’s why I left it of the model until now.
But now, I finally glued the foremast in place:

I did this before adding the snaking between the stays, because the snaking is fragile and I had noticed that placing the foremast makes the stays move quite a bit around.
But now, the snaking was added:

This is not copper wire, as I wanted something stiffer. Stretched sprue would have worked well, but since I will probably bump into the stays sooner or later during further rigging, I wanted something stronger. So I opted for the very stiff and strong 0,06 mm metal rigging wire by Shelf Oddity. Great stuff!
This is the lower end (after also adding main topmast preventer stay fall and lower yard truss pendants):

And the upper end:

I finally got round to adding footropes to the mizzen crossjack yard (thanks again for pointing it out Jim!). This was fiddly enough with the other ropes already in place, so I wanted to do it before the other masts would get in the way.
I also added some more details on the fore and main masts:
- Blocks under the tops, and the sections of ropes in between them. The other sections of the bunt- and leachlines etc. will be added later, but is easiest to have these pieces already in place now.
- Collars with blocks or thimbles for topmast (preventer)stays of the mast behind.
- The section of the lower yards trusses that sits around the mast.
With that completed, both masts are ready for installation:
But at first, only the mainmast is glued in place! I will explain why later…
After installing the lower yard truss pendants, and the remains of the mizzen stay and preventer stay, I added the lower shrouds and ratlines:
These were basically made in the same way as the topmast shrouds and ratlines.
But for the deadeyes, I used castings of more detailed masters I had made a long time ago (viewtopic.php?p=966513#p966513):
Masters for the shroud deadeyes (upper):
Masters for the chain deadeyes (lower):
As you can see, I had made holes for the lanyards in the deadeyes. I had also drilled these out on all the castings. And I succeeded in weaving lanyards through these like the real thing!
But in this scale, the result was simply looking too messy. So, I turned back to the same technique I used on the smaller topmast deadeyes: simply glue small sections of lanyard on them… Much cleaner result!
It now looks like this:
With the shrouds in place, the main and main preventer stays could follow.
Like those deadeyes, I had made masters for the hearts too (viewtopic.php?p=966067#p966067):
So I wrapped and glued twisted copper wire around their resin castings, and shaped the upper end into collars, constantly test-fitting around the lower mast top. Then they were painted.
And fitted in place:
I had to do this twice. The first time, I had woven one-piece lanyards through the hearts, but this tightened the stays too much and left them without any sag (which is so visible on the real ship). So I had to go all Dafi on the lanyard and redo it…
The reason the stays needed to be fitted after the shrouds, is because their collars wrap around the top ends of the shrouds.
I build up mouses for the stays with layers of Gesso, before touching up the paintwork.
The second version of the lanyards are not in one piece, nor woven between the hearts. Instead, they are in fact a bunch of separate short pieces, each glued in between the hearts. I’ll try to illustrate this better with the fore stays…
Whatever the method, the lashing in between the hearts would have been more difficult to do with the foremast in place. That’s why I left it of the model until now.
But now, I finally glued the foremast in place:
I did this before adding the snaking between the stays, because the snaking is fragile and I had noticed that placing the foremast makes the stays move quite a bit around.
But now, the snaking was added:
This is not copper wire, as I wanted something stiffer. Stretched sprue would have worked well, but since I will probably bump into the stays sooner or later during further rigging, I wanted something stronger. So I opted for the very stiff and strong 0,06 mm metal rigging wire by Shelf Oddity. Great stuff!
This is the lower end (after also adding main topmast preventer stay fall and lower yard truss pendants):
And the upper end:
-
Devin

- Posts: 2497
- Joined: Mon Jan 10, 2005 10:46 am
- Location: Hoboken, NJ
- Contact:
Re: HMS Victory and Le Redoutable at Trafalgar (1/300)
Beautiful work, as always, Marijn. I'm so happy that I got to see this in person last week (and every October) at SMC, so that I'm reminded of how truly tiny everything is.
I forgot to ask when we were talking last week: are you going to do any smoke in the diorama, or leave it smoke-free as you did for Lexington?
I forgot to ask when we were talking last week: are you going to do any smoke in the diorama, or leave it smoke-free as you did for Lexington?
We like our history sanitized and theme-parked and self-congratulatory, not bloody and angry and unflattering. - Jonathan Yardley
-
Pieter
- Posts: 1602
- Joined: Sat Sep 17, 2005 9:19 am
Re: HMS Victory and Le Redoutable at Trafalgar (1/300)
Nice to see them indeed. The model drew a lot of attention, not something one is used to for ship models at SMC which is very figure oriented. There were some nice ship models in competition too this year.
-
SG1
- Posts: 400
- Joined: Mon Apr 17, 2017 2:43 am
- Contact:
Re: HMS Victory and Le Redoutable at Trafalgar (1/300)
M A G N I F I C E N T ! 
I agree, jolly good wire. Very versatile. I also use it as standard glue applicator for my projects: releases just the right amount of glue, does not bend in the process, perfect.
I agree, jolly good wire. Very versatile. I also use it as standard glue applicator for my projects: releases just the right amount of glue, does not bend in the process, perfect.
marijn van gils wrote: Mon Oct 27, 2025 11:02 am So I opted for the very stiff and strong 0,06 mm metal rigging wire by Shelf Oddity. Great stuff!
-
Sszabi

- Posts: 122
- Joined: Sun Jan 17, 2021 3:33 am
Re: HMS Victory and Le Redoutable at Trafalgar (1/300)
Every time I look at the photos again, I notice new details, figures, etc. Now I suddenly couldn't say I'd do a project like this. There's always something to learn, because that rigging is incredible... and the figures... and the ship...
-
Dino Carancini
- Posts: 429
- Joined: Wed Oct 11, 2006 5:46 am
-
marijn van gils
- Posts: 2686
- Joined: Tue Feb 06, 2007 10:24 am
- Location: Belgium
Re: HMS Victory and Le Redoutable at Trafalgar (1/300)
Thank you very much for your kind words everyone (and sorry for my late reply)!
I don't think I can model big amounts of smoke that look convincing in the flesh. So, no smoke...
Smoke would be better for the atmosphere for sure. But on the upside, without smoke, all the detail is more visible.
It was great to see you again too Pieter! Thanks for showing me your model BTW, which is beautiful!
It was great to see you again Devin! Such a great weekend...Devin wrote: Mon Oct 27, 2025 11:19 amare you going to do any smoke in the diorama, or leave it smoke-free as you did for Lexington?
I don't think I can model big amounts of smoke that look convincing in the flesh. So, no smoke...
Smoke would be better for the atmosphere for sure. But on the upside, without smoke, all the detail is more visible.
Maybe that's because of all the figures on it?Pieter wrote: Tue Oct 28, 2025 4:35 am The model drew a lot of attention, not something one is used to for ship models at SMC which is very figure oriented.
It was great to see you again too Pieter! Thanks for showing me your model BTW, which is beautiful!
-
Joelle

- Posts: 193
- Joined: Fri Aug 12, 2022 8:50 am
- Location: Herdecke
- Contact:
Re: HMS Victory and Le Redoutable at Trafalgar (1/300)
One must constantly remind oneself how small the scale of this model is. I know I'm repeating myself, but it's simply fantastic. 
It's a real shame I couldn't make it to the SMC to see this work of art in person.
It's a real shame I couldn't make it to the SMC to see this work of art in person.
Greetings from Germany, Joelle.
Follow me on Instagram:

Follow me on Instagram:
-
marijn van gils
- Posts: 2686
- Joined: Tue Feb 06, 2007 10:24 am
- Location: Belgium
Re: HMS Victory and Le Redoutable at Trafalgar (1/300)
Thank you Joelle!
Maybe in 2026?
An update has been long overdue! Work has been busy lately...
I have continued on the shrouds and ratlines, and on the stays, also for the fore mast:

My first attempt to add the lanyard to connect the mainstay hearts was unsuccessful, because I tried to loop one length of twisted copper wire between them, but that doesn’t work the same as with thread. So I had replaced it with a series of short lengths. The forestay gave me the opportunity to photograph this process.
I started with one small piece of twisted and pre-painted copper wire. The ends were bent to hook in the hearts. This was glued in place:

Next, this was repeated with more individual lengths, glued next to one another:

And finally, this was repeated in the bottom to complete the illusion of one continuous lanyard:

The result is much neater than I could achieve with a one-piece lanyard, and it gave me more control over the tension and thus ‘hang’ of the stay.
I also photographed the lower shrouds and ratlines assembly before installation.
It is a bit more complex than the topmast shrouds/ratlines:
- The ratlines don’t continue all the way up, but only to the futtock stave (already indicated on the paper template)
- The 6 upper- and lowermost ratlines don’t continue to the first and last shrouds.
- The shroud spacing is more varied, and holes have to be made in the paper template for the occasional gun barrel sticking out.
- Unlike the lower tops, the channels are not completely horizontal, so the paper template has to be positioned carefully to achieve horizontal ratlines.
But with a little planning, it proved not too difficult:

Note that I cut the wire sticking out below the lower deadeyes at different lengths. This made it much easier to get them all into their holes in the channels.
I also added the ends of the futtock shrouds to this assembly, before painting and gluing it to the mast. The futtock shrouds wrap around the futtock stave (red arrow), and the ends are lashed to the lower shrouds. In this scale, I don’t want to really wrap the futtock shrouds around the futtock stave, so I simulated this by gluing short lengths of wire (blue arrows) to the appropriate shrouds:

After the shrouds/ratlines assemblies were attached to the masts, I added the futtock shrouds:

These were a bit harder to make than the regular shrouds, and quite time consuming. Because I don’t think I can make them fit precise enough after making them on a jig, I built them in situ:
- I made the shrouds (shroud + copper wire hook + nikkel-silver 0,1mm wire upper chainplate glued together as one assembly per shroud);
- I glued each shroud in place;
- I glued the ratlines on those, in situ, one length at a time.
The last part was the hardest, because one has to work carefully not to damage anything.

And an indication of scale (which is all too easy to forget… ). My thumb is right next to the shrouds (not closer to the camera! The blurring is because of long exposure time and my thumb moving).

I also added the topmast stays and preventer stays. They are basically small/thin versions of the lower stays, with collar and mouse.

That wraps up the most complex rigging assemblies of the main and fore masts!

Next: the channel chains!
Maybe in 2026?
An update has been long overdue! Work has been busy lately...
I have continued on the shrouds and ratlines, and on the stays, also for the fore mast:
My first attempt to add the lanyard to connect the mainstay hearts was unsuccessful, because I tried to loop one length of twisted copper wire between them, but that doesn’t work the same as with thread. So I had replaced it with a series of short lengths. The forestay gave me the opportunity to photograph this process.
I started with one small piece of twisted and pre-painted copper wire. The ends were bent to hook in the hearts. This was glued in place:
Next, this was repeated with more individual lengths, glued next to one another:
And finally, this was repeated in the bottom to complete the illusion of one continuous lanyard:
The result is much neater than I could achieve with a one-piece lanyard, and it gave me more control over the tension and thus ‘hang’ of the stay.
I also photographed the lower shrouds and ratlines assembly before installation.
It is a bit more complex than the topmast shrouds/ratlines:
- The ratlines don’t continue all the way up, but only to the futtock stave (already indicated on the paper template)
- The 6 upper- and lowermost ratlines don’t continue to the first and last shrouds.
- The shroud spacing is more varied, and holes have to be made in the paper template for the occasional gun barrel sticking out.
- Unlike the lower tops, the channels are not completely horizontal, so the paper template has to be positioned carefully to achieve horizontal ratlines.
But with a little planning, it proved not too difficult:
Note that I cut the wire sticking out below the lower deadeyes at different lengths. This made it much easier to get them all into their holes in the channels.
I also added the ends of the futtock shrouds to this assembly, before painting and gluing it to the mast. The futtock shrouds wrap around the futtock stave (red arrow), and the ends are lashed to the lower shrouds. In this scale, I don’t want to really wrap the futtock shrouds around the futtock stave, so I simulated this by gluing short lengths of wire (blue arrows) to the appropriate shrouds:
After the shrouds/ratlines assemblies were attached to the masts, I added the futtock shrouds:
These were a bit harder to make than the regular shrouds, and quite time consuming. Because I don’t think I can make them fit precise enough after making them on a jig, I built them in situ:
- I made the shrouds (shroud + copper wire hook + nikkel-silver 0,1mm wire upper chainplate glued together as one assembly per shroud);
- I glued each shroud in place;
- I glued the ratlines on those, in situ, one length at a time.
The last part was the hardest, because one has to work carefully not to damage anything.
And an indication of scale (which is all too easy to forget… ). My thumb is right next to the shrouds (not closer to the camera! The blurring is because of long exposure time and my thumb moving).
I also added the topmast stays and preventer stays. They are basically small/thin versions of the lower stays, with collar and mouse.
That wraps up the most complex rigging assemblies of the main and fore masts!
Next: the channel chains!
-
Rui Matos

- Posts: 417
- Joined: Wed Nov 22, 2006 4:42 pm
- Location: Lisbon, Portugal
Re: HMS Victory and Le Redoutable at Trafalgar (1/300)
Marijn,
Thank you for the update
I have no words to write, except that I enjoy your pics and explanations to be very rewarding and educative!
Keep up the EXCELLENT work
Cheers,
Rui
Thank you for the update
I have no words to write, except that I enjoy your pics and explanations to be very rewarding and educative!
Keep up the EXCELLENT work
Cheers,
Rui
Ship Modelers of the World UNITE
-
wefalck

- Posts: 2079
- Joined: Wed Sep 28, 2011 12:04 pm
- Location: Paris
- Contact:
Re: HMS Victory and Le Redoutable at Trafalgar (1/300)
The look is so realistic with the tension and sagging at the right places 
The thumb may be vibrating in the photograph, but other wise you must have an amazingly steady hand and very controlled movement
The thumb may be vibrating in the photograph, but other wise you must have an amazingly steady hand and very controlled movement
Eberhard
Former chairman Arbeitskreis historischer Schiffbau e.V. (German Association for Shipbuilding History)
--------------------------------------------------------------------------------------------------------------------------------------------------------------------------------------------


Former chairman Arbeitskreis historischer Schiffbau e.V. (German Association for Shipbuilding History)
--------------------------------------------------------------------------------------------------------------------------------------------------------------------------------------------
-
Dan K
- Posts: 9037
- Joined: Tue Jan 11, 2005 10:56 am
- Location: New York City
Re: HMS Victory and Le Redoutable at Trafalgar (1/300)
I agree, quite realistic, and exquisite.
-
marijn van gils
- Posts: 2686
- Joined: Tue Feb 06, 2007 10:24 am
- Location: Belgium
Re: HMS Victory and Le Redoutable at Trafalgar (1/300)
Thank you very much Rui, Eberhart and Dan!
In larger scales (like Dafi's 1/100 scale), scale rope becomes more interesting again, being easier to rig like the real thing and to achieve a realistic rope texture.
Thank you very much Eberhart! That is the main reason for me to use wire instead of rope/thread. In this scale, it would be so much harder to get thread to hang right. The lack of any fuzz is of course an additional benefit of wire.wefalck wrote: Mon Dec 22, 2025 5:47 amThe look is so realistic with the tension and sagging at the right places
In larger scales (like Dafi's 1/100 scale), scale rope becomes more interesting again, being easier to rig like the real thing and to achieve a realistic rope texture.
-
Joelle
- Posts: 193
- Joined: Fri Aug 12, 2022 8:50 am
- Location: Herdecke
- Contact:
Re: HMS Victory and Le Redoutable at Trafalgar (1/300)
That would certainly be possible, Marijn.
I would be so happy to admire your artwork in person. And it's possible that my Mikasa might be finished too.
PS: Your shrouds are amazing!
Greetings from Germany, Joelle.
Follow me on Instagram:
Follow me on Instagram:
-
MartinJQuinn

- Posts: 8512
- Joined: Tue Jan 11, 2005 1:40 pm
- Location: New Jersey
Re: HMS Victory and Le Redoutable at Trafalgar (1/300)
This project continues to blow my mind. It's phenomenal. Simply phenomenal.
Martin
"Tomorrow is the most important thing in life. Comes into us at midnight very clean. It's perfect when it arrives and it puts itself in our hands. It hopes we've learned something from yesterday." John Wayne
Ship Model Gallery
"Tomorrow is the most important thing in life. Comes into us at midnight very clean. It's perfect when it arrives and it puts itself in our hands. It hopes we've learned something from yesterday." John Wayne
Ship Model Gallery
-
SG1
- Posts: 400
- Joined: Mon Apr 17, 2017 2:43 am
- Contact:
Re: HMS Victory and Le Redoutable at Trafalgar (1/300)
Now it's Christmas! Superlative work Marijn, as usual, a pleasure to see. Merry Christmas everyone!
-
marijn van gils
- Posts: 2686
- Joined: Tue Feb 06, 2007 10:24 am
- Location: Belgium
Re: HMS Victory and Le Redoutable at Trafalgar (1/300)
Many thanks guys!
Likewise Joelle! I would love to see your Mikasa, finished or not!
Likewise Joelle! I would love to see your Mikasa, finished or not!
-
EJFoeth
- Posts: 2907
- Joined: Wed Jan 21, 2009 1:51 pm
Re: HMS Victory and Le Redoutable at Trafalgar (1/300)
Again, fantastic work, unparalleled