
It has been recommended that the plastic masts supplied in kit be replaced with metal. Can someone explain the best way to do this. Do you depend on CA or do you solder?
Kurt
Metal masts
Moderator: JIM BAUMANN
-
Rob

- Posts: 1067
- Joined: Fri Jan 14, 2005 10:08 am
- Location: Cornwall
- Contact:
-
Filipe Ramires

- Posts: 1185
- Joined: Mon Jan 10, 2005 5:56 pm
- Location: Lisbon, Portugal

-
MichelB

- Posts: 1689
- Joined: Tue Jan 11, 2005 10:26 am
- Location: The Netherlands
-
Rob
- Posts: 1067
- Joined: Fri Jan 14, 2005 10:08 am
- Location: Cornwall
- Contact:
Each to their own. Personally I prefer to build them in place directly onto the ship, I find it much easier to check for alignment, make sure platforms are the correct height etc.MichelB wrote:I would definetly recommend building the mast assembly apart from the ship and only installing it at the last moment, prior to rigging.
Probably the best way forward is to try each method and see which works best for you.
Cheers,
Rob
-
RNfanDan
- Posts: 862
- Joined: Fri Sep 16, 2005 3:17 pm
- Location: EN83
In as large a scale as 350, I'd highly recommend soldering. Just be sure to use a good grade of solder and as fine a heat source, as you can. I would also avoid prep-agents such as flux pastes or other corrosives; just clean the brass free of any finishes or tarnish at the solder-point, and use good-quality solder (Oh, yes--and do it while OFF the model, as far as possible---you can more easily square and measure your parts with precision, and you can keep multiple yardarms and other fittings parallel with each other and aligned in the same plane).
I prefer smooth-faced ceramic tile, which is virtually heat and solder-proof, as a layout backing. I clamp the brass rods in position with two-piece wooden clothespins, then lay the main mast rod over the secured and paralleled arm rods, soldering the "trunk to the limbs". Only after these steps, do I cut the parts to finished length. When it's time to do the actual cutting, I use shear-action cutters, NOT the pinch-jaw variety. Again, OFF the model.
If the mast is a tripod type, it's easier to insert the leg rods into the model first (I often run them right through the deck, down to the hull bottom). I leave them longer than needed, crossing them at the point where they join the mast but not soldering them yet. I then set the mast in place, checking all points and making any adjustments, before cutting.
These technique may not be best for you, but are those I have found easiest and most accurate, for me.

I prefer smooth-faced ceramic tile, which is virtually heat and solder-proof, as a layout backing. I clamp the brass rods in position with two-piece wooden clothespins, then lay the main mast rod over the secured and paralleled arm rods, soldering the "trunk to the limbs". Only after these steps, do I cut the parts to finished length. When it's time to do the actual cutting, I use shear-action cutters, NOT the pinch-jaw variety. Again, OFF the model.
If the mast is a tripod type, it's easier to insert the leg rods into the model first (I often run them right through the deck, down to the hull bottom). I leave them longer than needed, crossing them at the point where they join the mast but not soldering them yet. I then set the mast in place, checking all points and making any adjustments, before cutting.
These technique may not be best for you, but are those I have found easiest and most accurate, for me.
 Danny DON'T "waterline"...!
-
JIM BAUMANN

- Posts: 5689
- Joined: Mon Jan 10, 2005 5:30 pm
- Location: Nr Southampton England
I use ONLY scratchbuilt masts made of Steel/brass wire. For tall masts in 1/350 I use syringe needles, as a tube structure will not bend under tension in the sameway as a rod structure. When you make cage arials (Panay and Dreadnought etc) out of Ladies stocking lycra thread the cumulative tension is large and will pull masts out of line; even the shrinking of sprue with smoke will pull wire masts out of shape, always attach shrouds well, in model form they actually have a function even in sprue!!!
Metal masts... definitely use whenever possible tubular structures for non-tapered masts--ie the tripod and aft lower derrick stump(mainmast!)
for the upper lofty masts use ideally stainless steel welding rod--ideally tapered--extremely stiff and rigid
You are unlikely to get a satisfactory structurally sound join using lead solder--problem being in getting the other materials hot enough!-at least I have never had any success that way--but then my metallurgy skills are questionable...
I have used in the past CA superglue with success--as long as the model is not subjected to stress of movements or severe extremes of temperature
Recently I have taken to joining the masts to each other using epoxy--a rapid set like Araldite--(good enough for Abu Simpel in Egypt--good enough for my models!!-Abu simbel glued togetherwith araldite) http://witcombe.sbc.edu/sacredplaces/abusimbel.html
Simply wipe a medium file across the area to be joined -this enables a key to the glue surfaces- simply wip a fast drying cleansing agent across before gluing--I use methylated spirits--cellulose thinners works also
Making tapered spars of stainless steel welding rod is an interesting business--and will take a little practise--in fairness normal mild steel will be just as effective
My chum steve showed me how-- insert the rod into a drill chuck-place the rod end onto a piece of ply on the workbench with a shallow grove cut in-this will prevent the end from trying tp whip around.
Next whilst the drill is spinning the rod--(ideally either fix the drill in a clamp--or get a friend to hold the drill-) apply a small angle grinder with a flexible( flapper) sanding disc--the contra-rotation removes the stainless steel at an astonoshing rate--some practice required...!! The results are worth it!!
The main problem I have with plastic spars is not the rigidity initially-but the tendency for thin unsupported plastic to have a tendency to droop and or twist over time--it tries to grow toward's the light!!
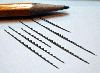
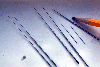
here are some images of stainless steel spars made by Steve and myself
http://www.modelwarships.com/reviews/sh ... 18-004.gif
http://www.modelwarships.com/reviews/sh ... 0_7391.gif
Good luck
Jim Baumann
Metal masts... definitely use whenever possible tubular structures for non-tapered masts--ie the tripod and aft lower derrick stump(mainmast!)
for the upper lofty masts use ideally stainless steel welding rod--ideally tapered--extremely stiff and rigid
You are unlikely to get a satisfactory structurally sound join using lead solder--problem being in getting the other materials hot enough!-at least I have never had any success that way--but then my metallurgy skills are questionable...
I have used in the past CA superglue with success--as long as the model is not subjected to stress of movements or severe extremes of temperature
Recently I have taken to joining the masts to each other using epoxy--a rapid set like Araldite--(good enough for Abu Simpel in Egypt--good enough for my models!!-Abu simbel glued togetherwith araldite) http://witcombe.sbc.edu/sacredplaces/abusimbel.html
Simply wipe a medium file across the area to be joined -this enables a key to the glue surfaces- simply wip a fast drying cleansing agent across before gluing--I use methylated spirits--cellulose thinners works also
Making tapered spars of stainless steel welding rod is an interesting business--and will take a little practise--in fairness normal mild steel will be just as effective
My chum steve showed me how-- insert the rod into a drill chuck-place the rod end onto a piece of ply on the workbench with a shallow grove cut in-this will prevent the end from trying tp whip around.
Next whilst the drill is spinning the rod--(ideally either fix the drill in a clamp--or get a friend to hold the drill-) apply a small angle grinder with a flexible( flapper) sanding disc--the contra-rotation removes the stainless steel at an astonoshing rate--some practice required...!! The results are worth it!!
The main problem I have with plastic spars is not the rigidity initially-but the tendency for thin unsupported plastic to have a tendency to droop and or twist over time--it tries to grow toward's the light!!
here are some images of stainless steel spars made by Steve and myself
http://www.modelwarships.com/reviews/sh ... 18-004.gif
http://www.modelwarships.com/reviews/sh ... 0_7391.gif
Good luck
Jim Baumann
....I buy them at three times the speed I build 'em.... will I live long enough to empty my stash...?
http://www.modelshipgallery.com/gallery ... index.html
IPMS UK SIG (special interest group) www.finewaterline.com
http://www.modelshipgallery.com/gallery ... index.html
IPMS UK SIG (special interest group) www.finewaterline.com