Hi all,
In creating my CAD artwork for my next ship kit, I'd like to create some surface textures for some of the deck levels (wood planking, non-skid, etc.) that will most likely be used in making an injection molding tool. I have not done this before and would like some tutoring or someone to lead me by the hand in creating one and how to use it. Can anyone help?
Thanks in advance,
Mike Bartel
Creating a surface texture- need help
Moderator: ArizonaBB39
-
Cliffy B

- Posts: 3125
- Joined: Sun Feb 01, 2009 3:55 pm
- Location: Hawaii
- Contact:
Re: Creating a surface texture- need help
I can't help you with a step by step tutorial but I can offer a term that might be helpful; bump mapping. That's one way of doing textures in 3D modeling (Maya, 3D Studio Max, etc...) and you basically build the texture instead of simply painting it on via Photoshop and then applying it. I have no clue if CAD works that way or not but I figured I tell you anyway. Might help you find a tutorial.
Good luck,
-Mike
Good luck,
-Mike
Drawing Board:
1/700 Whiff USS Leyte and escorts 1984
1/700 Whiff USN Modernized CAs 1984
1/700 Whiff ASW Showdown - FFs vs SSGN 1984
Slipway:
1/700 Whiff USN ASW Hunter Killer Group Dio 1984
1/700 Whiff USS Leyte and escorts 1984
1/700 Whiff USN Modernized CAs 1984
1/700 Whiff ASW Showdown - FFs vs SSGN 1984
Slipway:
1/700 Whiff USN ASW Hunter Killer Group Dio 1984
-
DrPR

- Posts: 1689
- Joined: Sun Mar 07, 2010 12:01 am
- Location: Corvallis, Oregon, USA
- Contact:
Re: Creating a surface texture- need help
Mike,
What CAD program are you using?
Whatever you use to add texture to surfaces will have to translate into real 3D coordinates for mold making. Some programs allow you to "paint" a picture onto a surface as a "texture map." For example, if you use a photo of oak wood as a texture map the surface you map it onto will render to look like oak wood. However, it is a 2D texture, and if you export the file as a 3D stereolith file the surface will be smooth with no texture. Likewise, you could map a photo of a line of rivets onto a surface, and the pretty picture that you render will look like rivets. But again, if you export the file the surface will be smooth without rivets.
One certain way to get deckplate surface is to draw the deckplates with all of the surface tread features. Wood grain will be a bit difficult, but you can model each board individually, with gaps between them. It is a lot of work!
Another way to get deck tread features and the gaps between boards in wooden decks is to photo etch the patterns into metal. The pattern is a simple 2D drawing that is used to create the photo mask. Some resin model makers use photo etch to create a "negative" pattern for decks where the boards are etched away and the "groove" between the boards is left raised. This pattern is then inserted into the mold, and the resultant molded parts have deck boards with grooves between them. I suppose you might be able to photo etch surfaces for injection molds. This would be a lot easier than trying to machine the patterns into the molds.
Phil
A collision at sea will ruin your entire day. Aristotle
-
Roscoe
- Posts: 296
- Joined: Thu Jul 07, 2011 5:12 pm
Re: Creating a surface texture- need help
Like what Phil has already mentioned, getting a wood grain surface into a mold is very labor intensive. It can be done, but probably isn't worth what it would cost. And doing it in CAD, then having it 3D printed to use as a plug to mold from, isn't quite there yet. If you really want a wood texture, why not go for the real thing, like in this thread viewtopic.php?f=53&t=77275. And here are a few other sites to check out http://www.vectorcut.com/ships.htm
http://www.modeldockyard.co.nz/product- ... ip+Decking.
Going this route, you can make your own deck templates (2d drawings) and send them off to a laser cutter to have etched and cut to fit each section of the ship, and it's really not that hard to do. I could give you some tips on how to do that if you are interested.
-Dean
-
DrPR
- Posts: 1689
- Joined: Sun Mar 07, 2010 12:01 am
- Location: Corvallis, Oregon, USA
- Contact:
Re: Creating a surface texture- need help
If you really want wood grain in your mold you can do it the way KaDee does it - or at least the way they did it 30 years ago when I toured the factory.
Their mold maker created a large scale (about 1:24) version of a rail car side - maybe two feet long. He used a slab of stainless steel and carved each board and feature, including the wood grain, into the metal. When it was done to perfection he used a pantograph arm mechanism to trace a fine pin along each detail. At the other end of the arm was a small milling machine with a tiny diamond tipped mill that carved the details into another block of stainless. The pantograph reduced the scale from the original to 1:87 (HO scale) or 1:160 (N scale). These small blocks were then used in an EDM machine to burn the pattern into the mold for the rail car.
They were able to make molds for N scale cabooses that had open holes in the chain links across the gaps in the end railings. The holes in the chain links were just a few thousandths diameter, and there was no mold flash.
Phil
A collision at sea will ruin your entire day. Aristotle
-
Mike@IHP
- Posts: 706
- Joined: Tue Feb 01, 2005 5:48 pm
Re: Creating a surface texture- need help
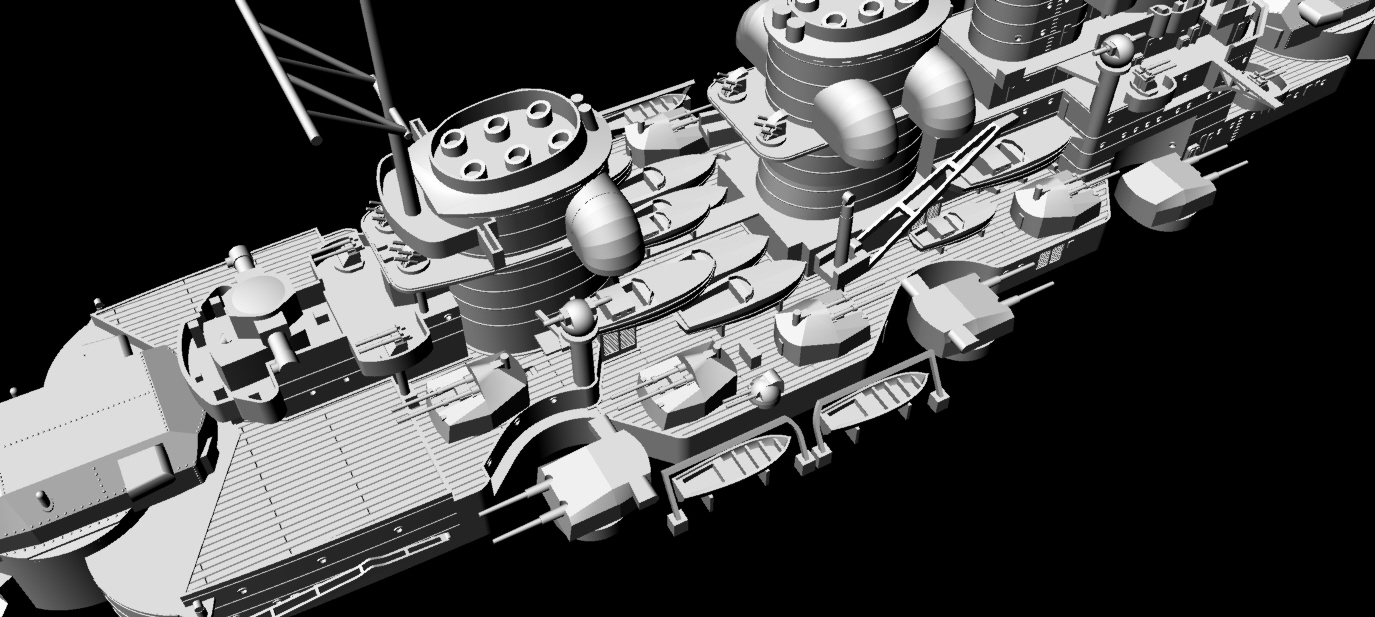
Thanks, guys. I decided that the main deck and the shelter decks would get planking, and the other surfaces would be linoleum (i.e. smooth).
I have updated the photos of my H39 CAD work in the thread in this virtual modeling section so you can see the deck planking pattern I came up with. The links are given below as well. It's part of the polysurfaces, not a separate texture as I orginally planned. I was able to do it without too many extra memory-consuming surfaces and still represent individual planks. I'm not really looking to get wood grain into it, in 1:700 that would be kind of overkill. I don't plan to do a real wood deck for it, either, unless one of the wood deck aftermarket folks want to do it. (I'm not yet a fan of those wood decks, to be honest.)
http://ihphobby.tripod.com/shipimages/test01.jpg
http://ihphobby.tripod.com/shipimages/test02.jpg
http://ihphobby.tripod.com/shipimages/test03.jpg
http://ihphobby.tripod.com/shipimages/test04.jpg
Thanks!
Mike Bartel
IHP
http://ihphobby.tripod.com
-
Roscoe
- Posts: 296
- Joined: Thu Jul 07, 2011 5:12 pm
Re: Creating a surface texture- need help
At that scale your right, trying to get a wood grain finish on it would be a real pain, and expensive.
Really great looking model, and as an ex-plastic injection moldmaker, I'm looking forward to seeing you finished it up.
-Dean
Really great looking model, and as an ex-plastic injection moldmaker, I'm looking forward to seeing you finished it up.
-Dean
-
Mike@IHP
- Posts: 706
- Joined: Tue Feb 01, 2005 5:48 pm
Re: Creating a surface texture- need help
Thanks, Dean. Yeah, I'm not going to try actual grain. I have just gotten my first sample parts from China for my HO trolley project, and I'm getting used to what details will actually come out. If I can work in a lot of detail, they seem to be able to get it to come out on the parts. Switching to injection molding over resin looks promising. I think if I did this kit in resin it wouldn't come out half as good.Roscoe wrote:At that scale your right, trying to get a wood grain finish on it would be a real pain, and expensive.
Really great looking model, and as an ex-plastic injection moldmaker, I'm looking forward to seeing you finished it up.
-Dean
Thanks!
MIke Bartel
IHP
http://ihphobby.tripod.com