Greetings,
Originally issued by Frog many decades ago, this WIP involves the Modelcraft reissue from 1996. Firstly, this has to be one of the worst molded kits ever. This is not a kit that can be quickly or easily constructed - it demands many hours of tedious work and scratch building. Some of the parts are so poor, they really can't be cleaned up or corrected. Every one of the remaining parts required some work, in some cases significant modification, to be useable. In several instances, I decided to discard kit parts entirely and scratch build replacements as this was faster and easier than struggling with the kit parts. There is a PE set available for this kit from Atlantic Models, but I used 1/125 scale brass railings and other parts from Toms Model Works which helped tremendously. I also used similar scale photo etched inclined ladders I had in my spares bin (can't remember who made these). Many kit parts were improved with scratch built details or items from the spares bin. Although there are many faults with this old kit, it has great potential. If you enjoy scratch building and have lots of patience, this is a great project of a unique subject in a large scale.
The first set of images show how I started with the hull and used the kit deck parts as templates for styrene replacements. The upper section of the main deck with all of the pipe detail was completely scratch built and snaps tightly into place against inner alignment strips of styrene glued to the deck.
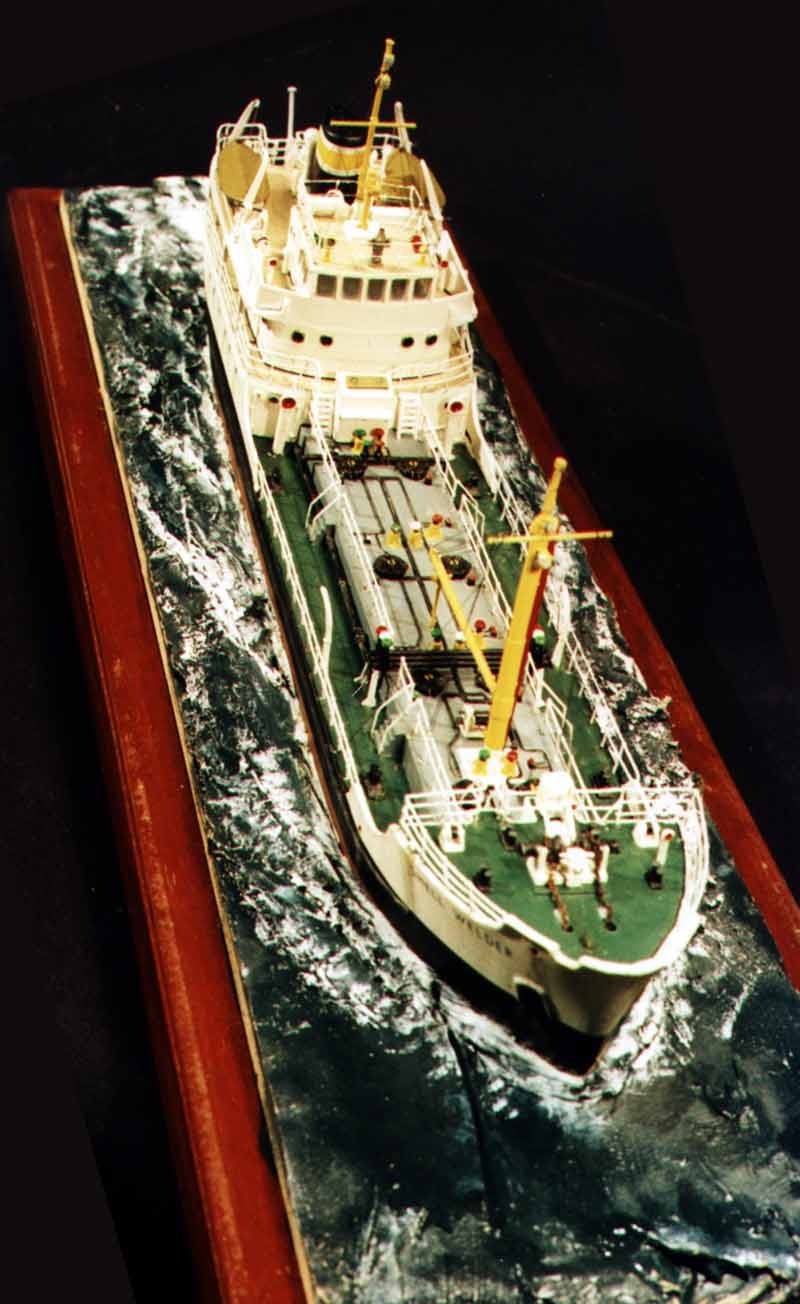
Shell Welder Coastal Tanker 1/130
Moderators: BB62vet, MartinJQuinn, JIM BAUMANN, Jon, Dan K
-
Red Devil Squadron

- Posts: 351
- Joined: Sun Sep 21, 2008 9:56 pm
Shell Welder Coastal Tanker 1/130
- Attachments
-
- Kit hull parts glued together and cleaned up. Display mounting bolts added.
-
- Replacement deck cut from styrene sheet.
-
- Closer view of replacement deck and some other added details.
-
- Another view of replacement deck and some other added details.
-
- Scratch built upper section of deck with piping details.
-
- Comparison of kit part and scratch built replacement.
-
- Upper section of deck dry fitted to main deck.
-
Red Devil Squadron
- Posts: 351
- Joined: Sun Sep 21, 2008 9:56 pm
Re: Shell Welder Coastal Tanker 1/130
This next set of images show how I cut away the superstructure bulkhead from the kit parts and mated them to a styrene v-groove deck. The bridge windows are scratch built from strip styrene which are a vast improvement over the kit parts. Support beams were added under the deck. The flared lip on the top of the bridge wings was difficult to mate with the other parts and required a lot of careful sanding. Brass railing was added now to ease subsequent assembly. Holes drilled to accommodate mounting pins on various items of equipment to be added later.
- Attachments
-
- Deck cut from V-groove styrene to simulate wood planking. Small tube piece is for alignment of funnel base.
-
- Another view of deck.
-
- Front view showing bridge windows and flare on top of bridge wings.
-
- V-groove deck with brass railing. Note mounting alignment tabs.
-
- Top of bridge with brass railing and v-groove deck.
-
- Details of bracing parts.
-
Red Devil Squadron
- Posts: 351
- Joined: Sun Sep 21, 2008 9:56 pm
Re: Shell Welder Coastal Tanker 1/130
The base for the funnel was cut away from the kit part and will be used on the new v-groove deck with the modified kit funnel. Kit parts for the masts were greatly modified and enhanced with styrene bits, photo etch and parts from the spares bin. Small holes drilled now to accommodate subsequent rigging.
- Attachments
-
-
-
-
-
Red Devil Squadron
- Posts: 351
- Joined: Sun Sep 21, 2008 9:56 pm
Re: Shell Welder Coastal Tanker 1/130
Images of various deck fittings and equipment either scratch built or modified kit part.
- Attachments
-
- Kit parts here needed much work and some modification.
-
- Lot of work to get these kit parts useable. Maybe easier to just scratch build these?
-
- More cleanup and modification needed to these kit parts. Some were entirely replaced.
-
- These were really bad. I spent a long time cleaning these up, but it would have been better and faster to scratch build.
-
- The kit parts here were not too bad and needed a minimal amount of work with some enhancements.
-
Red Devil Squadron
- Posts: 351
- Joined: Sun Sep 21, 2008 9:56 pm
Re: Shell Welder Coastal Tanker 1/130
The kit air vents were really rough. The smaller ones could not be used and had to be replaced with carefully curved and drilled solder. The larger kit vents were useable, but required a great of work.
- Attachments
-
- heavily worked kit parts.
-
- Scratch built from solder.
-
- Can't remember who makes these!
-
- Long pieces were scratch built from plastic coated wire.
-
- Valve wheels are from spares bin (I think they are old railroad detail parts). The bases are the cut off torpedo ends from the Revell U-47 kit.
-
Red Devil Squadron
- Posts: 351
- Joined: Sun Sep 21, 2008 9:56 pm
Re: Shell Welder Coastal Tanker 1/130
Some images showing most of the parts dry fitted. Apologies for poor alignment of parts and dust in these dry fit images. PE ladders need trimming to mate with railing, some of which not shown in these photos. Some more clean up and minor work needed before spraying primer.
- Attachments
-
-
-
-
-
-
-
-
Pieter
- Posts: 1604
- Joined: Sat Sep 17, 2005 9:19 am
Re: Shell Welder Coastal Tanker 1/130
Nice work. Are you going to put a crew on it?
-
Mgunns

- Posts: 674
- Joined: Mon Oct 13, 2014 5:39 pm
- Location: San Tan Valley Arizona
Re: Shell Welder Coastal Tanker 1/130
Looks good: Your work has really dressed this old kit up nicely. A few crew members manning a valve or standing around smartly would really enhance it.
Looks great.
Looks great.
Mark
Master Gunnery Sergeant USMC (Ret.)
http://www.modelshipgallery.com/gallery ... index.html
On the bench:
1/200 USS Enterprise, CV-6
Master Gunnery Sergeant USMC (Ret.)
http://www.modelshipgallery.com/gallery ... index.html
On the bench:
1/200 USS Enterprise, CV-6
-
JIM BAUMANN

- Posts: 5681
- Joined: Mon Jan 10, 2005 5:30 pm
- Location: Nr Southampton England
Re: Shell Welder Coastal Tanker 1/130
very very impressive work!
I built this kit back in 1998 --way before the AtlanticModels PE...
looking at your superb work..
alas it does show now!
I am watching this !
Jim Baumann
I built this kit back in 1998 --way before the AtlanticModels PE...
looking at your superb work..
alas it does show now!
I am watching this !
Jim Baumann
....I buy them at three times the speed I build 'em.... will I live long enough to empty my stash...?
http://www.modelshipgallery.com/gallery ... index.html
IPMS UK SIG (special interest group) www.finewaterline.com
http://www.modelshipgallery.com/gallery ... index.html
IPMS UK SIG (special interest group) www.finewaterline.com
-
JIM BAUMANN
- Posts: 5681
- Joined: Mon Jan 10, 2005 5:30 pm
- Location: Nr Southampton England
Re: Shell Welder Coastal Tanker 1/130
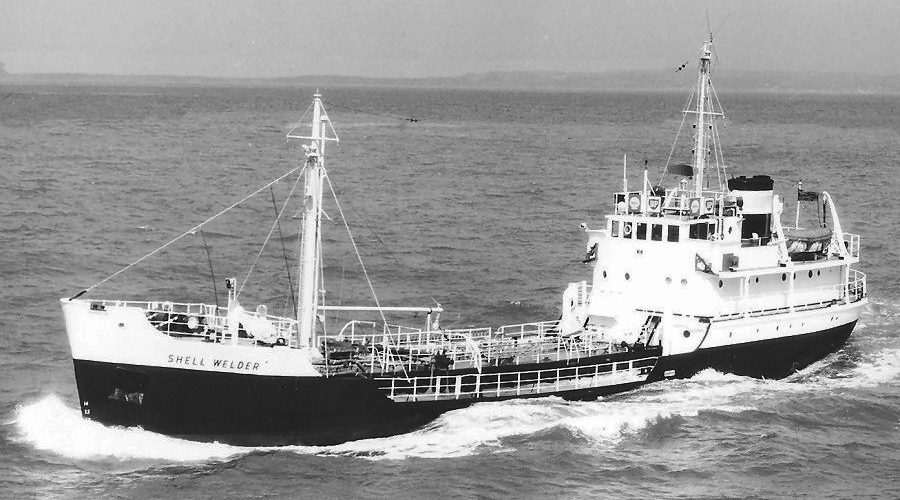
with the internet now
there are a surprising number of reasonable quality photos of the real thing on-line
I googled shell welder coastal tanker
and there are some most helpful images
!
here is a nice one
Jim Baumann
there are a surprising number of reasonable quality photos of the real thing on-line
I googled shell welder coastal tanker
and there are some most helpful images
!
here is a nice one
Jim Baumann
....I buy them at three times the speed I build 'em.... will I live long enough to empty my stash...?
http://www.modelshipgallery.com/gallery ... index.html
IPMS UK SIG (special interest group) www.finewaterline.com
http://www.modelshipgallery.com/gallery ... index.html
IPMS UK SIG (special interest group) www.finewaterline.com
-
Red Devil Squadron
- Posts: 351
- Joined: Sun Sep 21, 2008 9:56 pm
Re: Shell Welder Coastal Tanker 1/130
Thanks everyone for having a look and for your comments! I do plan on including crew figures with this build and will probably use the 1/125 scale figures from the Revell U-47 kit. They are almost the same scale and look correct on the model.
Cheers,
Bill
Cheers,
Bill
- Attachments
-
- Sample of the crew figures from the Revell 1/125 U-47 kit.
-
- Crew member on deck
-
- Crew member on the bridge wing.
-
Red Devil Squadron
- Posts: 351
- Joined: Sun Sep 21, 2008 9:56 pm
Re: Shell Welder Coastal Tanker 1/130
Greetings,
Thanks to all for having a look and for the comments. Please have a look at these new images of current progress. Most of the major painting is done. Smaller parts, additional railings, ladders, crew figures, rigging and minor details will come next followed by some subtle weathering and washes. The kit decal for the funnel cracked apart in the water, but I was able to save it. I hope the other decals will be easier.
Your questions, comments, and suggestions are always welcome.
Cheers,
Bill
- Attachments
-
- Nice colour photo of Shell Welder. This will be my colour guide for painting.
-
- Side view of painted lower superstructure.
-
- Lower superstructure with painted wood deck.
-
- Another view.
-
- Superstructure major parts painted and dry fitted.
-
- View of painted aft hull and superstructure.
-
- Another view.
-
- Side view.
-
- View of the deck.
-
- Another deck image.
-
Red Devil Squadron
- Posts: 351
- Joined: Sun Sep 21, 2008 9:56 pm
Re: Shell Welder Coastal Tanker 1/130
Some more images of current progress:
- Attachments
-
- View of the forward deck.
-
- Another view.
-
- Final image for this session.
-
Dan K
- Posts: 9047
- Joined: Tue Jan 11, 2005 10:56 am
- Location: New York City
Re: Shell Welder Coastal Tanker 1/130
Truly great work. Nice to see another tanker project.
-
LE BOSCO

- Posts: 2261
- Joined: Thu Aug 27, 2009 11:05 am
- Location: Paris France
Re: Shell Welder Coastal Tanker 1/130
HI RDS
Great work very nice to see
cheers
Nicolas
Great work
cheers
Nicolas
-
Red Devil Squadron
- Posts: 351
- Joined: Sun Sep 21, 2008 9:56 pm
Re: Shell Welder Coastal Tanker 1/130
Thanks everyone for having a look and for the comments!
More progress images to share today. Most of the major work is done now and some of the details have been started. Some of the parts in the photo are only dry fitted at this point, so please ignore any odd alignments. Apologies for any out of focus images and bits of dust in some of the photos, I should have cleaned these up!
Your comments, questions and suggestions are always welcome!
Cheers,
Bill
- Attachments
-
- Mid deck area showing pipes and valves. Mast and davits are dry fitted.
-
- General view forward. Some deck equipment still missing at this point.
-
- General view aft - several items remain to be fitted.
-
- Closer view of the mid deck area in low angle sunlight which helps show the raised pipe work.
-
- Another mid deck low angle sunlight view.
-
- Forward view with mast. The inclined ladder is dry fitted. The kit did not include a bell, so I made one from the spares bin and some brass wire.
-
- Aft area - the mast is dry fitted and a bit askew in this image. Some equipment items missing.
-
- Another view aft. Some photos of Shell Welder show small signal/search lights on the bridge wings. The kit does not include these, so I made two - this image shows one dry fitted.
-
Red Devil Squadron
- Posts: 351
- Joined: Sun Sep 21, 2008 9:56 pm
Re: Shell Welder Coastal Tanker 1/130
Some additional images . . . . .
- Attachments
-
- I am not sure what function the structure with the three circles serves. Some other builds of this kit show these circles with colours, so I did the same!
-
- A closer image of the scratch built bell which is seen in photos, but not included in the kit.
-
- Image of the bow area.
-
- View of the circle structure, valves and "No Smoking" decal taken from an old B-29 kit.
-
- Another view in low angle sunlight which helps show the raised pipe work and vales.
-
- Image of the scratch built bridge wing light.
-
- View of the mast boom support. The kit includes a support which I did not like very much so I made this one.
-
- Aft view with one of the kit cable reels. Even with a great deal of clean up work, these kit parts are not very good.
-
- Image showing the scratch built navigation light.
-
Red Devil Squadron
- Posts: 351
- Joined: Sun Sep 21, 2008 9:56 pm
-
biggles2
- Posts: 1980
- Joined: Thu May 30, 2013 1:50 pm
Re: Shell Welder Coastal Tanker 1/130
The proverbial silk purse from a sow's ear!
-
Red Devil Squadron
- Posts: 351
- Joined: Sun Sep 21, 2008 9:56 pm
Re: Shell Welder Coastal Tanker 1/130
Yes, this really is a difficult kit to work with. Every part was flawed to some degree with many being very poor and/or unusable. Replacing many of the major components helps a great deal along with scratch building and items from spares bin. The photo etch from Toms Modelworks in 1/125 scale is working, but the PE set specific for this kit from Atlantic Models is probably a better way to go. Despite all of these issues, I am pleased so far with the results.
Cheers,
Bill
Cheers,
Bill