1/700 HMS Hood (as sunk) by pascalemod / COMPLETE
Posted: Sun May 07, 2017 6:35 am
Hi all here is my WIP thread of HMS Hood as sunk, 1941 by Trumpeter using 3D printed parts from Shapeways and PE from Flyhawk.
The Ship Modelers Source
http://www.shipmodels.info/mws_forum/
Thank you for the tips.Vlad wrote:Hello,
Are you replacing the turrets? If not you should be, the basic shape of the Trumpeter ones is somewhat off. My personal recommendation would be these: https://www.shapeways.com/product/S4P7X ... d=61572631 3D printing knocks the competition out of the water for replacement parts these days. You can remove the barrels and replace with brass if that suits you better.
Do you have a copy of the Anatomy of the Ship book on Hood? That has a full rigging diagram among other things.
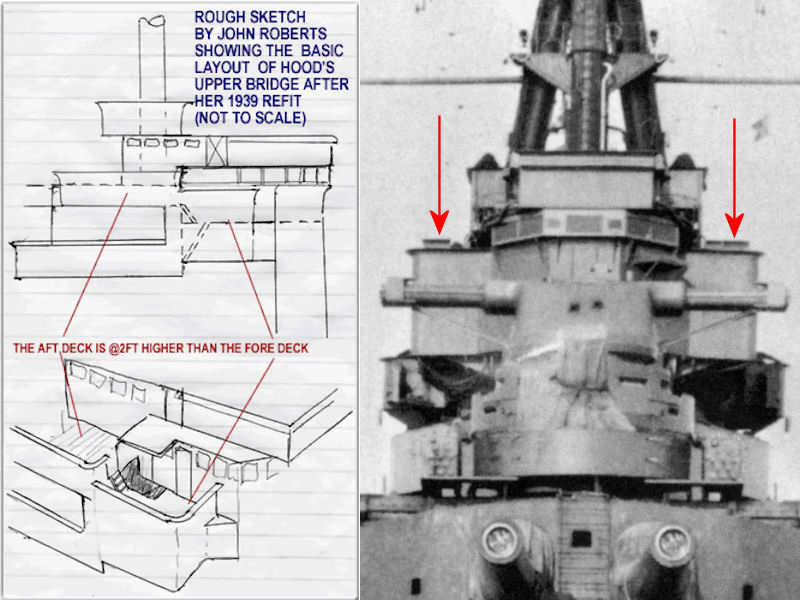
I don't know the extent of the Flyhawk set and if it corrects this, but a major bit of recent research invalidates both the AotS book's and the Trumpeter kit's assumptions about the bridge. The upper platform either side of the compass platform windows is NOT continuous at the same level, it is lower forward and higher aft (http://ontheslipway.com/wp-content/uplo ... dge_01.jpg). This is a fairly easy fix on the kit parts, I can share some pictures of how I've done this if you like.
Best of luck and I'm sure others will chip in on the technicalities of boats and cranes
2) I will come back to this when I get to it.EJFoeth wrote:I'll try to mix facts (F) with opinion (O)
2) Little cranes next to various hatches - remove them for battle? Makes a bit of an easier build.
(F) The two torpedo davits near the breakwater were nearly always stored, so yes. The other smaller davits near hatches (tiny actually in 1/700) were folded down. Note that the ladders from the fwd superstructure to the fwd deck, and the 4 ladders from from the superstructure towards the quarterdeck were also stored inside when at sea. The largest derricks were nearly always stored (bulkhead of the bridge, for example).
6) Lifeboats - covered with light gray or white color tarps or uncovered?
(F) All covered. This is one area where I will have some "artistic license" introduce an error and NOT add these covers (same for hawser reals).
7) amount of weathering on the anti-fouling paint - discolored already or still bright red? Survivors said it was black when it upturned, but it could have been oil I guess...?
(?) Don't know
8 ) hull anchor howse pipes, areas on the bow - rusty still? Overall how weathered would the hull be? I know they kept ships clean but generally speaking RN warships were often in much less kept shape than Kreigsmarine (I guess because they were actually used...)
(F) HMS Hood was frequently (!) repainted in 1941 and should be very well kept. However, some sediment and such is always present near the hawse pipes, even though the entire area was usually hosed. So some room for fouling there, but keep it subtle.
9) PE - Flyhawk - do you glue on superstructure brass panels on TOP of the plastic pieces or use them as replacement of plastic parts? Talking about conning tower for example I have the whole thing supposedly folding into a superstructure and I wonder if this is legit or it will be so brittle I will regret it...
(?) Don't know about kits and/or PE sets
10) who has rigging instructions for Hood? a good source i welcome. I dont wanna fully rig it in this scale... but basics are a must.
(?) How to do the rigging itself, or, how to do the rig? If the latter, I guess the Anatomy of the Ship is a good starting point? (Haven't studied the rig very well so far)
The turrets on the Trumpeter kit are too angular. They look almost OK from the side but not really from the top. Dressing the turret in PE won't change this unless the set you have completely alters the turret face. Ultimately, it's up to you to look at pictures and drawings and decide if this bothers you enough to make it worth the cost. 3D printing is still a fairly young technology, hence the expense, but in my opinion worth every penny (or cent if you like). There may be resin replacement turret sets as well, which would be cheaper, but I haven't searched for them in great detail. In any case though, Trumpeter kits are pretty cheap to start with and it looks like you've already spent more on PE than the base kit, do you want that blemished by sub-par turrets? Put it this way, I am using no other after market parts in my build but still considered it worth it to double the cost of the whole project just for those turrets. If you do go for them though, I recommend reading some of the other topics on here about working with 3D printed parts, as they have some more specific preparation, cleanup and painting needs.Guest wrote:
Thank you for the tips.
Regarding turrets - are they obviously wrong, even with PE added? Im asking because those you linked to are 21 dollars, the kit was cheaper, so something is off with the pricing of something here.Is it a must? Looks like a ripoff, its like a dollar part in material so labour at x20 seems crazy.
I will have to take a closer look at the bridge. Please do share the pics and ideas how to fix it, I think I might do that indeed! Thanks again!
I have no vested interest in 3D printing but something is off, and unfortunately it's your understanding of the cost of the printing medium - in the nicest possible way of course!Guest wrote:Thank you for the tips.Vlad wrote:Hello,
Are you replacing the turrets? If not you should be, the basic shape of the Trumpeter ones is somewhat off. My personal recommendation would be these: https://www.shapeways.com/product/S4P7X ... d=61572631 3D printing knocks the competition out of the water for replacement parts these days. You can remove the barrels and replace with brass if that suits you better.
Do you have a copy of the Anatomy of the Ship book on Hood? That has a full rigging diagram among other things.
I don't know the extent of the Flyhawk set and if it corrects this, but a major bit of recent research invalidates both the AotS book's and the Trumpeter kit's assumptions about the bridge. The upper platform either side of the compass platform windows is NOT continuous at the same level, it is lower forward and higher aft (http://ontheslipway.com/wp-content/uplo ... dge_01.jpg). This is a fairly easy fix on the kit parts, I can share some pictures of how I've done this if you like.
Best of luck and I'm sure others will chip in on the technicalities of boats and cranes
Regarding turrets - are they obviously wrong, even with PE added? Im asking because those you linked to are 21 dollars, the kit was cheaper, so something is off with the pricing of something here.
I will have to take a closer look at the bridge. Please do share the pics and ideas how to fix it, I think I might do that indeed! Thanks again!
I will consider those turrets, since I am trying to build a good ship. My comment still stands though, as of now the cost of 20 bucks for 4 tiny bits of plastic is a bit out there, level of tech not withstanding. I will consider the resin options of course, as those seem a little cheaper. Thanks for the tips though, i know it was well meant!SovereignHobbies wrote:
I have no vested interest in 3D printing but something is off, and unfortunately it's your understanding of the cost of the printing medium - in the nicest possible way of course!
The material is the biggest cost here and why 3D printed part costs go up almost exponentially as the scale increases.
I do agree with the others though - the Trumpeter turrets are noticably off. Trumpeter's 15" gun barrels are not very representative of the real thing either in many of their 1/700 RN subjects.
You are right, im gonna get the blasted turrets in the end, the perfectionist in me kicked in and I gotta have the best. While Im not interested in buying the deck, I suppose this could be my alternative:). Flyhawk was more than the kit, you are correct!Vlad wrote: do you want that blemished by sub-par turrets? Put it this way, I am using no other after market parts in my build but still considered it worth it to double the cost of the whole project just for those turrets. If you do go for them though, I recommend reading some of the other topics on here about working with 3D printed parts, as they have some more specific preparation, cleanup and painting needs.
I'll upload some bridge pictures later, and a couple of shots of the turrets as well for comparison.

Im using the well known "ship models from kits: 1/700...." book and have a decent degree of success painting by hand. My issue is the Tamiya paint is very bad to paintbrush, retarders and all. But I think Ive developed a style that I like by now and will stick with it.Vlad wrote:There is this famous picture of Hood believed to be taken as she sailed to intercept Bismarck. Blast bags on all guns, painted hull colour.
Actually I realise I lied, I am using a wood deck on my Hood, but mostly because I'm too lazy to paint deck detailsif you have a painting technique that works for you to simulate wood decks I would agree the stick-on ones aren't essential, but they are handy.
Cheers! I read the review of the turrets just after the last post on HMS Hood Association website and they felt that the turrets were a lot better on this kit vs 1/350 scale and I saw why. Still, your pics do show the new ones nicer. I am not so happy with the brass barrels included in Flyhawk set now that I see some other versions. So I might order those separartely with smaller caliber guns and the turretsVlad wrote:Right, here are the pictures as promised. .......
Oh, one more thing. Since you're building full hull, it may be worth noting that Trumpeter's paint instructions leave a bit to be desired.
I know that, which is why I said to take my paint with a pinch of salt. I chose to try to match the colour footage knowing it exaggerates the blue tint, so that the model looks more like the ship does in my mind's eye. It's a personal choice, but I like to think not too wildly out.SovereignHobbies wrote:Hood was painted Home Fleet Grey in May 1941 and typically kept in very good condition.
Ah, thank you! I thought I was taking a bit of artistic license with the blue content but it's hard to judge these things in different light conditions. If anyone's curious, the mix is Humbrol 27 with 104 for the blue tint then lightened with 127 and a touch of white, but I was pouring back and forth between two pots (and occasionally adding other colours) until I was happy so I wouldn't be able to give exact proportions. I ended up with the pot I'm using on Hood and one other a bit darker and more blue that's probably not far off USN 5-N Navy Blue.SovereignHobbies wrote:I think your HFG looks pretty good actually