Ship-in-a-bottle 1/2000 Sea Installer

Moderators: BB62vet, MartinJQuinn, JIM BAUMANN, Jon, Dan K

User avatar
Neptune
Posts: 2466
Joined: Sun Mar 13, 2005 11:51 am
Location: Belgium

Re: Ship-in-a-bottle 1/2000 Sea Installer

Post by Neptune »

Time for some test fitting with the bottle.
Deck cargo can stay on deck during bottling.
The real accomodation block, with helicopter pad and the start of the masts etc.
And some more platforms all around the vessel. Luckily they are nested against more solid structures, so I only need to make 2 legs and I can glue the backside to these more solid structures.
SI31.jpg
And for the gratings on the engine casing, I decided to paint them. Since they are slightly bigger, I opted for masking. I can't cut them this fine and close to each other, so I made one large hole and then separated the separate grills by using a tiny strip of masking tape.
SI30.jpg
The merchant shipyard
User avatar
Neptune
Posts: 2466
Joined: Sun Mar 13, 2005 11:51 am
Location: Belgium

Re: Ship-in-a-bottle 1/2000 Sea Installer

Post by Neptune »

Nearly there now, some minor paint jobs and she's ready.
I've also tested the etching cream. Test went like a walk-in-the-park, of course on the real bottle, it went sideways (a little). Some small bleed underneath the mask has made the result less then perfect. On the other side, it is only in the background, so I guess I'll keep it that way.
Been thinking about doing the whole bottle thing all over again, including the sand, with a new bottle, but that would take again 2 weeks, and I don't want to spend that amount of time on this first attempt. I'll just make the best of what I have.

I'll let the pics speak for themselves. The crane was eventually rigged with Uni Caenis thread for tying flies for fly fishing. Clearly the thinnest thread there was, also the weakest, but strong enough for this job.
Attachments
Deck cargo, partly for realism, partly for seam camouflage.
Helo deck in place, working the opposite way, supporting the supports rather than the other way around.
Overall view with rigged crane.
The merchant shipyard
Pieter
Posts: 1609
Joined: Sat Sep 17, 2005 9:19 am

Re: Ship-in-a-bottle 1/2000 Sea Installer

Post by Pieter »

Looks like you're almost there. Now don't hit the bottle...
marijn van gils
Posts: 2738
Joined: Tue Feb 06, 2007 10:24 am
Location: Belgium

Re: Ship-in-a-bottle 1/2000 Sea Installer

Post by marijn van gils »

Still a great idea and a fascinating project to follow :thumbs_up_1: :thumbs_up_1: :thumbs_up_1:
User avatar
Neptune
Posts: 2466
Joined: Sun Mar 13, 2005 11:51 am
Location: Belgium

Re: Ship-in-a-bottle 1/2000 Sea Installer

Post by Neptune »

Easy to forget in my rush to have it finished, but I still needed to add the Voight Schneider propellers. I wanted to do that last, since they would be very vulnerable during all manipulations of construction.
I also first did a test in the test bottle to see if my sequence would stand a reality test. I noticed the legs were trouble, too hard to press down, which I could do with the prototype, but with all the details on the real thing, it was hard to press without damaging something.
Decided to file a bit off the leg part that would fit in the "sleeve" of the hull, for easier up and down movement.
Sequence step 1
Sequence step 1
Sequence step 2
Sequence step 2
Then the Voights. Built up from tiny strips of Evergreen, which I eventually made even smaller. I made a core of 1mm styrene rod (brown, you can see it glued to the masking tape above the blades.
I then cut lengths of 1.5mm of the strip. Then I lined them up on some masking tape to avoid them flying away, and cut them with scalpel to have same length.
SI40.jpg
I then glued the strips to the central piece of rod/disk. And once the glue set, I pried it off the tape to glue them to the hull. I did this method to avoid handling the vessel and working on it directly. Afterwards I painted them.
SI41.jpg
I had to make 3 of them for this ship.
SI42.jpg
That was the final step before bottling.
The merchant shipyard
User avatar
JIM BAUMANN
Posts: 5698
Joined: Mon Jan 10, 2005 5:30 pm
Location: Nr Southampton England

Re: Ship-in-a-bottle 1/2000 Sea Installer

Post by JIM BAUMANN »

very very impressive V/S propeller construction !

Hard enough of you build it as a stand-alone model

;let alone try and get the thing onto a bottle....

Barking mad-- but brilliant!

:thumbs_up_1: :thumbs_up_1: :thumbs_up_1:

JB :wave_1:
....I buy them at three times the speed I build 'em.... will I live long enough to empty my stash...?
http://www.modelshipgallery.com/gallery ... index.html

IPMS UK SIG (special interest group) www.finewaterline.com
User avatar
Neptune
Posts: 2466
Joined: Sun Mar 13, 2005 11:51 am
Location: Belgium

Re: Ship-in-a-bottle 1/2000 Sea Installer

Post by Neptune »

Barking mad-- but brilliant!
Thanks Jim, I guess... :heh:

Well time to dive in. 1st attempt (yep!).
Part 1 in
Part 1 in
Attaching part 2 to part 1 was as expected and practiced and went quite well. The crane somehow wanted to shift and twist all the time in the tweezers, so took me a while to find the balance. The hull bouncing around didn't really help neither. As you can see, the legs go tangled, so it didn't want to sit properly.
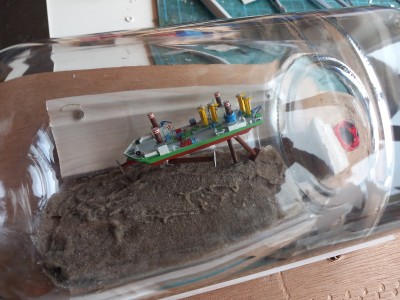
Part 2 in, attached and crane mounted (wobbly)
Then leg 1 dislodged. The tiny pin (0.3mm copper wire, normally locked in place with CA) came out and the lower part fell out. I never quite thought of that going wrong... In any case, I was still of the illusion that I could fix that once I got the other 3 legs properly deployed.
Leg 1 off
Leg 1 off
Until... a second leg came off. After several attempts to deploy the 3 legs, 2 went without a fuss, but the crane leg came off as well. I'm assuming I took out the CA glue during my last adjustments with the file around the hinge to make it slide easy. The leg was blocking completely at first, something that never happened before, I found out it was blocking on the partly extended pin. And yes, I did get nervous during this whole process and some curses escaped me. :heh: :heh: :heh: Exactly why I don't want the kids around when I'm trying this kind of stuff. :big_grin:
SI46.jpg
At that point I decided this wouldn't work anymore. I removed the wobbly crane and luckily thought of a way to split the hull halves again. I didn't use CA, only UHU plast glue, so it hadn't set yet. Normally I split the hull by using my knife point as a wedge, but that wouldn't work inside the bottle as I couldn't fix the hull. I put the tweezer tip between the aft leg casings and pushed it apart. Then I did the same with the forward leg casings and off they came. I removed both halves with surprisingly little damage (1 small disk came off on the forecastle) and am ready to have another go.
I guess I need to fix those pins better.
I used 0.3mm wire in a 0.5mm-ish hole since pressing a 0.5mm wire would be difficult and possibly break the hinge off the leg. This time I am going to press that 0.5mm wire in that hole to make sure it wedges itself in and won't come out by itself.

You can see the etched DEME logo near the back of the bottle in some of the pics as well. Be it under an angle.

The merchant shipyard
User avatar
Neptune
Posts: 2466
Joined: Sun Mar 13, 2005 11:51 am
Location: Belgium

Re: Ship-in-a-bottle 1/2000 Sea Installer

Post by Neptune »

As giving up isn't exactly in the dictionary, off to attempt No2.

Given the issues with the pins and the pretty obvious solution, I went ahead to fix it and try again (can't wait too long or I run the risk of shoving it somewhere at the back of a shelf).

This time I was succesful, except for 2 small issues. 1 leg was twisted, so the foot was pointing (Chaplin-style) outward. Second issue is that the glue on the accomodation block didn't seem to catch, so I assume I couldn't/didn't press it hard enough in its place. The latter action is also difficult as she's far from steady on the sandy surface. I'll wait until she's fixed in place to have another go at that.

She's not in final position yet as I'll fix her with the same sand-acrylic mixture as I used on the bottom. This will make her more steady and make sure all 4 feet are touching the bottom.

At the same time I'm running some epoxy tests as well as making a wind turbine hub to mount over the neck of the bottle.
Attachments
SI47.jpg
SI48.jpg
SI49.jpg
SI50.jpg
The merchant shipyard
User avatar
JIM BAUMANN
Posts: 5698
Joined: Mon Jan 10, 2005 5:30 pm
Location: Nr Southampton England

Re: Ship-in-a-bottle 1/2000 Sea Installer

Post by JIM BAUMANN »

I thought perhaps you may need to cut the bottom out of the bottle
to retrieve the model undamaged....


well done for persevering!

JIM B :thumbs_up_1: :wave_1:
....I buy them at three times the speed I build 'em.... will I live long enough to empty my stash...?
http://www.modelshipgallery.com/gallery ... index.html

IPMS UK SIG (special interest group) www.finewaterline.com
User avatar
Neptune
Posts: 2466
Joined: Sun Mar 13, 2005 11:51 am
Location: Belgium

Re: Ship-in-a-bottle 1/2000 Sea Installer

Post by Neptune »

Hi Jim,

luckily I didn't have to do that. I was indeed doubting between waiting for the glue between the hull halves to set, so I'd have a stronger platform to build on and manipulate or just to continue building.
Luckily I just continued, so I was still able to separate the halves. If that wouldn't have been possible, breaking the bottle would have indeed been the only way...

Next step was to attach the ship to the bottom to prevent it from floating (and toppling over) in the epoxy. Same for the monopile foundation I placed next to the vessel.
I then filled some holes between the feet and the (rock-hard) sandy bottom. Both gluing and filling was done with acrylic-sand mixture to blend it in with the bottom.
SI52.jpg
Next up was the filling of the epoxy. As you'll remember, I had a test bottle. So first test was with that bottle. I also added the Uni Caenis (nylon) thread along with the woven Uni 8/0 thread in it. Just to see what it would look like in Epoxy and to see if it would withstand epoxy at all.
SI54.jpg
The test bottle was ok, some bubbles which were immediately visible when I mixed the two components. I probably shook 1 or both components too much before pouring. Most of them disappeared due to the slow curing. I also noticed that some bubbles came from the sand, so despite the slow pouring, air was still trapped somewhere and released perhaps too far down the curing process of the epoxy. I didn't like the colour too much, so I decided to add more pigment for the real thing.

Then came the real pour. I'm stuck with some bubbles, but I can live with them. I noticed some air escaping from underneath one of the feet at regular intervals and relatively late in the curing process. Luckily none of them remained trapped mid-epoxy.

Not sure on the hub, it looks a bit heavy and eye-catching. Perhaps with a better stand underneath it will look better.
SI57.jpg
And at least the model is finished now. I'll see about the "extras".
SI58.jpg
SI59.jpg
The merchant shipyard
User avatar
Timmy C
Posts: 12470
Joined: Mon Jan 10, 2005 6:00 pm
Location: Ottawa, Canada

Re: Ship-in-a-bottle 1/2000 Sea Installer

Post by Timmy C »

That looks awesome. Everything came together so well!
De quoi s'agit-il?
User avatar
Neptune
Posts: 2466
Joined: Sun Mar 13, 2005 11:51 am
Location: Belgium

Re: Ship-in-a-bottle 1/2000 Sea Installer

Post by Neptune »

Thanks Timmy, didn't go from the 1st try, but not nearly enough setbacks to stop me from exploring this further. Finally found a way to do less than 1 year for 1 build!
The merchant shipyard
Post Reply

Return to “Works in Progress”