Pomeranian Rahschlup 1846 � 1/160 scale � Baltic trader

In progress online builds of Scratchbuilt ships of all scales. Remote Control and Static Display.

Moderators: MartinJQuinn, JIM BAUMANN, HMAS, Tiny69, Dave Wooley

User avatar
wefalck
Posts: 2075
Joined: Wed Sep 28, 2011 12:04 pm
Location: Paris
Contact:

Re: Pomeranian Rahschlup 1846 � 1/160 scale � Baltic trader

Post by wefalck »

Hawse-pipes

As I was dealing with fairleads through the bulwark, I decided to continue with the hawse-pipes as well. After some deliberation, I also decided to go fully ‘plastic’. In the past I fashioned the hawse-pipes and the entry-/exit-reinforcements from brass tubes with rings soldered on.

Image
Set-up in the horizontal milling machine for drilling the hawse-pipes

Here the actual pipes are very short and go through a massive layer of polystyrene. So, a separate pipe is not really needed. For drilling the 1 mm holes, the model was set up on the horizontal milling machine. The reinforcement rings were cut from 0.5 mm diameter polystyrene rod (or perhaps rather wire). To this end, the polystyrene wire was wound around a 0.9 mm drill-shaft, which was easier than expected, and then the springiness was taken out by slightly tempering it at 100°C with my hot-air soldering gun. From this spiral, the rings were cut.

The rings then were sanded flat on one side and cemented to the bulwark outside and inside. A first try with polystyrene cement was not very successful, as the ring began to spread open upon contact with the solvent. I then used the artificial-nail cement, composed of acrylic solution and cyanoacrylate.

After the cement had cured, the hole needed to be bored out again and smoothed.

Image
Outboard view of the hawse-pipes

Image
Inoard view of the hawse-pipes

As sobering these close-ups are with respect to cleanliness and crispness of the execution of the work are, they also show strikingly, where touching-up is really needed – not something that one sees very easily even using magnifying glasses.

To be continued …
Eberhard

Former chairman Arbeitskreis historischer Schiffbau e.V. (German Association for Shipbuilding History)

--------------------------------------------------------------------------------------------------------------------------------------------------------------------------------------------

Image Image Image Image
User avatar
wefalck
Posts: 2075
Joined: Wed Sep 28, 2011 12:04 pm
Location: Paris
Contact:

Re: Pomeranian Rahschlup 1846 � 1/160 scale � Baltic trader

Post by wefalck »

Bilge-pump

Although not drawn in the original drawings, the ship must have had at least one bilge-pump. Such pumps would be logically located at the lowest part of the hull, usually somewhere close to the mast. As its location is not marked on the drawings, this is a bit of guess-work.
While Downton-pumps or similar existed already, when the Rahschlup was designed, they were comparatively expensive items. As the ship was built in a rather economically marginal context, it is more likely that a traditional wooden pump was installed, that could also be built and maintained with local materials and by local craftsmen, such as a blacksmith. Nicely rendered drawings for such pumps can be found, for instance, in the Danish naval yard archive.

Image
Example for a bilge-pump from the former Danish naval yard (extract from G-2357-09)

The trunk would have been fashioned from a single tree, typically elm, that was bored out with the aid of spoon- or canon-drills in a sort of primitive boring-lathe. Iron bands kept it together and served as attachment points for the lever.

https://youtu.be/pj-XKqW29XE?si=9Q8RTsXOMxMuPPVN
Example for drilling of wooden pipes

I made a rough sketch to fix the dimensions and settled on a height of 4 mm and a diameter of 1 mm, which would be 64 cm and 16 cm on the original respectively. The body was turned from a short length of acrylic rod, leaving the future bands as proud rings.
The mechanism is composed of four lengths of 0.2 mm tinned copper wire. The wire was first bent to shape and flattened at the appropriate places with a special kind of flattening pliers. Initially, I intended to solder the parts together, but they were just too small and flimsy, so I settled on cementing them together with lacquer. The procedure is a bit difficult to document photographically while doing it, so there are only pictures of the finished product.

Image
The completed bilge-pump

I am afraid the translucent pump does not show very well in the photograph, but I generally only paint everything at the very end to avoid damage during repeated handling.

To be continued …
Eberhard

Former chairman Arbeitskreis historischer Schiffbau e.V. (German Association for Shipbuilding History)

--------------------------------------------------------------------------------------------------------------------------------------------------------------------------------------------

Image Image Image Image
User avatar
wefalck
Posts: 2075
Joined: Wed Sep 28, 2011 12:04 pm
Location: Paris
Contact:

Re: Pomeranian Rahschlup 1846 � 1/160 scale � Baltic trader

Post by wefalck »

A Mystery Resolved

When constructing the hull of the Rahschlup, it bugged me that there was no obvious way to free the deck quickly from larger amounts of water taken over in bad weather. The Jacht/Jagt-type vessels often have a gap between the covering board and lowest bulwark plank, but on all illustrations of Rahschlup-type vessels no such gap was visible. Freeing ports, as on modern ships came into use only later and the lead-lined gutters would not be sufficient.

Then I scanned through the images of the restoration project (https://www.jensine.dk, but the link does not seem to work at the moment) for the Danish Jagt JENSINE (1852) for a different reason and two images caught my eye:

Image

Image

They show that sections of the lowest bulwark plank are actually hinged and can swing out. In calm weather they are secured with latches. Subsequently, I noticed similar features on other restored vessels.

I am not sure that this is an ideal solution for securing, as the wedges would need to be removed individually and kept for re-use. Also, the latch is attached to the plank section and could get caught between the plank and the covering board. I think a solution with a hook fastened to the stanchion that engages a staple in the plank would be a better solution.

How to represent such parts now in 1/160? Producing the hinges will be relatively simple, although they will be tiny, but the hooks is another matter.

For the hinges I took 2 mm long lengths of 0.1 mm tinned copper wire that was squeezed flat on my repurposed watchmaker jewelling tool to a predetermined thickness. These jewelling tools have a micro-meter stop that allows to very precisely set the distance between the anvil and the stamp. By squeezing, the ends of the flattened wire become rounded, which suited well the purpose. There was also a slight dimple in the anvil from the turning, which resulted in a slight boss in the middle of the strip to simulate the actual hinging mechanism. The ‘hinges’ were glued on with varnish.

The latches are another matter and had to be much simplified. A double L-shape was bent into a short length of 0.1 mm tinned copper wire to simulate the hook and then one end was squeezed flat to represent the part that would have been screwed to the bulwark. These tiny pieces were then glued with varnish to the lowest bulwark planks and to the bulwark stanchion.

I decided to make only every second space between the bulwarks ‘swinging out’ and scored the lowest plank on the outside lightly to mark these sections.

Image

Unfortunately, these parts are so tiny, that they are almost impossible to photograph, unless I use my macro-photography set-up and then they would probably look discouragingly crude …

To be continued …
Eberhard

Former chairman Arbeitskreis historischer Schiffbau e.V. (German Association for Shipbuilding History)

--------------------------------------------------------------------------------------------------------------------------------------------------------------------------------------------

Image Image Image Image
User avatar
wefalck
Posts: 2075
Joined: Wed Sep 28, 2011 12:04 pm
Location: Paris
Contact:

Re: Pomeranian Rahschlup 1846 � 1/160 scale � Baltic trader

Post by wefalck »

Another small toolmaking digression

One of the great advantages of watchmaker’s lathes is the multitude of work-holding options/spindle tooling. There are collets and chucks of many different sizes and types. One type, however, never seems to have been made and this is collets with square holes. In a way it is understandable, as making exactly centric square holes with the technology available 50+ years ago, would have been quite a challenge and expensive. Today with EDM that would not be a problem anymore. It seems that watchmakers actually had little need for them and when they needed to chuck up a winding stem at the square end, they would have used a so-called 8-screw chuck, which however, is worse to set up than a four-jaw independent chuck.

I expect to have to work at the ends of some square section materials soon. While I have also a centric four-jaw chuck for the lathe, it does not fit onto micro-mill and for parts of less than 2 mm edge length it is not very precise. Working on such small parts in a chuck does not feel very safe either. Therefore, I decided to finally implement and idea that I have been tossing about for years: square insert collets. A standard fitting for watchmaker’s lathes is a set of brass insert collets that are used to hold delicate objects, such as small screws by their threads. They fit into a 5.0 mm collet and have three slots to ensure concentricity. The idea was to make collets with two cross-wise slots (like the cheapo brass collets you can buy for handheld drills) and a bore in the centre. By combining an appropriate slot width with an appropriate bore, you can make square stock fit diagonally into the collet and centre it exactly.

I worked out the geometry needed for 1 mm, 1.5 mm and 2 mm square stock/parts respectively. The other dimensions were taken from the existing insert collets, i.e. the diameter of 5 mm and the length of 20 mm. Blanks were turned up from some quality old brass rod, bored from the back with 2.5 mm and threaded M3 for depth stops to made at some later stage, if needed. The blanks then were turned around and drilled 1.1, 1.7 and 2.4 mm respectively for the three collet sizes. A shallow groove turned in facilitates the extraction from the main collet. The parts then were transferred to the mill and set up in a vice with a square collet block for slotting exactly across the centre. They were all slotted 0.5 mm.

A test turn with a 1 mm square polystyrene rod shows that this works very well.

Image
Size 1 mm, 1.5 mm and 2 mm square insert collets for 5 mm watchmaker’s lathe collet.

Back to the Rahschlup now.
Eberhard

Former chairman Arbeitskreis historischer Schiffbau e.V. (German Association for Shipbuilding History)

--------------------------------------------------------------------------------------------------------------------------------------------------------------------------------------------

Image Image Image Image
marijn van gils
Posts: 2686
Joined: Tue Feb 06, 2007 10:24 am
Location: Belgium

Re: Pomeranian Rahschlup 1846 � 1/160 scale � Baltic trader

Post by marijn van gils »

Those are some tiny collets! Beautiful! :thumbs_up_1: :thumbs_up_1: :thumbs_up_1:

How did you do the slots? With a slitting saw?
User avatar
wefalck
Posts: 2075
Joined: Wed Sep 28, 2011 12:04 pm
Location: Paris
Contact:

Re: Pomeranian Rahschlup 1846 � 1/160 scale � Baltic trader

Post by wefalck »

Yes, with a simple 0.5 mm thick slitting-saw in the milling machine.
Eberhard

Former chairman Arbeitskreis historischer Schiffbau e.V. (German Association for Shipbuilding History)

--------------------------------------------------------------------------------------------------------------------------------------------------------------------------------------------

Image Image Image Image
User avatar
wefalck
Posts: 2075
Joined: Wed Sep 28, 2011 12:04 pm
Location: Paris
Contact:

Re: Pomeranian Rahschlup 1846 � 1/160 scale � Baltic trader

Post by wefalck »

.

I wish all followers of this building log a peaceful Christmas and a good start into the New Year 2026!


Image
Eberhard

Former chairman Arbeitskreis historischer Schiffbau e.V. (German Association for Shipbuilding History)

--------------------------------------------------------------------------------------------------------------------------------------------------------------------------------------------

Image Image Image Image
User avatar
wefalck
Posts: 2075
Joined: Wed Sep 28, 2011 12:04 pm
Location: Paris
Contact:

Re: Pomeranian Rahschlup 1846 � 1/160 scale � Baltic trader

Post by wefalck »

As for most of us, our collaboration was required for various Christmas-related preparations, such as grocery shopping, decoration, cleaning the silver, but also kitchen-work, which ate into the workshop time. But it is a good and enjoyable time of the year. Workshop activities resumed with

Fitting the deck

Or rather cutting out the openings for the deckhouses etc. When I prepared for the layout and put the previously prepared deck onto the drawing, I realised suddenly that the engravings of the planks at stern were not symmetrical to the middle line and very noticeably so now. So, it was kind of back to square one with cutting a new deck and fitting it to the model. Using the old one has template sped up things, but there was still an evening of sanding and fitting and sanding again, etc. lost. Then also the planks had to be engraved again, this time taking utmost care not to get it wrong again. This has now been the fourth incarnation of the deck …
Then I started to tackle a job that literally has zero tolerance for error, meaning that the cut-outs for the deckhouses had to be a snug fit and there is no way to correct any inaccuracies. If there was any gap, it would have been again back to square one, with lots of possibilities to get something wrong again.

Image

After some rough layout, holes were drilled into the square, where there will be an opening and cuts were made with a scalpel and sufficient margin around the edges. Two diagonal cuts allowed to break out the waste in form of triangles. The openings then were cautiously widened by filing and frequent test-fitting until a snug-fit all around was achieved. By taking time, this went smoothly and without further incidents.

Image

The deck and the deckhouses are only temporarily installed and will be carefully adjusted during the final installation. I now need to make a temporary mast to determine the exact location and shape for it deck opening. This allows me also to determine the position the pump and drill a hole for it.

To be continued …
Eberhard

Former chairman Arbeitskreis historischer Schiffbau e.V. (German Association for Shipbuilding History)

--------------------------------------------------------------------------------------------------------------------------------------------------------------------------------------------

Image Image Image Image
User avatar
wefalck
Posts: 2075
Joined: Wed Sep 28, 2011 12:04 pm
Location: Paris
Contact:

Re: Pomeranian Rahschlup 1846 � 1/160 scale � Baltic trader

Post by wefalck »

Well, it has been almost a month since the last post just after Christmas. I got side-tracked a bit by something that has been on my to-do list for quite a while. Some two and a half years ago I inherited a nearly two-feet pile of naval artillery related photocopies and other material. This came originally mainly from one of the authors of a German book on the history of naval artillery and was passed on through inheritance to another German colleague and when he sadly died some three years ago, it was passed on to me, because I am actually working on some papers on the development of guns in the second half of the 19th century. The material had to be looked through for its actual value and eventual digitisation before disposal (except for any original material of possible historical value). I also spent considerable time trying to identify the source of the material as the ones who collected it didn’t note archival references or bibliographic details. In some cases, I knew the source and had either the original or a digital copy. In other cases, some detective work yielded results. A new avenue I explored successfully was to plug scanned images or pages of books into ChatGPT and asking it to identify the source (don’t think of the carbon-footprint of this method …). Sometimes, ChatGPT insisted on hallucinated results though.
Although this took a considerable amount of my spare time (and is not finished yet), I managed to work on some pieces.

Catheads

The catheads are depicted in the original drawings, but it is not very clear how far they extend inboard and they are also unusually placed below the rails, rather than at the same height or above, as is common. There are various designs for small ships like this. Sometimes they are made from a crooked piece of wood and are placed against the bulwark like a crane and sometimes they are straight and are set into the pawl-bit of the windlass. Below, these two variants are shown on museum models from Altona (Hamburg) of the period in question.

Image
Cathead of the crane design

Image
Straight cathead that extends to the pawl-bit

I opted for the straight version, although it would have been interesting to shape the crane design. However, the inboard end doubles also as a pin-rail for the outhauls and downhauls of the headsails.
Blanks for the 1.25 mm x 1.25 mm (equivalent to roughly 20 cm x 20 cm in full size) cathead where cut from a 1.5 mm sheet of acrylic glass and then milled to size.
The openings in the bulwark are located where it is doubled with timbers of the same size as the (cant-)frames. A pilot hole with 0.8 mm diameter was drilled aiming at the pawl-bit. The hole was filed square with a 1 mm x 1mm file, always aiming towards the pawl-bit.

https://www.maritima-et-mechanika.org/m ... up-106.jpg
Squaring the holes for the catheads

Image
Cathead blanks in place, meeting the pawl-bit

The catheads have to sheaves at the end. Most people would drill just four holes for the runner, but that would lead to a very unnatural run of the rope. I therefore cut two 0.25 mm slots for the sheaves into which discs of the same thickness will be set. This should lead to a more natural run of the rope without sharp bends.

Image
Set-up for sawing the slots into the catheads

Image
Sawing two 0.25 mm slots into the catheads

First, I tried to cut the sheaves from 1 mm polystyrene rod, but my old stock turned out too brittle for that. I then tried to punch them with a 1 mm hollow punch from 0.25 mm polystyrene strips, but this kind of thickened the resulting discs and they would not fit into the slots, though the strip itself perfectly slit into it – I had no thinner sheet or strips. So, I resorted to paper soaked in varnish. Perhaps I should have made myself a punch-and-die set with solid punches or bought a commercial one (which are quite expensive for what they are).
Once the sheaves were in place, a thin piece of acrylic was cemented to the front and sanded back to the same profile as the cathead. The front was actually given the shape of a hipped roof on the milling machine, using again the square collet in the dividing attachment.
I didn’t take pictures of the last two operations.

Image
The completed cathead temporarily installed

The catheads cannot be installed yet, as their exact inboard length can only be determined once the pawl-bit has been finally installed. There are a few more building steps to be completed, before this can be done.

To be continued …
Eberhard

Former chairman Arbeitskreis historischer Schiffbau e.V. (German Association for Shipbuilding History)

--------------------------------------------------------------------------------------------------------------------------------------------------------------------------------------------

Image Image Image Image
User avatar
JIM BAUMANN
Posts: 5675
Joined: Mon Jan 10, 2005 5:30 pm
Location: Nr Southampton England

Re: Pomeranian Rahschlup 1846 � 1/160 scale � Baltic trader

Post by JIM BAUMANN »

As ever a magnificent instructive posting in the use of material and tool. most excellent

I am still watching!
Jim Baumann
....I buy them at three times the speed I build 'em.... will I live long enough to empty my stash...?
http://www.modelshipgallery.com/gallery ... index.html

IPMS UK SIG (special interest group) www.finewaterline.com
marijn van gils
Posts: 2686
Joined: Tue Feb 06, 2007 10:24 am
Location: Belgium

Re: Pomeranian Rahschlup 1846 � 1/160 scale � Baltic trader

Post by marijn van gils »

I second that! :thumbs_up_1: :thumbs_up_1: :thumbs_up_1:

Also very clever to cut the slots in the end of the cathead, and then close the end by gluing a piece to it. Ingenious in its simplicity, and very effective!
I wish I thought of that, as it would have made my catheads a lot better.
User avatar
wefalck
Posts: 2075
Joined: Wed Sep 28, 2011 12:04 pm
Location: Paris
Contact:

Re: Pomeranian Rahschlup 1846 � 1/160 scale � Baltic trader

Post by wefalck »

I don't think this was my original idea Marijn, but it is a simple method for the catheads and the likes, when you can hide the joint under paint.

***********************************************************

Channels

According to the original drawings, the Rahschlup was supposed to be fitted with, by this time, somewhat old-fashioned channels. Perhaps the designer felt it was necessary to give the lower rigging a wider spread for more stability of the rather lofty rig.
Their thickness and length can be taken off the drawings, but their width had to be worked with the still rudimentary rigging plan. They have to be so wide that the shrouds including the deadeyes clear the main rail. The dimensions on the model worked out at 19.4 mm length, just under 0.6 mm thickness and 0.8 mm width.

Image
Milling the slots in the channels for the chains.

As I did not have styrene of 0.6 mm thickness, I settled on rods of 0.5 mm x 1 mm. Two lengths were fixed onto a small faceplate with double-sided tape, which seemed to be a more convenient option for the following milling operation than shimming them up by 0.5 mm in the small mill-vice, which has a depth of 1 mm. The milling concerned the slots for the chains. Their position and width were taken off the original drawing. They were cut to a depth of 0.4 mm, allowing for 0.2 mm thick chain-material and that the width of the channels has to be reduced from 1 mm down to 0.8 mm once they have been installed.

Image
The channels cleaned up and ready for installation

In the same set-up on the mill, also 0.2 mm holes were pre-drilled in the first and last slot for short lengths of steel-wire to be inserted for additional strength.
Channels were usually supported by knees. For this a length of 1 mm x 1 mm styrene rod was taped to the faceplate and half-round hollow profile milled in. From this stock 0.5 mm wide slices were cut on the guillotine.

Image
Milling the profile for the knees

Image
Chopping off the knees on the guillotine

It would be better to face now the channel with a thin (half-round?) batten, but as I am not sure yet of how I will fabricate the chains and deadeyes I will leave this for latter. It may be easier to assemble these on the bench, rather than in situ.

Image
Channels and knees cemented into place

To be continued …
Eberhard

Former chairman Arbeitskreis historischer Schiffbau e.V. (German Association for Shipbuilding History)

--------------------------------------------------------------------------------------------------------------------------------------------------------------------------------------------

Image Image Image Image
User avatar
wefalck
Posts: 2075
Joined: Wed Sep 28, 2011 12:04 pm
Location: Paris
Contact:

Re: Pomeranian Rahschlup 1846 � 1/160 scale � Baltic trader

Post by wefalck »

Rudder and helm

Another little item to be added were the rudder and the helm. The helm as drawn in the original plans had a rather strange, baroque shape and didn’t look very practical. I decided to go for something simpler and straightforward shape. Being a waterline model, there will be only one pintle visible.

Image
Rudder and helm laid

The shape of both were drawn in the drawing programme and then printed out at the correct scale. The drawings then were pasted on some scrap of 1 mm acrylic glass sheet to be cut out with the scroll saw. The final shaping was done on the disc-sander and with various files.

At this size/scale I did not attempt to reproduce functional pintles, but rather just went for the (hopefully) the right kind of look using some 0.5 mm Ø polystyrene rod and ‘irons’ cut from 0.1 mm sheet.

Image
Rudder provisionally installed (these close-ups are terribly sobering …)

The rudder is only loosely put into position at this point and only will be finally installed, when the model is installed in its scenic setting.

To be continued …
Eberhard

Former chairman Arbeitskreis historischer Schiffbau e.V. (German Association for Shipbuilding History)

--------------------------------------------------------------------------------------------------------------------------------------------------------------------------------------------

Image Image Image Image
User avatar
wefalck
Posts: 2075
Joined: Wed Sep 28, 2011 12:04 pm
Location: Paris
Contact:

Re: Pomeranian Rahschlup 1846 � 1/160 scale � Baltic trader

Post by wefalck »

Painting the Deck

I normally prefer to delay painting until the last possible moment, as handling the model while trying out and fitting parts may damage the paintwork. However, the building has now progressed to a stage, where elements have to be permanently installed in order to be able to fit other parts to them. This includes in particular the deck.
One has to think about the sequence of painting in order to avoid unnecessary masking and wrapping. Thus, I will begin with the deck, proceed with the inside of the bulwark and then move on to the outside of the hull. In most cases I do not prime, as the parts will see very little handling and leaving the acrylic paints sufficient time to settle, reduces the risk of damage. However, I have primed the outside of the hull this time in order to be able to better see any blemishes or gaps in the planking, particular at the bulwark.

Image
Deck airbrushed with a basecoat of RAL 1001 ‘beige’.

Painting the deck is a relatively elaborate process. The Rahschlup is a working vessel, the deck is not regularly ‘holy-stoned’ as was practice on naval vessels, and she is not to be depicted in a brand-new state, but after a few years of rough trade. Thus, the deck will have greyed without necessarily having degraded. It started off with a base-coat of Vallejo model air 71.075 (RAL 1001 beige). This was followed by a wash of 70.834 (transparent wood) and several thin washes of 71.023 (hemp) to achieve the desired aged look. This base colour was sealed with a spray of gloss varnish in preparation for lining out the plank seams.

Image
Deck after a light wash with Vallejo ‘transparent wood’ and ‘hemp’.

The lightly engraved plank seams were followed with a Faber-Castell PITT acrylic artists pen brush in black. Excess was wiped off immediately with the finger. The gloss varnish prevented any smear on the underlying paint, resulting in reasonably crisp lines. Once dry, the deck was lightly rubbed down with fine steel wool (000), which essentially left the black only in the engraved lines.
In the next step, individual planks were picked out with Faber-Castell PITT artist pen brushes 116 (abricot) and 180 (raw umber). Finally, the deck was given washes with Vallejo model air 71.132 (aged white) to ‘grey’ its appearance. The gloss varnish protected the previous paintwork, so that any unsatisfactory washes could be wiped off, when needed.

Image
Deck with seams filled in black and individual planks picked out by different washes.

Lastly, the deck was sealed with a spray of matt varnish to give it a uniform matt look.
Overall, I am not 100% satisfied with the appearance, as the base-coat turned out to be too dark. I had aimed for a more whiteish-greyish look. Changing this would have meant to make a completely new deck, as scraping off the paint completely would have been too difficult without damaging the engraved seams.

To be continued …
Eberhard

Former chairman Arbeitskreis historischer Schiffbau e.V. (German Association for Shipbuilding History)

--------------------------------------------------------------------------------------------------------------------------------------------------------------------------------------------

Image Image Image Image
User avatar
wefalck
Posts: 2075
Joined: Wed Sep 28, 2011 12:04 pm
Location: Paris
Contact:

Re: Pomeranian Rahschlup 1846 � 1/160 scale � Baltic trader

Post by wefalck »

Colour-Scheme

In the first half of the 19th century, the hull of the merchant vessels in northern Europe tended to be quite colourful, even though the predominant colour tended to be black. Occasionally, hulls were painted green, blue or even white. Apart from prevailing fashion, there are simple economic reasons for that: most pigments other than black are rather expensive and white, while relatively cheap as pigment, is expensive to maintain, particularly, when the harbour waters became increasingly dirty due to the presence of grimy steamships.
The colourful outward appearance came largely from the wales and perhaps adjacent strakes being lined in different colours. Most common colours again are white, green, blue and black. Importantly, in most cases one band was scraped-clean natural wood, but treated with some concoction of line-seed oil, tar and other components.
The inside of bulwarks, deckhouses, the tips of spars, mast doublings, etc. where usually painted in some colour, rather than the later more common white. Apart from the apparent preference of the time for pastel hues, there may also be economic reasons behind, as expensive pigments were stretched with the comparatively cheaper white. Thus, one often sees pale greens, ochres, and blues on historic images.

Image
Water-colour by Friis-Pedersen of a slup

When vessels did not normally venture beyond the Bay of Biscay, hulls were treated with repeated coats of Stockholm tar, because at that time teredo navalis had not yet penetrated into the North Sea as it is observed today, and the salinity in the Baltic is too low for it. When vessels traded in the Mediterranean or overseas, they had to be sheathed in copper or quite often in the cheaper zinc.
One has to also remember that ready-made paints became only available in the second half of the century and being expensive probably were not common in the economically more marginal areas of Pomerania and Mecklenburg.
Based on these considerations I opted for a colour-scheme similar to the one in the above water-colour by Friis-Pedersen, which seems to be quite representative. The hull above the waterline will be black, with much of the wale in oiled wood, framed by a dark green and a white stripe above and below. Below the waterline, the hull will be tarred bare wood. The inside of the bulwark will be Vallejo model air 70.009 (duck-egg green), a pale green that the French would most likely associate with the famous maker of ‘macarons’, La Durée. All the inboard woodwork, deckhouses, coamings, cheeks of the windlass, etc. will be in the same green. The main rail and the scrollwork etc. on the transom will be white.

Image
Some basic paint on the hull

As one can see from the picture above, I managed to lighten the deck a bit with pastel-pens. The deck-furniture has been only put into place for the photograph.

To be continued …
Eberhard

Former chairman Arbeitskreis historischer Schiffbau e.V. (German Association for Shipbuilding History)

--------------------------------------------------------------------------------------------------------------------------------------------------------------------------------------------

Image Image Image Image
User avatar
wefalck
Posts: 2075
Joined: Wed Sep 28, 2011 12:04 pm
Location: Paris
Contact:

Re: Pomeranian Rahschlup 1846 � 1/160 scale � Baltic trader

Post by wefalck »

I have been travelling for a few days, which in a way was good, as it gave the paint to dry thoroughly. For acrylics this is a somewhat lengthy process until full consolidation, although the initial drying is very fast. The solvent, water, needs time to diffuse out between the crosslinking acrylic molecules and the paint may retain a somewhat rubbery consistency for some time. Masking may rip off the paint.
However, in between I turned my attention to painting some details, such as the pin-rails, belaying cleats, bollards, the barrels of the anchor winch and details around the main hatch.
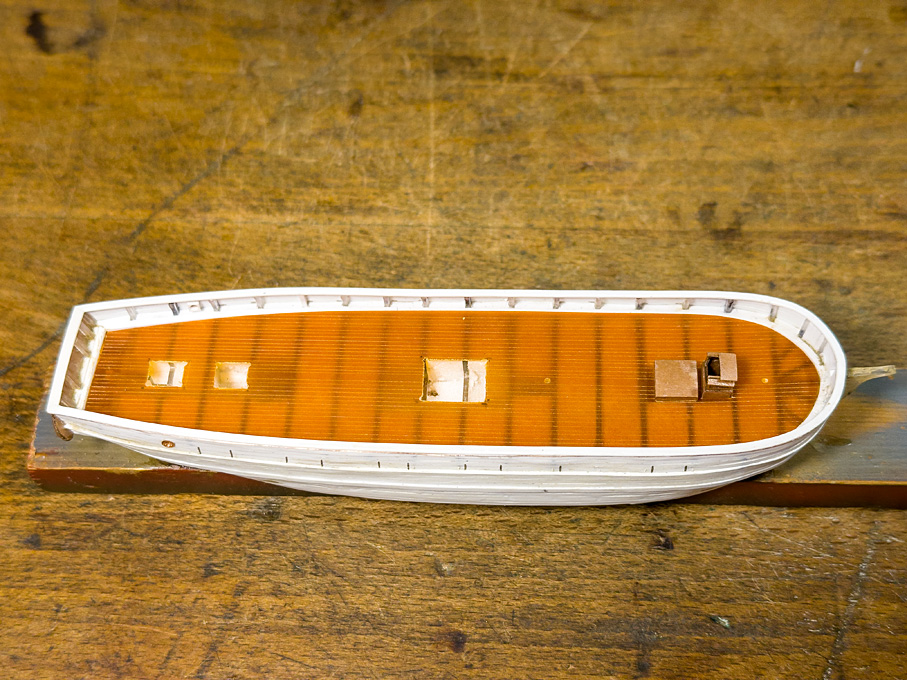
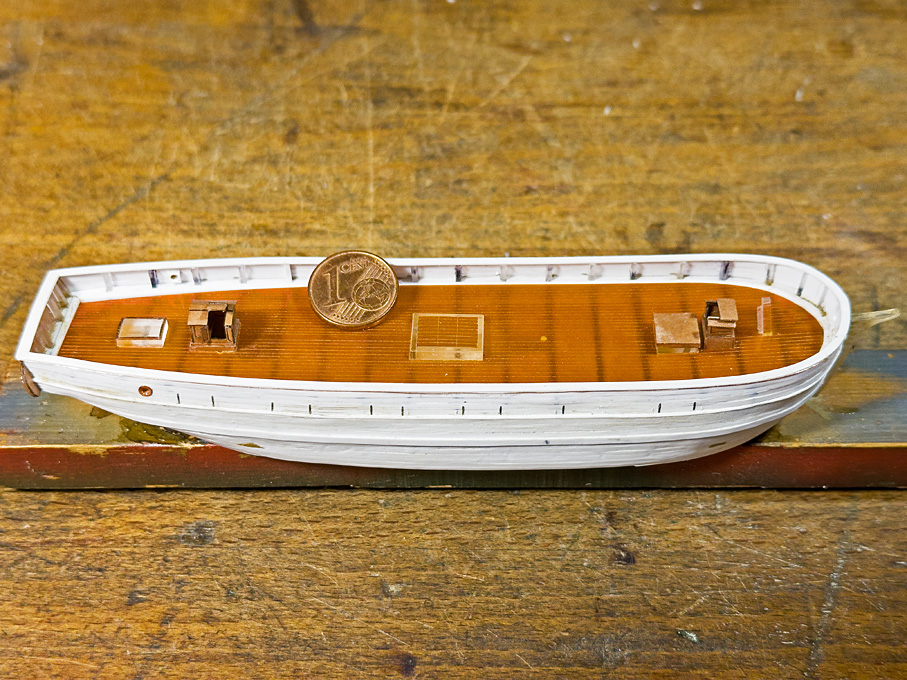
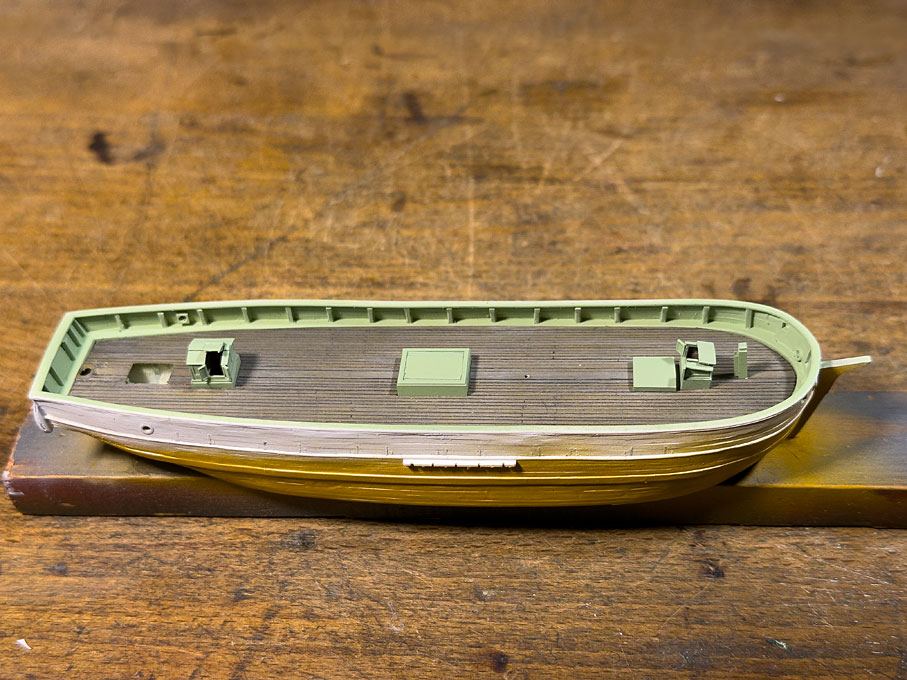
Main hatch
The main hatch has some covering panels that previously had been cut from Bakelite paper and engraved and which were sprayed now in Vallejo model air 71.077 (wood) and somewhat aged with Vallejo model air 71.032 (aged white).
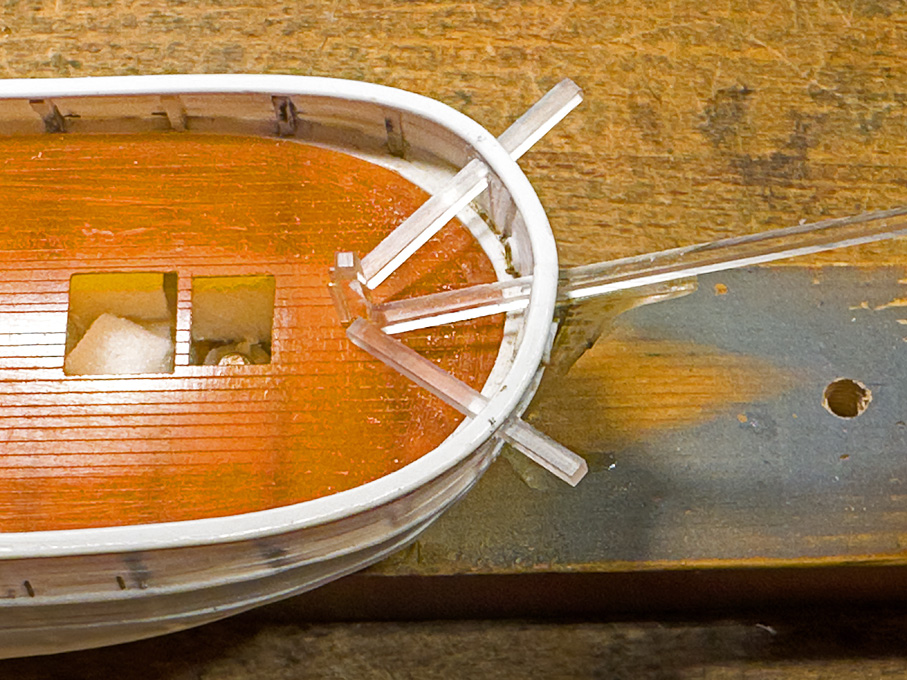
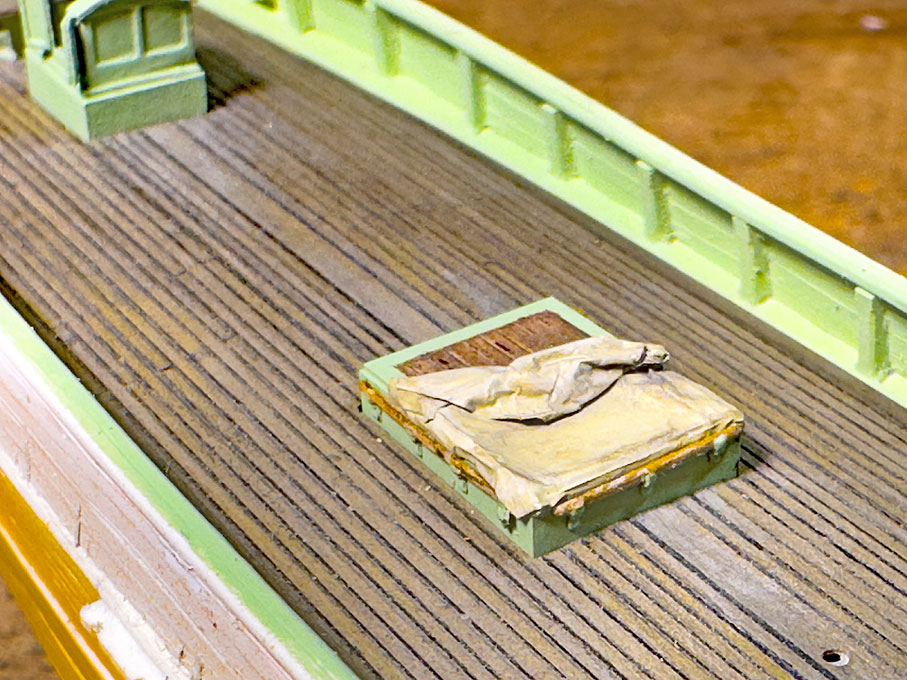
During not so nice weather, the hatch would be covered in a tarpaulin that was secured with wooden battens laid in wooden cleats. The battens would be secured with wedges driven in from both sides into the cleats, but I ignored that detail at this small scale.
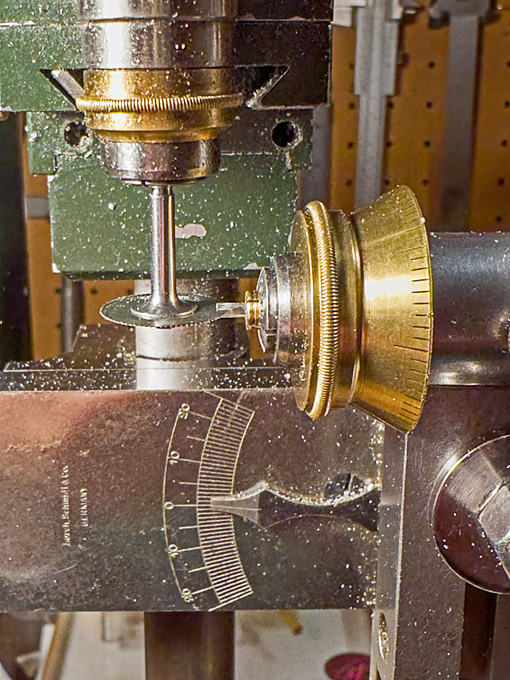
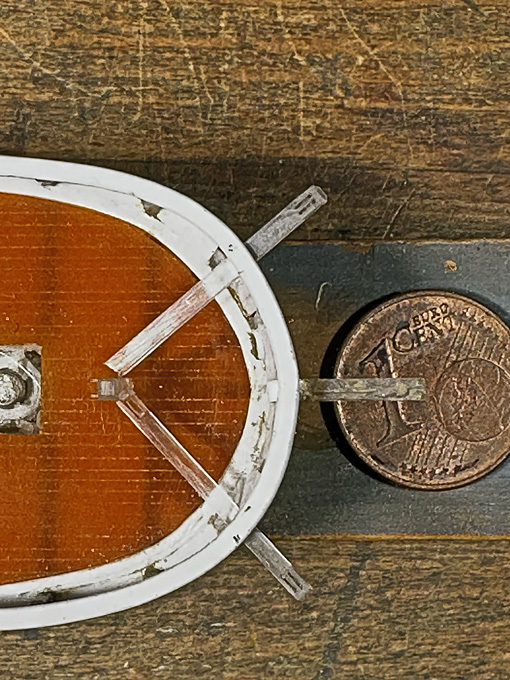
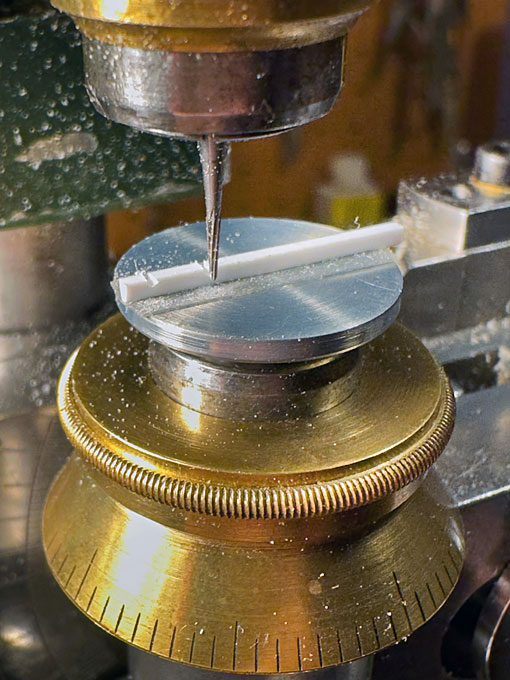
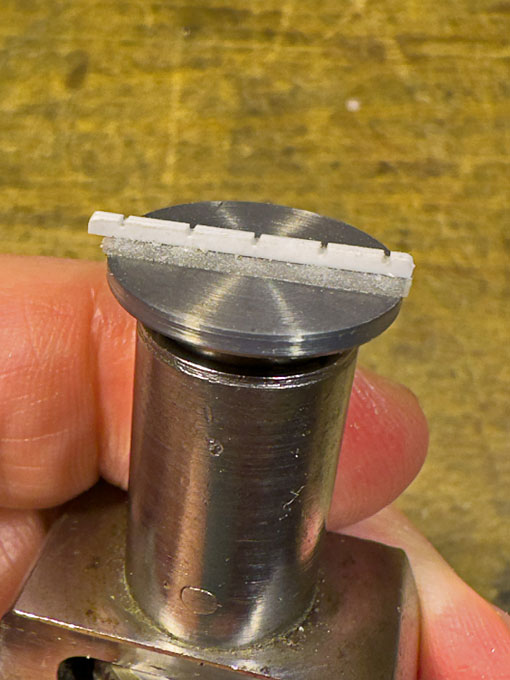
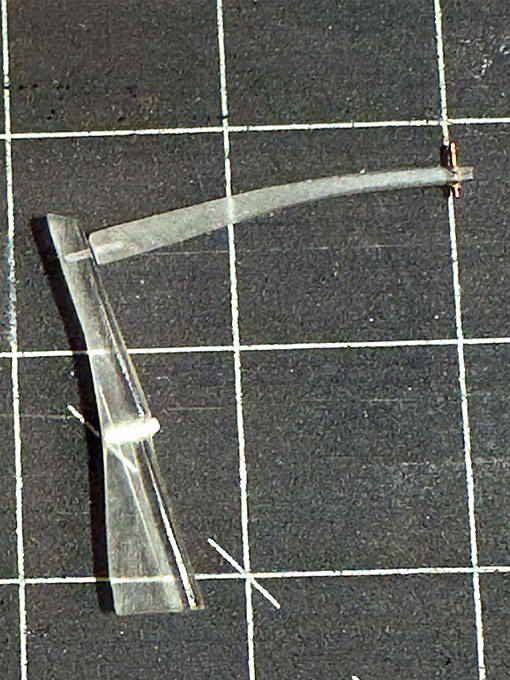
The battens and the cleats were cut from Canson-paper with the laser-cutter as per the template below. Some parts are really tiny, 0.5 mm x 0.7 mm square … To facilitate assembly, I also combined parts of the cleats with the battens.
The parts were soaked in varnish and then cemented together with the same varnish.
The battens were given the same treatment as the hatch cover, but the cleats were painted in the same green as the hatch coaming. They were attached with tiny drops of matt acrylic varnish. Eventually, there will be also a partly removed tarpaulin, but I will make this later.

Image
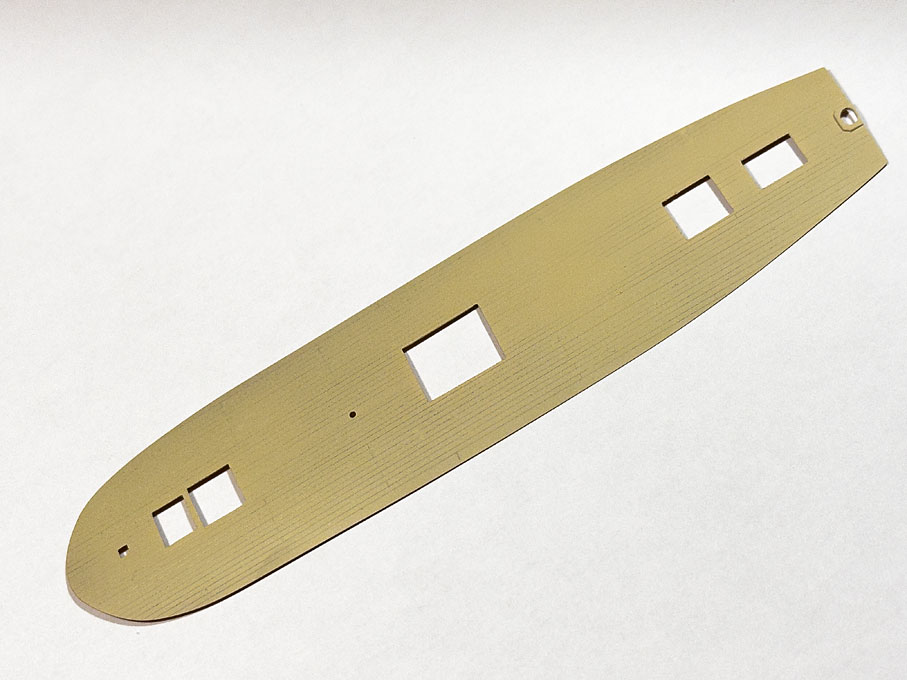
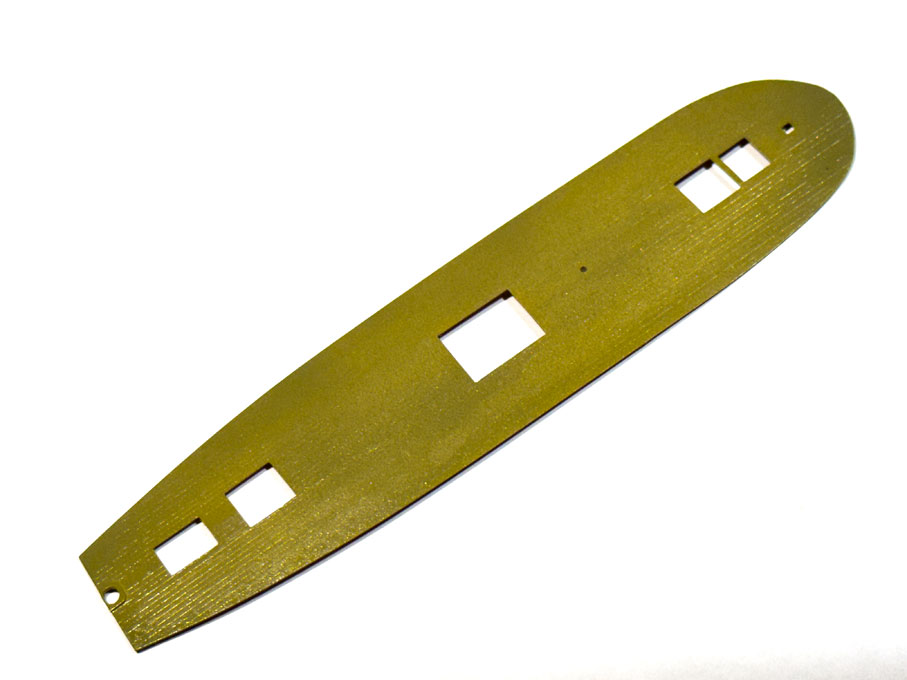
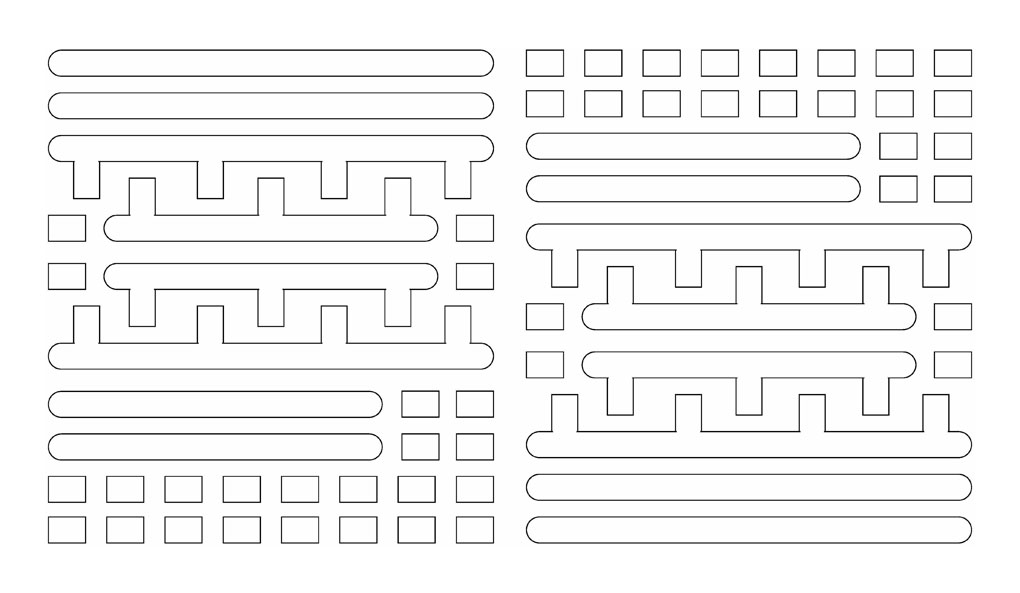
Template for laser-cutting the tie-down battens of the main hatch

Image
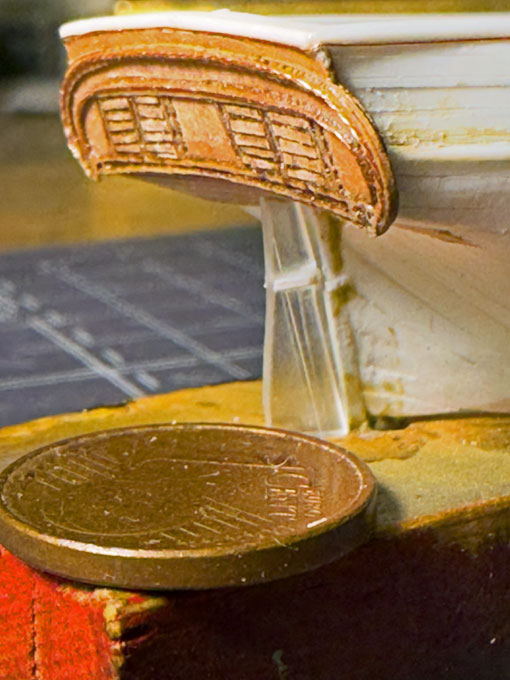
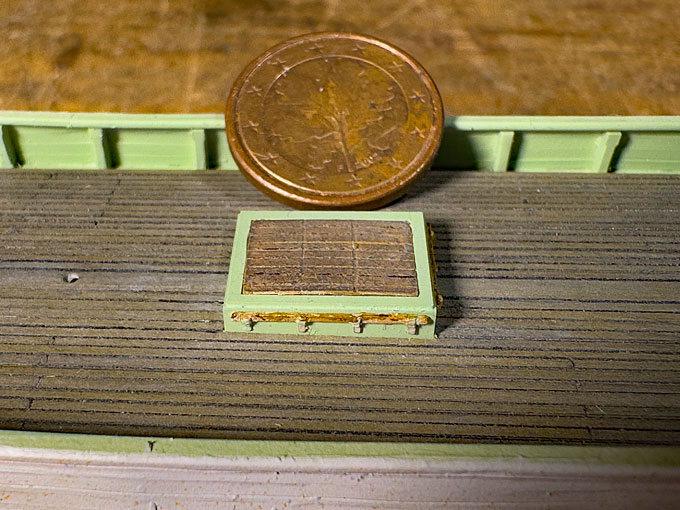
Battens fitted to the main hatch - as usual, close-ups are quite sobering ...

Painting details
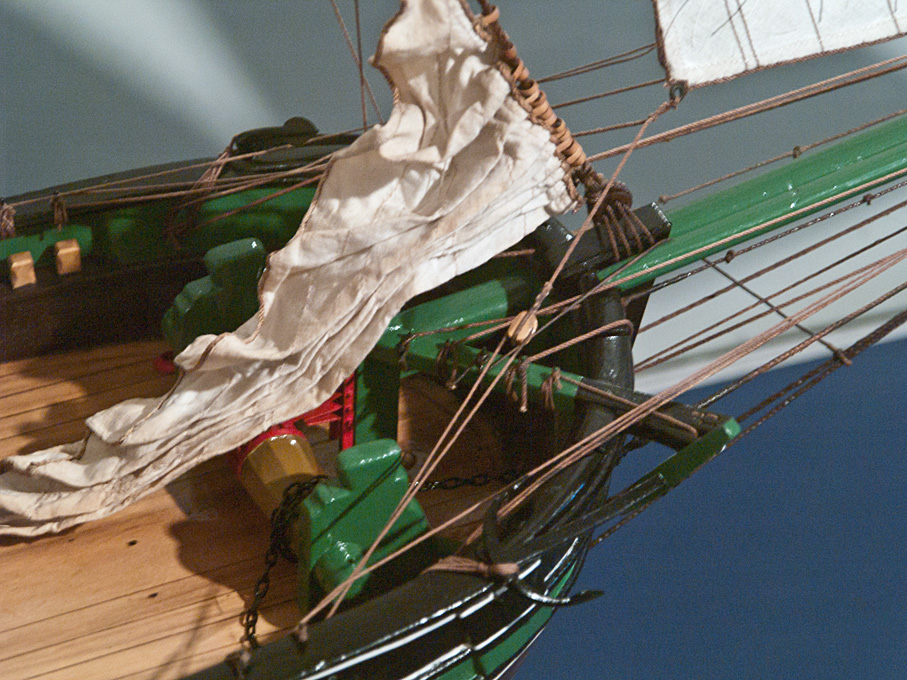
The other parts were first given a spray with Vallejo model air 71.077 (wood), this was followed by a light touch with a Faber-Castell PITT artist pen brush Raw Umber 180. Finally, light coat with Faber-Castell PITT artist pen brush Orange glaze 113 gave the parts the appearance and ‘depth’ of varnished wood. I found it necessary to spread the paint from the pens more equally with a normal paint brush. To tie the slightly varying shines together, these parts were also sprayed with satin varnish.
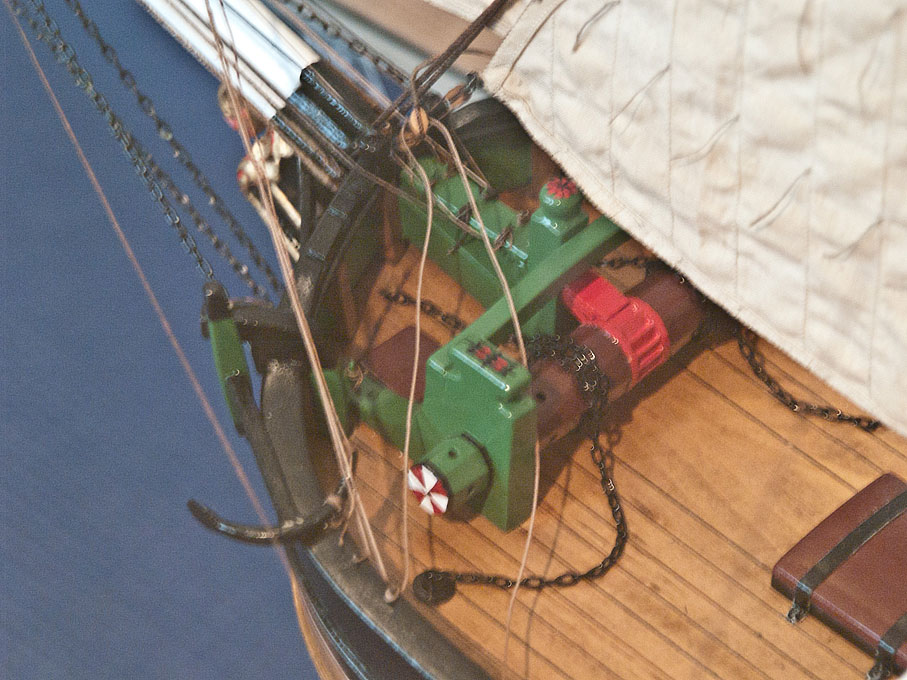
For the bare wood barrels and drums of the winch the orange glaze was omitted and the wood aged as for the hatch cover. Everything was sprayed in matt varnish and then the iron banding was picked out in black, as was the ratchet-wheel. It was done in this sequence to underline the different sheen of the bare wood and the painted bands.

Image
The collection of detail parts ready for installation

This painting is quite time consuming actually, as in spite of the fast initial drying of the acrylics, one better waits a day between paint coats and successive washes.
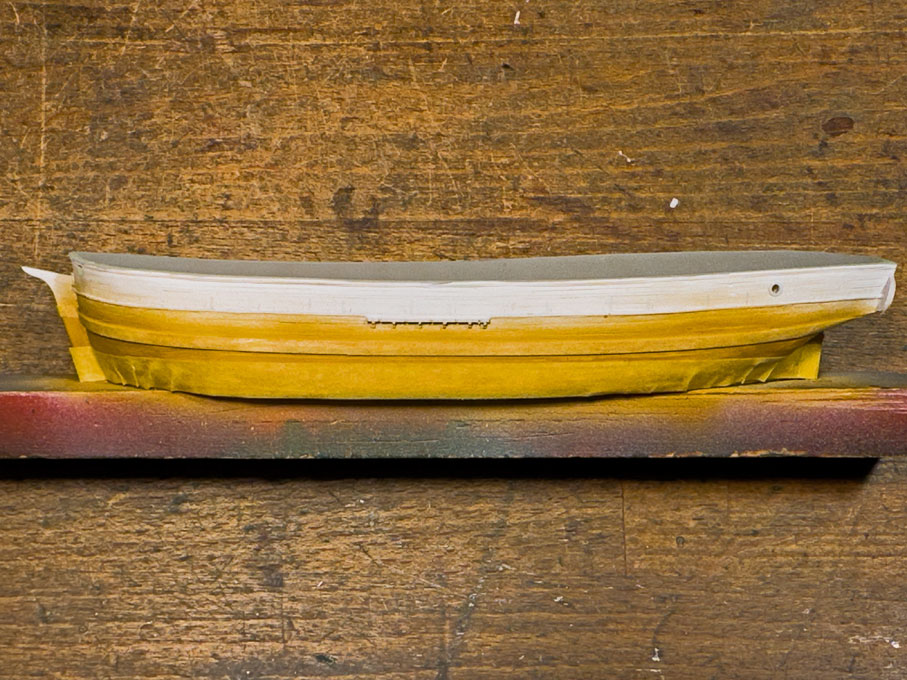
Some more ageing or weathering will be needed eventually to give the ship a used look, but this can only be done, once all deck details have been installed in order to ‘tie’ everything together visually. On the other hand, I first want to finish the outside painting of the hull, as this requires quite bit of handling for masking and blocking of bulwark openings.

To be continued …
Eberhard

Former chairman Arbeitskreis historischer Schiffbau e.V. (German Association for Shipbuilding History)

--------------------------------------------------------------------------------------------------------------------------------------------------------------------------------------------

Image Image Image Image
User avatar
wefalck
Posts: 2075
Joined: Wed Sep 28, 2011 12:04 pm
Location: Paris
Contact:

Re: Pomeranian Rahschlup 1846 � 1/160 scale � Baltic trader

Post by wefalck »

A quick update on some more paintwork.

The tarpaulin over the main hatch
I have tried out a new method to make tarpaulins. The idea was to show the tarpaulin over the main hatch half thrown back. The folds should halfway realistic, as the thickness of the material. In the past I have used 9 g/m2 silk paper for this, about the thinnest available on the market and used, for instance in the restoration of books. However, I found that the surface structure still looks a bit rough, even when soaked in acrylic paint. Although very thin, it is not so easy to create realistic folds.
Therefore, I used ordinary household aluminium foil. A piece slightly larger than needed was cut and the edges folded back and burnished down to create a ‘seam’. This ‘tarpaulin’ was draped over the hatch and the folded-back part and creases created and molded with a pair of tweezers.
This ‘tarpaulin’ was given a base-coat of Vallejo Model air 71.288 (Portland stone). Shadows were painted with 71.023 (hemp) and highlights accentuated with 71.132 (aged white). A somewhat dirty and used appearance then was created by lightly dusting it with grey pastel, taken up in a soft bristle-brush.
The ‘tarpaulin’ was attached to the hatch with a few drops of matt acrylic varnish, which was also used to glue on the last batten, which ties down the tarpaulin at one end.
A disadvantage of using aluminium foil for the ‘tarpaulin’ is that one needs to check very carefully after installation that no bright spots of bare metal are left by either omission or handling. They become only visible, when observing at different angles with different illumination.

Image

Painting the anchor-winch
Some parts of the anchor-winch had already been painted together with other ‘wooden’ details. What was missing was picking out the iron-work in black acrylic paint. Once dry a soft (9B) pencil was rubbed onto the black paint to give it a slightly metallic sheen. Everything was pulled together by giving the parts a light brushing in matt acrylic varnish.

Image

The deck-furniture has only been placed loosely, as everything will have to be taken off for painting the outside of the hull.

To be continued …
Eberhard

Former chairman Arbeitskreis historischer Schiffbau e.V. (German Association for Shipbuilding History)

--------------------------------------------------------------------------------------------------------------------------------------------------------------------------------------------

Image Image Image Image
User avatar
JIM BAUMANN
Posts: 5675
Joined: Mon Jan 10, 2005 5:30 pm
Location: Nr Southampton England

Re: Pomeranian Rahschlup 1846 � 1/160 scale � Baltic trader

Post by JIM BAUMANN »

Ah now-
-with the flaked canvas,... the main hatch does look far more interesting!

pencils are my best friend too

good work!

JIM B :wave_1:
....I buy them at three times the speed I build 'em.... will I live long enough to empty my stash...?
http://www.modelshipgallery.com/gallery ... index.html

IPMS UK SIG (special interest group) www.finewaterline.com
User avatar
wefalck
Posts: 2075
Joined: Wed Sep 28, 2011 12:04 pm
Location: Paris
Contact:

Re: Pomeranian Rahschlup 1846 � 1/160 scale � Baltic trader

Post by wefalck »

HAPPY EASTER to all !

More on painting coming soon ...
Eberhard

Former chairman Arbeitskreis historischer Schiffbau e.V. (German Association for Shipbuilding History)

--------------------------------------------------------------------------------------------------------------------------------------------------------------------------------------------

Image Image Image Image
User avatar
wefalck
Posts: 2075
Joined: Wed Sep 28, 2011 12:04 pm
Location: Paris
Contact:

Re: Pomeranian Rahschlup 1846 � 1/160 scale � Baltic trader

Post by wefalck »

The work again was interrupted by two business-related trips abroad that were almost back to back …

Painting continues

I am not a great friend of masking, but some masking and covering was be unavoidable. The wale and the hull below the waterline were sprayed in Vallejo model air 71.077 (wood). After the paint had the chance to thoroughly dry because of my absence, these areas were masked off with the yellow Tamiya tape – the waterline was eye-balled and the tape applied slightly above the designed waterline, as it is custom. Also, all openings in the bulwark were taped off from the inside to prevent the hull paint from entering. The hull then was sprayed in black.

Image
The masked hull

Image
The basic colour-scheme after demasking showing the need of some touch-up

Image
The basic colour-scheme after adjusting the colours of the wale and the underwater body

At this stage I worked on the wale to give it the appearance of oiled wood. The base-coat was worked over with Staedtler PITT artist brush pen 180 ‘raw umber’ to give the ‘wood’ more depth and a slightly more brownish tint. The hull below the waterline was given several washes in Schmincke aerocolor ‘burnt umber’ to simulate the colour of wood treated repeatedly with wood tar (Stockholm tar) – wooden ships not venturing south beyond the Channel at that time did not need a specific protection against Terredo navalis.
The edges of the wale were painted white, extending slightly onto the vertical surface. Originally, I was not too concerned about getting a clean edge on the wale, as the edges were meant to be separated by dark green stripes from the scraped part of the wale. However, the overall width of the wale is only 2 mm, so having five different coloured bands, with the middle one even being wider was a technical challenge and the optical weight did not seem to be right. In consequence, I opted for the colour scheme as seen on the Danish jagt in C.W. Eckersberg’s painting below

Image
A jagt (‘The Sea’), C.W. Eckersberg, 1831, Louvre, Paris

Somehow, I am struggling with brush-painting acrylic paints, because they dry too fast. Getting a clean white edge was difficult. Therefore, I resorted to white gouache, which allows corrections to be made even later with a humid brush. In this way, I managed to get a reasonably clean separation between the white stripe and the scraped part – but at the expense of this not being waterproof. It had to be protected, therefore, by a thin spray of satin acrylic varnish.
The green stripe required several attempts. The original idea was to produce painted strips of decal. To this end 0.7 mm wide strips were cut from a clear inkjet-printer decal sheet. The strips were taped to a piece of cardboard covered in clingfilm and then spray-painted with the airbrush. First, I choose a green too dark, that was barely visible on the black of the hull. The next version with a lighter green (Vallejo model air 71.094 ‘green zinc oxide’) would not separate from the clingfilm cleanly and detach from the decal sheet. Also applying the long narrow decal without breaking it proved very difficult (perhaps I don’t have enough practice in handling decals). Finally, I spray-painted a wide strip of thin tissue paper in Vallejo 71.094 and cut this into the narrow strips required. These were applied to the hull using clear satin varnish.

Image
The final colour scheme of the hull.

At this stage also the mouldings on the transom were picked out in white – another exercise in holding my breath and a lot of touching up. Painting 3D surfaces is much more difficult than painting on a flat sheet.

Image
A stern-view

To be continued ...
Eberhard

Former chairman Arbeitskreis historischer Schiffbau e.V. (German Association for Shipbuilding History)

--------------------------------------------------------------------------------------------------------------------------------------------------------------------------------------------

Image Image Image Image
Post Reply

Return to “Online Scratchbuild Projects”