Ditto on the review.
Second that we see what Joe is working on!
Owen
The CAD-yard
Moderator: ArizonaBB39
-
tea monster

- Posts: 275
- Joined: Sat Jun 11, 2011 5:02 pm
- Contact:
-
Roscoe
- Posts: 296
- Joined: Thu Jul 07, 2011 5:12 pm
Re: The CAD-yard
Owen,
I think we'll hear from Devin fairly soon. Not to spoil anything, but he mentioned to me that he receiver the parts from shapeways and seems pretty happy with them, so I'm sure he'll show some pics of those too. I haven't seen them myself (except the turret) so I'm also looking forward to it.
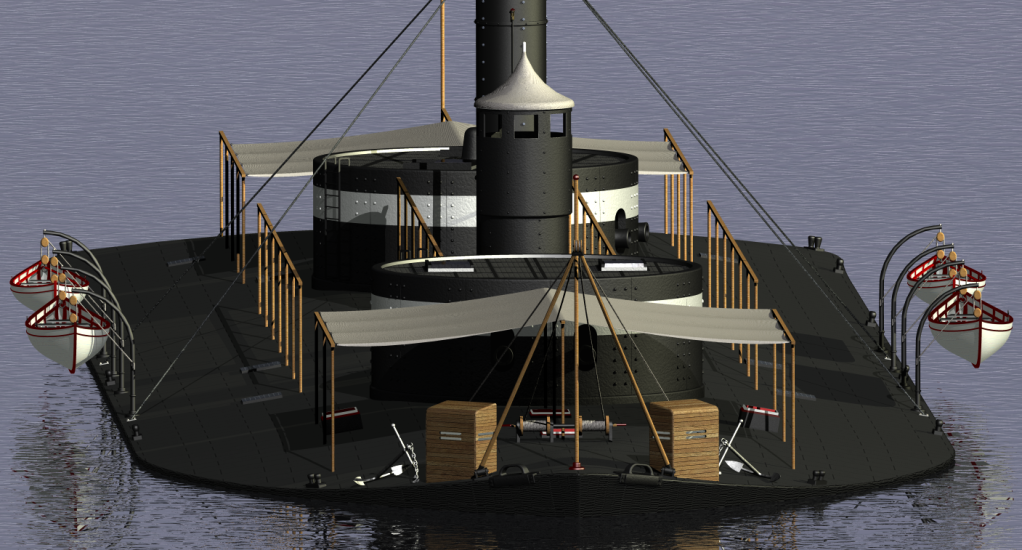
It's been awhile since I did any modeling, took a break for the holidays, but I started to add a few little items to the Chickasaw. I wanted to see what some tarps would look like on those bare beams, so I made up a quickie and threw it on there for the fun of it, let me know what you guys think. I'll probably end up adding the middle section, but for now it's just the front one which I also copied to the rear.
And these are not the final textures either, I'll finish those when I consider it done, modeling wise.
Regards,
Dean
I think we'll hear from Devin fairly soon. Not to spoil anything, but he mentioned to me that he receiver the parts from shapeways and seems pretty happy with them, so I'm sure he'll show some pics of those too. I haven't seen them myself (except the turret) so I'm also looking forward to it.
It's been awhile since I did any modeling, took a break for the holidays, but I started to add a few little items to the Chickasaw. I wanted to see what some tarps would look like on those bare beams, so I made up a quickie and threw it on there for the fun of it, let me know what you guys think. I'll probably end up adding the middle section, but for now it's just the front one which I also copied to the rear.
And these are not the final textures either, I'll finish those when I consider it done, modeling wise.
Regards,
Dean
-
DrPR

- Posts: 1689
- Joined: Sun Mar 07, 2010 12:01 am
- Location: Corvallis, Oregon, USA
- Contact:
Re: The CAD-yard
Dean,
Looks good. I'm glad you put up the tarps. The ocean gray cruiser I was on had light color teak decks and it got pretty hot inside in summer. We riged canvas over the decks to keep it cool.
I get hot just thinking of the black monitors with hot boilers inside baking in the summer sun. more canvas!
Phil
A collision at sea will ruin your entire day. Aristotle
-
tea monster
- Posts: 275
- Joined: Sat Jun 11, 2011 5:02 pm
- Contact:
Re: The CAD-yard
Wow, that's a right monster isn't it? I've noticed you got all the texturing going pretty good with the iron plating and surface texture.
The canvas is looking good and has a natural sag to it.
Was it a canvas top on the top of the pilot house? Maybe get a bit of fold and sag on that.
You really have presented a wonderful perspective on these ships.
Owen
The canvas is looking good and has a natural sag to it.
Was it a canvas top on the top of the pilot house? Maybe get a bit of fold and sag on that.
You really have presented a wonderful perspective on these ships.
Owen
-
Roscoe
- Posts: 296
- Joined: Thu Jul 07, 2011 5:12 pm
Re: The CAD-yard
Thanks guys,
I think you've convinced me to add more tarps, don't want those sailors getting heatstroke now, do we.
The input from you guys has been invaluable, and I know I've said this was finished at least once, but after a couple more items and texture changes, this one will have to finally end, at least for now, other projects are calling.
After seeing those laser cut sheets, it's got me itching to build something this winter (like I need another project). But not really being a ship builder myself, I think I'll stick to something I'm more familiar with. And it just so happens that another forum I frequent is having a fun build contest of multi-engine aircraft, it's as good an excuse as any to start building something.
Looking forward to seeing more of your guys superb work,
Dean
-
Devin

- Posts: 2500
- Joined: Mon Jan 10, 2005 10:46 am
- Location: Hoboken, NJ
- Contact:
Re: The CAD-yard
Okay, here's what we're working with. Initially I thought the printings to be flawless, but as they come in that translucent/clear medium that Dean showed with his test turret image, it's hard to see exactly what's going on until you get some primer on them.
- Attachments
-
- The turret roofs are amazing. The tiny holes are all there and the Mr. Surfacer primer didn't clog them up! These are good to use as-is.
-
- The props have just a little roughness to them, but a little sanding and they'll be good to go. Only showing one of the four here. I forgot to put an item for scale in the photo, but the props are 12mm in diamater.
-
- The 11" Dahlgren is a little rough. Again, nothing that some Mr. Surfacer and sanding won't fix. I'm really surprised this tiny gun turned out so well.
We like our history sanitized and theme-parked and self-congratulatory, not bloody and angry and unflattering. - Jonathan Yardley
-
Devin
- Posts: 2500
- Joined: Mon Jan 10, 2005 10:46 am
- Location: Hoboken, NJ
- Contact:
Re: The CAD-yard
Now on to the turrets. They're a mixed bag. The limits of the printing process for smooth cylinders show here as they did on the Dahlgren. One note: when these parts arrived they had a slightly oily texture. I soaked everything in Simple Green for an hour, then tooth-brushed them and rinsed. Then most of the parts had a stickiness to them, kind of like uncured resin, or paint that hasn't fully dried. I brushed them down with lacquer thinner and they were then fine to prime.
- Attachments
-
- The overall view from the front is really promising.
-
- The interior is a little rough, but some sanding will knock that down in no time (and, honestly, how much will be visible inside a 1/200 scale turret?)
-
- And here we see the problem. Roughness that wouldn't normally be a problem to knock down with a sanding stick, but now we're dealing with the bolt heads. This will be a tricky one to figure out. Maybe I can sand just this part and get close enough matches with some resin rivet decals. We'll see.
We like our history sanitized and theme-parked and self-congratulatory, not bloody and angry and unflattering. - Jonathan Yardley
-
Devin
- Posts: 2500
- Joined: Mon Jan 10, 2005 10:46 am
- Location: Hoboken, NJ
- Contact:
Re: The CAD-yard
So that's it. I'm really happy with how this stuff turned out. Of course it would have been great not to have to deal with replacing bolt/rivet detail on the turret, but that's a small price to pay for the work the props, turret roof, and guns will save me. Great work, Dean!
We like our history sanitized and theme-parked and self-congratulatory, not bloody and angry and unflattering. - Jonathan Yardley
-
Roscoe
- Posts: 296
- Joined: Thu Jul 07, 2011 5:12 pm
Re: The CAD-yard
Devin,
That turret does look rougher than the one I have. Is that material or primer between the rivets?
Because the one I have doesn't look like that, even the interior on mine looks smoother. I'm wondering if the simple green or lacquer thinner didn't soften or melt the plastic some, because it looks like some of the rivets were mushed too.
If you want, I can send you the turret I have, I'm not going to do anything with it anyway. You can use it to replace that one or as a spare.
With the cannon, except for the steps, the shape does look pretty good, it just sucks that it didn't come out smoother. It definitely shows the limits of printing small stuff.
Thanks for showing them, I've been eager to see how they came out.
Dean
-
Devin
- Posts: 2500
- Joined: Mon Jan 10, 2005 10:46 am
- Location: Hoboken, NJ
- Contact:
Re: The CAD-yard
Dean,
I looked at the other turret I have, and wouldn't you know, that with a 50/50 shot, I picked the one with the problems. The other one looks really good. I'm sure it isn't primer, I use Mr. Surfacer and that stuff doesn't build up or flake like other stuff, plus if it had then the roof and props would have shown the same results.
I'm surprised the gun turned out as well as it did, considering neither of us knew if it would even work at all!
Sure, if you don't mind trading turrets, that'd be great. I can even shoot some paint and weathering on it for you, so it looks the part.
-Devin
We like our history sanitized and theme-parked and self-congratulatory, not bloody and angry and unflattering. - Jonathan Yardley
-
Roscoe
- Posts: 296
- Joined: Thu Jul 07, 2011 5:12 pm
Re: The CAD-yard
Devin,
That's kinda strange that one turret would look good and the other doesn't, the bad one must have been done on a Monday. (old lame mechanical joke)
Yeah, no problem, I'll send you the turret I have, but you can keep the bad one, you can use it as a practice piece. Thanks anyway...
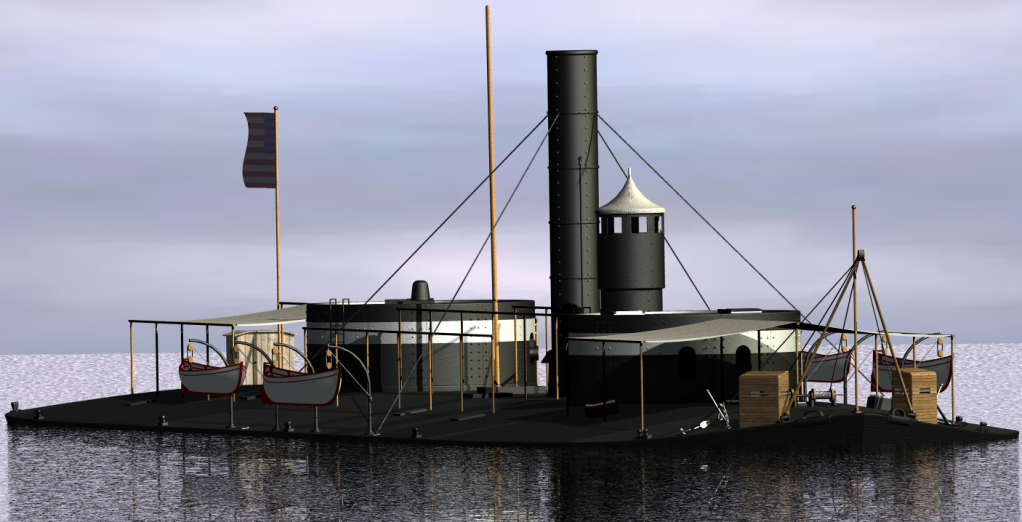
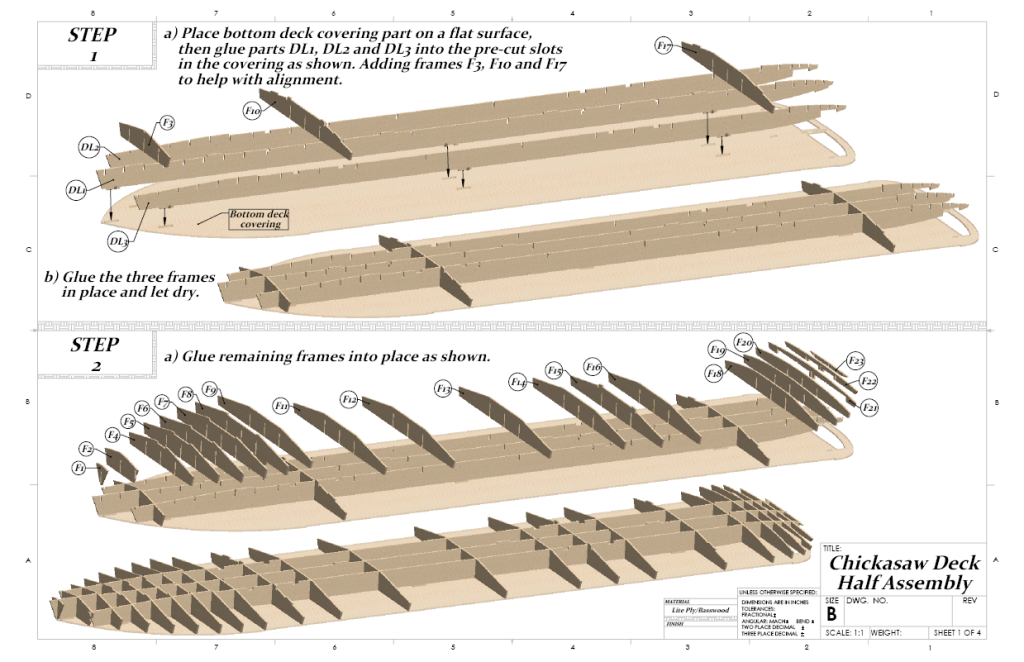
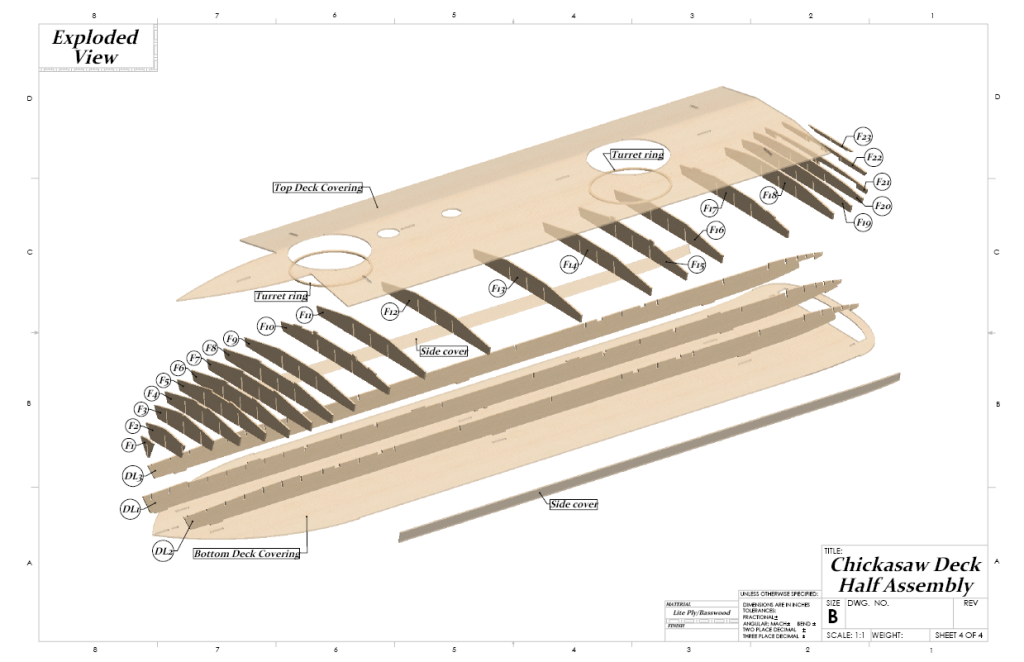
OK, I sent you the assembly drawings for the top half to check out, they are fairly basic, but I'd like to get your opinion on the instructions. Here's some pics of them so if you or anyone else has any suggestions, feel free to critique them.
Sheet 1
Sheet 2
Sheet 3
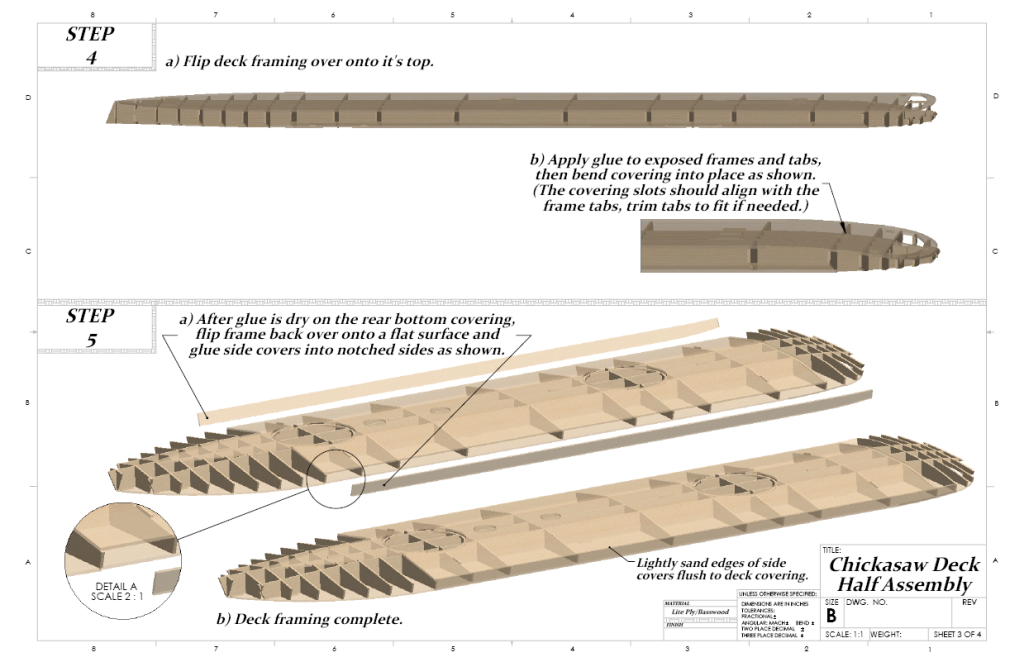
Sheet 4
Take care,
Dean
That's kinda strange that one turret would look good and the other doesn't, the bad one must have been done on a Monday.
Yeah, no problem, I'll send you the turret I have, but you can keep the bad one, you can use it as a practice piece. Thanks anyway...
OK, I sent you the assembly drawings for the top half to check out, they are fairly basic, but I'd like to get your opinion on the instructions. Here's some pics of them so if you or anyone else has any suggestions, feel free to critique them.
Sheet 1
Sheet 2
Sheet 3
Sheet 4
Take care,
Dean
-
Devin
- Posts: 2500
- Joined: Mon Jan 10, 2005 10:46 am
- Location: Hoboken, NJ
- Contact:
Re: The CAD-yard
Nice job on the instructions! Once I finally get my current project off of the bench, I'll start transferring those part numbers to the wood sheets and cut those things out. I imagine the actual assembly will be a quick process.
We like our history sanitized and theme-parked and self-congratulatory, not bloody and angry and unflattering. - Jonathan Yardley
-
Roscoe
- Posts: 296
- Joined: Thu Jul 07, 2011 5:12 pm
Re: The CAD-yard
Thanks Devin,
Glad you like them, I try to keep the drawings simple if possible, and if you ever do have a question about anything, I'm just an e-mail or PM away.
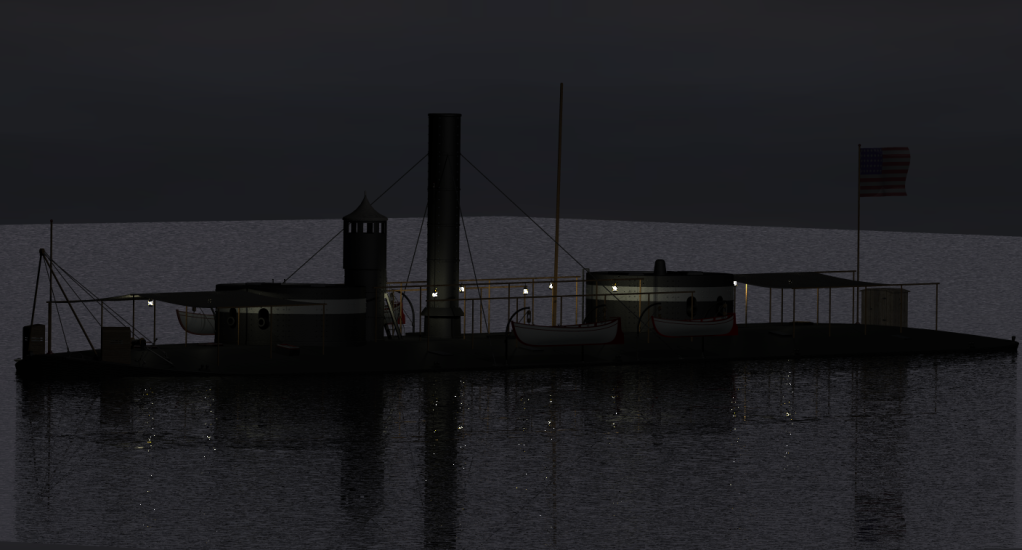
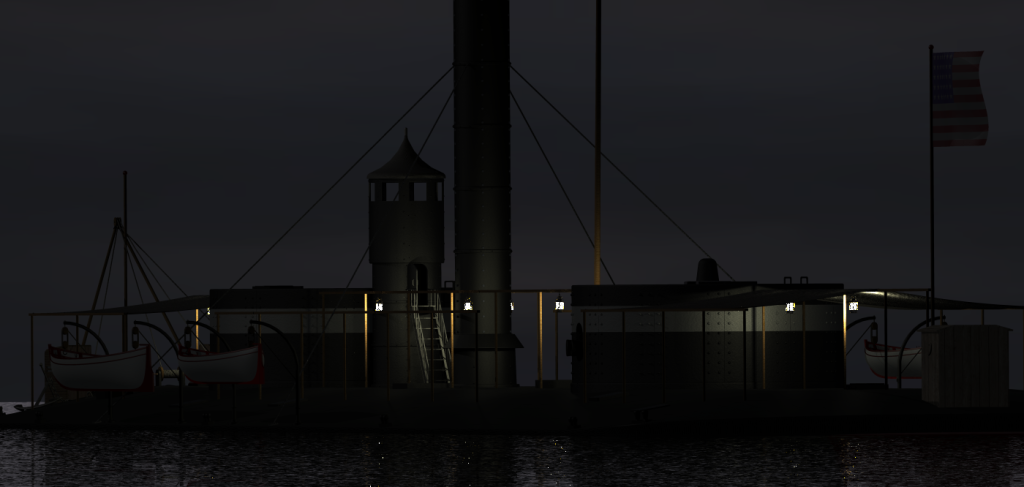
For a fun little experiment, I wanted to try out some nighttime renders, so I made up a period lantern, put a few on the Chickasaw, and did a render. Adding the 10 lanterns and their light really increased the render time, A LOT, but that was to be expected. I still need to tweak the lighting and scene some to get it to look better.
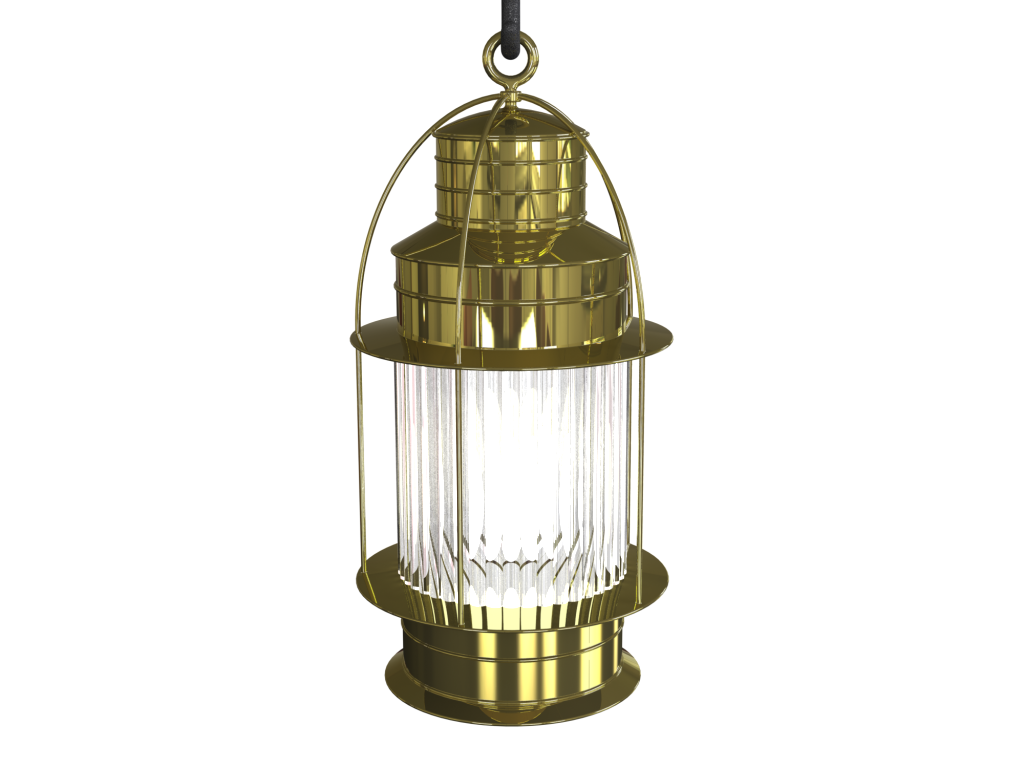
You can't tell what the lantern's look like from that pic, so here's a close-up......
Dean
Glad you like them, I try to keep the drawings simple if possible, and if you ever do have a question about anything, I'm just an e-mail or PM away.
For a fun little experiment, I wanted to try out some nighttime renders, so I made up a period lantern, put a few on the Chickasaw, and did a render. Adding the 10 lanterns and their light really increased the render time, A LOT, but that was to be expected. I still need to tweak the lighting and scene some to get it to look better.
You can't tell what the lantern's look like from that pic, so here's a close-up......
Dean
Last edited by Roscoe on Sat Jan 14, 2012 12:58 pm, edited 1 time in total.
-
Devin
- Posts: 2500
- Joined: Mon Jan 10, 2005 10:46 am
- Location: Hoboken, NJ
- Contact:
Re: The CAD-yard
Wow, that looks fantastic! Also, thanks for the lantern render, I'm going to need to scratch build some in 1/96th for my Carondelet build, and I was lacking a good drawing or photo to go from.
We like our history sanitized and theme-parked and self-congratulatory, not bloody and angry and unflattering. - Jonathan Yardley
-
Cadman

- Site Admin

- Posts: 3631
- Joined: Sat Jan 08, 2005 4:31 pm
- Location: Plattsburg, Missouri
-
Roscoe
- Posts: 296
- Joined: Thu Jul 07, 2011 5:12 pm
Re: The CAD-yard
Thanks Devin and Cadman.
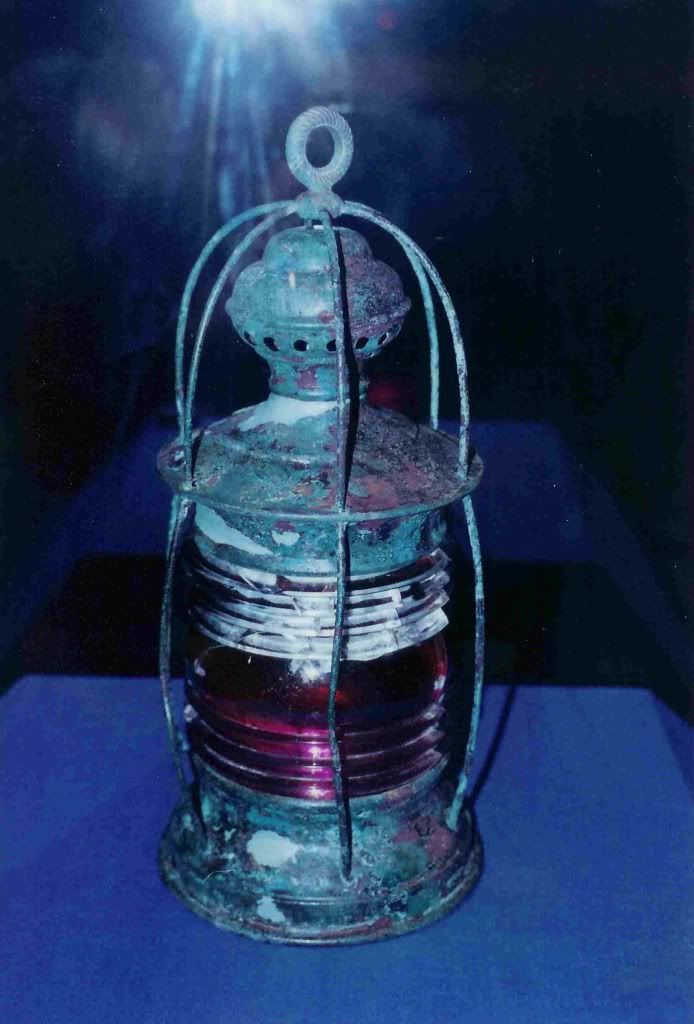
Here's a couple more evening shots, and a pic of a period signal lantern that I found that maybe you can use Devin.

Red signal lantern...
Take care guys,
Dean
Here's a couple more evening shots, and a pic of a period signal lantern that I found that maybe you can use Devin.
Red signal lantern...
Take care guys,
Dean
-
Devin
- Posts: 2500
- Joined: Mon Jan 10, 2005 10:46 am
- Location: Hoboken, NJ
- Contact:
Re: The CAD-yard
Oh, yeah, that's the lantern from Monitor. Now that I see it, I recall I have all kinds of photos of that thing. Duh. Sometimes mind no work good.
Really great renders, looks very realistic.
Really great renders, looks very realistic.
We like our history sanitized and theme-parked and self-congratulatory, not bloody and angry and unflattering. - Jonathan Yardley
-
DrPR
- Posts: 1689
- Joined: Sun Mar 07, 2010 12:01 am
- Location: Corvallis, Oregon, USA
- Contact:
Re: The CAD-yard
Good photo of the lantern - from the Monitor?
It is worth noting that this style glass lens was still in use on shipboard navigation lights when I was in the Navy in the 1960s and 1970s, more than a century after the Monitor. So, when in doubt, use this type lens.
Phil
It is worth noting that this style glass lens was still in use on shipboard navigation lights when I was in the Navy in the 1960s and 1970s, more than a century after the Monitor. So, when in doubt, use this type lens.
Phil
A collision at sea will ruin your entire day. Aristotle
-
Roscoe
- Posts: 296
- Joined: Thu Jul 07, 2011 5:12 pm
Re: The CAD-yard
Lol, happens to me all the time.Devin wrote: Duh. Sometimes mind no work good.
Yes, here's an interesting quote from the NOAA website that accompanies the lantern picture.DrPR wrote: from the Monitor?
"On the night the Monitor went down, the captain raised this red lantern as a final distress signal. The last object seen by the Monitor's crew was to later become the first object recovered from the wreck site."
And it's amazing that they still used that glass style into the 1970's, pretty cool....
Dean
-
tea monster
- Posts: 275
- Joined: Sat Jun 11, 2011 5:02 pm
- Contact:
Re: The CAD-yard
Dean, that is so sweet!
Try chucking a silvery spot up in one corner of the scene and put a nice moonlit river scene in the background.
That looks amazing!

Owen
Try chucking a silvery spot up in one corner of the scene and put a nice moonlit river scene in the background.
That looks amazing!
Owen