Channell wrote:Very clean, straight and exact work Kelly!
Are you gonna go for the Veteran bofors or use the Pontos set modificatons?
I haven't decided yet... I'm really getting to the point where I want this thing done soon. How far do I want to go on a part that people will spend a half second looking at? Then on the other hand I want it to be as nice and detailed as I can make it. I keep flip-flopping.
I know that burnout feeling! It hasn't hit on my 'Mo yet but I am really puttering around on my build and suppose I'll count it's build time in years.
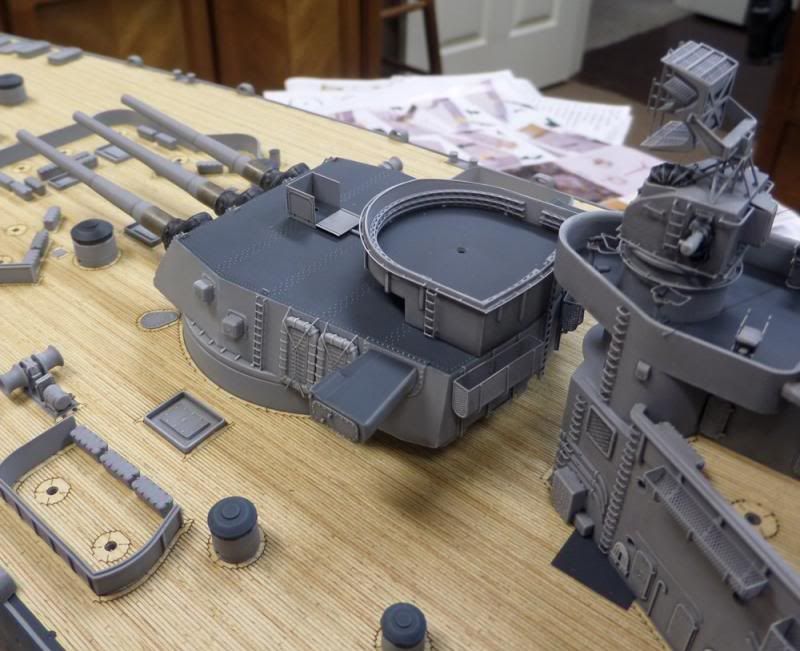
I'm interested in seeing your guns come together... I'm really pulling my hair out on mine but it will be cool to see them done with your mad modeling skills no matter which road you take on 'em.
A great build...makes me want to have a 1/200 Mighty Mo as well...but I do not have the room for it.
One thing about the timeframe...wooden decks and MS-22 are post war, you identified that already. Also the issue with the 2x3 20mm at turret No2...but I believe that during the break at Pearl before going to New York the whole hull was painted Navy Blue, so no demarcation horizontally any more and no Haze Gray bow. Check your photos...I am rather certain!
cheers
Uwe
...who has a 1945 1/350 under restauration and just bought the new 1991 version as well
Great build. Just amazing. I have this kit bought myself and look forward to at least a few years of tough work to finish and I am both awed at the level of quality I see and terrified that I won't even get close when I build this beast. Going to be a lot of fun trying to get close to your amazing abilities though, Kelly Quirk.
Waiting for the slipway to be built: (it will be soon)
Trumpeter 1/200 USS Missouri
Tamiya 1/350 Bismarck
Tamiya 1/350 USS Enterprise
Tamiya 1/350 King George V
Tamiya 1/350 IJN Yamato
A great build...makes me want to have a 1/200 Mighty Mo as well...but I do not have the room for it.
One thing about the timeframe...wooden decks and MS-22 are post war, you identified that already. Also the issue with the 2x3 20mm at turret No2...but I believe that during the break at Pearl before going to New York the whole hull was painted Navy Blue, so no demarcation horizontally any more and no Haze Gray bow. Check your photos...I am rather certain!
cheers
Uwe
...who has a 1945 1/350 under restauration and just bought the new 1991 version as well
Holy smokes I think you're right about the paint, wow I never caught that! Hmm, not sure what I'll do... According to Stillwell, the decks were holystoned on the way back to Pearl, so there was a brief time when the decks were tan and the haze gray bow would be correct. My problem may be that I put "October" on my name plate. Crap, there is always something! I'll have to give it some thought.
Thanks everybody for the help and compliments. I haven't touched it for a couple of weeks now, hope to do some work on it today.
This is an amazing build. Thank you for sharing it.
I know I won't get anywhere near the quality you have shown here but I sure am going to use what you have shown us as inspiration. Please keep up the great work.
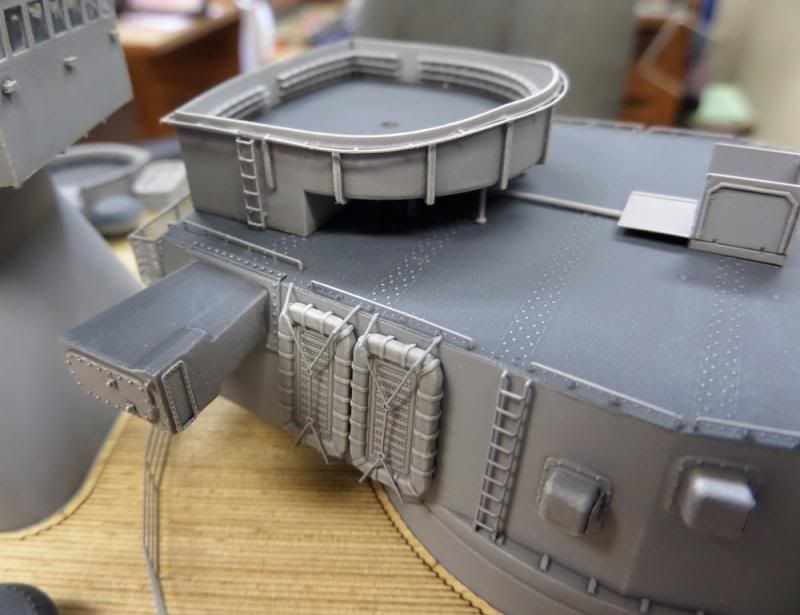
I have to ask: How do you make the ladder rungs so perfectly aligned? I used the drilling template as directed (Thank you Pontos!) and all the little holes line up but when I install the rungs they are offset by a little bit so it looks like I was quite drunk when I installed them. Honest I don't drink and model. Looking at my results in comparison to yours though perhaps I should.
The photos you are posting are as good a reference on how the Pontos photoetch is supposed to look as is the instruction manual by Pontos itself. Thanks again.
Dadeo911 wrote:I have to ask: How do you make the ladder rungs so perfectly aligned? I used the drilling template as directed (Thank you Pontos!) and all the little holes line up but when I install the rungs they are offset by a little bit so it looks like I was quite drunk when I installed them. Honest I don't drink and model. Looking at my results in comparison to yours though perhaps I should.
The photos you are posting are as good a reference on how the Pontos photoetch is supposed to look as is the instruction manual by Pontos itself. Thanks again.
Chris
Are you shaving off the kit "step" mold lines before taping the templates down? If the templates aren't totally flat on the plastic, they can easily get off-center. you've also gotta be careful to drill the holes straight in at 90 degrees to the bulkhead. Just a random thought...
I have sanded down the kit rungs. I have tried to go at a 90 degree to the surface I'm drilling at. It seems like the rungs don't want to go to the center of the hole drilled so they are off by a bit and then the entire rung doesn't want to sit square to the surface of the funnel or whatever I'm working on. Kinda frustrating. From a distance it doesn't look terrible but up close it does. Thanks for the reply Jason. Maybe I just need to cut back on the caffeine.
Dadeo911 wrote:I have sanded down the kit rungs. I have tried to go at a 90 degree to the surface I'm drilling at. It seems like the rungs don't want to go to the center of the hole drilled so they are off by a bit and then the entire rung doesn't want to sit square to the surface of the funnel or whatever I'm working on. Kinda frustrating. From a distance it doesn't look terrible but up close it does. Thanks for the reply Jason. Maybe I just need to cut back on the caffeine.
Chris
Get a small enough needle (a sharp one meant for sewing) and poke it into the hole location before going at it with the drill; that will help start the hole and keep the drill bit from wandering.
Also, drink more caffeine... you can never have too much.
Dadeo911 wrote:I have to ask: How do you make the ladder rungs so perfectly aligned? I used the drilling template as directed (Thank you Pontos!) and all the little holes line up but when I install the rungs they are offset by a little bit so it looks like I was quite drunk when I installed them. Honest I don't drink and model. Looking at my results in comparison to yours though perhaps I should.
The photos you are posting are as good a reference on how the Pontos photoetch is supposed to look as is the instruction manual by Pontos itself. Thanks again.
Chris
Chris, I know what you are saying. It's really just a matter of taking your time, and spot checking each rung as you glue it. Sometimes one or two of mine would go in a little wonky, but just take your tweezers and adjust it before the glue dries. It takes some time and patience, but the results are worth it.
I'm having sort of the same experience with the rungs as Chris has mentioned - some maybe not aligning in the holes. My holes are straight, but getting the rung into it inline is a devil. I've started drilling the holes only partially thru the plastic wall instead of drilling thru. This has helped. Any comments on this approach?
I did find an online supplier with .03mm dia. drill bits and bought 5 sets - I've already lost 3 to the carpet monster and they weren't even broken in yet!! Maybe I need more caffine.
Hank
HMS III
Mocksville, NC
BB62 vet 68-69
Builder's yard:
USS STODDARD (DD-566) 66-68 1:144, Various Lg Scale FC Directors Finished:
USS NEW JERSEY (BB-62) 67-69 1:200
USN Sloop/Ship PEACOCK (1813) 1:48
ROYAL CAROLINE (1748) 1:47
AVS (1768) 1:48
Kelly, you are buzzing right though this build. I think you'll be like the first kid on the block to have it build....then take it to cruise and place it in dry dock before anyone else catches up Well, great work...shes looking fine. I'm waiting to see how you tackle the main guns.
I've started up on mine again, after a certain degree of demoralization kicked in when the aft deck section started bubbling up (I'm using the blue stained one). Fortunately, I was able to peel it off slowly and carefully, shoot a some 3M spray adhesive underneath and re-attach things.
Still working on the touch-ups and have not yet started weathering the hull. With all that Pontos PE, it seems like you can work for hours and not have much to show for it!