Here is a photo-tutorial for how I've done some calmer waters. I whipped this sea off for the tutorial so it's not the greatest, but it shows how I did the calm water in my Graf Spee diorama Using plaster http://www.modelshipgallery.com/gallery ... /index.htm.
Usually my models are 1/350, this little 1/700 hull was used as a test piece for the demo.
Although the plaster can give great results, these days I'd probably do a calm sea using pink styrofoam and clear medium. Full tutorial for that technique here: viewtopic.php?f=4&t=158909&p=651903#p651903
Plaster can work, but it's kind of messy and out of control. But for what it's worth, here it is.
For rougher or rippled seas, I've outlined other methods here:
viewtopic.php?f=4&t=155661
viewtopic.php?f=4&t=155661
Calm water photo-tutorial with plaster
Moderator: JIM BAUMANN
-
sargentx

- Posts: 924
- Joined: Wed May 22, 2013 7:20 pm
Calm water photo-tutorial with plaster
- Attachments
-
- I use pre-made artist's painting panels for my bases. Here I've cut heavy illustration card into 1/2 inch strips. I will build a small wall to contain my water. This wall will be trimmed later. IT IS CRUCIAL THAT YOU SEAL YOUR INSIDE WALLS AND BASE WITH ACRYLIC MEDIUM ONCE IT HAS BEEN CONSTRUCTED. The wet plaster can warp your base and mush-up your cardboard walls. Sealing it will prevent this.
-
- Using a glue gun and ruler to ensure true verticals, I build a retaining wall that will end up being my 'block' of water. I run a bead of hot glue around the inside perimeter.
-
- It is important to plan how deep your water will be. I want my waterline to show so I use the model to make a line around my wall that is exactly how deep I want the water to be. HERE THE MODEL IS JUST A HULL....I DO MY SEA AROUND MY COMPLETED MODEL! I used this hull as an example.
-
- You will need plaster of paris (available at art stores) gloves, and a mixing bucket.
-
- Plan how much plaster you will need. Here I dumped my plaster in to the water line to measure. This was messy and I wouldn't do this again! But still, it's easy to mix way too much plaster; and God forbid should you mix too little.
-
- Dumping the plaster into a mixing bucket.
-
- Add water to the plaster until the mixture is something a little more runny than pudding. It should pour, but not be too wet.
-
- *****THOROUGHLY MIX YOUR PLASTER AND RID IT OF LUMPS! Use gloved hands to do this. You can feel the lumps**** Here I am pouring the plaster into my base to the water line.
-
- Sifting the base on the table facilitates easy self levelling. If you see some lumps, mush them out now.
-
- Using a straw, gently blow directly down onto the sea to make horizontal riddles. All you need is the slightest flow of air. If you over do it, just sift the base to soften things out again. Obviously you can blow whatever pattern you want into the water.
Last edited by sargentx on Tue Feb 17, 2015 7:27 pm, edited 13 times in total.
Every time the PE sticks to your tweezers, you lose a minute off your life.
-
sargentx
- Posts: 924
- Joined: Wed May 22, 2013 7:20 pm
Re: Chris Flodberg Calm water tutorial
PART 2
- Attachments
-
- Here I have blown parallel riddles. I will now place my completed model into the plaster.
-
- Carefully place your completed model into the plaster and make sure it is straight. Try to put it in once, correctly, and without adjusting. Do it once, do it right.
-
- If you want, you can now blow in some trailing wake. Vary your blowing distance as the wake moves away from the ship. Study how trailing wake moves back and away from the ship. These wake lines will intersect the breezy horizontals and make a moray pattern. This has a strong 'how did you do that' factor.
-
- All the blowing is finished and it must be left to cure and dry out for 24 hours or even more.
-
- I didn't wait for this to cure so my walls are damp and things aren't trimming away nicely. I've opted to tear off all the cardboard and sand things neatly. Normally, the cardboard would trim away nicely at the tops and I can sand the plaster nice and flush to this edge.
-
- Sandpaper and razor blades trim and shape the plaster easily at the edge. My edges are ugly here because I didn't want to wait for it to cure.
-
- Using typical model putty, you can fill any air holes and imperfections. I usually sand the water as well to make things smooth and nice.
-
- Here I have painted the water a dark bluish grey and have applied dozens of coats of High gloss acrylic varnish. The gloss really kicks things over into a truly liquid effect. The more coats you do (brushing with the waves of course) the better it looks. Leave your plaster at least a week before you paint and finish it.
-
- Same technique. Finished with epoxy.
Last edited by sargentx on Wed May 27, 2015 12:59 am, edited 2 times in total.
Every time the PE sticks to your tweezers, you lose a minute off your life.
-
sargentx
- Posts: 924
- Joined: Wed May 22, 2013 7:20 pm
Re: Chris Flodberg Calm water tutorial
SOME IMPORTANT NOTES ON THIS TECHNIQUE
-Adding some cardboard feet or some dremeled grooves to the bottom of your ship will give the plaster something to grip and will secure your ship in.
-If you screw up your water, it's easy to simply remove the ship out of the damp plaster with little mess to the ship so you can restart again.
-When you place a full hull ship into the plaster, the displaced plaster will form a mound around the ship. It is a good idea to waterline your ship for this process. if you don't, be sure to sift out this displaced mound.
-Thoroughly allow your plaster to dry. If you don't, you will get poor adhesion of subsequent paint layers.
-If you plan on coating this water with epoxy, first allow your plaster to dry for at least a week. Then, after you've painted your water on, give it 24 hours to fully cure. If you apply epoxy onto un-cured paint/plaster, you will get a foggy, patching effect known as bloom. It will ruin your sea. I strongly recommend NOT using epoxy as a shiny coating. Multiple layers of Liquitex High Gloss medium is ideal, permanent, non-yellowing, and extremely shiny.
-If you get bloom, repaint the water colour right onto the epoxy, wait, and re-apply more epoxy. This isn't great, but it'll save things.
-The wet plaster has the ability to warp your base as it is curing. Before pouring your plaster, seal the inside of your 'well' with acrylic clear medium. This will prevent warping. Be sure to coat your cardboard walls as well.
-Until the plaster is fully cured, it will crumble at the cardboard walls while you are trimming it. This is lame.
-Adding some cardboard feet or some dremeled grooves to the bottom of your ship will give the plaster something to grip and will secure your ship in.
-If you screw up your water, it's easy to simply remove the ship out of the damp plaster with little mess to the ship so you can restart again.
-When you place a full hull ship into the plaster, the displaced plaster will form a mound around the ship. It is a good idea to waterline your ship for this process. if you don't, be sure to sift out this displaced mound.
-Thoroughly allow your plaster to dry. If you don't, you will get poor adhesion of subsequent paint layers.
-If you plan on coating this water with epoxy, first allow your plaster to dry for at least a week. Then, after you've painted your water on, give it 24 hours to fully cure. If you apply epoxy onto un-cured paint/plaster, you will get a foggy, patching effect known as bloom. It will ruin your sea. I strongly recommend NOT using epoxy as a shiny coating. Multiple layers of Liquitex High Gloss medium is ideal, permanent, non-yellowing, and extremely shiny.
-If you get bloom, repaint the water colour right onto the epoxy, wait, and re-apply more epoxy. This isn't great, but it'll save things.
-The wet plaster has the ability to warp your base as it is curing. Before pouring your plaster, seal the inside of your 'well' with acrylic clear medium. This will prevent warping. Be sure to coat your cardboard walls as well.
-Until the plaster is fully cured, it will crumble at the cardboard walls while you are trimming it. This is lame.
Last edited by sargentx on Wed May 27, 2015 1:03 am, edited 1 time in total.
Every time the PE sticks to your tweezers, you lose a minute off your life.
-
RoyMac

- Posts: 49
- Joined: Mon Jan 04, 2010 3:28 pm
Re: Chris Flodberg Calm water photo-tutorial
Dear Chris
Hugely impressed with heavy seas, ice, and calm waters techniques.
Going to give the latter a go on my 1/350 Flower....before trying the harder heavy seas on something more substantial. I wondered if you could clarify the two part epoxy application from your calm waters tutorial?
Is this the type of epoxy where you mix it up in a beaker and then pour onto the base or is it a brushed on application?
If you pour it how do you get it to settle evenly over the painted plaster base whilst maintaining the ripples you have already created in the plaster?
Also, have you experienced any problems with heat generation from the epoxy..I once followed a thread on another forum where a chap had made an extraordinary Swordfish dio only for him to pour the resin and have it melt the planes floats into a gooey mess!
Thanks in advance
Roy
Hugely impressed with heavy seas, ice, and calm waters techniques.
Going to give the latter a go on my 1/350 Flower....before trying the harder heavy seas on something more substantial. I wondered if you could clarify the two part epoxy application from your calm waters tutorial?
Is this the type of epoxy where you mix it up in a beaker and then pour onto the base or is it a brushed on application?
If you pour it how do you get it to settle evenly over the painted plaster base whilst maintaining the ripples you have already created in the plaster?
Also, have you experienced any problems with heat generation from the epoxy..I once followed a thread on another forum where a chap had made an extraordinary Swordfish dio only for him to pour the resin and have it melt the planes floats into a gooey mess!
Thanks in advance
Roy
"There are some men in the water just about there"
-
sargentx
- Posts: 924
- Joined: Wed May 22, 2013 7:20 pm
Re: Chris Flodberg Calm water photo-tutorial
Glad it's getting the cogs going! You'll definitely have to putz with these methods to iron out the wrinkles. With the oats...use OAT BRAN if you can find it. It may not work as well for 1/700. Protect your ship against the curing PE and be sure fill the oat surface before painting. The most effective way of doing this I've found is by gluing small 1" sized pieces of paper all over the surface. This will bridge the gaps of the texture and create a really convincing surface. It also makes bridging cracks or splits along the waterline idiot proof!
I usually try to avoid epoxy these days as it tends to yellow quite badly. For the calm water, I simply brushed it on rather thinly. Too much epoxy and it starts to puddle and pool in the recesses resulting in a strange, undesirable look. I almost dry-brush it on...like a teaspoon for the whole sea.
I usually try to avoid epoxy these days as it tends to yellow quite badly. For the calm water, I simply brushed it on rather thinly. Too much epoxy and it starts to puddle and pool in the recesses resulting in a strange, undesirable look. I almost dry-brush it on...like a teaspoon for the whole sea.
Every time the PE sticks to your tweezers, you lose a minute off your life.
-
biggles2
- Posts: 1980
- Joined: Thu May 30, 2013 1:50 pm
Re: Chris Flodberg Calm water photo-tutorial
What type (brand) of epoxy do you use, as opposed to resin? Can you tint the epoxy before pouring to offset any future yellowing? 
-
biggles2
- Posts: 1980
- Joined: Thu May 30, 2013 1:50 pm
Re: Chris Flodberg Calm water photo-tutorial
If you coat the insides of the cardboard retaining walls with Vasoline (or similar), will they be easier to peel off? Have you ever used decorative wood strip molding (dollhouse wood strips) as retaining walls, and, of course, left them there as part of the base?
-
sargentx
- Posts: 924
- Joined: Wed May 22, 2013 7:20 pm
Re: Chris Flodberg Calm water photo-tutorial
I don't use anything but cardboard because it's easy to trip to the top of the sea which will never be level or perfect. I suppose you could make temporary walls and coat them with an oil to resist the plaster. I don't know, whatever is the neatest final presentation I guess. I actually prefer 5 minute epoxy you'd get from the hardware store from LePage. I like that it's very thick and self leveling. If I'm not using that, I'm using Envirotex Pour On. You won't notice yellowing for the most except where you've painted wake or applied cotton or whatever. There the yellowing will show-up as an ugly nicotine looking blotches of stain.
Every time the PE sticks to your tweezers, you lose a minute off your life.
-
biggles2
- Posts: 1980
- Joined: Thu May 30, 2013 1:50 pm
Re: Chris Flodberg Calm water photo-tutorial
Oh, I thought you removed the cardboard retaining walls completely. But you just trim them down to water level at the edge? Do you paint the remaining cardboard walls, or cover them with a veneer (for a better look)? I've never used 2-part epoxy for anything other than sticking two parts together. You can actually brush it? How many tubes of epoxy did it take to cover the Graf Spee water, or can you get epoxy in bulk? I imagine you have to work real fast once the epoxy is mixed!
-
sargentx
- Posts: 924
- Joined: Wed May 22, 2013 7:20 pm
Re: Chris Flodberg Calm water photo-tutorial
Nope....I keep the cardboard as part of the diorama. I'm careful to make the edges nice. The edges of all my seas are painted cardboard. I just pain the sides the same color as the sea.
5 minute epoxy does set quite fast but behaves in a really nice, thick, but levelling way. The pour on stuff is soupier like syrup and tends to settle more into recesses. It takes 12-24 hours to cure, but is sticky after about 3 hours. When using epoxy, always ensure a perfect mix as per the instructions or you will end up with a permanently sticky, semi-dried sea.
5 minute epoxy does set quite fast but behaves in a really nice, thick, but levelling way. The pour on stuff is soupier like syrup and tends to settle more into recesses. It takes 12-24 hours to cure, but is sticky after about 3 hours. When using epoxy, always ensure a perfect mix as per the instructions or you will end up with a permanently sticky, semi-dried sea.
Every time the PE sticks to your tweezers, you lose a minute off your life.
-
Eric Bergerud
- Posts: 359
- Joined: Thu Apr 01, 2010 10:24 pm
Re: Chris Flodberg Calm water photo-tutorial
Chris,
Very interesting. How do you handle white water effects when doing calm water. Cotton? Put a little gel on and dry brush the tops white? I'm thinking something like this:
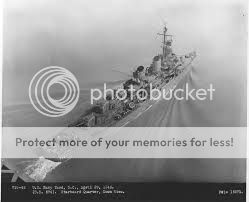
Or maybe this - not quite dead calm, but no gale either:

Thanks
Eric
Very interesting. How do you handle white water effects when doing calm water. Cotton? Put a little gel on and dry brush the tops white? I'm thinking something like this:

Or maybe this - not quite dead calm, but no gale either:

Thanks
Eric
A model boat is much cheaper than a real one and will not sink with you in it.
-
sargentx
- Posts: 924
- Joined: Wed May 22, 2013 7:20 pm
Re: Chris Flodberg Calm water photo-tutorial
To make that sea in the black and white photo, I'd use oats and CA or carved styrofoam covered with oats and buried under paper or paper towel.
I would then finish it exactly the same way I finish my other seas....airbrush the subsurface churn (usually some kind of minty greenish color), followed by cotton.
For sea that is super glassy calm,BUT there is wake effect is a much more difficult thing to do.
For an ultra calm sea, but wake effects present, I'd carve my sea out of foam, sand it, coat with plaster of paris, sand again, coat with epoxy, sand again, airbrush the sea color, put in ship, resolve cracks with paper, do wake with airbrush and cotton, and finally coat with more epoxy. I would only put the epoxy up to where any whitewater effects start. I don't ever touch my cotton with epoxy as it tends to yellow over time and look gross!
I would then finish it exactly the same way I finish my other seas....airbrush the subsurface churn (usually some kind of minty greenish color), followed by cotton.
For sea that is super glassy calm,BUT there is wake effect is a much more difficult thing to do.
For an ultra calm sea, but wake effects present, I'd carve my sea out of foam, sand it, coat with plaster of paris, sand again, coat with epoxy, sand again, airbrush the sea color, put in ship, resolve cracks with paper, do wake with airbrush and cotton, and finally coat with more epoxy. I would only put the epoxy up to where any whitewater effects start. I don't ever touch my cotton with epoxy as it tends to yellow over time and look gross!
Every time the PE sticks to your tweezers, you lose a minute off your life.
-
Eric Bergerud
- Posts: 359
- Joined: Thu Apr 01, 2010 10:24 pm
Re: Calm water photo-tutorial with plaster
Chris,
I've never done a water effect base before because I have very serious space problems but I also think that unless the effects are done right they can detract from the model rather than enhance it. Yours enhance greatly.
I'm going to send a couple of monkeys into orbit before I plunk a completed DD into wet plaster. Would it be possible to give a guesstimate on water/plaster proportions for the mixture - I doubt I've used the stuff since junior high art class?
Wish me luck
Eric
I've never done a water effect base before because I have very serious space problems but I also think that unless the effects are done right they can detract from the model rather than enhance it. Yours enhance greatly.
I'm going to send a couple of monkeys into orbit before I plunk a completed DD into wet plaster. Would it be possible to give a guesstimate on water/plaster proportions for the mixture - I doubt I've used the stuff since junior high art class?
Wish me luck
Eric
A model boat is much cheaper than a real one and will not sink with you in it.
-
sargentx
- Posts: 924
- Joined: Wed May 22, 2013 7:20 pm
Re: Calm water photo-tutorial with plaster
Practice makes perfect...
Definitely try some tests.
Think a little thicker than house paint. Somewhere between house paint and pudding.
Add plaster to the water until you see an island sticking up in the middle of your water. That's about right. You really have to experiment.
Definitely read over the list above where I note some important things.
These days I'm all about using styrofoam. For calm waters, I've been having very good luck with acrylic gloss medium added on top of a pre-painted, ultra smooth surface that was carved from the foam. That's how my Prince of Wales was done just recently.
Honestly, I've spent 100's of hours putzing with water effects for better or worse; and no two are the same. I pick and choose from many 'discoveries' depending on what I want to depict.
Although I disliked the idea at first, I've come to believe that a sea that can be made separate from the ship is best. That way you can try multiple times until you like it and you're not so committed.
Good luck and keep us posted!
Definitely try some tests.
Think a little thicker than house paint. Somewhere between house paint and pudding.
Add plaster to the water until you see an island sticking up in the middle of your water. That's about right. You really have to experiment.
Definitely read over the list above where I note some important things.
These days I'm all about using styrofoam. For calm waters, I've been having very good luck with acrylic gloss medium added on top of a pre-painted, ultra smooth surface that was carved from the foam. That's how my Prince of Wales was done just recently.
Honestly, I've spent 100's of hours putzing with water effects for better or worse; and no two are the same. I pick and choose from many 'discoveries' depending on what I want to depict.
Although I disliked the idea at first, I've come to believe that a sea that can be made separate from the ship is best. That way you can try multiple times until you like it and you're not so committed.
Good luck and keep us posted!
Every time the PE sticks to your tweezers, you lose a minute off your life.
-
Eric Bergerud
- Posts: 359
- Joined: Thu Apr 01, 2010 10:24 pm
Re: Calm water photo-tutorial with plaster
Was on YouTube and found some nuggets after first searching in the wrong places. Certainly seems that some very good rail road guys think it very important (as you note in the previous post) to add plaster into cold water until those islands form and air bubbles start to pop and mix very carefully. That's not on the instructions delivered by DAP so I may have avoided an initial crash. Another fantasy game player has tested many materials for water effects and likes Liquitex Gloss Medium a lot. Course, he was all about surface and not about gentle waves which I saw on the plaster. (I've got Woodland Scenics Water Effects and Liquitex Gloss. Give both a try. Really would like to avoid epoxies because my work area is poorly ventilated.) Other railroaders like sheetrock (most plaster paris anyway) which dries far faster and can even be bought pre-mixed and then thinned. There's also a clear gloss acrylic modeling paste - that might be worth a shot. I'm using canvasboard from Blick Arts for a base material so I'll be able to throw a lot of things at the wall and hope something sticks.
Will definitely report any partial successes or particularly splendid blunders.
Eric
Will definitely report any partial successes or particularly splendid blunders.
Eric
A model boat is much cheaper than a real one and will not sink with you in it.
-
Eric Bergerud
- Posts: 359
- Joined: Thu Apr 01, 2010 10:24 pm
Re: Calm water photo-tutorial with plaster
I've killed a couple of monkeys on the launch pad: PETA is demanding an ejection mechanism and damn the cost. It's been fun though - plaster and acrylics, a little like being back in junior high art class. That's not bad.
One rocket is a couple feet off the pad and I thought I'd confer before hitting self-destruct. The base is canvas board painted with a dark gray/blue Golden Acrylic brew I invented. I airbrushed to keep the layer of paint as thin as possible. The hull mark is from a 1/700 DML waterline DD. Still haven't mastered the riddles, but you can see a series running at an angle from the hull. (I think maybe your plaster is a little thicker than mine. Been told that using really cold water lengthens work time: hope so because the plaster quickly starts to harden beyond the degree that a whiff of air will show up. We'll get it I hope.)
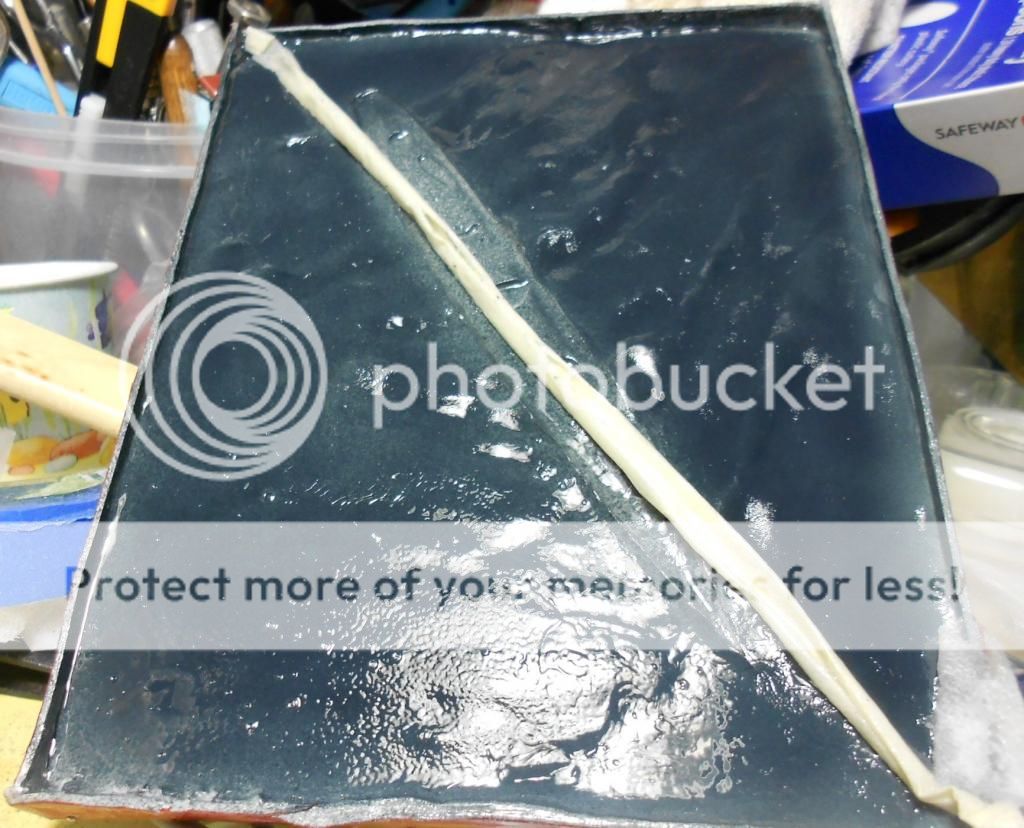
Anyway, I've divided this example with some rolled up tape. On the right, I've used Woodland Scenics Realistic Water; on the left Liquitex Gloss Medium/Varnish. The Woodland brew is very clear and I may actually have a little too much on. The Liquitex is quite clear and both are very hard. (The photo makes it appear that the left side is lighter - that really reflects the angle of the photo: they both cured very clear.) One difference though and I'm not sure if it's good or bad. The Liquitex has a slightly coarse texture on the top: perhaps there's a little more air in it. But I'm not sure that's bad. I do a lot of fishing in SF Bay and even during a dead calm the water always has a kind of shimmer to it - doesn't look like glass. The Woodland does have a mirror quality: that'll help when I get the riddles in better shape, but I'm not sure if it isn't going to be too translucent. May well be that I've got too much gloss agents on altogether. Next one will go on in two thin layers. One of these has to be it I think - my place is small and I don't want to mess with expoxy.
Here's the ship that hopefully will find a home. It's a Dragon so you spend some moments wondering who's lost their marbles and others impressed by the company's skill. My ships don't meet the bar found on this board, but I kind of like it. Also took five months - maybe I should try a car.
Eric

One rocket is a couple feet off the pad and I thought I'd confer before hitting self-destruct. The base is canvas board painted with a dark gray/blue Golden Acrylic brew I invented. I airbrushed to keep the layer of paint as thin as possible. The hull mark is from a 1/700 DML waterline DD. Still haven't mastered the riddles, but you can see a series running at an angle from the hull. (I think maybe your plaster is a little thicker than mine. Been told that using really cold water lengthens work time: hope so because the plaster quickly starts to harden beyond the degree that a whiff of air will show up. We'll get it I hope.)

Anyway, I've divided this example with some rolled up tape. On the right, I've used Woodland Scenics Realistic Water; on the left Liquitex Gloss Medium/Varnish. The Woodland brew is very clear and I may actually have a little too much on. The Liquitex is quite clear and both are very hard. (The photo makes it appear that the left side is lighter - that really reflects the angle of the photo: they both cured very clear.) One difference though and I'm not sure if it's good or bad. The Liquitex has a slightly coarse texture on the top: perhaps there's a little more air in it. But I'm not sure that's bad. I do a lot of fishing in SF Bay and even during a dead calm the water always has a kind of shimmer to it - doesn't look like glass. The Woodland does have a mirror quality: that'll help when I get the riddles in better shape, but I'm not sure if it isn't going to be too translucent. May well be that I've got too much gloss agents on altogether. Next one will go on in two thin layers. One of these has to be it I think - my place is small and I don't want to mess with expoxy.
Here's the ship that hopefully will find a home. It's a Dragon so you spend some moments wondering who's lost their marbles and others impressed by the company's skill. My ships don't meet the bar found on this board, but I kind of like it. Also took five months - maybe I should try a car.
Eric

A model boat is much cheaper than a real one and will not sink with you in it.
-
EJFoeth
- Posts: 2924
- Joined: Wed Jan 21, 2009 1:51 pm
Re: Calm water photo-tutorial with plaster
When adding the divergent bow wave, try to model the pattern as visible here:
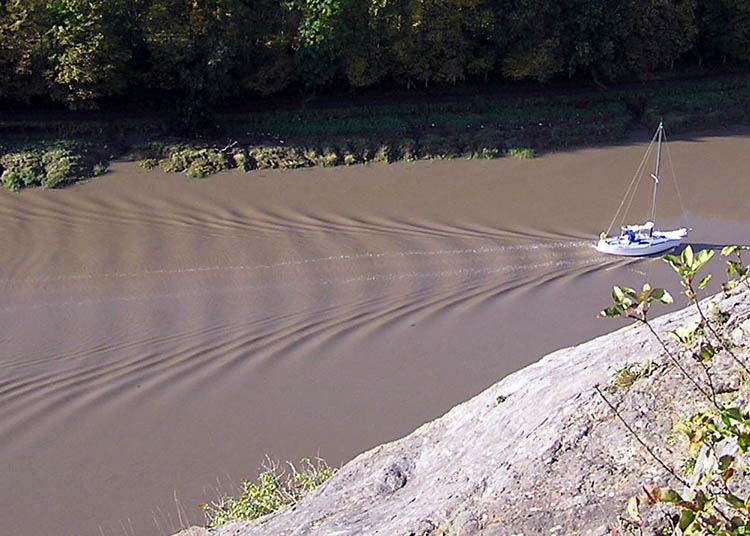
Note how the bow waves appear as a combination of smaller waves. This is called the Kelvin wave pattern.
These diverging waves originate at the bow and stern of the ship and never at the center point of the hull.
(I was half way writing an article on water waves for ship modelers but I guess it slowed to a halt somewhere...)
Note how the bow waves appear as a combination of smaller waves. This is called the Kelvin wave pattern.
These diverging waves originate at the bow and stern of the ship and never at the center point of the hull.
(I was half way writing an article on water waves for ship modelers but I guess it slowed to a halt somewhere...)
-
sargentx
- Posts: 924
- Joined: Wed May 22, 2013 7:20 pm
Re: Calm water photo-tutorial with plaster
That looks like it'll work. If worst comes to worst, you can always just pull the ship out of the semi-cured plaster. It slips out quite easily. A few minutes of clean up and you're ready to go again.
Once you do your plaster and it has totally cured; fill and sand it. The fewer divits, lumps, grits, holes etc. the better. You can always go back with some acrylic clear medium to affect some wavelets on top of the painted sea.
You might also give some pink styrofoam a try. Honestly, I only use foam these days for all types of sea. If you can cut that hole perfectly, you can make pretty convincing water by simply squeezing squahing the faom...or even carving it. It sands well and after some filling and additional sanding it can look really great for calm water.
Thanks for the update.
Once you do your plaster and it has totally cured; fill and sand it. The fewer divits, lumps, grits, holes etc. the better. You can always go back with some acrylic clear medium to affect some wavelets on top of the painted sea.
You might also give some pink styrofoam a try. Honestly, I only use foam these days for all types of sea. If you can cut that hole perfectly, you can make pretty convincing water by simply squeezing squahing the faom...or even carving it. It sands well and after some filling and additional sanding it can look really great for calm water.
Thanks for the update.
Every time the PE sticks to your tweezers, you lose a minute off your life.
-
Eric Bergerud
- Posts: 359
- Joined: Thu Apr 01, 2010 10:24 pm
Re: Calm water photo-tutorial with plaster
Lovely photo EJ. Wish the waves were generated from the bow - be hard to use for a single ship base.
I've been futzing with adding waves on top of cured water effects or gloss medium and it works well enough. (I've seen several YouTube railroad guys making little round water effect circles on wax paper: when dry they stick them on to a pond, lake etc and they look like ripples.) What I don't see, however, is how you get the trough effect so evident on EJ's photo.
Gotta to admit that project fatigue is setting in. But if I can't get decent results with plaster I can buy some foam and get out a lighter. Lord knows I have every gel known to man. I was very tempted to buy a nice wooden base to use for photo purposes and then find a comfy place to sit the model where I can see it. I do like to look at my own models and that would be impossible if each had some kind of base.
BTW: I've used some of the Golden High Flow and they do look good. What they are is a thinner version of Golden Fluids, a brand I use all the time. (A little like Vallejo thin Model Air vs thicker Model Color). I've got an early WWI biplane next up and it will need linen wings: I think a tad of ocher in with white will get pretty close. Then we'll see.
I've been futzing with adding waves on top of cured water effects or gloss medium and it works well enough. (I've seen several YouTube railroad guys making little round water effect circles on wax paper: when dry they stick them on to a pond, lake etc and they look like ripples.) What I don't see, however, is how you get the trough effect so evident on EJ's photo.
Gotta to admit that project fatigue is setting in. But if I can't get decent results with plaster I can buy some foam and get out a lighter. Lord knows I have every gel known to man. I was very tempted to buy a nice wooden base to use for photo purposes and then find a comfy place to sit the model where I can see it. I do like to look at my own models and that would be impossible if each had some kind of base.
BTW: I've used some of the Golden High Flow and they do look good. What they are is a thinner version of Golden Fluids, a brand I use all the time. (A little like Vallejo thin Model Air vs thicker Model Color). I've got an early WWI biplane next up and it will need linen wings: I think a tad of ocher in with white will get pretty close. Then we'll see.
A model boat is much cheaper than a real one and will not sink with you in it.
-
sargentx
- Posts: 924
- Joined: Wed May 22, 2013 7:20 pm
Re: Calm water photo-tutorial with plaster
Just a note on gel medium:
I personally never use it anymore. I find that it holds peaks and points too aggressively. I really enjoy the effect of putting acrylic clear medium NOT gel just regular clear medium on top of a smooth, painted surface. Don with little dibby dabs and failry thick application, it settle out into really nice, rounded wavelets. My Prince of Wales build was don by pouring noodles of clear medium on top of the painted base.
This whole water thing is a real science hey? lol keeps me up at night figuring out new ways to do it!
I personally never use it anymore. I find that it holds peaks and points too aggressively. I really enjoy the effect of putting acrylic clear medium NOT gel just regular clear medium on top of a smooth, painted surface. Don with little dibby dabs and failry thick application, it settle out into really nice, rounded wavelets. My Prince of Wales build was don by pouring noodles of clear medium on top of the painted base.
This whole water thing is a real science hey? lol keeps me up at night figuring out new ways to do it!
Every time the PE sticks to your tweezers, you lose a minute off your life.