IJN Zuikaku 1/350

Moderators: BB62vet, MartinJQuinn, JIM BAUMANN, Jon, Dan K

Guest

Re: IJN Zuikaku 1/350

Post by Guest »

Thanks for setting me straight, Dan. I agree the CVL elevator structure has some real differences from that on the bigger CVs.
The diagram above is from the Gran Prix Shuppan volume on the IJN CVs, and is is definitely for Junyo.
Sorry to continue down this rathole. I didn't realize the caption was in error. I'll have to make a note of that. Do you have anything more on sources I can add to that note? (though "Dan K said so" is pretty good already).

Just to make sure we're on the same page (literally), you're talking p152 of the Grand Prix "Nippon no Koukuubokan" by Hasegawa Touichi, right? My reading of the caption is "fig 4-15 aircraft elevator structure schematic depiction (carrier 'Chiyoda' forward elevator)".

Thanks,
George
Dan K
Posts: 9037
Joined: Tue Jan 11, 2005 10:56 am
Location: New York City

Re: IJN Zuikaku 1/350

Post by Dan K »

You know what, you are correct. It is captioned as Chiyoda, and it appears to be a single hangar deck design. I must have confused it with another diagram. :censored_2:

I mistook the hangar deck edge on the right as the deck between two hangar decks, as opposed to a machinery space on the bottom. :censored_2: :censored_2:

I suppose that helps make the case that the CVL versions are different than the CVs. :wink_3.gif
marijn van gils
Posts: 2686
Joined: Tue Feb 06, 2007 10:24 am
Location: Belgium

Re: IJN Zuikaku 1/350

Post by marijn van gils »

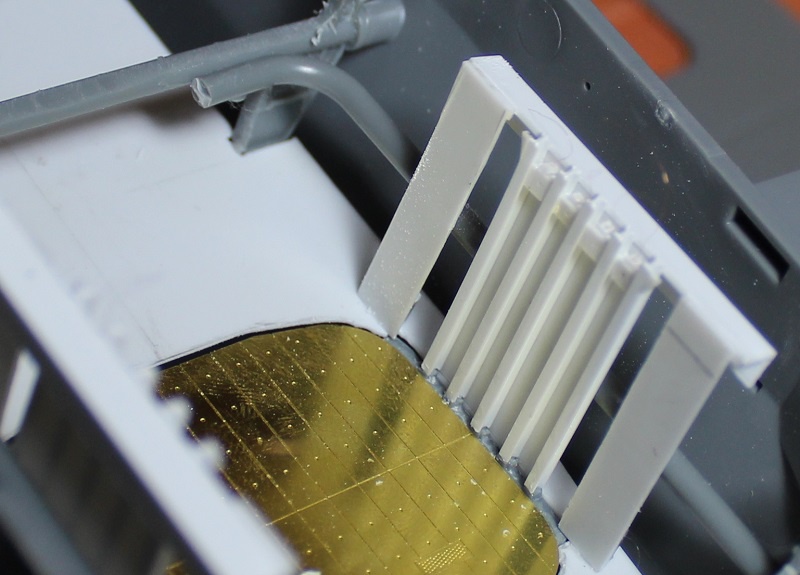
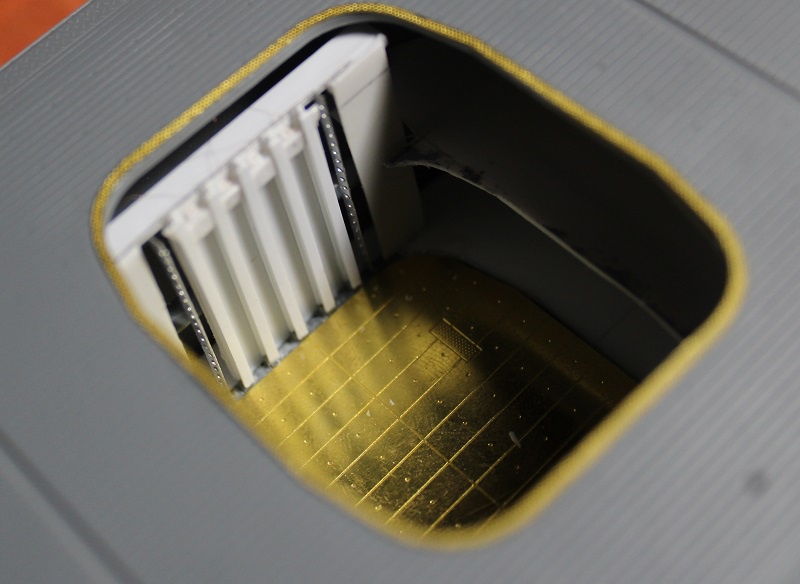
StevenVD wrote:I also see a sound base for the "grill shapes" on the picture taken backwards from the plane. If you look carefully next to the rudder of that plane, you see the dark lines crossing the deck marking stripes. Another grill is visible on the bow elevator floor on your color picture. Therefore I'll go with the masking.
These are very faint on both pics so it is hard to be sure, but I think you may be right!
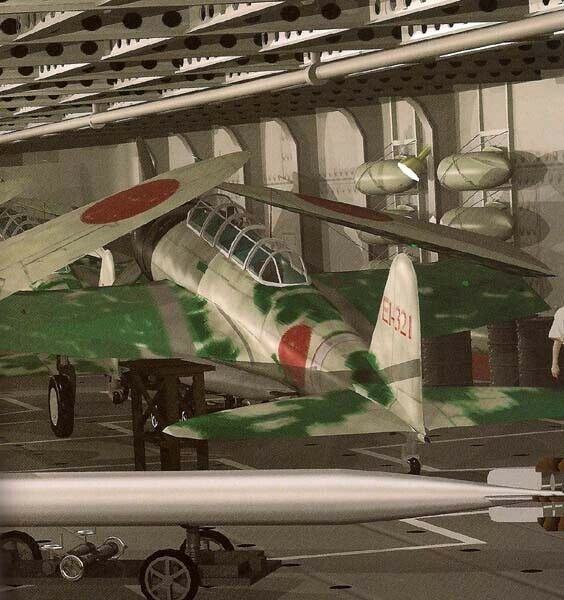
In this regard, I think this photograph of Katsuragi is very interesting:

Image

It has these grill shapes in the same positions: in front of and on the forward elevator. It is not completely clear if the one on the elevator is a grill or a solid block (the shadows of island and mast confuse a little). But on the overhead shot of Zuikaku I would say: if it is anything, it is a grill shape and not a solid block.

I also noticed that the rest of the pattern resembles Zuikaku very closely: light areas with the same shapes at the bow and stern, delineated by double dark arrow-shapes. We hadn't seen this at the stern yet (at least not double and bordering the light area), but now that I look at the overhead photo again, I do believe they are present! Interestingly, they are present on the deck masks you bought...

The light arrow shape midships is interupted by the hole in the flight deck, but it seems to be present on Katsuragi too. The dark arrow shape in front of it is present too, and the dark shape to its rear could be the same as on Zuikaku.

I have seen the shape on the aft elevator of Katsuragi interpreted as a solid block, but it may be a grill shape that is hard to see because the elevator looks darker because of its different texture. I find it hard to be sure here...

In any case I find the resembances striking. Maybe both ships were painted to the same design?

Note also how dark the windbreak looks on Katsuragi. But maybe it is partly opened and we see a shadow?

Between the windbreak and the forward elevator, there is another dark line. I'm not sure if this is present on Zuikaku, but it could be?
It is present in the deck masks. In fact, I do get the feeling the pattern of these masks was at least partly based on this photo of Katsuragi...

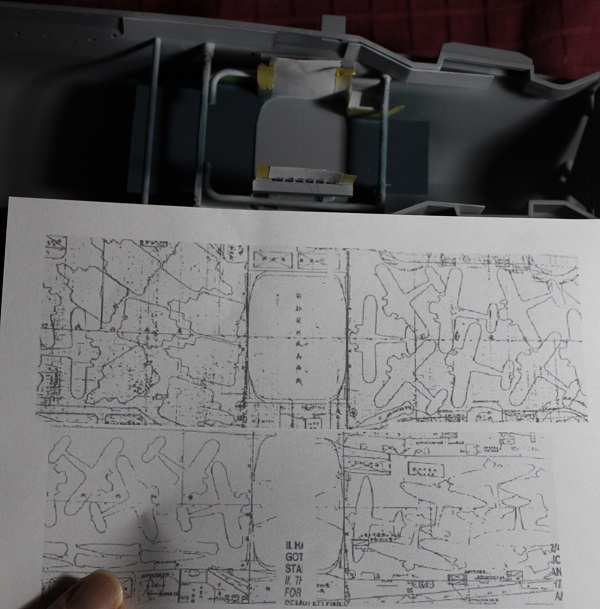
Anyway, I think I should colour up a new interpretation to visualize all of this. But I'll need some extra time for that! ;)

Also note the shape of the shadow of the mast. This seems to confirm Dan's assessment! :thumbs_up_1:
StevenVD wrote:But on the last picture you made an error, you got the deck upside down. This is visible at the stern port side dark arrow point I mentioned earlier. So the stern is down on the picture and the zone you indicated would be on the left. That makes some things more clear that were obscured on the large picture, like the light backward-pointing arrow before the dark one.
I'm not sure what you mean? Surely the stern is up in the picture? It is cropped from this photo (well, from a high-resolution version of it):
Image
But probably I'm misunderstanding what you mean... ;)
marijn van gils
Posts: 2686
Joined: Tue Feb 06, 2007 10:24 am
Location: Belgium

Re: IJN Zuikaku 1/350

Post by marijn van gils »

One last observation:
Note in the Katsuragi pic how the red-and-white deck markings at the stern shine through the green camouflage:
Image

This was also visible on Amagi:
Image

Although it is not visible on the photo's of Zuikaku (but those are much lower quality), it is not unreasonable to suspect that they were also visible on Zuikaku.
In any case, it is an interesting effect to replicate, and it tells part of the history if the ship:
Image

But if you do this, check the pattern Zuikaku had for these red-and-white markings. The ones of Katsuragi and Amagi already differed a lot...
Dan K
Posts: 9037
Joined: Tue Jan 11, 2005 10:56 am
Location: New York City

Re: IJN Zuikaku 1/350

Post by Dan K »

A couple of camo comments:

Photos indicate that Zuikaku was wearing the standard, alternating red and wipe warning striping on her round down earlier in the year. I think it very likely they were just painted over and would be slightly visible under the camo paint at Cape Engano, as Marijn and the Amagi photo suggests.

Pilots complained about the camouflage decks making landings more difficult. In many cases, some camo details were allowed to fade between the time of their application in the summer of '44 and Leyte Gulf. So, those grill markings are really not visible in the overhead at Cape Engano, whereas as the photo taken from the Tenzan taking off on a training flight occurred several months earlier, with those markings clearly visible.

FWIW.
StevenVD
Posts: 604
Joined: Fri Dec 27, 2013 6:32 pm

Re: IJN Zuikaku 1/350

Post by StevenVD »

Marijn, with the wake now fully visible I retract my objection, it was only based on the design of the first arrow shape being quite sharp but I think that's because of the oblique angle we see the deck in. I didn't realize the red-and-white had to be overpainted, that should be a challenge. Later on I'll post some pictures of the elevator counterweights I built, with lifting cables on them and all.
StevenVD
Posts: 604
Joined: Fri Dec 27, 2013 6:32 pm

Re: IJN Zuikaku 1/350

Post by StevenVD »

With Dan's scheme and Marijn's picures it was possible to improve the elevator considerably.

Image

The counterweights are pending in the shafts.

Image

Image

Hair-thin copper threads are tensioned with a steel wire.

Image

I made some rails for the guidance of the elevator floor.

Image

They were mounted in the well.

Image

Image

I clad the hull with Evergreen plating. Important is that these do not touch the hull edge because of the deck underside ridge. I started adding strips on the walls too, to have some relief when you look inside.

Image

Image

Image

I had to primer now before I could finish the construction of the upper hangar deck. The floor is a narrow fit in the hull and interior details would impede the fit.
Dan K
Posts: 9037
Joined: Tue Jan 11, 2005 10:56 am
Location: New York City

Re: IJN Zuikaku 1/350

Post by Dan K »

Much improved, and very nice.
marijn van gils
Posts: 2686
Joined: Tue Feb 06, 2007 10:24 am
Location: Belgium

Re: IJN Zuikaku 1/350

Post by marijn van gils »

Great job Steven! :thumbs_up_1: :thumbs_up_1: :thumbs_up_1:

One detail: I believe that the solid wall continued behind the support pilars too.

Dan K wrote:Pilots complained about the camouflage decks making landings more difficult. In many cases, some camo details were allowed to fade between the time of their application in the summer of '44 and Leyte Gulf. So, those grill markings are really not visible in the overhead at Cape Engano, whereas as the photo taken from the Tenzan taking off on a training flight occurred several months earlier, with those markings clearly visible.
That is very very interesting Dan! :thumbs_up_1: :thumbs_up_1: :thumbs_up_1:

The video shows the grill shapes clearly indeed:
Image

Image

But it is even much clearer when watching the moving images.

Note also in the video how the forward part of the light area at the bow looks much lighter where the deck is metal: [url=https://flic.kr/p/2jYzd6a]Image

And so do the elevators and the part of the deck edges:
Image

I also noticed the edges of the decks to look lighter on Amagi:
Image

Image

Image

This is a bit weird, because Amagi didn't have a wooden deck, everything was metal. Maybe there was an anti-slip coating on the rest of her deck, causing a slightly darker appearance? I don't know...

Anyway, on the overhead shot this effect is much less on Zuikaku, so I guess it is mostly caused by different reflection of the light on different surfaces? So, it is your choice whether or not to incorporate it in your model or not... ;)

Anyway, the video is also very helpful for something else: flight deck markings.
The above stills clearly show one dashed line along the centre. Besides that, I cannot make out much, expect a double L-shaped line close to her port deck edge (marked with ??? in the previous stills). Any idea what this can be?

Image
Dan K
Posts: 9037
Joined: Tue Jan 11, 2005 10:56 am
Location: New York City

Re: IJN Zuikaku 1/350

Post by Dan K »

One detail: I believe that the solid wall continued behind the support pillars too.
That is correct
This is a bit weird, because Amagi didn't have a wooden deck, everything was metal. Maybe there was an anti-slip coating on the rest of her deck, causing a slightly darker appearance? I don't know...

Anyway, on the overhead shot this effect is much less on Zuikaku, so I guess it is mostly caused by different reflection of the light on different surfaces?
The Unryu class flight decks were designed for wood planking over metal plating, but the lack of wood led to a latex mix covering instead, not bare or painted metal. The camouflage was painted over the latex. All the carrier flight decks were rimmed with a narrow, treaded metal strip, with rain gutters attached outboard. This is without question on Zuikaku. So, I would agree that it is a diffused reflection of light.
double L-shaped line close to her port deck edge
Warning stripe

But, again, keep in mind that this is a training film taken in the summer of 1944. Some aspects, like the grills, have faded by October.
StevenVD
Posts: 604
Joined: Fri Dec 27, 2013 6:32 pm

Re: IJN Zuikaku 1/350

Post by StevenVD »

I wanted to include the hangar deck markings for the planes, as in this Futabashi image.

Image

With the Morskie plans in 1/400 at my disposal, I only had to rescale to 114% to have a paper template for my painting session. I realise this is probably not accurate for 1944, but I don't have a plan for that.

Image

After painting the walls outside the elevator shaft white and the deck in Lifecolor Deck Blue, I could begin cutting out all plane positions on both decks.

Image

For each of 3 types of planes a master mask had to be trimmed to create a fine outline. Taping apertures were also created.

Image

The upper deck was easiest because it was still unattached.

Image

The lower deck masking had to be inserted into my makeshift hangar superstructure.

Image

Image

The results were acceptable after correcting overspray and blending with Tamiya NATO black as a shading agent.

Image

Then I unpacked the elevator shaft and did a dry-fit with the deck on. I'd say it was worthwile, but it would be too time-consuming to do this for all three elevators, as I had to interrupt painting with each new plane position to remask. If someone brought out a decal with these three outline types, that would really ease up the operation... Maybe a combo with small scale as these have often hangar decks added too.

Image

Image

Before I can definitely fix the deck, I have to add the boat deck girders. I can replace all +100 gallery girders with PE, but they strangely left out the front deck understructure.
marijn van gils
Posts: 2686
Joined: Tue Feb 06, 2007 10:24 am
Location: Belgium

Re: IJN Zuikaku 1/350

Post by marijn van gils »

Very nice Steven! :thumbs_up_1:
Dan K
Posts: 9037
Joined: Tue Jan 11, 2005 10:56 am
Location: New York City

Re: IJN Zuikaku 1/350

Post by Dan K »

Very nice work on the wells.

The outlines are an interesting detail to add.
StevenVD
Posts: 604
Joined: Fri Dec 27, 2013 6:32 pm

Re: IJN Zuikaku 1/350

Post by StevenVD »

Thanks! Now the deck is in for a razing.

Image

All support structures in plastic are removed for the replacement PE.

Image

The remains are levelled and slightly sanded down until only the position remains outlined. On the upside, the anti-skid is sanded, though Fujimi's anti-skid seemed slightly superior to Shipyard's. I can't leave the plastic anti-skid on because of the deck edge level. Also, three munition elevator covers are replaced.

Image

Sadly there is no replacement for the front flight deck support structure, it being riddled with pinmarks. I will have to invent something here.

Image

Don't copy this construction, I made an error that I soon discovered. The beam has to be superimposed, but I was able to hammer it out again. That's because this is first class RVS, not giving an inch even when it is being deburred with a file. Take care when handling it, because it's like holding a fistful of airbrush needles when it's finished.

Image

Beams 10 and 11 (2dn and 3d) on this picture are the only lateral girders where you should mind the direction, because both miss one end to avoid some underdeck obstacles.

Image

When I was at this stage, I marvelled about the perfect fit of this grid. If I only had one for the front end too...

Image

Don't know why Fujimi moulded an extra support beam on the plastic monstrosity that can now put aside.

Image

But there rose a sneeky problem in the support beam triangles.

Image

These should not have been symmetrical, they have to follow the deck droop. Some grinding will be in the works.
Dan K
Posts: 9037
Joined: Tue Jan 11, 2005 10:56 am
Location: New York City

Re: IJN Zuikaku 1/350

Post by Dan K »

Don't know why Fujimi moulded an extra support beam on the plastic monstrosity that can now put aside.
Another sweet mystery of life....
StevenVD
Posts: 604
Joined: Fri Dec 27, 2013 6:32 pm

Re: IJN Zuikaku 1/350

Post by StevenVD »

It even appeared that that plastic part was never to be used, there is another one for the stern girders. But it's still a bit thick. Let's continue with the PE, because I just provided myself with another load of that for when the Zui will ever get finished: http://www.modelwarships.com/reviews/mi ... eview.html. I ordered this at Modelplast in Poland, so I suppose I don't risk the elevated customs fee I would incur if I bought the cheaper overseas offers.

Image

I removed the strange girder support outcropping, hoping I wouldn't launch this metal porcupine across the room.

Image

Image

Now it would fit, during a dry-fit of the stern hangar wall. It had to be pressed against the slope, so there is some tension present. Therefore you see more glue there.

Image

On the sloop deck the plastic supports are clipped.

Image

The first half of the PE replacements are then aligned. You get both sides apart. The choice of doors is sometimes open, you sure seem to get plenty of them with the set. Each one is also accompanied by a little rain gutter.

Image

The underside of the gallery is also provided in PE, though this seems a bit arbitrary because the ceiling itself is not.

Image

The capstans get their metal anchor chains.

Image

The aft piece was soon installed.

Image

The front anchor chains don't seem to lead to a chain chamber.

Image

The front AA platforms also get a lot of detail. I opened up one of the doors. This will remain a dry-fit until the deck is painted.

Image

The AA guns will be produced later, this will probably take a week or so.
Dan K
Posts: 9037
Joined: Tue Jan 11, 2005 10:56 am
Location: New York City

Re: IJN Zuikaku 1/350

Post by Dan K »

Crisp work, Steven.
StevenVD
Posts: 604
Joined: Fri Dec 27, 2013 6:32 pm

Re: IJN Zuikaku 1/350

Post by StevenVD »

Thanks, Dan! I'll try to keep up. Over to the upper sloop deck.

Image

Image

I'll keep this a dry-fit until the lower deck is painted and provided with finished sloops.

Image

I couldn't explain why the middle deck support interfered with the anchor chain trajectory. This is probably a design error from Fujimi, I couldn't find a clear reference for it in Morskie. The 1/100 model in Gakken 13 had the chain running on port side of the post, probably the reason why it is leaning forward to allow the chain to reach the hole in the middle of the deck. Fujimi should have deviated the deck plating around the post. Luckily the metal chain was easily redressed.

Image

The smoke stacks are then cleaned up for the addition of the PE railing.

Image

Not the fiddly railing is the hard part, but the shaping of the large base plate over the curved funnel. This is curved in both directions and the plate is grooved laterally, so I had to take care not to ply the metal.

Image

The second stack needed 2 retries before the plate was in the right position. That meant a layer of CA had to be removed from under it. I think this is as good as it gets because of the grooves.

Image

A PE support structure is still to come. This means probably that the smoke stacks can not be left off through painting.
Dan K
Posts: 9037
Joined: Tue Jan 11, 2005 10:56 am
Location: New York City

Re: IJN Zuikaku 1/350

Post by Dan K »

I couldn't explain why the middle deck support interfered with the anchor chain trajectory. This is probably a design error from Fujimi
I completely agree. I had exactly the same issue with my 1/700 Taiho (F).
StevenVD
Posts: 604
Joined: Fri Dec 27, 2013 6:32 pm

Re: IJN Zuikaku 1/350

Post by StevenVD »

That's remarkable, you would expect the producers to have dryfitted their own kits before releasing them, or learning from a mistake if it happens. But in this case it's not a disaster, because all is obscured by an extra AA platform that goes on top of it.

Image

Now I'll construct the ship's boats, so as to be able to close off the stern lower decks part.

Image

The Fujimi PE is again impeccable for the cabins, but plying has to happen with a pincer because it is so thin.

Image

The windshield goes on well because of an indentation in the cabin.

Image

Comparison Shipyard-Fujimi. Shipyard is an improvement in fit and can be dry-fitted right away on the sheet. Fujimi has some burnmarks and the arrows show areas that have to be trimmed.

Image

Also, the planking of Shipyard is a clear improvement on the plastic deck, though I have no wood Fujimi deck to compare to. Even the anchor points are more visible.
Post Reply

Return to “Works in Progress”