Willi:
Nice addition to the antenna! It is much appreciated that you share your technique with everyone. When I was making a plethora of hand wheels (before printing came along) I used a similar technique with very thin brass beading wire and one of my few victories in the world of soldering. I'll have to experiment with such use of sprue, certainly useful for many small shipboard items!
Regards: Tom
1/144 Jorge Juan (ex USS McGowan)
Moderators: BB62vet, MartinJQuinn, JIM BAUMANN, Jon, Dan K
-
Willie

- Posts: 690
- Joined: Sat Apr 29, 2006 7:36 am
- Location: Vigo, Spain
Re: 1/144 Jorge Juan (ex USS McGowan)
Hi again, Tom and all,
If there is one, the only problem is to get a stretched sprue spring, but you only have to make sprue lines until you get a correct thickness, then wind it in close turns around a suitable metallic bar, and then reheat softly with a flame, making sure that the heat gets all along and all around the spires. Period. Then you have to cut circles making long cuts (this is important) and undoing the spring profile turning the cuts against each other, so that the pressure keeps the circle closed by itself. Then apply a small drop of liquid poly in the seam, and it is done. If the cuts are properly made you will not be able to see the seam anymore.
You will remember that I explained the process in my post of last Nov.9th.:
viewtopic.php?f=59&t=163082&start=220
I have made today one of these handwheels, just for you to see the process:
Four parts altogether. As I used one of the springs that I already had in my spare parts box, the process took me exactly 5 minutes.
The trick is very, very easy, and as the styrene will be strong after the poly is completely dry, I would say very useful and time saving as well.
Nice going and best regards,
Willie.[/size]
Always my pleasure to share things with you guys.Fliger747 wrote:Nice addition to the antenna! It is much appreciated that you share your technique with everyone.
Why, if you are able to solder such tiny pieces, you do not belong to this world !!!!! I have never tried it myself, but I have used stretched sprue by the mile, and I can only guess that using stretched sprue is waaaayyyyyy easier, and the results are of the same quality, if not better, because they are absolutely clean.Fliger747 wrote:When I was making a plethora of hand wheels (before printing came along) I used a similar technique with very thin brass beading wire and one of my few victories in the world of soldering. I'll have to experiment with such use of sprue, certainly useful for many small shipboard items!
If there is one, the only problem is to get a stretched sprue spring, but you only have to make sprue lines until you get a correct thickness, then wind it in close turns around a suitable metallic bar, and then reheat softly with a flame, making sure that the heat gets all along and all around the spires. Period. Then you have to cut circles making long cuts (this is important) and undoing the spring profile turning the cuts against each other, so that the pressure keeps the circle closed by itself. Then apply a small drop of liquid poly in the seam, and it is done. If the cuts are properly made you will not be able to see the seam anymore.
You will remember that I explained the process in my post of last Nov.9th.:
viewtopic.php?f=59&t=163082&start=220
I have made today one of these handwheels, just for you to see the process:
The trick is very, very easy, and as the styrene will be strong after the poly is completely dry, I would say very useful and time saving as well.
Nice going and best regards,
Willie.[/size]
Amen dico tibi, hodie mecum eris in paradiso (Lk 23,43).
-
Fliger747
- Posts: 5068
- Joined: Wed Jan 02, 2013 1:15 am
Re: 1/144 Jorge Juan (ex USS McGowan)
Willi:
I made dozens of 1:120 scale shackles for the APA which solidified my soldering skills. Plastic or even 3D would lack the strength for the rigging to remain reliable. I was just looking at the 1:192 hand wheels for the anchor handling gear on Missouri, those came out well. If we can get to the same place via differing techniques or materials then we are successful. An item on a ship model should not scream out it's technique of construction. You have very successfully concentrated on working with styrene shapes. Maybe if they had been more available here I might have gone that route. For the myriad of drain pipes external to the hull on the APA I ended up having to split very small dowels, not having an availability of the very nice half round. To make the half round along the sides of the LSM Hank was helpful in sending me some that he had in stock which was just enough for the job.
Looking forward to your next progress report, always things to learn from other modelers!
Best regards: Tom
-
Willie
- Posts: 690
- Joined: Sat Apr 29, 2006 7:36 am
- Location: Vigo, Spain
Re: 1/144 Jorge Juan (ex USS McGowan)
Hi there Tom and all,
Hats off to you, my friend. This is something I dare not to even dream of, as it is years-light ahead of me...
I am stuffed with plastic parts, so as a variation I have decided this week to start painting something. I had already many elements that were finished, but I am always somehow reluctant to paint, as it is so easy to ruin a good part with a lousy paint job.
I use a brush and dilute the paint to a 50-60%, as the superficial tension will delete immediately all the brush lines. The same physical law that prevents water from being written on. You will need three or even four hands instead of only one, but the results are superb.
I used Humbrol light grey Matt 64, for me a good Navy light grey. As most of these pieces are big enough, to leave them plain seemed somehow kind of boring to me, so I gave then a light wash to deepen the shadows. I have seen many modelers doing this kind of wash in black. I don�t think it is the right decision: shadows are not black, but the same color of the rest of the surfaces, only darker. I made a mixture of 50%-50% dark Humbrol dark grey Matt 79 and the previous light grey Matt 64., and diluted it to say 40%. After an overnight dry I took lights using again Matt 64. Here you are:
The shadows are soft and the effect, subtle, and IMO it does not ruin the pieces.
I am considering giving lights with a lighter grey, but I am worried of being overdoing. I have done it in the past with my 1/35 artillery, but 1/35 is not 1/144.
I hope you like it, and very best regards from Spain,
Willie.[/size]
Fliger747 wrote:I made dozens of 1:120 scale shackles for the APA which solidified my soldering skills
Hats off to you, my friend. This is something I dare not to even dream of, as it is years-light ahead of me...
I am stuffed with plastic parts, so as a variation I have decided this week to start painting something. I had already many elements that were finished, but I am always somehow reluctant to paint, as it is so easy to ruin a good part with a lousy paint job.
I use a brush and dilute the paint to a 50-60%, as the superficial tension will delete immediately all the brush lines. The same physical law that prevents water from being written on. You will need three or even four hands instead of only one, but the results are superb.
I used Humbrol light grey Matt 64, for me a good Navy light grey. As most of these pieces are big enough, to leave them plain seemed somehow kind of boring to me, so I gave then a light wash to deepen the shadows. I have seen many modelers doing this kind of wash in black. I don�t think it is the right decision: shadows are not black, but the same color of the rest of the surfaces, only darker. I made a mixture of 50%-50% dark Humbrol dark grey Matt 79 and the previous light grey Matt 64., and diluted it to say 40%. After an overnight dry I took lights using again Matt 64. Here you are:
I am considering giving lights with a lighter grey, but I am worried of being overdoing. I have done it in the past with my 1/35 artillery, but 1/35 is not 1/144.
I hope you like it, and very best regards from Spain,
Willie.[/size]
Amen dico tibi, hodie mecum eris in paradiso (Lk 23,43).
-
Fliger747
- Posts: 5068
- Joined: Wed Jan 02, 2013 1:15 am
Re: 1/144 Jorge Juan (ex USS McGowan)
Willie:
The painting of the small bits and pieces nicely enhances the visual detail. Once installed they will ad greatly to the overall impression of the ship!
Regards: Tom
The painting of the small bits and pieces nicely enhances the visual detail. Once installed they will ad greatly to the overall impression of the ship!
Regards: Tom
-
marijn van gils
- Posts: 2686
- Joined: Tue Feb 06, 2007 10:24 am
- Location: Belgium
Re: 1/144 Jorge Juan (ex USS McGowan)
Great work Willie! The paint coat looks nice and smooth. 
The shadows are far from overdone IMO. I think you can take them much further than this, which would give much more depth to the details, and thereby make them more visible. Remember they will be part of a big ship, and things will look much more subtle when everything is put together.
I would advise you to use some scrap parts (but with details), and practice a little on them. Go further and further until it is really overdone. Then you will know how far to go on your model (just a little less than overdone)!
Do the same for the highlights.
Also make sure to look at theeffect from a little distance, not only close-up under your workbench lamps.
Instead of a dark grey, you could also use a very dark brown for the shadows. That will give a bit more variation to the base colour. But of course it depends on your intended look of the model whether you want that or not (pristine versus a little lived-in)
For the highlights, I would recommend to paint them on with a fine brush, rather than use drybrushing. This gives more control and avoids the 'stony' look drybrushing can give. It is IME also not slower than a well-executed drybrush-job.
Only for textures (for example tread plate), I would use drybrushing.
-
Willie
- Posts: 690
- Joined: Sat Apr 29, 2006 7:36 am
- Location: Vigo, Spain
Re: 1/144 Jorge Juan (ex USS McGowan)
Howdy Marijn and all,
This is the BT winch that I will have to install, and that actually is already built. As I have this clear picture of what it should be, this will be the first element to receive the treatment:
I have already done this in the past, and the effect is of used but washed and well maintained material, much more attractive than a plain factory piece, as you very correctly say. This is a Soviet 122 mm. howitzer, with two washes in dark greens, another one in rust, a dry brush with the base green and highlights with the same green base + ca. 20% yellow.
I have never tried it in full ships, and that�s why I want to be cautious.
As for washes, I have already started the 533 mm. torpedo tubes.
This is what I had already built:
After so much work on these tubes, both building and painting, because this thing is tricky in some places, the first wash would be enough for a headache and even a heart attack if I didn�t know what comes next:
After an overnight dry and two hours work, it looks now like this:
As the grey tone of the first wash was so real and I was painting under a strong light, I found myself at times trying to dry brush literally shadows; not painted shadows, but real shadows, a new experience. Some of this new effect can be seen in the pictures.
The macro shows some spots that have not been correctly treated that will be corrected tomorrow, when the first paint job is completely dry.
I hope you like it, and very best regards from this side of the world,
Willie.[/size]
Excellent idea. I had not considered it yet, but I will definitely put it in practice. Even if not in the upper decks in well maintained ships, a certain amount of rust will be unavoidable, specially in wet ships as Fletchers certainly were, after their low freeboard.marijn van gils wrote:Instead of a dark grey, you could also use a very dark brown for the shadows. That will give a bit more variation to the base colour. But of course it depends on your intended look of the model whether you want that or not (pristine versus a little lived-in).
This is the BT winch that I will have to install, and that actually is already built. As I have this clear picture of what it should be, this will be the first element to receive the treatment:
As for washes, I have already started the 533 mm. torpedo tubes.
This is what I had already built:
The macro shows some spots that have not been correctly treated that will be corrected tomorrow, when the first paint job is completely dry.
I hope you like it, and very best regards from this side of the world,
Willie.[/size]
Amen dico tibi, hodie mecum eris in paradiso (Lk 23,43).
-
Fliger747
- Posts: 5068
- Joined: Wed Jan 02, 2013 1:15 am
Re: 1/144 Jorge Juan (ex USS McGowan)
Willie:
I don't know how you did your stencils earlier but since you only need a couple, you could with some care on these larger numbers hand cut the stencils with a sharp blade and the number somehow printed on the upper surface of the stencil material as a guide. I think the displace the stencil method would work satisfactorily. I was able to reuse the stencil for the shift. A number of coats of very light spray, especially if pre sealed with a mist of matte such as Krylon 1310 seems to work well.
Regards: Tom
-
Willie
- Posts: 690
- Joined: Sat Apr 29, 2006 7:36 am
- Location: Vigo, Spain
Re: 1/144 Jorge Juan (ex USS McGowan)
Hi there Tom and all,
Tom, thanks again once more for your follow up and your interest in my humble work. It is very appreciated.
Actually the font was different from that in the US Navy. This is Lepanto, former USS Capps:
Regarding yuor question:[/size]
As you can see the figures were 9 mm. high and 5 mm. wide.[/size]
Of course the contrast of grey, white and black will not put things that easy, but the size of the figures is also bigger, so I think I will find some way to do the job. Maybe anyway that I have to disturb your attention with some questions in the future, but I have some way to go before this, so the nuisance is not imminent.
Very best regards from across two oceans,
Willie.[/size]
Tom, thanks again once more for your follow up and your interest in my humble work. It is very appreciated.
Actually the font was different from that in the US Navy. This is Lepanto, former USS Capps:
Well, I hand made a very basic stencil, using mm. patterned paper:Fliger747 wrote:I don't know how you did your stencils earlier.
Exactly what I did, but with a dry brush instead, what made the sealing unnecessary. I gave 4 coats, as far as I can remember. The results were satisfactory, but the contrast in two greys is somehow mistake friendly, and some little errors go unnoticed when you see the thing a foot away.Fliger747 wrote:A number of coats of very light spray, especially if pre sealed with a mist of matte such as Krylon 1310 seems to work well.
Very best regards from across two oceans,
Willie.[/size]
Last edited by Willie on Fri Aug 13, 2021 6:39 am, edited 1 time in total.
Amen dico tibi, hodie mecum eris in paradiso (Lk 23,43).
-
Amphion
- Amphion

- Posts: 44
- Joined: Tue Apr 14, 2015 9:19 am
- Location: Sweden
Re: 1/144 Jorge Juan (ex USS McGowan)
It would seem to have been different styles of text (especially of the number 2) in use over time:


-
Fliger747
- Posts: 5068
- Joined: Wed Jan 02, 2013 1:15 am
Re: 1/144 Jorge Juan (ex USS McGowan)
Good observation on the numbers! Lepanto is an early round bridge Fletcher, a lot of steaming miles there! In the lower photo familiar Motor Whaleboat!
Cheers: Tom
Cheers: Tom
-
Willie
- Posts: 690
- Joined: Sat Apr 29, 2006 7:36 am
- Location: Vigo, Spain
Re: 1/144 Jorge Juan (ex USS McGowan)
Hi there Amphion and all,
Thanks very much for your post.
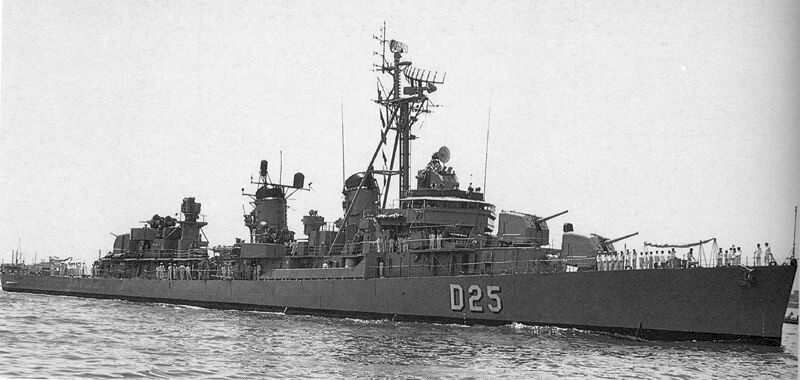
I am trying to reproduce Jorge Juan in the, say, late 60�s-mid 70�s, when in full commission in the 21st DesRon, with the modified rear stack, so this corresponds to your picture nr.2, rounded shaded markings. Too bad: had they been angled US Navy markings, things would be somehow easier again.
There is a curious anecdote with Jorge Juan: when she was commissioned in the Spanish Navy on Dec.1st 1960, she had no hull markings, other than the name McGowan in her transom. Notice the Spanish navy ensign and the American name.
Jorge Juan should have had a "45" painted on her hull, but if she ever received it, it had to be for a very brief time, before she was given her definitive "D25" some months afterwards, in 1961.
So, for some time she sailed like this, the only Spanish Navy ship with no pennant number and an American name. Wonderful.
Nice going and very best regards from Spain,
Willie.[/size]
Thanks very much for your post.
The hull markings in the Spanish navy changed from the traditional only shaded hull letters to only rounded shaded numbers in white, then to rounded letters and numbers in only white; then to angled US Navy-style markings in only white, to shaded angled US Navy-style markings; then to shaded white rounded Spanish markings, then to shaded grey rounded Spanish markings and finally to grey-only rounded Spanish markings, as they are nowadays. Lots of stuff to study and a headache to follow up. I have never been able to trace the exact dates, but there are examples of all this.Amphion wrote:It would seem to have been different styles of text (especially of the number 2) in use over time:
I am trying to reproduce Jorge Juan in the, say, late 60�s-mid 70�s, when in full commission in the 21st DesRon, with the modified rear stack, so this corresponds to your picture nr.2, rounded shaded markings. Too bad: had they been angled US Navy markings, things would be somehow easier again.
There is a curious anecdote with Jorge Juan: when she was commissioned in the Spanish Navy on Dec.1st 1960, she had no hull markings, other than the name McGowan in her transom. Notice the Spanish navy ensign and the American name.
So, for some time she sailed like this, the only Spanish Navy ship with no pennant number and an American name. Wonderful.
Willie.[/size]
Amen dico tibi, hodie mecum eris in paradiso (Lk 23,43).
-
Fliger747
- Posts: 5068
- Joined: Wed Jan 02, 2013 1:15 am
Re: 1/144 Jorge Juan (ex USS McGowan)
Willie:
Of course it would be entirely correct to have no hull numbers! Easily identifiable in the fleet as the ship with no number!
Regards: Tom
Of course it would be entirely correct to have no hull numbers! Easily identifiable in the fleet as the ship with no number!
Regards: Tom
-
Willie
- Posts: 690
- Joined: Sat Apr 29, 2006 7:36 am
- Location: Vigo, Spain
Re: 1/144 Jorge Juan (ex USS McGowan)
Hi all modelers again,
Going on with the paint job week, and considering how to highlight the smaller details, I have made some testing on redundant elements, first darkening with a mixture of Humbrol dark grey Matt 79 and light grey Matt 64, and then clearing with Mat 64 again, the standard procedure. To upgrade this with different combinations of light grey Matt 64 and light grey Matt 147 produced no visible effects that were worth the action, and applying Matt 147 pure seemed to go too far, as the effect was pretty much like a toy, and not too realistic. Too bad. As for now, I will leave the things as they are with only a wash and light grey on top of it.
I have already finished the Mk.37 fire director, with three coats of grey and a wash. The shadows allow to see that the wash is subtle, and that it can be accepted.
The radar antenna will be a different story, I am afraid, but as for now the basic tower is there.
And the Mk.56 fire director as well. I painted the windows with a 0.05 marker, and refined the frames with a very fine brush. A nasty experience, as my hands are no more what they used to be. Had I known before what kind of garden I was stepping into, I would have made the frames in stretched sprue, and would have filled them with the said marker, way easier and mistake-proof, but it is useless crying over the spilled milk.
I hope you like it, and best regards from this side,
Willie.[/size]
Going on with the paint job week, and considering how to highlight the smaller details, I have made some testing on redundant elements, first darkening with a mixture of Humbrol dark grey Matt 79 and light grey Matt 64, and then clearing with Mat 64 again, the standard procedure. To upgrade this with different combinations of light grey Matt 64 and light grey Matt 147 produced no visible effects that were worth the action, and applying Matt 147 pure seemed to go too far, as the effect was pretty much like a toy, and not too realistic. Too bad. As for now, I will leave the things as they are with only a wash and light grey on top of it.
I have already finished the Mk.37 fire director, with three coats of grey and a wash. The shadows allow to see that the wash is subtle, and that it can be accepted.
And the Mk.56 fire director as well. I painted the windows with a 0.05 marker, and refined the frames with a very fine brush. A nasty experience, as my hands are no more what they used to be. Had I known before what kind of garden I was stepping into, I would have made the frames in stretched sprue, and would have filled them with the said marker, way easier and mistake-proof, but it is useless crying over the spilled milk.
Willie.[/size]
Amen dico tibi, hodie mecum eris in paradiso (Lk 23,43).
-
Fliger747
- Posts: 5068
- Joined: Wed Jan 02, 2013 1:15 am
Re: 1/144 Jorge Juan (ex USS McGowan)
The experts at weathering effects are probably the model railroaders? These are all individual taste decisions and there is no "wrong", only everyone's opining. As the old saw goes, "everyone has one".
I find the armor guys like to combat wear and destress things a lot. As Willie stated, the result if overdone, becomes cartoonish. Even using colors from chips such as Snyder and Shorts for mixing or buying colors, yields a very "saturated" model. My APA is very saturated as it lacks the diffusion and scattering effects that viewing a real ship brings aboard. If one was very sophisticated they would design and paint for a pre planned lighting brightness, density, color temperature, spectrum etc. I'm not that sophisticated. Most of us end up with a builders style model, just out of dockyard with a shinny brass prop. I'll plead guilty. In the saturated light and distance under which we view our models things maybe look a little too sharp and defined. For WWII USN vessels employed in the Pacific there is a lot of atmospheric diffusion. Adding washes to bring out the detail that we have strived mightily to achieve achieves a certain effect. Is this the overall effect we want? Perhaps, perhaps not.
Such choices make the modelers art. Just because we might have an opinion does not (present culture not withstanding) make us right or wrong. Very exciting to see and appreciate all the styles!
Cheers: Tom
-
Willie
- Posts: 690
- Joined: Sat Apr 29, 2006 7:36 am
- Location: Vigo, Spain
Re: 1/144 Jorge Juan (ex USS McGowan)
Hi there Tom and all,
Just a thought.
Nice going from across the seas,
Willie.
You don�thave to be. Running the risk of becoming pedantic, there is what I would call scale effect: what is acceptable in 1/35, 1/48 or even in 1/72 would not be in 1/144 and higher scales. A shadow in 1/48 can be 0.3 mm. wide, for example, which is my limit, but in 1/72 my limit stays the same, the same as in 1/144, but in relationship to the scale, my limit makes shadows larger and larger the bigger the scale becomes.Think of 1/350 and 1/700 adopting methods of 1/48, as I have often seen, what turn an otherwise excellent construction into a mere toy.Fliger747 wrote:If one was very sophisticated they would design and paint for a pre planned lighting brightness, density, color temperature, spectrum etc. I'm not that sophisticated.
Just a thought.
Nice going from across the seas,
Willie.
Amen dico tibi, hodie mecum eris in paradiso (Lk 23,43).
-
Fliger747
- Posts: 5068
- Joined: Wed Jan 02, 2013 1:15 am
Re: 1/144 Jorge Juan (ex USS McGowan)
Ships mostly live outside in natural light. Exceptions might be FRAM at the "Skips museet" near Oslo and U Boats in a "pen". I really like taking my models outside into the sunshine, but of course they can't live there. They don't live under the studio strobes I use to photograph them either.
Your components look quite convincing and it will be a treat to see the bits and pieces begin to form a ship!
I used your dry brushing of the stencils, as best I could, though the acrylic titanium white I use doesn't "dry brush" very well. A model lacquer would probably work better. What really worked well was Phil's suggestion of an initial coat of hull color to seal the stencil. All in all it was pretty successful.
Best regards! Tom
-
Willie
- Posts: 690
- Joined: Sat Apr 29, 2006 7:36 am
- Location: Vigo, Spain
Re: 1/144 Jorge Juan (ex USS McGowan)
Howdy Tom and all,
I am already deeply involved with painting my 3in/50 Mk27�s. The guns themselves are already completely painted with the initial three coats, and ready for the wash and the dry brush. The small glossy spots are a side effect of the amount of necessary thinner to get this fine texture, but will be gone with the dry brush.
As for the mounts, I have applied the second coat to the structure and the first to the handrails. While painting the handrails it came to my mind that as far as I can remember, I had never set all the elements together before. While building the round magazines and so on I had counted with 1/2 mm. on both sides of each mount for the handrails, but I had never tested the accuracy of my calculations. Surprising, to put it mildly. As I prefer a single "just in case" now rather than three "Oh my goshes" later on, I wanted to make a dry fit before painting everything else.
I am on the very limit, only tenths of mm. to play with, but other than small mistakes in some places I think that everything is +/- OK.
Nice going and very best regards from this side of the ocean,
Willie.[/size]
I am glad it has worked for you too. With a dry brush you can never make mistakes that cannot be mended right away at cost nil.Fliger747 wrote:I used your dry brushing of the stencils, as best I could, though the acrylic titanium white I use doesn't "dry brush" very well. A model lacquer would probably work better. What really worked well was Phil's suggestion of an initial coat of hull color to seal the stencil. All in all it was pretty successful.
I am already deeply involved with painting my 3in/50 Mk27�s. The guns themselves are already completely painted with the initial three coats, and ready for the wash and the dry brush. The small glossy spots are a side effect of the amount of necessary thinner to get this fine texture, but will be gone with the dry brush.
Nice going and very best regards from this side of the ocean,
Willie.[/size]
Amen dico tibi, hodie mecum eris in paradiso (Lk 23,43).
-
BB62vet

- Posts: 3145
- Joined: Mon Nov 18, 2013 3:41 pm
- Location: Mocksville, NC
Re: 1/144 Jorge Juan (ex USS McGowan)
Willie,
Your 3" gun mounts are looking really nice - good progress!!!
Hank
Your 3" gun mounts are looking really nice - good progress!!!
Hank
HMS III
Mocksville, NC
BB62 vet 68-69
Builder's yard:
USS STODDARD (DD-566) 66-68 1:144, Various Lg Scale FC Directors
Finished:
USS NEW JERSEY (BB-62) 67-69 1:200
USN Sloop/Ship PEACOCK (1813) 1:48
ROYAL CAROLINE (1748) 1:47
AVS (1768) 1:48
Mocksville, NC
BB62 vet 68-69
Builder's yard:
USS STODDARD (DD-566) 66-68 1:144, Various Lg Scale FC Directors
Finished:
USS NEW JERSEY (BB-62) 67-69 1:200
USN Sloop/Ship PEACOCK (1813) 1:48
ROYAL CAROLINE (1748) 1:47
AVS (1768) 1:48
-
Fliger747
- Posts: 5068
- Joined: Wed Jan 02, 2013 1:15 am
Re: 1/144 Jorge Juan (ex USS McGowan)
Willie:
Having previously hand constructed 40 mm Quad and Twin Bofors I have some idea of how complex those are. It is difficult enough to divine how the various parts are shaped and sized let alone actually isolating and constructing them. These will be very impressive when complete and installed on your masterpiece!
Regards: Tom