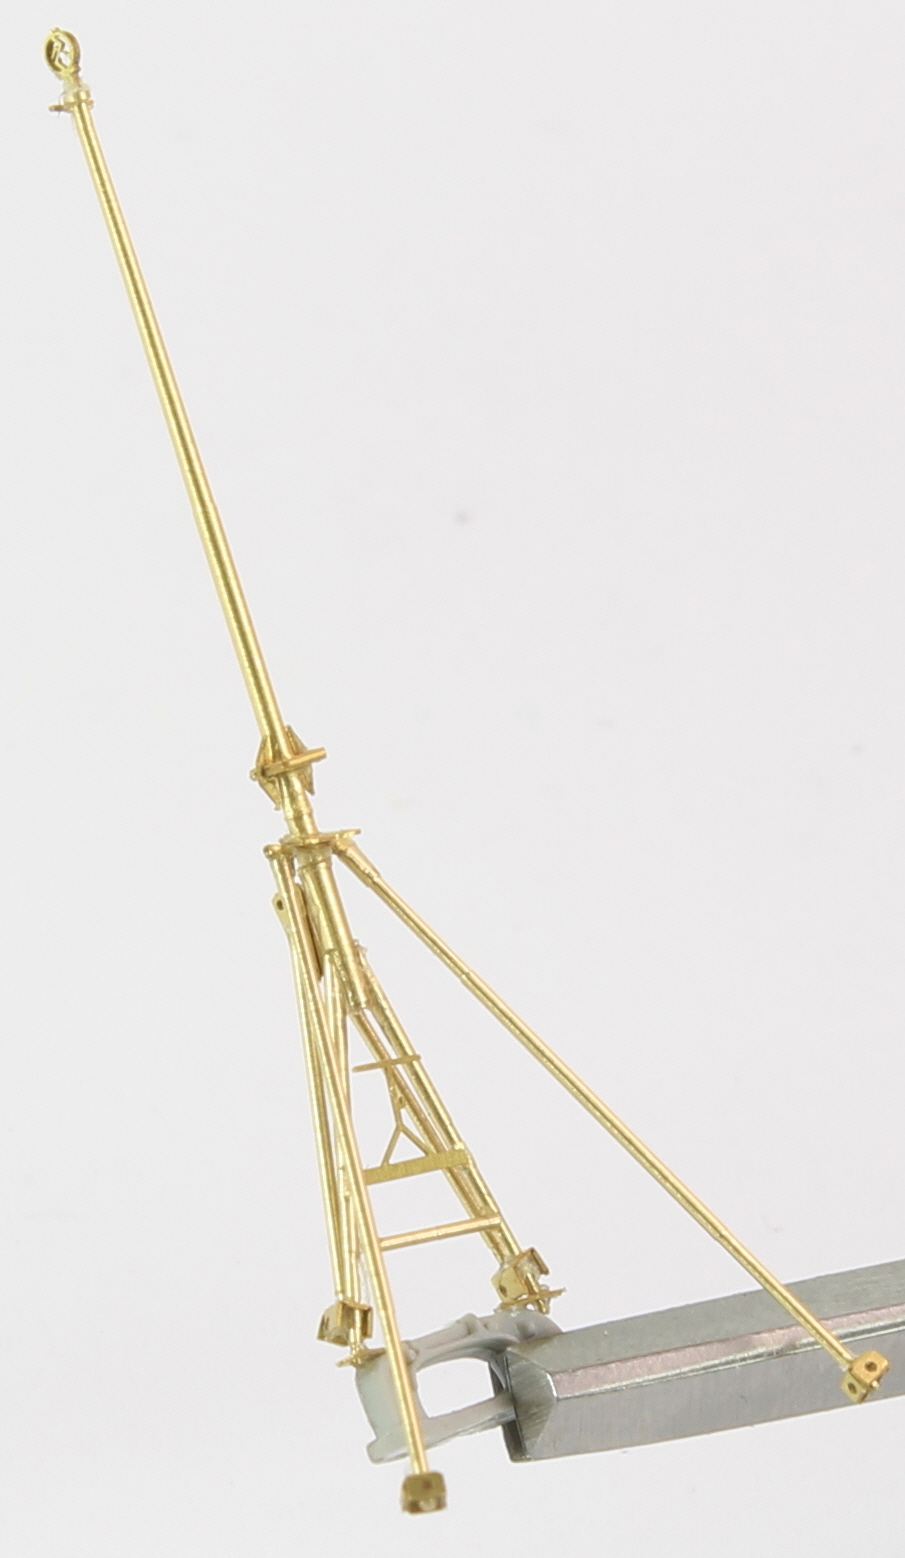
Part 223 is reflected in the After Mast instruction in red and I used it for this construction.
However, in the Fore Mast instructions Part 223 is also displayed, but in blue. Any significance in this?
There is only one Part 223 on the sheet #3-3. The only other similar part is Part 187 and up to now I could not find an allocation for it. Is it therefore safe to presume that I can use Part 187 in place of Part 223 (Blue) for the Fore Mast?
Regards,
Dawie van Rensburg
Dawie,
Simply saying, 187/223 and 186 are the same size parts.
And as for the Catapult, Nice work Catapults
User should adjust with cutting the length of Brass 28 for their wishing position.
And 83/84 can be ommitted during work We added these two parts for more detail on 87/88.
So in 1/350 Bismarck set we sum these 83/84 and 94 on 87/88 for easier work and solve the height problem of Catapult coming with smaller scale than 1/200.
I think you will understand that our interpretation of the construction detail is not the same as yours, as we don't have the background of the development and design process. It is therefore sometimes very difficult to just interpret detail from a photograph. However, I have so far not got completely stuck - the catapult is complete and I will be finishing all the mast after this weekend.
Your availability to respond to queries is however essential!
Do you have any feedback on the tracking number for the outstanding advanced photo etching sheets?
"And 83/84 can be ommitted during work We added these two parts for more detail on 87/88."
Well there you go Dawie. Totally unnecessary parts that were not indicated as such. Way to drive one crazy. Also, not indicating that you can cut a part to customize it added to the frustration. Wonder what else we will find that is not documented!
At this stage of the game, Pontos might not be interested in providing any additional help, but if possible it would be AWESOME and VERY helpful if Pontos could upload some high resolution photos of the complicated assemblies so that we can actually see where the numerous tiny parts go. I am working on the stern staff and there are about 20 parts in this tiny assembly alone. It is virtually impossible to see how the parts go together on both the printed directions and the PDFS. Even drawings would help. Yes, I can fiddle with it and "guess" where the parts go and make it look good, but that's not something that I want to do. I want to know how PONTOS designed them to be assembled.
I fully support Tobori in his request. I think we are all experiencing the same difficulties and frustrations in the assembly process. I still maintain that the detail of these upgrade kits are both incredible and intimidating and adds so much value to the build once completed. A picture tells a thousand words and a detail picture is worth even more. Your assistance with this request will be appreciated.
Thanks for your support Dawie. This whole Pontos adventure has become very discouraging. I have been an electro/mechanical tech my entire life. I was given prototypes of things that had never been built because I have always been good at interpreting drawings. I was a top notch assembler and it always carried over to model building. But I have never come across something so "unfinished" as this Pontos set and it's gotten very tiring. If Pontos doesn't supply us with high rez pics, I'm ready to take the loss and just do what I can with it. I'm sure they have LOTS of pics already; and if they don't I'm sure they can take some from their builds. I have several kits waiting in the wings that I can be enjoying rather than struggling with this one. They all have PE sets from other companies that so far I have had very little problems with. As always, documentation is never that good, but when you compare stuff from Eduard for instance with Pontos, their docs are a dream. Yes, Pontos kicks butt in the quality and quantity department, but that doesn't do you much good when it's dumped on you with such shoddy documentation.
I hope Pontos helps us all out.
Hi Tobori
I am not defending Pontos in fact l agree wholeheartedly with everything that you say but when you request high resolution pictures do you realise that the pdf download files from Pontos can be enlarged on your computer screen? Sorry l don't use windows but on my Mac when you hold the command key down and press the plus key you would be amazed at how much you can enlarge the various pictures before they break up. I am sure that windows can do this as well.... but what key you hold down????. Without this facility l would have been struggling even more than l was.
When l built my Bismarck like you are saying in the end l just thought l would do what l new about and forget everything else - l was getting to wound up to care in the end and was glad when l could put it to one side as ' finished' and move on to another kit with a different make of detail kit.
Pontos kits are superb for the amount you get and the value but as has been said without more instructions that at least cover what is supplied on the etched fret then they will always be getting the comments on this site.
Hi Alang,
Hope all is well with you.
Zooming in on the PDF's doesn't work for me. You do get much better images when you do, but try zooming in on the "aft staff" and tell me that you can see each of the 20 or so pieces and where they go. It just doesn't work. Some macro shots in high res would be much better and not at all difficult to do if you just took a few minutes. Hope Pontos listens.
O.K. I have tried to search unopen photo for stern staff.
This may help your assembling.
And I know Nasa, Tamiya, Eduard or some other similar big makers have printed more kind manuals.
I always have tried to make better instruction manual and our current manuals are the best result limited in our work status and my editing ability.
Last night I completed building the main mast. It took me almost 2 hours. Once it was put together I realized it could have been assembled in about 1/2 hour...IF! the instructions were clear.u Assembling is not hard at all. It's trying to figure out where ALL those parts go together, and correcting errors when you finally figure out how it goes together and you have to reassemble things BECAUSE of the directions!
Last edited by Tobori on Mon Dec 15, 2014 5:05 pm, edited 1 time in total.
Tobori wrote:Last night I completed building the main mast. It took me almost 2 house. Once it was put together I realized it could have been assembled in about 1/2 hour...IF! the instructions were clear. Assembling is not hard at all. It's trying to figure out where ALL those parts go together, and correcting errors when you finally figure out how it goes together and you have to reassemble things BECAUSE of the directions!
Could you upload some photos. I'm dealing with the same stupid issues myself,
I am really impressed! Perfect build. Your attention to detail, accuracy and patience is motivating. Keep up the good work and remain focused despite the obvious challenges.
I have another time saving build tip which, as per your previous post, took me too much time to resolve and can save somebody a lot of time:
The build of the two <20mm Flak30>'s: parts 298 and 299, second picture set after you have bent them - make sure that you turn part 299 upside down (as displayed in this picture set) and then fit it on top of part 298.
However, I still don't know where to fit parts 311 and 306! Even if I use the internet display of these parts, that detail is still eluding me. Somebody else might see what I am obviously missing.
I am really impressed! Perfect build. Your attention to detail, accuracy and patience is motivating. Keep up the good work and remain focused despite the obvious challenges.
I have another time saving build tip which, as per your previous post, took me too much time to resolve and can save somebody a lot of time:
The build of the two <20mm Flak30>'s: parts 298 and 299, second picture set after you have bent them - make sure that you turn part 299 upside down (as displayed in this picture set) and then fit it on top of part 298.
However, I still don't know where to fit parts 311 and 306! Even if I use the internet display of these parts, that detail is still eluding me. Somebody else might see what I am obviously missing.
Thanks Dawie!
The build may look nice but is it right? Who knows? As I said before, it's not hard to make things "look" good, but who knows how many different interpretations there are since we're not supplied with clear and detailed directions. Even tough I'm not a rivet counter, I still like to know something is properly built.
Have fun!
Refer my posts on 13 and 24 Nov - I still urgently need the tracking number as requested above - my progress on the ship decking will be adversely effected due to the unavailability of the outstanding Advanced photo etching sheets and the parts that have to be prepared for fitment.
Were these parts shipped? Please let me know asap.