Pomeranian Rahschlup 1846 � 1/160 scale � Baltic trader

Post a reply

Confirmation code
Enter the code exactly as it appears. All letters are case insensitive.
Smilies
:smallsmile: :wave_1: :big_grin: :thumbs_up_1: :heh: :cool_1: :cool_2: :woo_hoo:
View more smilies

BBCode is ON
[img] is ON
[url] is ON
Smilies are ON

Topic review
   

Expand view Topic review: Pomeranian Rahschlup 1846 � 1/160 scale � Baltic trader

Re: Pomeranian Rahschlup 1846 � 1/160 scale � Baltic trader

by wefalck » Sun Aug 02, 2026 7:28 am

Machining the mast – first attempt

OK, turning the mast from 3 mm acrylic rod didn't work. First tried the larger watchmaker's lathe, but couldn't bring the fixed steady close enough to the point of work. Switched to the smaller lathe, which has a steady specially for thin material, but the rod still flexed and jumped over the cutting bit. Brass is siffer, but still not stiff enough I think. Have to go back reoentantly to steel - this will now call for some serious soldering and micro-metal work, not just cementing plastics.

Simply tapering the rod with wet-and-dry paper could perhaps have worked, but I like to turn-on the iron bands - looks much crisper than adding them later.

It's becoming to warm now in the workshop - another oncoming heatwave plus the internal heat from frustration. Have to give it a go at another day.

In between, I also drew the cargo winch, based on a drawing from the Danish archives for a little topsail schooner of 1852 (G-5204-17, https://arkivalieronline.rigsarkivet.dk/)

Image
Working drawing for the cargo-winch attached to the mast

To be continued …

Re: Pomeranian Rahschlup 1846 � 1/160 scale � Baltic trader

by wefalck » Sat Aug 01, 2026 3:49 am

There is a difference between polystyrene-sheets or -profiles and the stuff used in injection moulding. The latter seems to contain less plasticisers. I haven't looked into the boxed kit-models that I built in the late 1960s and early 1970s, but when I last looked, they seem to have been holding up quite well. But then they have been in their box since the mid-1980s at least. The same seems to apply to my treasured boyhood collection of WIKING-car models that dates back as far as the late 1950s.

Re: Pomeranian Rahschlup 1846 � 1/160 scale � Baltic trader

by marijn van gils » Sat Aug 01, 2026 3:34 am

I'm looking forward to that! :thumbs_up_1: :thumbs_up_1: :thumbs_up_1:

I'm using a simple fan in the workshop when temperatures rise, pointed at me. Helps me a lot to stay modelling in the summertime!

I understand that plexi is more stable than styrene, but for this model that shouldn't be an argument. There is already plenty of styrene on it! :big_grin:
Luckily, the stability of sterene is not to bad, at least when painted an kept out of direct sunlight. A friend of mine who has restored a number of models and box dioramas by Sheperd Paine from the 70ies and 80ies, noticed how lead items have correded away from under the paint, how natural materials (like tree roots to make miniature branches and trees) have become very brittle and crumble, and how the electronics fail, but the styrene and epoxy putty items don't seem to have deteriorated at all after 40 - 50 years. That doesn't mean it will hold up as long as plexi of course, but it's not too bad compared to the longevity of our own bodies ;)

But to be clear, I'm not trying to convince you here (just some fun discussion)! I understand you feel very comfortable with working plexi as a material, which is maybe the best reason for using it. :thumbs_up_1: :thumbs_up_1: :thumbs_up_1:

Re: Pomeranian Rahschlup 1846 � 1/160 scale � Baltic trader

by wefalck » Thu Jul 30, 2026 3:55 am

I have been against using polystyrene on model due to its inherent lack of long-term stability - plasticisers tend to diffuse out making the material brittle, but for miniature models it does have many advantages. I know, some of the 'classical' miniaturists would throw up their arms in horror ...

Acrylic glass (Plexiglas) on the other hand has been demonstrated to be long-term stable over many decades and is easy to work with, of one observes certain rules, such as not too high tool-speeds and moderate feed-rates to allow the working heat to dissipate - it has a rather low thermal conductivity.

Last night, I set up the dividing attachement on the milling machine, but still need to do some drawing and produce a working drawing with measures pencilled in. The plan is to have a go at it over the coming weekend - it seems that outside temperatures and thus workshop temperatures will stay in a bearable range.

Re: Pomeranian Rahschlup 1846 � 1/160 scale � Baltic trader

by marijn van gils » Thu Jul 30, 2026 3:34 am

Great research Eberhart! :thumbs_up_1: :thumbs_up_1: :thumbs_up_1:

I may be biased (because I don't have experience with acrylic glass but I do with brass), but maybe brass would work fine for the lower mast too?

The dimensions are similar to the masts on my models (smaller scale but larger ships ;) ), and brass is certainly more than rigid enough for the lower masts. There is a bit of flex in my topgallant masts, but not enough to be an issue for rigging unless you put a lot of stress on it (which is best avoided anyway).

I had good luck drilling 0,2mm holes in them with my Proxxon MF70 micromill (very high spindle speed!). A test with 0,1mm in brass worked out fine too, but I didn't try it on a round surface (but only because I didn't need too).
Hounds etc. can be made from styrene and glued with a combination of CA and plastic glue. A plus of styrene is that it is easy to refine the shape of pieces after they are attached to the mast.

But on the other hand, I wouldn't mind seeing how you do these in acrylic glass! :big_grin:

Re: Pomeranian Rahschlup 1846 � 1/160 scale � Baltic trader

by wefalck » Mon Jul 27, 2026 3:28 pm

Masting

I spent days ruminating around textbooks, contemporary images, photographs of (contemporary) models, etc. in order to understand what the geometry in particular of the lower mast of such small vessel from the Baltic could have looked like. There is a lot of information on larger merchant ships and in particular naval vessels, but comparatively little on such small ones. My working hypothesis was that the mast would be similar in construction to the fore-mast of a topsail schooner with lower mast and top-mast on which two square sails would be carried.
When I also went through the collection of beautiful drawings of masts of different types and sizes from the archives of the Danish Naval Yard (now in the Rigsarkivet), I realised that I already had partially solved my problem a long time ago: there is a set of beautifully rendered drawings for the spars of a two-masted freight-carrying top-sail schooner of the right size, albeit from 1811 rather than the 1840s. How parts of the masts are shaped in detail and how the cross-trees etc. are designed may vary from case to case, but overall, there have not been so fundamental changes over the decades. So, the drawings below, will be a good guidance for the reconstruction.

Image
Masts and bowsprit for a top-sail freight schooner (G-4802-39, https://arkivalieronline.rigsarkivet.dk/)

Image
Top-mast for a top-sail freight schooner (G-4802-41, https://arkivalieronline.rigsarkivet.dk/)

The overall dimensions for the spars of the Rahschlup were given in a table on the original sail plan. The above drawings had to be scaled appropriately and some of the proportions, such as the length of the top adjusted to the given information.
Given the maximum and minimum diameters of 2.6 mm and 1.6 mm of the mast respectively, some simplifications will be unavoidable at the small scale of 1:160.
Below are my reconstruction drawings for the lower mast, the top-mast, the top and the cap-head set against the drawings from the Rigsarkivet.

Image
Reconstructed lower and top-mast, top and cap

Some details are still missing in the drawing. There will be a slightly more modern cargo-winch attached to the mast than the one drawn above, for which there is also a nice drawing in the Danish archive. Also, various ring-bolts etc. are not drawn yet, as these require more work on the reconstruction of the rigging.
I have been also thinking about the material(s) for the masting. In principle, I like masts made from steel rods. Turning and milling-on flats etc. are straightforward, but drilling holes of less than 0.5 mm diameter into steel is always something causing me quite a bit of anxiety., particularly when drilling into round material. Attaching parts, such as the hounds needs to be done by (silver) soldering, doable, but also a bit stressful. So, I have been thinking of using acrylic glass for the lower mast instead.
With a length of 113 mm above deck, a maximum diameter of 2.6 mm and a 1.7 mm square section at the doubling that seems to be sufficiently stable, even for brittle material such as the acrylic glass.
The top-mast, on the other hand tapers from a 1.7 mm square to only 0.85 mm diameter at the truck. Making it from acrylic glass may call for trouble. Brass or aluminium would be a safer option, also considering that it needs to cross-drilled for a couple of functional ‘sheaves’ (e.g. for the halliard of the topgallant yard). A couple of other sheaves, e.g. those for lifting the top-mast can be faked only.

To be continued …

Re: Pomeranian Rahschlup 1846 � 1/160 scale � Baltic trader

by wefalck » Wed Jul 22, 2026 3:49 pm

Thanks, Jim, much appreciated !
****************************************

Just a sign of life from this building log. Apart from the heat, I also spent a week away on travelling again.

Practical workshop-work is stalling at the moment, while I am working out the details of the mast and the spars. The original drawings only give the lengths and the maximum diameter. Some measures can also be taken off the sail-plan, but all the other details have to be reconstructed from (contemporary if possible) sources. Not so easy to find for small commercial vessels.

I also have to make a decision on the material(s) to use. In principle, I am inclined towards steel for its stiffness, but cross-drilling is more difficult and attaching elements such as hounds and cross-trees will likely require some complex soldering. The mast has a diameter of only 2.6 mm at its thickest part and the yards, boom and gaff etc. will be considerably thinner.

So bear with me for the time being.

Re: Pomeranian Rahschlup 1846 � 1/160 scale � Baltic trader

by JIM BAUMANN » Mon Jul 06, 2026 4:02 pm

Its certainly coming on now--appears to be taking shape!!

Re: Pomeranian Rahschlup 1846 � 1/160 scale � Baltic trader

by wefalck » Mon Jul 06, 2026 1:21 pm

The number of visits to this building-log has exploded the last few weeks. Not sure, whether these were real visits or the result of 'bots' doing web-crawling ...

In between two heat-waves hitting Paris over the last three weeks I managed to overcome my lethargy and spend a bit of time in the yard.

Stern-davits
Theses vessels typically carried a small tender in stern-davits. It was used for general work around the vessel and ferrying people and lighter goods between the anchorage and the shore.

Image

The davits were fashioned from pieces of 2 mm x 2 mm styrene rod. In a first step, these were slotted with a 0.2 mm saw on the milling machine for the halyards. These slots than were capped with small pieces of styrene. Finally, the curved shape of the davits was elaborated with fine files. The davits were cemented onto the capping rails.

A connecting piece was fashioned from a pieces of styrene rod 0.5 mm x 1.0 mm. This piece also serves as a support for the boom, when it is lowered.

Two cleats for the boat halliards were carved from styrene strip and cemented to each davit.

Image

Bow monkey-railing
The capping rail at the bow on such vessels was surmounted by a kind of monkey-railing. Into this monkey-railing fairleads for hawsers and for the down-hauls etc. for the jibs are cut. This piece was bent from a 0,5 mm x 1,5 mm styrene strip, cut to length and cemented in place. The further shaping took place in situ.

With all these pieces in place, the rails etc. were painted white.

Image

At this moment also the deck was permanently glued in place. Before that it was assured that the mast could be stepped at the correct angle and the hole for the mast opened to the correct diameter.

To be continued (heat permitting) …

Re: Pomeranian Rahschlup 1846 � 1/160 scale � Baltic trader

by wefalck » Thu Jun 25, 2026 4:08 am

For larger areas, flame-polishing is another method, but there may be slight optical distortions due to uneven thickness.

Re: Pomeranian Rahschlup 1846 � 1/160 scale � Baltic trader

by EJFoeth » Thu Jun 25, 2026 3:55 am

Same here, the heat wave torturing France is heading here for the coming days with a chance we'lll see 40 degrees locally. Still trying to clean freshly vacuumed hulls though, hope they stay in shape in the heat :big_grin:

I had some perspex windows made for a cavitation tunnel once but they were not as perfectly smooth as one would want (so not polished so nice I guess). Used them for optical measurements and always wondered if the quality would affect that, but in any case too late now. Hence I was slightly triggered by you action...

Re: Pomeranian Rahschlup 1846 � 1/160 scale � Baltic trader

by wefalck » Thu Jun 25, 2026 2:51 am

Thanks EJFoeth. I was surprised myself, when I first tried it this way some 20 years ago. As my father worked in the pharmaceutical branch of the company that manufactures the original Plexiglas (then Rhöm GmbH, now called Evonik), I obtained in the early 1980s their complete handbook for working with Plexigals, including the various polishing techniques. In the past I used the classical techniques of sanding and then polishing with polishing paste. These green silicone rubber bits with some polishing compound imbedded make the job on small parts much simpler.

With temperatures close to 40°C outside and 33°C in my study/workshop, the shipyard had to close down, hoping for more clement condistions next week :oops: :mad_2:

Re: Pomeranian Rahschlup 1846 � 1/160 scale � Baltic trader

by EJFoeth » Tue Jun 16, 2026 1:53 pm

Good progress, I like the polishing step that seems to, hmm, polish really well.

Re: Pomeranian Rahschlup 1846 � 1/160 scale � Baltic trader

by wefalck » Tue Jun 16, 2026 12:53 pm

Cabin-skylight

Although I had already made this a while ago, I was not really satisfied with the product and decided to have another go. The skylight is a relatively low affair in order to clear the helm and also to not get into the way with deck-work in this area, such as tending the main boom-sheet. There are various designs for such skylights, but essentially, they consist of a gabled roof-structure in which the glass-panes are protected with metal bar. A contemporary example can be found in the illustration below.

Image
The Norwegian jægt HAABET (1849). Source: Town archives of Trondheim - https://www.flickr.com/photos/trondheim ... 3539132719.

Getting the bars, made from 0.1 mm copper-wire, straight and equidistant is a challenge. After several failed attempts, I decided to mill shallow grooves into the acrylic glass plug as a guide for the bars and this worked.

The plug for the skylight was milled from a piece of acrylic glass. Nothing special. The gabled roof was milled with the help of the angle-adjustable mini-vice. The fly-cutter already leaves a very smooth surface that is then polished by a couple of passes with a silicone rubber bit.

Image
Adjusting the vice to the 10° angle to be milled with the help of a template

Image
Fly-cutting the gabled-roof surfaces

Image
Polishing the surfaces

Then shallow grooves for the bars were milled with a pointed burr. Unfortunately, I forgot to take a picture of this set-up.

The frames for the bars were cut out from thin cardboard with the laser-cutter and the pre-painted. The bars from 0.1 mm brass-plated copper-wire were lacquered onto ‘roof’ structure, using the grooves as guide, taking care to only apply lacquer to areas that will be underneath the frame. The bars were trimmed to length and the pre-painted frames were lacquered on.
Overall, I am reasonably happy now with the result.

Image

Image
The finished skylight, ready to installed.

To be continued …

Re: Pomeranian Rahschlup 1846 � 1/160 scale � Baltic trader

by wefalck » Sat Jun 13, 2026 8:10 am

A sign of Life from the Shipyard

The last few weeks since the posting at the end of April have been crazy with travelling. I have been two weeks to Switzerland, a week to Denmark, and another week in Spain, mainly for business reasons.

I extended that business-trip to Copenhagen by a few days in order to re-visit a few museums in and around the city, including the M/S Museet for Søfart in Helsingør, the Vikingeskibs Museet in Roskilde, and the Krigsmuseet in Copenhagen that now houses the naval collection from the Holmen.

It being the long Pentecost-weekend, there turned out to be a sailing ship gathering in the harbour of Helsingør in front of the Kronborg Castle (of Hamlet’s fame). Among the various schooners, galiots, and smacks (jagts) there was also JENSINE af HADERSLEV (https://www.jensine.dk), a Danish jagt originally built in 1852, so more or less contemporary with the Rahschlup. She has the kind of livery that I have chosen for my project.

Unfortunately, JENSINE was sort of parked in third row, so I could get close to her. However, there are a few shots from this event below.

Image

Image

Image

In between travels, I continued to work on small bits and pieces, but nothing has progressed to a stage that can be shown yet.

Updates to come soon …

Re: Pomeranian Rahschlup 1846 � 1/160 scale � Baltic trader

by EJFoeth » Thu Apr 23, 2026 3:36 am

That is a very nice barrel!! Very interesting to see how it was made.

Re: Pomeranian Rahschlup 1846 � 1/160 scale � Baltic trader

by DrPR » Tue Apr 21, 2026 10:02 pm

Eberhard,

I make close up macro photos of my modeling work, and parts that look very nice at arm's length show huge imperfections in the photos! But on the completed model these flaws just aren't noticeable.

Nice work on the barrel. Again, I have tool envy seeing what you do with your watchmaker's lathe.

Re: Pomeranian Rahschlup 1846 � 1/160 scale � Baltic trader

by wefalck » Tue Apr 21, 2026 2:20 pm

Some more deck details

There were some deck details of which the location puzzled me a bit. These included the down-pipes into the chain-locker for the anchor-chains (to be discussed later), the chimney(s) for the stove(s) in the crew- and captain’s quarters, the mandatory drinking-water barrel, and to some extent the bilge-pump (also to be discussed later).

Chimney
By the middle of the 19th century small cast-iron stoves were in common use on ships like the Rahschlup. Looking at illustrations of the time, the more traditional square, sheet-metal lined wooden chimneys were gradually replaced by round sheet-metal stove pipes. The chimney could be removed and the passage through the deck closed with a cap, so that they would not get in the way when handling the anchors or sails.
I found a good image in my collection of a model of a Jagt in the Museet for Søfart in Helsingør/Danmark, that shows exactly the sort of arrangement that I had in mind.
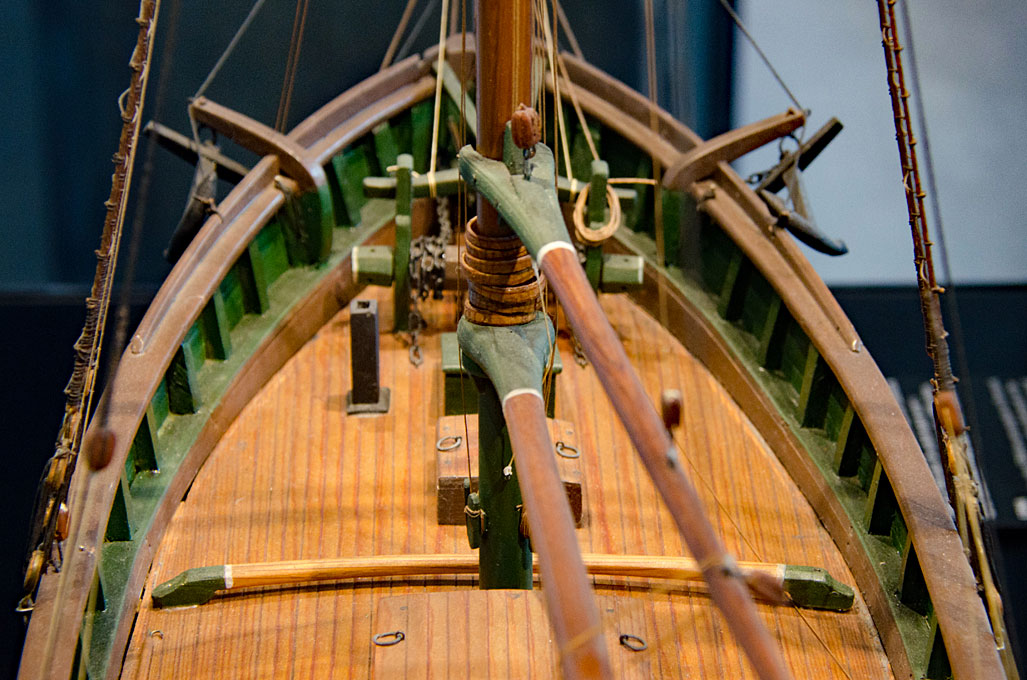
Image
Model of a Jagt in the Museet for Søfart in Helsingør/Danmark

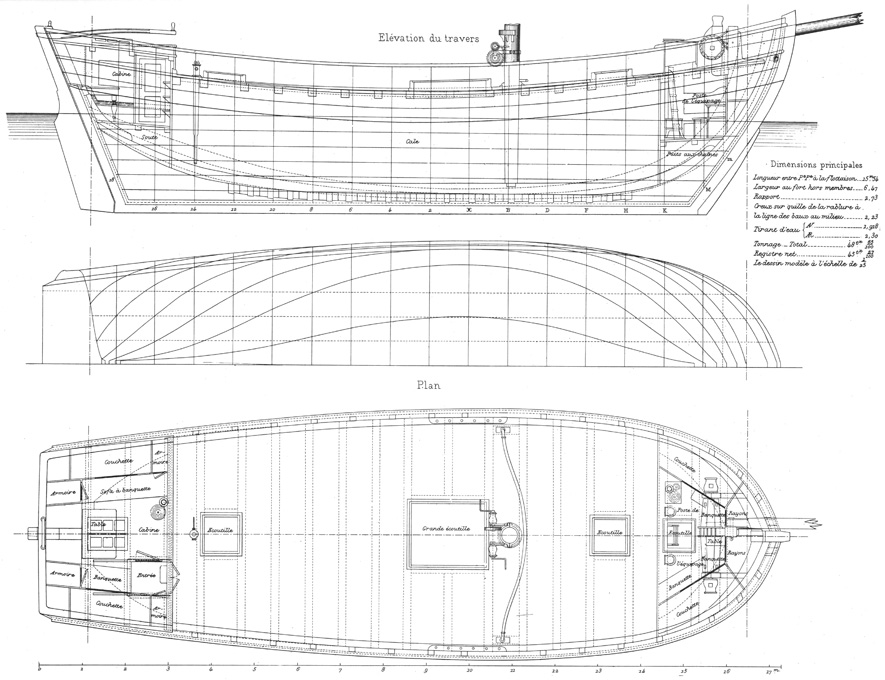
Perhaps the best illustration of the interior arrangement is that of ‘Caboteur Danois’, i.e. a Danish ‘jagt’, from Paris’ ‘Souvenirs de la Marine’ (Planche 213). It gives even more details than the drawings for DE FIRE BRØDERE and CASTOR from Nielsen‘s ‚Danske Bådtyper‘.
According to this the stove in the crew quarters is placed next to the access ladder, at the rear bulkhead, while the placement of the one in the captain’s quarters depends on the layout of that cabin. Again, it is likely placed against the forward bulkhead.
Image
Caboteur Danois (jagt), Pl. 213 of the Souvenirs de la Marine by E. de Pâris

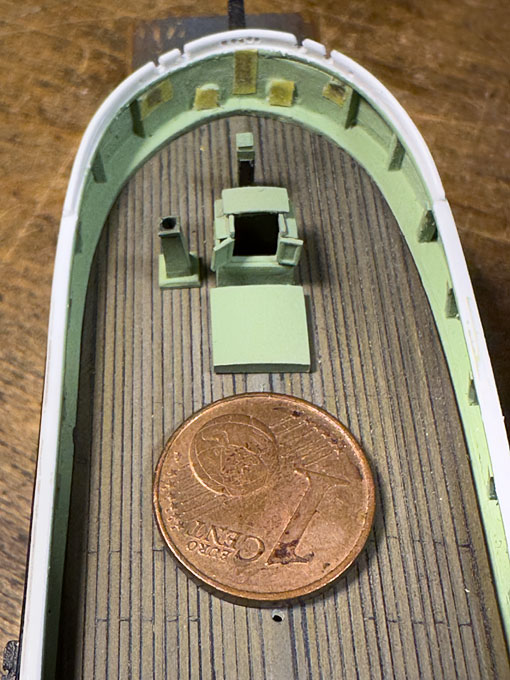
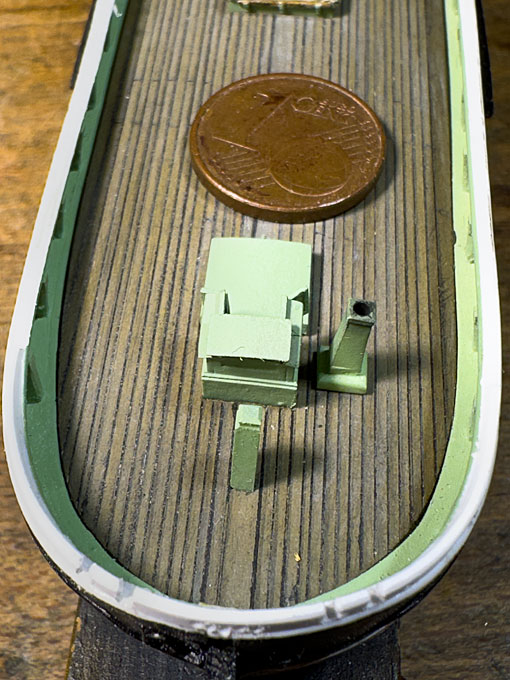
As the model will be shown moored alongside a quay, the chimney will be rigged and will be placed on the port side of the crew companionway. Although, I envisage a summer setting, it is shown, because the stove would have been used for cooking as well.
I am not sure, where the stove for the main cabin would have been placed, but I am showing it as closed with a cap on the port side of the companionway.
The forward chimney was milled from a piece of 2 mm x 2 mm polystyrene rod with the base as a separate piece cut from 1 nm x 3.2 mm polystyrene.
Image

Image

Drinking-water barrel
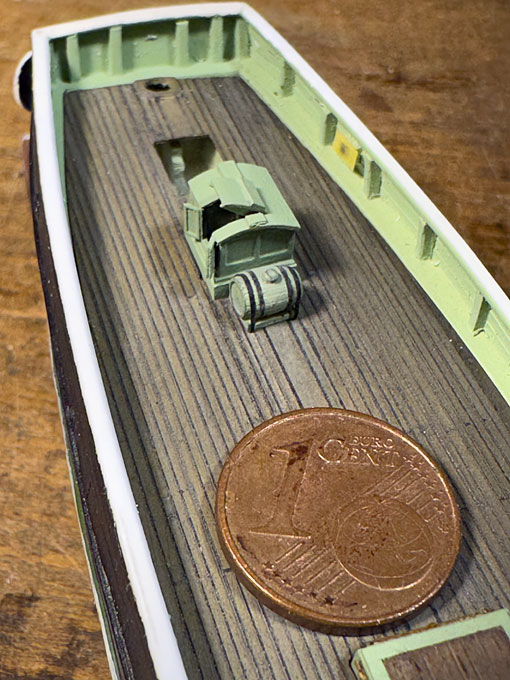
According to pictorial evidence, the placement of the barrel was quite variable, probably at a place where it did not get in the way of the operation of the ship and where it was somewhat protected. Often it was placed near the bulwark or near a companionway. As there is quite a distance between the main cabin companionway and the main hatch, I put it in front of the companionway.
The barrel was turned from a length of 4 mm acrylic rod, giving a barrel of of about 60 cm diameter, which appeared about right according to photographs of the time. With a length of about 5 mm (= 80 cm) such a barrel would hold about 200 l, which should be sufficient for a few days for a crew of 5 to 6.
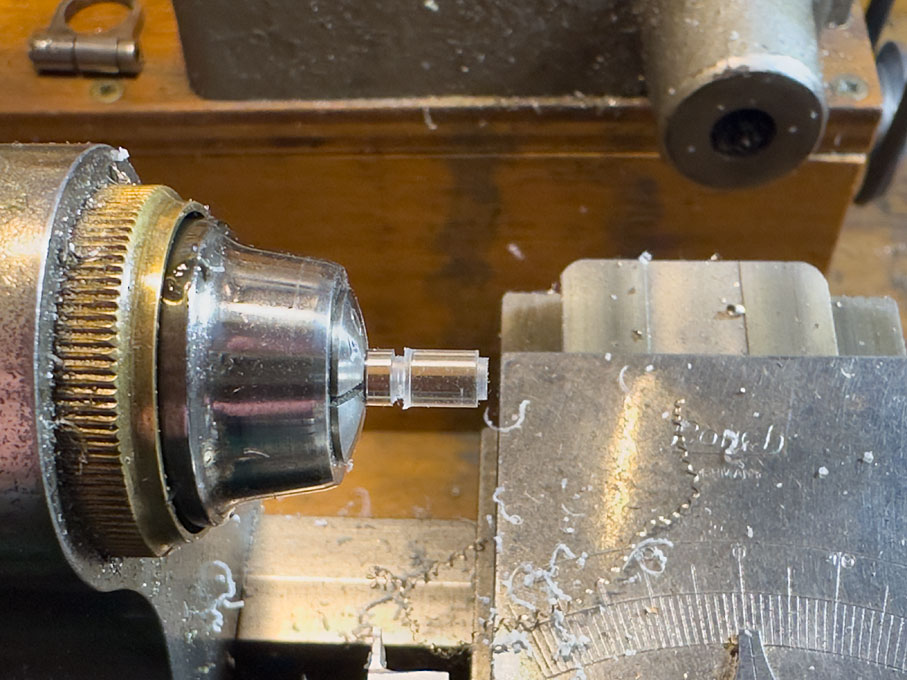
Image
Determining the overall dimensions of the barrel

The curvature of the barrel was turned with the help of the radius turning attachment I made some years ago, held in the quick-change tool-post (QCTP). The geometries were worked out on my CAD software, i.e. the radius of the curvature was set to 9 mm and the minimum diameter would be 3 mm. Accordingly, a step with 3 mm diameter was turned on each side of the blank and then the attachment set to the middle of the future barrel. The whole radius turning tool was lowered in steps until the tool arrived at the minimum diameter.
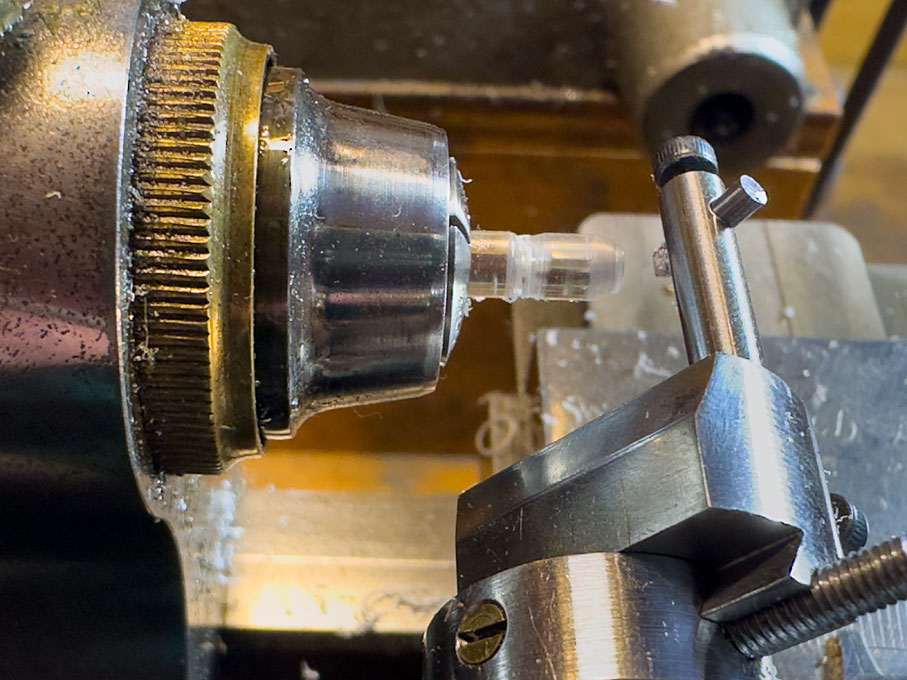
Image
Initial steps of turning the curvature with the radius turning tool
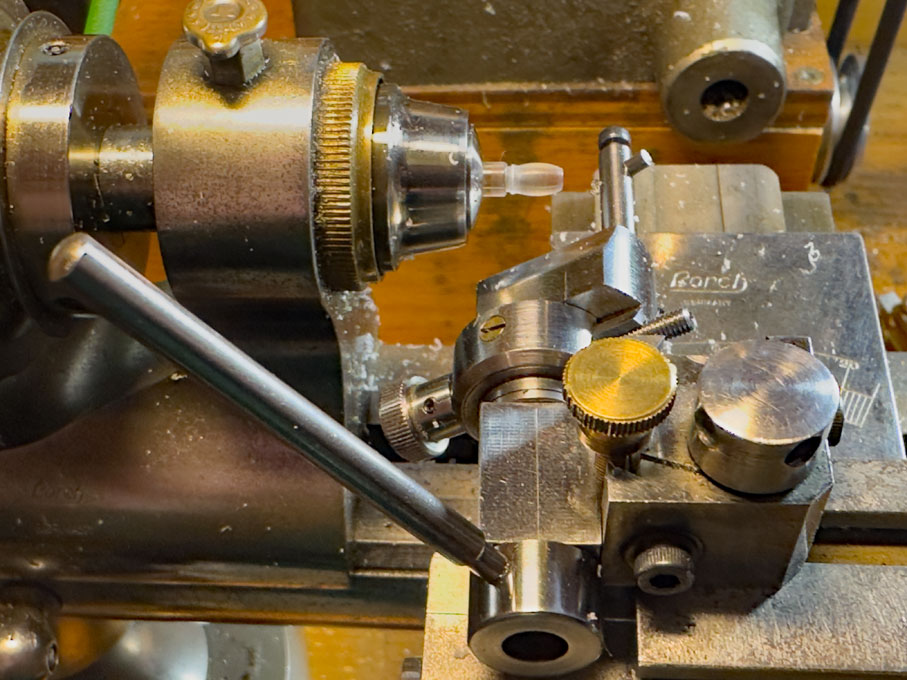
Image
Final shape of the barrel

Without changing any other settings, the cutting tool was turned by 90° so that it cut lengthwise. The radius now was reduced by 0.1 mm to lightly engrave the staves. An Internet-consultation revealed that the staves should be about 10 cm wide at the large circumference. For a 60 cm diameter barrel this results in about 20 staves. Using the built-in dividing disc of the watchmakers lathe these 20 staves were engraved one by one.
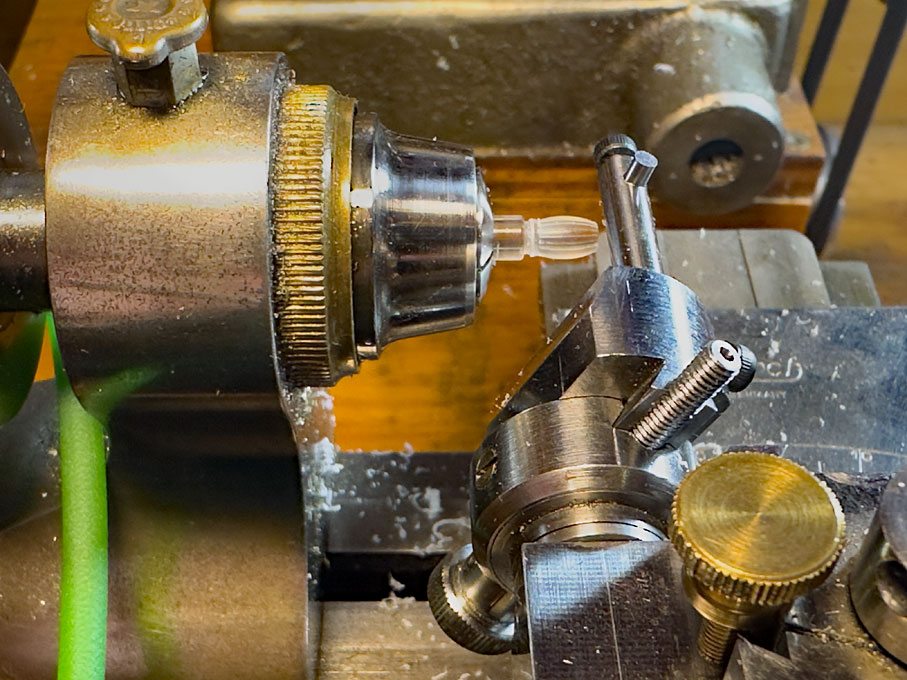
Image
Engraving the staves

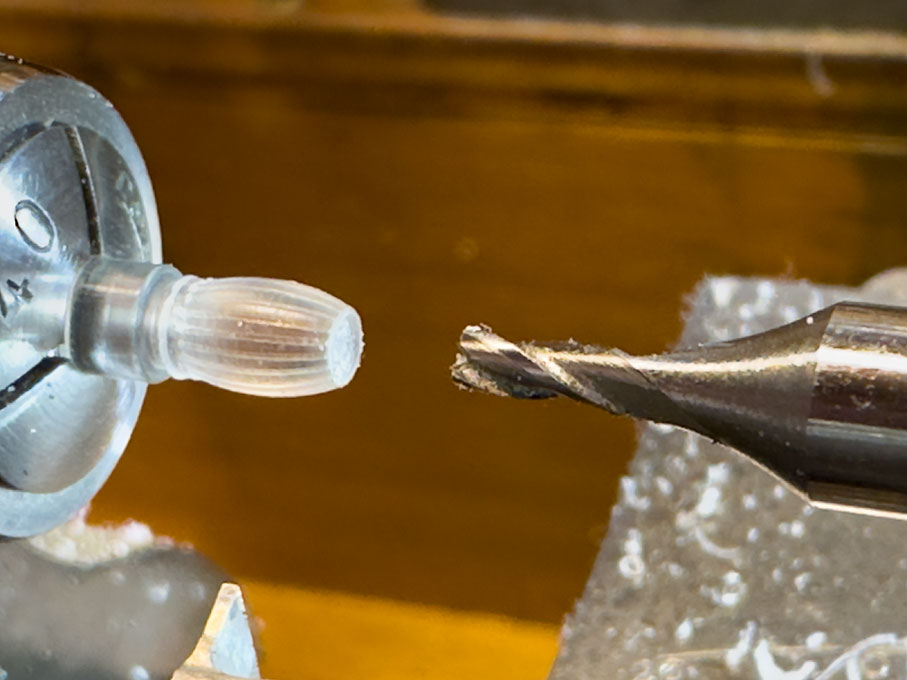
The recesses for the lids were simply cut with an end-mill that cuts over the centre. Holding the barrel once it has been parted off the stock was a bit tricky, but the watchmakers’ collets pinch at the front, so that even bulbous parts can be held for light operations.
Image
Cutting the recesses for the lids

The cradle was fabricated from tiny pieces of various polystyrene profiles.
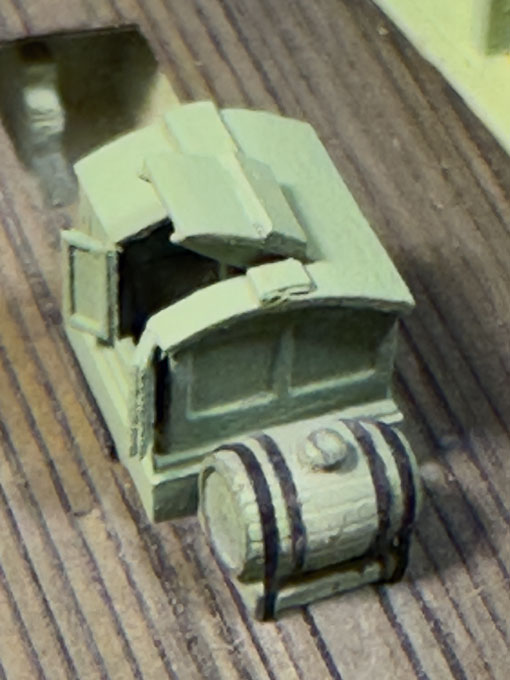
Barrel and cradle were given a base-coat of the same green as the other deck furniture. The barrel-hoops and the retaining straps are thin pre-painted strips of paper.
Image
The painted water barrel at its future location
Image
… and a horribly sobering close-up shot of the water barrel

To be continued …

Re: Pomeranian Rahschlup 1846 � 1/160 scale � Baltic trader

by wefalck » Mon Apr 13, 2026 2:38 pm

Jim, I would have indeed used decal strips (as I did on SMS WESPE), if the colour didn't need to go around the edge of the wale. OK, perhaps a white decal strip and then painting over it and the edge ... I could still do that.

Re: Pomeranian Rahschlup 1846 � 1/160 scale � Baltic trader

by JIM BAUMANN » Mon Apr 13, 2026 2:29 pm

ahoi wefalck

Looking nice!-- I also loathe masking for its--in my hands anyhow--lack of precision !

I think you may obtain a sharper definition / demarcation of the white lines using thin decal striping

images below are from the 170 mm loa model of 1891 HMS Hood
Image


Image

Top