Iron Duke Class
Iron Duke
Benbow
Marlborough
Emperor of India
1/96 HMS Iron Duke (1916)
Moderators: MartinJQuinn, JIM BAUMANN, HMAS, Tiny69, Dave Wooley
-
ARH

- Posts: 2557
- Joined: Mon Jan 10, 2005 10:52 am
- Location: Land of the Cheshire cat
Hi Guys, Not a lot to-day, I cut out the litho for the platforms and glued them to the ply, I plated the tower and fit the top 2 platforms, also put in the tower strengthening brackets.
The lower platform is only placed in position.
enjoy, ARH 
Last edited by ARH on Sun Oct 20, 2013 1:41 am, edited 1 time in total.
Simple but effective.
-
ARH
- Posts: 2557
- Joined: Mon Jan 10, 2005 10:52 am
- Location: Land of the Cheshire cat
Hi Guys, One hour to day, I got the first deck platform drilled to take part of the tripod mast, also drilled out for the main mast and glued it in position,
The main mast is brass tube 10 mm wide, the angled leg is brass 6mm wide, it is drilled in to the deck and passes though the first platform, you can see the hole drilled on the opposite side of the platform.
The block of wood is steadying the first platform while work is in progress
Both legs are glued in position and are left to dry,
Long shot of to-days work.
enjoy, ARH 
Last edited by ARH on Sun Oct 20, 2013 1:47 am, edited 1 time in total.
Simple but effective.
-
ARH
- Posts: 2557
- Joined: Mon Jan 10, 2005 10:52 am
- Location: Land of the Cheshire cat
Iron Duke Part II
Hi Jorit, good question, they are glued together, the tape is holding them while the super glue dries hard, im suprised how strong they are. ARHJWintjes wrote:This is already really looking the part - very impressive! Will you glue the brass tubes together or use another method of binding them together?
Jorit
Last edited by ARH on Wed May 02, 2007 12:41 pm, edited 2 times in total.
Simple but effective.
-
ARH
- Posts: 2557
- Joined: Mon Jan 10, 2005 10:52 am
- Location: Land of the Cheshire cat
Hi Guys, I have been looking at the number of viewings, 2400 in the last month, 50 since teatime today, I think the hacker did us a favour, made us more resolved to do it better, thanks guys.
I have left the forward structure to harden for a few days and have moved on to the rear structure, I have built the second large barbette and put together the balsa wood around the opening.
Fitted the strengthening sections for the deck, note the pin heads, I put these in to strengthen everything, they are dress makers pins, they go into balsa very easily.
A view of midships
Deck cut and glued in place, all of this work took about 3 hours. The ruler gives you some idea of the scale of the model.
Along shot from the stern, my 4th turret has not yet been painted in the new colour yet
enjoy ARH,
I have left the forward structure to harden for a few days and have moved on to the rear structure, I have built the second large barbette and put together the balsa wood around the opening.
Last edited by ARH on Sun Oct 20, 2013 2:00 am, edited 1 time in total.
Simple but effective.
-
ARH
- Posts: 2557
- Joined: Mon Jan 10, 2005 10:52 am
- Location: Land of the Cheshire cat
As its Saturday the class can have a short lesson, 

We will continue with the rear structure, I cut more balsa wood to finish the second level structure, inside we put our usual strengthening pieces to take the floor, where the balsa wood is I have used balsa cement and pins to give it added strength.
The back was cut to shape out of the litho and glued in place.
Next the side, note the cut down next to the barbette, this is were a ladder fits either side.
We go to the upper structure and fit one side, again a cut out.
The cut out is for a 24 inch search light,
enjoy, ARH
We will continue with the rear structure, I cut more balsa wood to finish the second level structure, inside we put our usual strengthening pieces to take the floor, where the balsa wood is I have used balsa cement and pins to give it added strength.
Last edited by ARH on Sun Oct 20, 2013 2:09 am, edited 2 times in total.
Simple but effective.
-
Victorious
- Posts: 395
- Joined: Mon Jun 06, 2005 3:24 pm
- Location: Tamworth, Staffs, Home of No1 Drydock
-
middle_watch
- Posts: 344
- Joined: Tue Aug 09, 2005 7:00 am
- Location: S Yorks, England
-
Victorious
- Posts: 395
- Joined: Mon Jun 06, 2005 3:24 pm
- Location: Tamworth, Staffs, Home of No1 Drydock
No Match for us RonARH wrote:Dave, tell him, with IRON DUKE and MARLBOROUGH, Victorious and I will soon sort him outDave Wooley wrote:Ron , watch out for Howie Baker he's building SMS Derfflinger!
Dave Wooley


Iron Duke

Marlborough
Presently Building - Aircraft Carrier H.M.S. Victorious 1/96

Under Construction Laid Up - H.M.S. Marlborough 1/96
Under Construction Laid Up - H.M.S. Marlborough 1/96
-
ARH
- Posts: 2557
- Joined: Mon Jan 10, 2005 10:52 am
- Location: Land of the Cheshire cat
Quiet at the back, 
 After that short recess we will continue with the build,
I finished off the opposite side of the rear turret housing, there is still more litho to do when I have worked out the small structure that fits on top, the edge of the barbette was sanded to shape.
The first part of the forward superstructure gets a coat of WEM colour matched paint
BOW shot
STERN shot
Close up shot, tripod mast painted.
Rear superstructure painted.
A long shot of the ship, from the stern, 4th turret painted.
A long shot from the bow showing the nice lines of the hull, also the difference between the superstructure colour and the deck colour when planked.
Second coat of paint on structure.
enjoy, ARH
I finished off the opposite side of the rear turret housing, there is still more litho to do when I have worked out the small structure that fits on top, the edge of the barbette was sanded to shape.
Last edited by ARH on Sun Oct 20, 2013 2:15 am, edited 1 time in total.
Simple but effective.
-
Victorious
- Posts: 395
- Joined: Mon Jun 06, 2005 3:24 pm
- Location: Tamworth, Staffs, Home of No1 Drydock
Hello CMJ
Let me add to what Ron has said.
When he covers the frames which form the hull, he uses a waterproof glue. This glue is white in colour and is usually called P.V.A. There are many different makes, but basically, they are all the same.
Once he has planked the hull, using the PVA glue, he then covers it with a fibreglass coating, which will seal the wood planking and help to waterproof it.
When this has been done, he then covers the hull with a plastic paste ( the sort that they use to repair car bodywork ) This paste is mixed with a hardener, and once mixed, it goes hard within a few minutes, so you have to spread it on rather quickly before it starts to set. Just a very thin covering is put on at first and once all the hull has been covered and it has dried hard, it is then rubbed down using wet and dry paper, until smooth. Then another thin coat is applied and once dry, it is sanded smooth again. This process is repeated again, untill the hull shape has an all over even surface and is finally sanded to give a very smooth finish. Altogether it is about 1/16th of an inch thick when all the coats have been applied.
This body filler paste, is also water proof when set hard. Once this has been done. He gives the hull several coats of undercoat paint and rubs each coat with wet and dry paper to finish. Then finally, the hull is painted with the final top coat of paint, which gives the ship it's final finish and colour.
Every step of this process, helps to seal the hull, so that it is completely waterproof.
Also the inside of the hull can be given several coats of varnish, which will also be waterproof.
I hope that this has explained how Ron makes sure his ships are completely waterproof.
Presently Building - Aircraft Carrier H.M.S. Victorious 1/96
Under Construction Laid Up - H.M.S. Marlborough 1/96
Under Construction Laid Up - H.M.S. Marlborough 1/96
-
Victorious
- Posts: 395
- Joined: Mon Jun 06, 2005 3:24 pm
- Location: Tamworth, Staffs, Home of No1 Drydock


-
ARH
- Posts: 2557
- Joined: Mon Jan 10, 2005 10:52 am
- Location: Land of the Cheshire cat
Hi Guys, Not a lot tonight, but a little complicated,
We first shape a block of balsa wood, put a thin skin of 1/64th ply around it and on top, it helps to take the litho better, we have also put in the front of the superstructure.
Rear view.
I have covered it all over with the litho plate.
A view of the whole structure, with turrets.
A close up, I have drawn in where the set of p/e ladders will fit.
enjoy, ARH
We first shape a block of balsa wood, put a thin skin of 1/64th ply around it and on top, it helps to take the litho better, we have also put in the front of the superstructure.
Last edited by ARH on Sun Oct 20, 2013 2:20 am, edited 1 time in total.
Simple but effective.
-
ARH
- Posts: 2557
- Joined: Mon Jan 10, 2005 10:52 am
- Location: Land of the Cheshire cat
First of all I have weighed the ship model and it came out at 10lbs, that's with all the turrets on.
As to the camber of the deck, you can see it in this picture, 1/8 inch balsa under the rule either side,
The little housing has been painted and work begun on the middle barbette, this one is slightly taller than the no1 turret and the rear turret barbettes by 4mm.
Work on the 5th barbette at the same stage.
Full view of model, all 5 turret's, second one needs the blast bags moulding and all painting and P/E fitting.
enjoy, ARH
Last edited by ARH on Sun Oct 20, 2013 2:26 am, edited 1 time in total.
Simple but effective.
-
ARH
- Posts: 2557
- Joined: Mon Jan 10, 2005 10:52 am
- Location: Land of the Cheshire cat
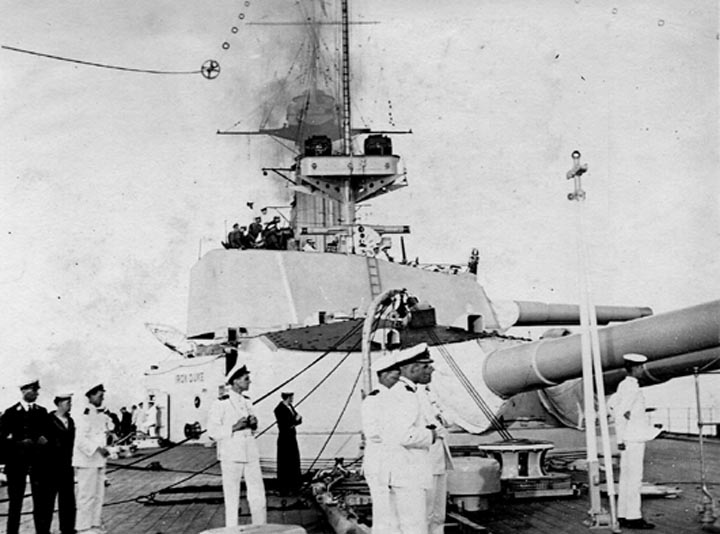
Hi Guys , I have been searching for these two pics, just found them
see the officer under the barrel, the barrel is level but well above his head,
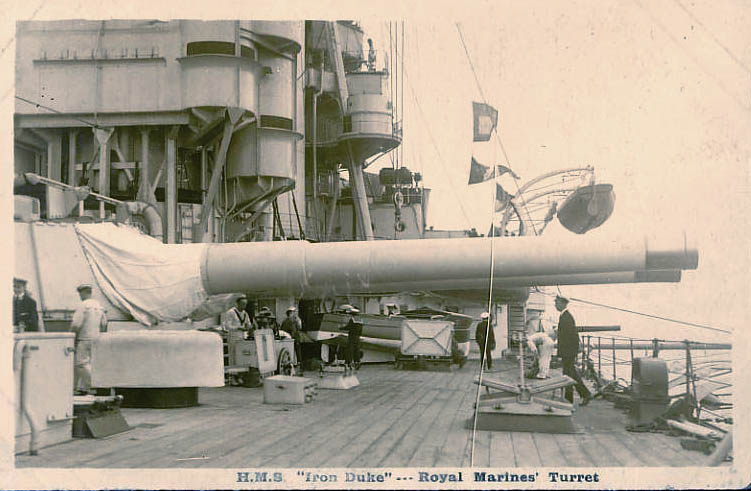
In the second picture the rating under the barrel is nearly touching it and the barrel is in the part raised position. It could have been there was more going on in the midship section
see the officer under the barrel, the barrel is level but well above his head,
In the second picture the rating under the barrel is nearly touching it and the barrel is in the part raised position. It could have been there was more going on in the midship section
Simple but effective.
-
ARH
- Posts: 2557
- Joined: Mon Jan 10, 2005 10:52 am
- Location: Land of the Cheshire cat
Hi Guys, My timbers arrived this week, so I have made a start on the margin planks at the edge of the deck.
First the flat sections of Eurpean Lime and 150 3mm x 1mm x 1mtre deck planks.
To get the awkward shapes I put the timber under the deck and mark around, cut that side and then scribe out the same shape 3/8 of an inch away and cut, using a good sharp blade #11
The timber is glued in position with compact adhesive, leave to dry slightly before putting in position.
Down by the casement guns it is a little wider, it actually overhangs the hull quite a bit.
A bow shot, beginning to take shape.
A stern shot, note the 12 casement barrels, made by Steve Nuttall.
enjoy, ARH
ps, have you noticed the clean new grey cover, Victorious is coming tomorrow, took me 3 hours to clean up the workshop.
First the flat sections of Eurpean Lime and 150 3mm x 1mm x 1mtre deck planks.
ps, have you noticed the clean new grey cover,
Last edited by ARH on Sun Oct 20, 2013 2:33 am, edited 1 time in total.
Simple but effective.

-
Victorious
- Posts: 395
- Joined: Mon Jun 06, 2005 3:24 pm
- Location: Tamworth, Staffs, Home of No1 Drydock
Thank you Ron, my wife and I were made very very welcome by you and your wife Angela.
I would also like to thank you for loaning me the plans of Iron Duke and for providing me with the full size frame pattern's and turrett mould. Also for your guidance of how to tackle certain aspects of the build, which will help me when I start on the Marlborough.
Ron also gave me a copy of his book 'Tribute to a Flower' H.M.S. Bryony, which he has specially signed for me. His model of this corvette is outstanding, as are all of his models, and he is always willing to help anyone who is eager to learn.
Without Ron's help, I'm sure I would have struggled in attempting to make my first scratchbuilt model.
Although I have not known Ron, very long, I feel as though I have known him for years, a true friend indeed.
Geoff
Presently Building - Aircraft Carrier H.M.S. Victorious 1/96
Under Construction Laid Up - H.M.S. Marlborough 1/96
Under Construction Laid Up - H.M.S. Marlborough 1/96
-
ARH
- Posts: 2557
- Joined: Mon Jan 10, 2005 10:52 am
- Location: Land of the Cheshire cat
Deck Planking,
We have already laid the 1/64 ply on the deck, now we have to cut and shape the combing and margin planks.
This is how I mark out the combing, I slide it under the object and mark around it, then cut at that point,
Continue till you have done all margin planks in that area.
For the pitch between the planks we are going to use black electrical tape, sticky on one side. Roll out the tape, sticky side up, turn your planks on edge and press them on to the tape.
Now turn them over and rub your fingers over the tape to make sure it is stuck to the planks
With a #11 blade put it between each plank and gently slice each plank away from each other.
You should now have 13 planks with a thin layer of tape attached.
Now we start laying them. I have marked the centre line and laid a rule along it, next we put down some PVA white glue and lay the first 5 planks.
I have cut another 5 planks and tried them in position, marked a line to show me were to put the glue to.
PVA in position, ready for planks.
A bow shot of all the planks laid.
This is only the beginning of the planking, there,s a long way to go, the planks laid are very long you may say, they will get divided into 20 ft scale lengths later, and all hatches will be marked and cut out, also it has to be sanded and treated to water proof it.
enjoy, ARH.
We have already laid the 1/64 ply on the deck, now we have to cut and shape the combing and margin planks.
For the pitch between the planks we are going to use black electrical tape, sticky on one side. Roll out the tape, sticky side up, turn your planks on edge and press them on to the tape.
enjoy, ARH.
Last edited by ARH on Sun Oct 20, 2013 2:47 am, edited 1 time in total.
Simple but effective.
-
ARH
- Posts: 2557
- Joined: Mon Jan 10, 2005 10:52 am
- Location: Land of the Cheshire cat
Hi Guys, Tonight we continue to plank the deck. As you can see I use a little weight to hold the edges down till the glue dries.
14 more planks laid on the opposite side, these 14 planks took 35 minutes to cut, put on the tape, mark out and lay.
We have now run 1 long piece though and are working back to the centre line.
Replaced the barbette and the guns.
A shot from behind the superstructure.
The deck can be lifted off the model, I prefer to be able to do this, as the years go on a sailing model needs a repaint, it's far easier to be able to paint and replace, it helps to keep all your deck lines clean.
That's the whole of one side of the forecastle finished.
The first part of the deck has been lightly sanded, hence the lighter shade, today's work is still darker.
There is a lot of decks to do, but the contrast in colour between the decks and the superstructure should highlight what would be a dull model.
enjoy, ARH
Last edited by ARH on Sun Oct 20, 2013 2:58 am, edited 1 time in total.
Simple but effective.