wefalck
1:72 CCG MSPV (2012): 3D printing project. COMPLETE
Moderators: MartinJQuinn, JIM BAUMANN, HMAS, Tiny69, Dave Wooley
-
wefalck

- Posts: 2079
- Joined: Wed Sep 28, 2011 12:04 pm
- Location: Paris
- Contact:
Re: Canadian CG Midshore Patrol Vessel: 1/72 3D printing pro
Just to get an idea, how much roughly did the frame below set you back ?
wefalck
wefalck
Eberhard
Former chairman Arbeitskreis historischer Schiffbau e.V. (German Association for Shipbuilding History)
--------------------------------------------------------------------------------------------------------------------------------------------------------------------------------------------


Former chairman Arbeitskreis historischer Schiffbau e.V. (German Association for Shipbuilding History)
--------------------------------------------------------------------------------------------------------------------------------------------------------------------------------------------
-
PATMAT
- Posts: 442
- Joined: Fri Jan 21, 2005 8:24 pm
- Location: Temecula
- Contact:
Re: Canadian CG Midshore Patrol Vessel: 1/72 3D printing pro
http://www.shapeways.com/materials/frosted-detail
"FUD" material is USD3.49/cm3... and there is a good number of cm3's in there...
"FUD" material is USD3.49/cm3... and there is a good number of cm3's in there...
Pat Matthews
Get your boats wet!
Blog: [redacted]
Shapeways Shop: [redacted]
MWS Gallery: http://www.modelshipgallery.com/gallery ... index.html
Get your boats wet!
Blog: [redacted]
Shapeways Shop: [redacted]
MWS Gallery: http://www.modelshipgallery.com/gallery ... index.html
-
wefalck
- Posts: 2079
- Joined: Wed Sep 28, 2011 12:04 pm
- Location: Paris
- Contact:
Re: Canadian CG Midshore Patrol Vessel: 1/72 3D printing pro
Yes, I know, how they calculate it, but would have liked to get a rough idea of the cost such a part before diving myself into the subject matter 
wefalck
wefalck
Eberhard
Former chairman Arbeitskreis historischer Schiffbau e.V. (German Association for Shipbuilding History)
--------------------------------------------------------------------------------------------------------------------------------------------------------------------------------------------
Former chairman Arbeitskreis historischer Schiffbau e.V. (German Association for Shipbuilding History)
--------------------------------------------------------------------------------------------------------------------------------------------------------------------------------------------
-
Bill Waldorf

- Waldorf Productions

- Posts: 541
- Joined: Mon Jan 10, 2005 11:57 pm
- Location: Jacksonville, Florida
Re: Canadian CG Midshore Patrol Vessel: 1/72 3D printing pro
Pretty amazing Pat. Hard to believe parts made by a "printer". Looking great.... 

Waldorf Productions / Museum Quality Model Warships
Custom Building Services Available
Custom Building Services Available
-
PATMAT
- Posts: 442
- Joined: Fri Jan 21, 2005 8:24 pm
- Location: Temecula
- Contact:
Re: Canadian CG Midshore Patrol Vessel: 1/72 3D printing pro
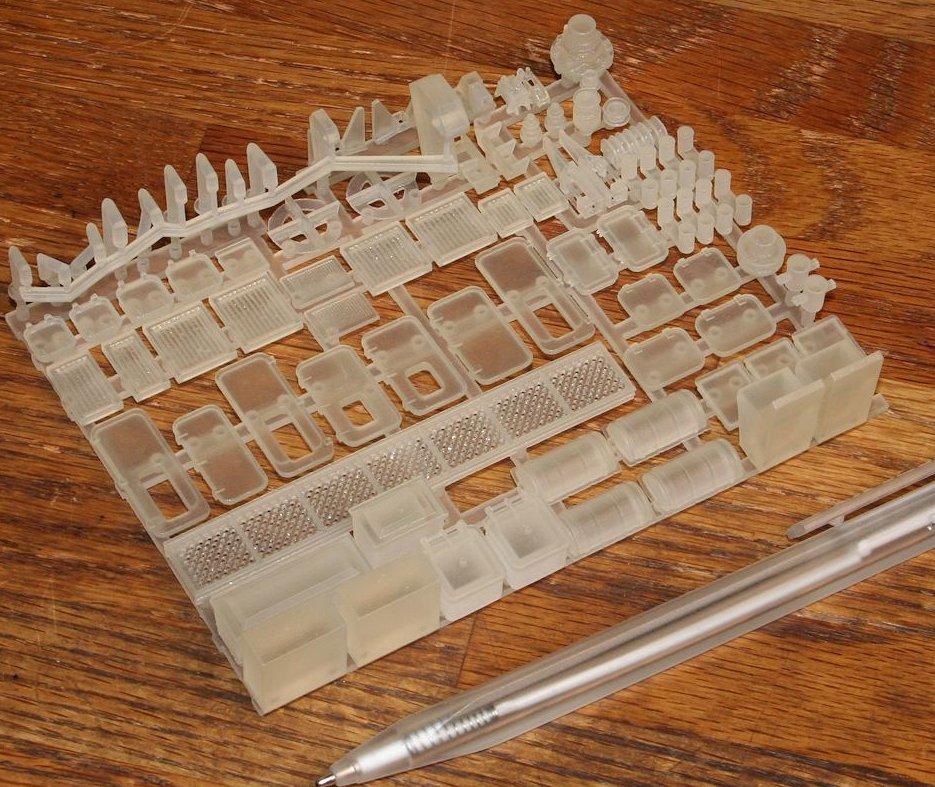
A little hard to see all the parts in some of the previous shots, so's here's a catalog for anyone keeping score.
I actually have a lot more parts coming in the net 2 weeks... in the meantime, I'll be fettling these, getting them ready for paint.
Again, the parts come in with some wax and oil, which I clean off each part with warm soapy water and a toothbrush. Then, each part needs a certain amount of surface smoothing in addition to the deflashing/sprue clean up that you'd expect with a plastic kit.
The plastic is more brittle than regular styrene, which means de-spruing needs to be done more carefully. You can't just snip the parts off... I've been using a jeweler's saw instead.
- Attachments
-
- The House
-
- Hull... with black CA gooped on to hold the internal bulkheads.
-
- Ladders and railings
-
- Rub rails and aft aux gasoline tanks
-
- Forward bulwark braces
-
- Some boxy things
-
- RHIB outboards
-
- Reels & liferaft racks
-
- RHIB cradles, cages, lift structures
-
- Vent gratings
Pat Matthews
Get your boats wet!
Blog: [redacted]
Shapeways Shop: [redacted]
MWS Gallery: http://www.modelshipgallery.com/gallery ... index.html
Get your boats wet!
Blog: [redacted]
Shapeways Shop: [redacted]
MWS Gallery: http://www.modelshipgallery.com/gallery ... index.html
-
PATMAT
- Posts: 442
- Joined: Fri Jan 21, 2005 8:24 pm
- Location: Temecula
- Contact:
Re: Canadian CG Midshore Patrol Vessel: 1/72 3D printing pro
more
- Attachments
-
- Doors & hatch covers
-
- Skegs & props
-
- Bevy of vent pipes
-
- Crane parts
-
- Capstans, ground tackle gear
Pat Matthews
Get your boats wet!
Blog: [redacted]
Shapeways Shop: [redacted]
MWS Gallery: http://www.modelshipgallery.com/gallery ... index.html
Get your boats wet!
Blog: [redacted]
Shapeways Shop: [redacted]
MWS Gallery: http://www.modelshipgallery.com/gallery ... index.html
-
PATMAT
- Posts: 442
- Joined: Fri Jan 21, 2005 8:24 pm
- Location: Temecula
- Contact:
Re: Canadian CG Midshore Patrol Vessel: 1/72 3D printing pro
And here's what's coming:
- Attachments
-
- Miscellaneous things that stick out here and there
-
- Pilot house glazing (clear)
-
- The RHIBs and a few little parts
Pat Matthews
Get your boats wet!
Blog: [redacted]
Shapeways Shop: [redacted]
MWS Gallery: http://www.modelshipgallery.com/gallery ... index.html
Get your boats wet!
Blog: [redacted]
Shapeways Shop: [redacted]
MWS Gallery: http://www.modelshipgallery.com/gallery ... index.html
-
PATMAT
- Posts: 442
- Joined: Fri Jan 21, 2005 8:24 pm
- Location: Temecula
- Contact:
Re: Canadian CG Midshore Patrol Vessel: 1/72 3D printing pro
Alright, after a long time of researching, designing, ordering, and waiting for the UPS man, I now have ALL parts in hand to complete the build. Basically, I'm at the point where a kit modeler excitedly opens the new box!
Most everything has been washed, de-sprued, fettled, and washed again, ready for paint and assembly. And indeed, I've started with prime/sand/prime/sand/repeat on the large parts-- hull and cabin. A lot of filling is needed to remove all traces of the 3D Print strata.
The new RHIB parts were just received today. These come from i.materialise, a Belgian firm that operates like Shapeways, but also farms work out to shops around the world... my parts came to me in Michigan from Wisconsin.
Shapeways' fine detail parts are all done on multijets, but i.materialise leans heavily on stereolithography (the process where parts are drawn by laser in a pool of liquid resin). Both processes are capable of very high definition... but you are at the mercy of the supplier, who may choose not to use the highest def process in interests of processing time. You can still see the strata on the close up of the small RHIB... but it's almost invisible to my unaided 56 year old eyes. They'll still get sanded and filled though.
Another point is that you are at the mercy of part orientation... look closely at the seat/deck assembly for the large RHIB, it's downright glossy... that surface was horizontal and up.
- Attachments
-
- RHIBs. Big ones are split so that I could hollow them out to save material.
-
- Small RHIB, with visible striations
-
- Hull, nicely filled and smoothed.
-
- Hull, cabin, roof-- all coming along nicely
-
- 124 stanchions in 0.5mm stock- all desprued and fettled.
Pat Matthews
Get your boats wet!
Blog: [redacted]
Shapeways Shop: [redacted]
MWS Gallery: http://www.modelshipgallery.com/gallery ... index.html
Get your boats wet!
Blog: [redacted]
Shapeways Shop: [redacted]
MWS Gallery: http://www.modelshipgallery.com/gallery ... index.html
-
Guard-Officer
- Posts: 2
- Joined: Wed Jun 26, 2013 5:57 am
Re: Canadian CG Midshore Patrol Vessel: 1/72 3D printing pro
ok I registered and am posting so that I can follow this build better!
Looks great so far!
I sent an e-mail out to Hawk Graphics in Canada asking about decvals for Cdn Coast Guard vessels. I have the PDF of our color scheme and appearance, so if they are interested, I might be able to get them to produce a decal set of some sort.
Cheers
G-O
Looks great so far!
I sent an e-mail out to Hawk Graphics in Canada asking about decvals for Cdn Coast Guard vessels. I have the PDF of our color scheme and appearance, so if they are interested, I might be able to get them to produce a decal set of some sort.
Cheers
G-O
-
PATMAT
- Posts: 442
- Joined: Fri Jan 21, 2005 8:24 pm
- Location: Temecula
- Contact:
Re: Canadian CG Midshore Patrol Vessel: 1/72 3D printing pro
I lied. I said this model would be 99% 3D Printed. Well, maybe 96%... I made the main deck from plywood & styrene.
I did design a deck for printing, but it was so trivial I didn't bother... just used the design as a pattern to cut out the 1/32" aircraft ply, and coated that with 0.010" styrene.
Also, the bulkheads and deck beams are ply.
And I turned the exhaust outlets from brass.
I have to admit, it was good smelling the sawdust again as I sanded the deck edge...
BTW, the notches in the aft quarters are for ejectable gasoline tanks, as spec'd by the CCG. The ship is diesel powered, so they have to carry gasoline for the boats on deck. This is done with these side tanks, and the tanks are ejectable for safety reasons...
- Attachments
-
-
-
Pat Matthews
Get your boats wet!
Blog: [redacted]
Shapeways Shop: [redacted]
MWS Gallery: http://www.modelshipgallery.com/gallery ... index.html
Get your boats wet!
Blog: [redacted]
Shapeways Shop: [redacted]
MWS Gallery: http://www.modelshipgallery.com/gallery ... index.html
-
PATMAT
- Posts: 442
- Joined: Fri Jan 21, 2005 8:24 pm
- Location: Temecula
- Contact:
Re: Canadian CG Midshore Patrol Vessel: 1/72 3D printing pro
Almost forgot the bow thruster!
The bore through is about 5/16" diameter.
The bore through is about 5/16" diameter.
- Attachments
-
Pat Matthews
Get your boats wet!
Blog: [redacted]
Shapeways Shop: [redacted]
MWS Gallery: http://www.modelshipgallery.com/gallery ... index.html
Get your boats wet!
Blog: [redacted]
Shapeways Shop: [redacted]
MWS Gallery: http://www.modelshipgallery.com/gallery ... index.html
-
PATMAT
- Posts: 442
- Joined: Fri Jan 21, 2005 8:24 pm
- Location: Temecula
- Contact:
Re: Canadian CG Midshore Patrol Vessel: 1/72 3D printing pro
Propshafts-on-skegs, and aft quarter rub rails. I printed the portion of the rub rails with all the intersecting parts, and used 1/2 round styrene for the long straight run forward.
- Attachments
-
- 1:1 skegs and rub rails
-
- My skegs
-
- My rub rails
Pat Matthews
Get your boats wet!
Blog: [redacted]
Shapeways Shop: [redacted]
MWS Gallery: http://www.modelshipgallery.com/gallery ... index.html
Get your boats wet!
Blog: [redacted]
Shapeways Shop: [redacted]
MWS Gallery: http://www.modelshipgallery.com/gallery ... index.html
-
PATMAT
- Posts: 442
- Joined: Fri Jan 21, 2005 8:24 pm
- Location: Temecula
- Contact:
Re: Canadian CG Midshore Patrol Vessel: 1/72 3D printing pro
A busy weekend with the airbrush. Lots of little details, as well as big jobs like the hull. I jump around a bit... painted and assembled the aft ladder for example.
- Attachments
-
- Hull mostly painted
-
- Aft ladder, all 3DP
-
- 1:1 ladder... ok, a few liberties taken... my railings are a heavy 0.75mm, close to the limit for this printing technology and modeling feasibility.
Pat Matthews
Get your boats wet!
Blog: [redacted]
Shapeways Shop: [redacted]
MWS Gallery: http://www.modelshipgallery.com/gallery ... index.html
Get your boats wet!
Blog: [redacted]
Shapeways Shop: [redacted]
MWS Gallery: http://www.modelshipgallery.com/gallery ... index.html
-
Rdutnell

- Posts: 822
- Joined: Mon Dec 19, 2011 9:11 pm
- Location: Norman, Oklahoma
Re: Canadian CG Midshore Patrol Vessel: 1/72 3D printing pro
Great stuff Pat!
I always have to do a double take to check if I'm looking at a picture or the model. OK, that may be a slight exaggeration, but not by much.
Thanks for posting your work (play).
I always have to do a double take to check if I'm looking at a picture or the model. OK, that may be a slight exaggeration, but not by much.
Thanks for posting your work (play).
Completed:
1/350 USS Missouri (BB-63) * 1/350 USS England (DE-635) * "Underway Personnel Transfer" Diorama
In Progress:
1/350 USS Bennington (CV-20)
1/144 USS Greenling (SSN-614) - ACAD/3D Printing
1/144 USS Batfish (SS-310) - ACAD/3D Printing
1/350 USS Missouri (BB-63) * 1/350 USS England (DE-635) * "Underway Personnel Transfer" Diorama
In Progress:
1/350 USS Bennington (CV-20)
1/144 USS Greenling (SSN-614) - ACAD/3D Printing
1/144 USS Batfish (SS-310) - ACAD/3D Printing
-
PATMAT
- Posts: 442
- Joined: Fri Jan 21, 2005 8:24 pm
- Location: Temecula
- Contact:
Re: Canadian CG Midshore Patrol Vessel: 1/72 3D printing pro
The forward bulwark braces (20 per side) are ALL different, to fit inside the bulwark with its changing form. Of course you COULD design these to be printed with the hull, but then it would be a nightmare to sand between them, not to mention painting, especially where they meet the deck. So they're all loose, and now it's time to pay the piper...
I designed them 0.5mm "into" the bulwark wall, and then subtracted them from the hull, leaving perfectly placed grooves for placement. These are all scraped out after painting, and the braces are prepainted and ready for gluing in place. Well, at least I've started.
I designed them 0.5mm "into" the bulwark wall, and then subtracted them from the hull, leaving perfectly placed grooves for placement. These are all scraped out after painting, and the braces are prepainted and ready for gluing in place. Well, at least I've started.
- Attachments
-
- Scraping the grooves out... 0.5mm wide.
-
- It's a start.
Pat Matthews
Get your boats wet!
Blog: [redacted]
Shapeways Shop: [redacted]
MWS Gallery: http://www.modelshipgallery.com/gallery ... index.html
Get your boats wet!
Blog: [redacted]
Shapeways Shop: [redacted]
MWS Gallery: http://www.modelshipgallery.com/gallery ... index.html
-
PATMAT
- Posts: 442
- Joined: Fri Jan 21, 2005 8:24 pm
- Location: Temecula
- Contact:
Re: Canadian CG Midshore Patrol Vessel: 1/72 3D printing pro
Evening's progress... black stripes on the white band, white paint on the house (and buffed out too!), and finished one side of bulwark braces.
- Attachments
-
Pat Matthews
Get your boats wet!
Blog: [redacted]
Shapeways Shop: [redacted]
MWS Gallery: http://www.modelshipgallery.com/gallery ... index.html
Get your boats wet!
Blog: [redacted]
Shapeways Shop: [redacted]
MWS Gallery: http://www.modelshipgallery.com/gallery ... index.html
-
PATMAT
- Posts: 442
- Joined: Fri Jan 21, 2005 8:24 pm
- Location: Temecula
- Contact:
Re: Canadian CG Midshore Patrol Vessel: 1/72 3D printing pro
If you're going to print a hull, you can include all sorts of features... ledge for the deck, ribs for placing bulkheads, etc.
I included nice heavy bosses for the pedestal mounting.
> Inside, a cut-out locates the 1/4"-20 nuts; a simple cap is glued on to trap the nut.
> Under the keel, cut-outs provide sockets for the pedestals themselves. These are flat-bottomed, and set at the same height, so the pedestals are simple flat topped cylinders of the same length, and they mount the hull perfectly square to the base... no carving the pedestals to fit the hull!
And being so solid, I have no fears about the mounting screws being snugged up over the years...
- Attachments
-
- Nut in socket
-
- Cap to trap the nut
-
- Socket underneath perfectly matches the pedestal.
Pat Matthews
Get your boats wet!
Blog: [redacted]
Shapeways Shop: [redacted]
MWS Gallery: http://www.modelshipgallery.com/gallery ... index.html
Get your boats wet!
Blog: [redacted]
Shapeways Shop: [redacted]
MWS Gallery: http://www.modelshipgallery.com/gallery ... index.html
-
PATMAT
- Posts: 442
- Joined: Fri Jan 21, 2005 8:24 pm
- Location: Temecula
- Contact:
Re: Canadian CG Midshore Patrol Vessel: 1/72 3D printing pro
Working on the foredeck, it's like hanging ornaments on a tree...
You can see some of the crazy bent vent pipes along the bulwarks... easy in 3D, they'd be a bear to hand build!
You can see some of the crazy bent vent pipes along the bulwarks... easy in 3D, they'd be a bear to hand build!
- Attachments
-
- 1:1 version
-
- ALL fittings should be pegged for mounting. Sometimes I remember to include them in the 3DP, sometimes I add them, like here with 0.030" rod.
-
- Most of the gear loosely in place. Needs a lot of touch up paint still. I like how the detail on the windlass came out.
Pat Matthews
Get your boats wet!
Blog: [redacted]
Shapeways Shop: [redacted]
MWS Gallery: http://www.modelshipgallery.com/gallery ... index.html
Get your boats wet!
Blog: [redacted]
Shapeways Shop: [redacted]
MWS Gallery: http://www.modelshipgallery.com/gallery ... index.html
-
HvyCgn9
- Posts: 771
- Joined: Mon May 10, 2010 9:09 am
- Location: Adelaide,SouthOZ
Re: Canadian CG Midshore Patrol Vessel: 1/72 3D printing pro
koooorrrrr!! Wicked little project mate! looks stunning with some red paint on her.
Cheers Bruce
PS: how much has it cost in total so far........!
Cheers Bruce
PS: how much has it cost in total so far........!
building:
1/72 RC USS LONG BEACH CGN9
1/72 RC USS CALIFORNIA CGN36
1/72 RC USS SAIPAN LHA2
1/72 RC USS JOHN PAUL JONES DDG53
1/72 RC USS SHARK SSN591
1/72 RC USS SEAWOLF SSN21
1/72 RC USS ALBANY CG10
1/72 RC USS LONG BEACH CGN9
1/72 RC USS CALIFORNIA CGN36
1/72 RC USS SAIPAN LHA2
1/72 RC USS JOHN PAUL JONES DDG53
1/72 RC USS SHARK SSN591
1/72 RC USS SEAWOLF SSN21
1/72 RC USS ALBANY CG10
-
PATMAT
- Posts: 442
- Joined: Fri Jan 21, 2005 8:24 pm
- Location: Temecula
- Contact:
Re: Canadian CG Midshore Patrol Vessel: 1/72 3D printing pro
Another example of the problem of surface finish. SLS (selective laser sintering) fuses dry nylon powder together to make the part. It's more affordable than most multijet processes, but it make porous parts with a larger step dimension. This means lots of filling and sanding, which again means that little surface detail should be included to allow for the sanding. It's also helpful to use a heavy primer-filler for the first coat or two.
My pilot house and pilot house roof are both SLS. The house is nearly done and is looking good, while the roof has only had the first coat of primer filler, and could use another before I go to regular "finish primer"... see the steps in the shallow angles on the roof.
My pilot house and pilot house roof are both SLS. The house is nearly done and is looking good, while the roof has only had the first coat of primer filler, and could use another before I go to regular "finish primer"... see the steps in the shallow angles on the roof.
- Attachments
-
-
Pat Matthews
Get your boats wet!
Blog: [redacted]
Shapeways Shop: [redacted]
MWS Gallery: http://www.modelshipgallery.com/gallery ... index.html
Get your boats wet!
Blog: [redacted]
Shapeways Shop: [redacted]
MWS Gallery: http://www.modelshipgallery.com/gallery ... index.html